We understand the development of Windows 8 applications on XAML / С #, implementing a simple RSS Reader. Part 3
The New Year holidays were over and it was time to please the hack readers with a continuation of the story about writing a WinRT application on XAML / C # using the example of a simple RSS reader.
Beginning of Part 1 history (creating an application from a template, linking and retrieving RSS data, tiles of different sizes on the start page) and continuing Part 2 (different tiles in different groups, different patterns for tiles, live tiles, Share contract).
Partially formatted HTML display
If you look at the result that we received after the second part, it is clear that we did everything beautifully, except for displaying HTML. We simply clean the HTML from the RSS from tags and display it as text. As a basic solution, this is a completely acceptable result, however, I would like to “make it beautiful” here.
')
In order to solve this problem - you can use the example solution from atreides07 , which can be briefly read here , and which is available through NuGet .
Let's get started To do this, open the project with the application and add to it, using the Library Package Manager, a library with NuGet. I used the Package Manager Console for this,

where you executed the command:
Install-Package WinRTExtensions 
Now, you need to add it to the XAML file of the page where HTML should be displayed, remove the built-in simple text breakdown into columns from there, and also remove the cleaning of HTML from the tags from the method: AddGroupForFeedAsync.
Add to the ItemDetailPage.xaml page:
<common:LayoutAwarePage x:Name="pageRoot" x:Class="MyReader.ItemDetailPage" DataContext="{Binding DefaultViewModel, RelativeSource={RelativeSource Self}}" xmlns="http://schemas.microsoft.com/winfx/2006/xaml/presentation" xmlns:x="http://schemas.microsoft.com/winfx/2006/xaml" xmlns:local="using:MyReader" xmlns:data="using:MyReader.Data" xmlns:common="using:MyReader.Common" xmlns:d="http://schemas.microsoft.com/expression/blend/2008" xmlns:mc="http://schemas.openxmlformats.org/markup-compatibility/2006" xmlns:ext="using:WinRTExtensions" mc:Ignorable="d"> We remove the text breakdown into columns and use the expansion options:
<RichTextBlock x:Name="richTextBlock" Width="560" Style="{StaticResource ItemRichTextStyle}" IsTextSelectionEnabled="False" ext:RichTextBlockExtensions.HtmlContent="{Binding Content}"> <Paragraph> <Run FontSize="26.667" FontWeight="Light" Text="{Binding Title}"/> <LineBreak/> <LineBreak/> <Run FontWeight="Normal" Text="{Binding Subtitle}"/> </Paragraph> </RichTextBlock> We remove the cleaning of RSS content from HTML tags in the AddGroupForFeedAsync function:
if (i.Summary != null) clearedContent = i.Summary.Text; else if (i.Content != null) clearedContent = i.Content.Text; Now you can collect and see how the post display now looks like:

There are still flaws, but overall it looks much better.
Adapted tile display
When my colleagues reviewed the example that I wrote, they scolded me that on the tablet's standard permissions, the initial screen of the application is inefficiently used - there are too few tiles with news. Let's try to start moving in this direction, which you can finish on your own if you wish.
So, the simplest thing you can do is reduce the size of the base tile by changing the pattern accordingly.
Reduce the size of the base tile by 4 times in the GroupedItemsPage.xaml file:
<GroupStyle.Panel> <ItemsPanelTemplate> <VariableSizedWrapGrid Orientation="Vertical" Margin="0,0,80,0" ItemWidth="100" ItemHeight="62" MaximumRowsOrColumns="18" /> </ItemsPanelTemplate> </GroupStyle.Panel> Modify the basic patterns:
<DataTemplate x:Key="CustomItemTemplate"> <Grid HorizontalAlignment="Left"> <Border Background="{StaticResource ListViewItemPlaceholderBackgroundThemeBrush}"> <Image Source="{Binding Image}" Stretch="UniformToFill" AutomationProperties.Name="{Binding Title}"/> </Border> <StackPanel Background="{StaticResource ListViewItemOverlayBackgroundThemeBrush}" VerticalAlignment="Bottom"> <TextBlock Text="{Binding Title}" Foreground="{StaticResource ListViewItemOverlayForegroundThemeBrush}" Style="{StaticResource ExtendedTitleTextStyle}" Height="45" Margin="15,0,15,0" FontSize="15" /> </StackPanel> </Grid> </DataTemplate> <DataTemplate x:Key="CustomItemTemplate2"> <Grid HorizontalAlignment="Right"> <Border Background="{StaticResource ListViewItemPlaceholderBackgroundThemeBrush}"> <Image Source="{Binding Image}" Stretch="UniformToFill" AutomationProperties.Name="{Binding Title}"/> </Border> <StackPanel Background="{StaticResource ListViewItemOverlayBackgroundThemeBrush}" VerticalAlignment="Top"> <TextBlock Text="{Binding Title}" Foreground="{StaticResource ListViewItemOverlayForegroundThemeBrush}" Style="{StaticResource ExtendedTitleTextStyle}" Height="45" Margin="15,0,15,0" FontSize="15" /> </StackPanel> </Grid> </DataTemplate> Now, on the initial screen with small resolutions, for example, at a resolution of 1366x768, more tiles fit:

This is only the first step in creating an adaptive design, but we already have all the possible tools in the form of templates, tables with cells of different sizes, determining the logic of cell sizes.
Search contract
It's time to add a search contract to your app. Make it simple enough. You need to add a new Search Contract Item to your project:

This will add a search display page, which I called MySearchResultsPage.xaml.
If after adding a contract to assemble an application and try to search for it, this page will be displayed. Moreover, since we have not added any display logic, it will be empty.

Let's now add the logic by which the search will occur. For simplicity, we will work out the search script in an already running application, assuming that the data from the RSS is in the application's memory.
First, remove the unnecessary definitions of the application name from the page MySearchResultsPage.xaml, we have already defined this variable in App.xaml:
<Page.Resources> <CollectionViewSource x:Name="resultsViewSource" Source="{Binding Results}"/> <CollectionViewSource x:Name="filtersViewSource" Source="{Binding Filters}"/> <common:BooleanToVisibilityConverter x:Key="BooleanToVisibilityConverter"/> <!-- TODO: Update the following string to be the name of your app --> </Page.Resources> Next, we modify the Filer class, which is defined in MySearchResultsPage.xaml.cs, so that it returns the list of our Item type:
private sealed class Filter<T> : MyReader.Common.BindableBase { private String _name; private bool _active; private List<T> _results; public Filter(String name, IEnumerable<T> results, bool active = false) { this.Name = name; this.Active = active; this.Results = results.ToList(); } public List<T> Results { get { return _results; } set { if (this.SetProperty(ref _results, value)) this.OnPropertyChanged("Description"); } } public override String ToString() { return Description; } public String Name { get { return _name; } set { if (this.SetProperty(ref _name, value)) this.OnPropertyChanged("Description"); } } public int Count { get { return _results.Count; } } public bool Active { get { return _active; } set { this.SetProperty(ref _active, value); } } public String Description { get { return String.Format("{0} ({1})", _name, this.Count); } } } Do not forget to add to the block using the directive:
using MyReader.Data; Now it’s actually necessary to determine the search logic in the LoadState method of the MySearchResultsPage.xaml.cs file:
var filterList = new List<Filter<RSSDataItem>>( from feed in RSSDataSource.AllGroups select new Filter<RSSDataItem>(feed.Title, feed.Items.Where(item => (item.Title != null && item.Title.Contains(queryText) || (item.Content != null && item.Content.Contains(queryText)))), false)); filterList.Insert(0, new Filter<RSSDataItem>("All", filterList.SelectMany(f => f.Results), true)); And in the Filter_SelectionChanged handler, change the call to the filter in accordance with our changes above, as well as assign the result to this.DefaultViewModel [“Results”]:
var selectedFilter = e.AddedItems.FirstOrDefault() as Filter<RSSDataItem>; this.DefaultViewModel["Results"] = selectedFilter.Results; If we start the application now and use the search wonder button, we will be able to see the following:

When selecting search results, we do not have a transition to the corresponding page of the record, since we do not handle this event. Let's add this functionality. To do this, define the ItemClick event handler for resultsGridView::
<GridView x:Name="resultsGridView" AutomationProperties.AutomationId="ResultsGridView" AutomationProperties.Name="Search Results" TabIndex="1" Grid.Row="1" Margin="0,-238,0,0" Padding="110,240,110,46" SelectionMode="None" IsSwipeEnabled="false" IsItemClickEnabled="True" ItemsSource="{Binding Source={StaticResource resultsViewSource}}" ItemTemplate="{StaticResource StandardSmallIcon300x70ItemTemplate}" ItemClick="resultsGridView_ItemClick"> And in the code:
private void resultsGridView_ItemClick(object sender, ItemClickEventArgs e) { var itemId = ((RSSDataItem)e.ClickedItem).UniqueId; this.Frame.Navigate(typeof(ItemDetailPage), itemId); } Now you can run the application and check that everything is working as expected.
Contract settings
The application we write is not just - we want to publish it in the Windows Store. If we add to this that our application goes to the Internet, and read the requirements for certification of applications, it turns out that we need to implement a contact settings, which would in one way or another indicate the Privacy Settings.
As an example, I will use the MSDN blog privacy policy. When creating a real application, you will need to use the appropriate privacy policies.
Add a Settings contract for the initial page only. To do this, override the OnNavigateTo and OnNavigateFrom methods, register and de-register the handler for the settings:
protected override void OnNavigatedFrom(NavigationEventArgs e) { SettingsPane.GetForCurrentView().CommandsRequested -= Settings_CommandsRequested; base.OnNavigatedFrom(e); } protected override void OnNavigatedTo(NavigationEventArgs e) { SettingsPane.GetForCurrentView().CommandsRequested += Settings_CommandsRequested; base.OnNavigatedTo(e); } Now we define the Settings_CommandsRequested handler:
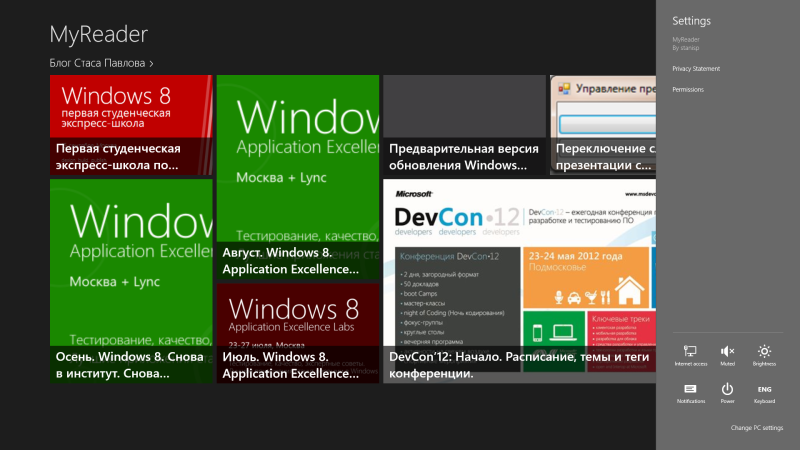
private void Settings_CommandsRequested(SettingsPane sender, SettingsPaneCommandsRequestedEventArgs args) { var viewPrivacyPage = new SettingsCommand("", "Privacy Statement", cmd => { Launcher.LaunchUriAsync(new Uri("http://go.microsoft.com/fwlink/?LinkId=248681", UriKind.Absolute)); }); args.Request.ApplicationCommands.Add(viewPrivacyPage); } It is very simple. We display the settings item called the Privacy Statement and, by clicking on it, send MSDN blogs to the Privacy Policy.
If you now start the application and select it on the main page in the wonder panel, we will see the following:
Now we actually have an example application, which is almost ready for publication in the Windows Store.
The application code is posted on SkyDrive and is available via a short link aka.ms/w8RSSp3
There is not enough processing of loading the application data and checking the network status when the application starts. In the next part, we will figure out how to add this functionality, and also try to make our application more general.
Source: https://habr.com/ru/post/166421/
All Articles