Introduction to the development of WinRT applications in HTML / JavaScript. Improving data handling
This article continues the series of materials ( first part , second part ), devoted to the basics of developing WinRT applications on HTML / JS for Windows 8. In this part we will try to improve the reliability of receiving and the quality of data display, and also talk a little about contracts.
Let me remind you that in the previous part we stopped at the fact that we learned how to get data from external RSS feeds and changed the data display styles for various application states, including the snapped mode.
If you try to trace once again how the data is received and displayed, you will easily notice that we do not limit them in any way. The application receives data feeds from RSS as input, converts them into an internal structure used to link the data, and then projects them into the collection on the screen. In fact, we immediately see all the data right from the first screen.
')
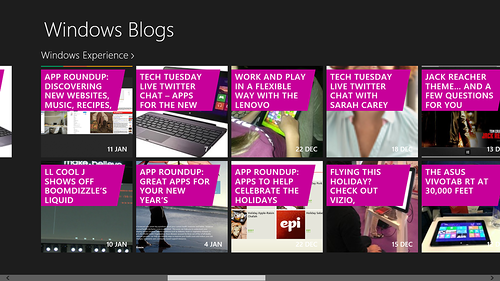
Ultimately, in our case, instead of showing quickly and completely the whole picture of the latest events, for which it would be sufficient to display the 6-8 last records, we immediately bring down the entire news flow to the user. A large set of data also does not allow you to quickly switch to neighboring groups - you have to scroll for too long (looking too far ahead, I will say that this problem is partially smoothed by Semantic Zoom).
Thus, our first priority is to limit the flow of data on the first screen.
To do this, open the pages \ groupedItems \ groupedItems.js file .
At the beginning of the function in the variable area, create two more:
In the first, we will store the filtered collection. The second one indicates how many tiles can be displayed (ideally, these parameters should be put into separate configuration files or similar data structures describing the project parameters).
Next, find the following line:
This function is called when the page is initialized and prescribes what data to display on the screen depending on the display mode used. The data source is a global Data object, described in the data.js file.
Add at the beginning of the function the following lines:
Let me remind you that the Data property of the Data object contains a collection of data ( WinJS.Binding.List ), grouped by belonging to certain RSS feeds.
To filter the data, we take this collection and leave only elements whose index is less than our limit, and then re-group the collection in accordance with the groups.
Later in the same function, replace the references to Data and Data.items below with the variable groupedItems :
Run the project:

Fine! Now we immediately see all the freshest.
The next important point: make sure that the application behaves correctly in the absence of an Internet connection. If you try to start the current version of the application with the network disconnected, for example, by turning on Airplane mode, it should cause an error due to the inability to download the necessary stream. (Perhaps they had time to cache, so for the reliability of the experiment, you can connect any other threads.)
In addition, if the stream is unavailable, there will also be a problem.
To check the availability of the Internet, open the js \ data.js file and add the following function to it:
Here we refer to WinRT to find out the current network status. This is already good information, although it does not give a 100% guarantee that there is really access to the Internet and the right stream.
Now let's add a function that will display an error message if there are problems:
This function, using the WinRT API, displays the specified error message and, by default, if donotexit is not set (or it is false), the application terminates.
Next step: start the connection check, for this replace the line
to the following:
In fact, we wrapped the data conversion into an Internet connection check. If not, the application displays an error message and closes:

Now let's go back to the getBlogPosts function. Here, too, there is the likelihood of receiving an error, for example, if an RSS feed has stopped working, in this case our XHR wrapper will cause an exception that needs to be intercepted.
Try replacing one of the links in RSS with an incorrect one and launch the application (here we assume that the server’s response will be the corresponding incorrect link).
To handle an exception, in the Promise description, you need to add a function that is called when an error occurs. Immediately after the internal anonymous function function (response) {...} add a comma separated:
In this case, we display an error message, but do not close the application: it is possible that other threads will be processed normally.
Try to make one of the links incorrect and start the application:

Hooray! Now we can please the user with malicious messages. Here I want to repeat once again an important thought: such informing the user is just a half-measure. Ideally, you need to cache data and inform the user about the presence of connection problems in a less disruptive way. See for example how Bing News works in Windows 8.
Finally, in this article, we will learn how to share information from an application to the outside, using contracts of general access (sharing) and printing.
Open the pages \ itemDetail \ itemDetail.js file . Add a variable to hold the event handler at the beginning:
Add also at the beginning or near the end (outside WinJS.UI.Pages.define ()) the following functions:
1. setupSharing - registration for data transfer
Here we access the data transfer manager through WinRT and hang the data request event handler.
2. onSharingDataRequested - event for processing the request
Here we describe what data we transmit to the recipient application: link, text, etc. (Details of the data transfer can be found here: sharing content and receiving it ).
Inside the ready function, at the very end, add a call to register for contract support:
Run the application, go to the post and through the charm buttons panel, try to transfer the news to another application:

It remains to add another very important detail. If you try to return to the level above (leave the current page) and use the sharing contract (Sharing), you will see that it still “responds” and offers the user several options to choose from. This is not what we would expect as a proper application behavior.
To prevent this from happening, you need to reset the event handlers in the data transfer manager. This can be done at the entrance to each page, or vice versa at the exit. Add the following function:
Here we simply remove the corresponding event handler. To call a function after the description of the ready property, separated by commas, add a function for unload :
Done, now data transfer works only where it should work.
Now let's add print support. First of all, it should be noted that by default your application does not know how to print. To submit documents for printing, the system printing contract ( Print ) is available to users through the “Devices” wonder-button:

To add the ability to print in the same pages \ itemDetail \ itemDetail.js file (this is our print context), you must subscribe to the corresponding manager in the same way as we did for general access. Add a variable to store the handler:
the function to sign on the print contract:
and event handlers:
Here you can also customize print options and subscribe to additional events.
for example, handle a print end event.
Inside the ready function, at the very end, add a call to register for contract support:
and don't forget to remove the print request handler in clearContracts :
Try to launch the application and send the article to print:


If you are observant enough, you should immediately see the problem: only one page has been sent to print, moreover, in the form that the page looks like on the screen (with horizontal scrolling).
In the same way that you would solve this problem for the web, here we are come to the aid of media queries and CSS rules for printing. (You can also print a specially generated page, a fragment, iframe, etc.)
Add a new pages \ itemDetail \ print.css file to the project, or simply write the following code into the css-file associated with the desired page (itemDetail.css). Add the following lines to it:
Run the application and try to print:

This concludes the current article.
The finished project at the current stage can be downloaded here: http://aka.ms/win8jsreadertemplate_v2 .
In the next part, we will continue to deal with the display and see how to use more complex templates and add support for contextual scaling.
Let me remind you that in the previous part we stopped at the fact that we learned how to get data from external RSS feeds and changed the data display styles for various application states, including the snapped mode.
Data output restriction
If you try to trace once again how the data is received and displayed, you will easily notice that we do not limit them in any way. The application receives data feeds from RSS as input, converts them into an internal structure used to link the data, and then projects them into the collection on the screen. In fact, we immediately see all the data right from the first screen.
')
I note that a feature of this solution is that, in fact, we always have on hand all the available information. In a complex project with a large amount of data, perhaps server logic and the presence of special APIs, it would most likely make sense to request data as needed, loading only the headers first. But that's another story. :)
Ultimately, in our case, instead of showing quickly and completely the whole picture of the latest events, for which it would be sufficient to display the 6-8 last records, we immediately bring down the entire news flow to the user. A large set of data also does not allow you to quickly switch to neighboring groups - you have to scroll for too long (looking too far ahead, I will say that this problem is partially smoothed by Semantic Zoom).
Thus, our first priority is to limit the flow of data on the first screen.
To do this, open the pages \ groupedItems \ groupedItems.js file .
At the beginning of the function in the variable area, create two more:
var groupedItems; var tilesLimit = 6; In the first, we will store the filtered collection. The second one indicates how many tiles can be displayed (ideally, these parameters should be put into separate configuration files or similar data structures describing the project parameters).
Next, find the following line:
_initializeLayout: function (listView, viewState) { This function is called when the page is initialized and prescribes what data to display on the screen depending on the display mode used. The data source is a global Data object, described in the data.js file.
Add at the beginning of the function the following lines:
groupedItems = Data.items.createFiltered(function (item) { return item.index < tilesLimit; }).createGrouped( function groupKeySelector(item) { return item.group.key; }, function groupDataSelector(item) { return item.group; } ); Let me remind you that the Data property of the Data object contains a collection of data ( WinJS.Binding.List ), grouped by belonging to certain RSS feeds.
To filter the data, we take this collection and leave only elements whose index is less than our limit, and then re-group the collection in accordance with the groups.
Note : in this case, we explicitly limit the number of elements to six (tilesLimit), however, in general, this is the wrong approach. On a large monitor, the number of tiles may be less than desired, besides, lonely hanging tiles may appear at the end of the list. The most correct: dynamically calculate the limit depending on the available space.
Later in the same function, replace the references to Data and Data.items below with the variable groupedItems :
if (viewState === appViewState.snapped) { listView.itemDataSource = groupedItems.groups.dataSource; listView.groupDataSource = null; listView.layout = new ui.ListLayout(); } else { listView.itemDataSource = groupedItems.dataSource; listView.groupDataSource = groupedItems.groups.dataSource; listView.layout = new ui.GridLayout({ groupHeaderPosition: "top" }); } Note : Be careful with other Data entries on this page. In this case, we do not change them, as they are used in the transition to the internal pages, and above we just made a data filter. But in general, if you change the source of the data, it may need to be changed everywhere, or, more correctly, take out the layer of work with the data separately.
Run the project:
Fine! Now we immediately see all the freshest.
Check Internet connection
The next important point: make sure that the application behaves correctly in the absence of an Internet connection. If you try to start the current version of the application with the network disconnected, for example, by turning on Airplane mode, it should cause an error due to the inability to download the necessary stream. (Perhaps they had time to cache, so for the reliability of the experiment, you can connect any other threads.)
In addition, if the stream is unavailable, there will also be a problem.
To check the availability of the Internet, open the js \ data.js file and add the following function to it:
function isInternetConnection() { var connectionProfile = Windows.Networking.Connectivity.NetworkInformation.getInternetConnectionProfile(); return (connectionProfile != null); } Here we refer to WinRT to find out the current network status. This is already good information, although it does not give a 100% guarantee that there is really access to the Internet and the right stream.
Now let's add a function that will display an error message if there are problems:
function showConnectionError(msg, donotexit) { msg = (msg != undefined) ? msg : ""; var messageDialog = new Windows.UI.Popups.MessageDialog(msg, "Can not connect"); messageDialog.commands.append(new Windows.UI.Popups.UICommand("Ok", null, 1)); messageDialog.showAsync().done(function (command) { if (!donotexit && command.id == 1) { MSApp.terminateApp({ number: 0, stack: "", description: "No internet connection" }); } }); } This function, using the WinRT API, displays the specified error message and, by default, if donotexit is not set (or it is false), the application terminates.
Note : in a real application, the behavior logic may differ. For example, an application may intentionally cache data or prompt the user to try downloading the streams from the server again if there was a temporary loss of the connection.
Next step: start the connection check, for this replace the line
list = getBlogPosts(list); to the following:
function tryUpdateData() { if (isInternetConnection()) { list = getBlogPosts(list); } else { showConnectionError("Please check your internet connection. "); } }; tryUpdateData(); In fact, we wrapped the data conversion into an Internet connection check. If not, the application displays an error message and closes:
Now let's go back to the getBlogPosts function. Here, too, there is the likelihood of receiving an error, for example, if an RSS feed has stopped working, in this case our XHR wrapper will cause an exception that needs to be intercepted.
Try replacing one of the links in RSS with an incorrect one and launch the application (here we assume that the server’s response will be the corresponding incorrect link).
To handle an exception, in the Promise description, you need to add a function that is called when an error occurs. Immediately after the internal anonymous function function (response) {...} add a comma separated:
function (error) { showConnectionError("Can't get rss updates for " + feed.title + ". Used source: " + feed.url, true); } In this case, we display an error message, but do not close the application: it is possible that other threads will be processed normally.
Try to make one of the links incorrect and start the application:
Hooray! Now we can please the user with malicious messages. Here I want to repeat once again an important thought: such informing the user is just a half-measure. Ideally, you need to cache data and inform the user about the presence of connection problems in a less disruptive way. See for example how Bing News works in Windows 8.
Share information
Finally, in this article, we will learn how to share information from an application to the outside, using contracts of general access (sharing) and printing.
Open the pages \ itemDetail \ itemDetail.js file . Add a variable to hold the event handler at the beginning:
var sharingHandler; Add also at the beginning or near the end (outside WinJS.UI.Pages.define ()) the following functions:
1. setupSharing - registration for data transfer
function setupSharing(item) { var dataTransferManager = Windows.ApplicationModel.DataTransfer.DataTransferManager.getForCurrentView(); sharingHandler = onSharingDataRequested.bind(item); dataTransferManager.addEventListener("datarequested", sharingHandler); } Here we access the data transfer manager through WinRT and hang the data request event handler.
2. onSharingDataRequested - event for processing the request
function onSharingDataRequested(e) { var request = e.request; var item = this; var text = item.title; if (item.link) { text += "\n\r" + item.link; request.data.setUri(new Windows.Foundation.Uri(item.link)); } request.data.properties.title = text; request.data.properties.description = "Some awesome news on Windows!"; request.data.setText(text); } Here we describe what data we transmit to the recipient application: link, text, etc. (Details of the data transfer can be found here: sharing content and receiving it ).
Inside the ready function, at the very end, add a call to register for contract support:
setupSharing(item); Run the application, go to the post and through the charm buttons panel, try to transfer the news to another application:
It remains to add another very important detail. If you try to return to the level above (leave the current page) and use the sharing contract (Sharing), you will see that it still “responds” and offers the user several options to choose from. This is not what we would expect as a proper application behavior.
To prevent this from happening, you need to reset the event handlers in the data transfer manager. This can be done at the entrance to each page, or vice versa at the exit. Add the following function:
function clearContracts() { var dataTransferManager = Windows.ApplicationModel.DataTransfer.DataTransferManager.getForCurrentView(); dataTransferManager.removeEventListener("datarequested", sharingHandler); } Here we simply remove the corresponding event handler. To call a function after the description of the ready property, separated by commas, add a function for unload :
unload: function () { clearContracts(); } Done, now data transfer works only where it should work.
We print articles
Now let's add print support. First of all, it should be noted that by default your application does not know how to print. To submit documents for printing, the system printing contract ( Print ) is available to users through the “Devices” wonder-button:
To add the ability to print in the same pages \ itemDetail \ itemDetail.js file (this is our print context), you must subscribe to the corresponding manager in the same way as we did for general access. Add a variable to store the handler:
var printTaskHandler; the function to sign on the print contract:
function setupPrinting(item) { var printManager = Windows.Graphics.Printing.PrintManager.getForCurrentView(); printTaskHandler = onPrintTaskRequested.bind(item) printManager.addEventListener("printtaskrequested", printTaskHandler); } and event handlers:
function onPrintTaskRequested(printEvent) { var printTask = printEvent.request.createPrintTask(this.group.title, function (args) { args.setSource(MSApp.getHtmlPrintDocumentSource(document)); }); } Here you can also customize print options and subscribe to additional events.
for example, handle a print end event.
Inside the ready function, at the very end, add a call to register for contract support:
setupPrinting(item); and don't forget to remove the print request handler in clearContracts :
var printManager = Windows.Graphics.Printing.PrintManager.getForCurrentView(); printManager.removeEventListener("printtaskrequested", printTaskHandler); Try to launch the application and send the article to print:
If you are observant enough, you should immediately see the problem: only one page has been sent to print, moreover, in the form that the page looks like on the screen (with horizontal scrolling).
In the same way that you would solve this problem for the web, here we are come to the aid of media queries and CSS rules for printing. (You can also print a specially generated page, a fragment, iframe, etc.)
Add a new pages \ itemDetail \ print.css file to the project, or simply write the following code into the css-file associated with the desired page (itemDetail.css). Add the following lines to it:
@media print { /* */ .itemdetailpage.fragment { -ms-grid-rows: 40px 1fr; } /* */ header[role="banner"] { -ms-grid-columns: 40px 1fr !important; } /* "" */ .win-backbutton { display:none; } /* */ header[role="banner"] h1.titlearea { margin: 0px !important; font-size: 1em; text-transform: uppercase; } /* */ .itemdetailpage.fragment, .itemdetailpage .content, .itemdetailpage .content article { height:auto !important; overflow: visible !important; } /* */ .content { padding-left: 40px; } /* */ .itemdetailpage .content article { column-width: auto; width: auto; margin-left: 0px; margin-top: 40px; } } Run the application and try to print:
This concludes the current article.
Project
The finished project at the current stage can be downloaded here: http://aka.ms/win8jsreadertemplate_v2 .
Further
In the next part, we will continue to deal with the display and see how to use more complex templates and add support for contextual scaling.
Previous parts
Source: https://habr.com/ru/post/165909/
All Articles