Step-by-step firmware OpenWRT to TP-LINK TL-WR741ND router
Routers lose their native firmware for various reasons. The desire to add functionality, solder the USB port, or simply add stability to the operation of the router.
In my case, the router on the latest stable native firmware with 3 WiFi and 2 Ethernet consumers hung up 4 times a week. This is not very scary, but it is also tired of restarting it. I wanted stability. After searching and reading reviews, the choice fell on OpenWRT. The article already presents step by step instructions without errors that I had to go through.
The first thing to do is upgrade and install the latest native firmware.
Here you can find the latest firmware for the TL-WR741ND, for the corresponding hardware version.
Next, you need to select the firmware version of OpenWRT.
')
You should use exactly the file that is consistent with the version of the iron of your model. Do not neglect this rule! There are two possible file system options for booting: JFFS2 and SquashFS.
The word factory in the file name means that you should upload such file to your device over the factory (native) firmware. The file with the word sysupgrade is applicable only for updating OpenWRT, i.e. poured after factory firmware.
We have a native firmware, which means we need to install the firmware with the factory tag.
Below is a single firmware with a different hardware version of the device, choose the one to which your router belongs, in order to determine the version see Step 1 :
We download factory firmware and sew in the usual way. System Tools -> Backup & Restore (System Tools -> Firmware Upgrade).
After successful firmware, we get a working router with the included web-interface. Therefore, go to the firmware settings through the browser. Further actions are as follows:
Enter in the address bar the address of the router 192.168.1.1

Press the Enter key and the web interface of the router appears. We will see what they offered us to enter Username and Password. Enter root as Username, leave the Password field empty. Click Login .

This ended the firmware, you got into the web interface of the Openwrt firmware.
Click on Network -> Interfaces -> Wan -> Edit
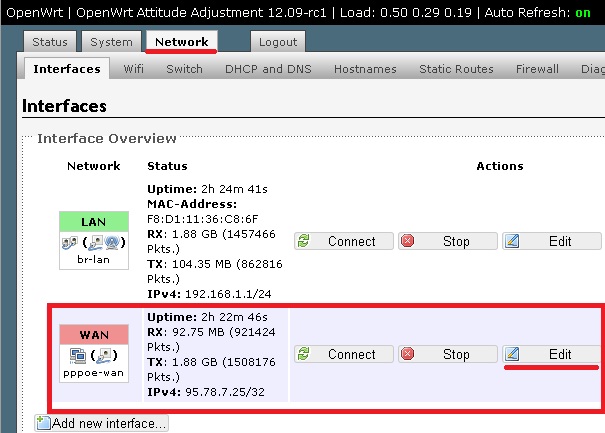
We choose the protocol we need, in my case it is PPPoE. Enter the username from the Internet in the PAP / CHAP username string, and the password in the PAP / CHAP password . Click Save & Apply .

Go back to Interfaces by clicking on this section, select the WAN line and click connect . Internet is configured.

It is configured in almost the same way as the Internet connection, so I’ll tell you briefly.
Go to the Network -> Wifi -> edit (if there is) or Add (if not created). In the General Setup section, we change the ESSID , this is the name of your network, then go to Wireless Security . In the Encryption line, select WPA-PSK / WPA2-PSK Mixed Mode . In the Key line we write the password from the wi-fi network. Click Save & Apply .

Go back to the Wifi section and click connect . Wi-fi is configured.
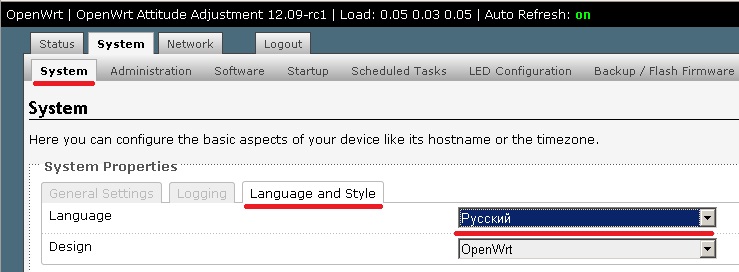
In order to Russify the firmware, we need to go to the System -> Software -> section and click on the Update List button.

After that click on Available Packages , select the section L. Find the file with the name " luci-i18n-russian " click the Install button. At the request do you agree, click ok .

Language pack downloaded, now it needs to be applied. Open the section System -> Language and Style -> Language -> Russian . After that, click the Save & Apply button .
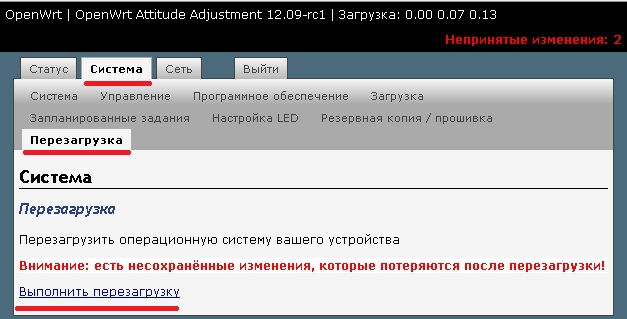
We update the page (click on the F5 keyboard) and see the Russian interface.
Go to the section System -> Management. Set the password of the router . Click save and apply .

System -> Restart -> Restart .
In my case, the router on the latest stable native firmware with 3 WiFi and 2 Ethernet consumers hung up 4 times a week. This is not very scary, but it is also tired of restarting it. I wanted stability. After searching and reading reviews, the choice fell on OpenWRT. The article already presents step by step instructions without errors that I had to go through.
Step 1, flashing to the latest official firmware
The first thing to do is upgrade and install the latest native firmware.
Here you can find the latest firmware for the TL-WR741ND, for the corresponding hardware version.
- Turn the router over and check the version of the hardware in it using the sticker on the case.
- Download the archive with the latest firmware.
- Sew the router firmware from the archive in the usual way. System Tools -> Backup & Restore (System Tools -> Firmware Upgrade).
Step 2, download and install OPENWRT
Next, you need to select the firmware version of OpenWRT.
')
You should use exactly the file that is consistent with the version of the iron of your model. Do not neglect this rule! There are two possible file system options for booting: JFFS2 and SquashFS.
Before proceeding with the description of the assembly, I’ll dwell on how the OpenWRT root file system works. It is a mini_fo file system that transparently merges two other file systems: an immutable SquashFS mounted to / rom, and a variable JFFS2 mounted to / overlay. All files that are created or modified after installing the firmware are in / overlay. When deleting files that were originally in the firmware, mini_fo simply marks them as deleted, the files themselves remain in / rom and continue to take up space. Both SquashFS and JFFS2 use compression, but SquashFS gives a better compression ratio, so putting all the necessary packages at once into / rom gives smaller firmware. The exclusion of unnecessary packages from the firmware also allows you to save such a valuable place on a flash drive.
alt
The word factory in the file name means that you should upload such file to your device over the factory (native) firmware. The file with the word sysupgrade is applicable only for updating OpenWRT, i.e. poured after factory firmware.
We have a native firmware, which means we need to install the firmware with the factory tag.
Below is a single firmware with a different hardware version of the device, choose the one to which your router belongs, in order to determine the version see Step 1 :
We download factory firmware and sew in the usual way. System Tools -> Backup & Restore (System Tools -> Firmware Upgrade).
Step 3, enter the WEB interface of the firmware
After successful firmware, we get a working router with the included web-interface. Therefore, go to the firmware settings through the browser. Further actions are as follows:
Enter in the address bar the address of the router 192.168.1.1
Press the Enter key and the web interface of the router appears. We will see what they offered us to enter Username and Password. Enter root as Username, leave the Password field empty. Click Login .
This ended the firmware, you got into the web interface of the Openwrt firmware.
Step 4, set up internet connection
Click on Network -> Interfaces -> Wan -> Edit
We choose the protocol we need, in my case it is PPPoE. Enter the username from the Internet in the PAP / CHAP username string, and the password in the PAP / CHAP password . Click Save & Apply .
Go back to Interfaces by clicking on this section, select the WAN line and click connect . Internet is configured.
Step 5, set up a Wi-Fi connection
It is configured in almost the same way as the Internet connection, so I’ll tell you briefly.
Go to the Network -> Wifi -> edit (if there is) or Add (if not created). In the General Setup section, we change the ESSID , this is the name of your network, then go to Wireless Security . In the Encryption line, select WPA-PSK / WPA2-PSK Mixed Mode . In the Key line we write the password from the wi-fi network. Click Save & Apply .
Go back to the Wifi section and click connect . Wi-fi is configured.
Step 6, Russify the firmware
In order to Russify the firmware, we need to go to the System -> Software -> section and click on the Update List button.
After that click on Available Packages , select the section L. Find the file with the name " luci-i18n-russian " click the Install button. At the request do you agree, click ok .
Language pack downloaded, now it needs to be applied. Open the section System -> Language and Style -> Language -> Russian . After that, click the Save & Apply button .
We update the page (click on the F5 keyboard) and see the Russian interface.
Step 7, set the password on the router
Go to the section System -> Management. Set the password of the router . Click save and apply .
Step 8, the final stage
System -> Restart -> Restart .
Source: https://habr.com/ru/post/165739/
All Articles