Little Brave Arkanoid (Part 1 - IwGl)
As I said, the framework I described earlier lacks a lot to be considered a full-fledged game engine. It does not have physics simulation, it uses inflexible and not fast Iw2D for graphics output. In fact, all he can do is perform 2D sprite animations, accompanied by sound effects. In order to somehow grow above oneself, it is obviously necessary to master new opportunities, but it is boring and uninteresting to do this without having a goal.
We will set a goal, and develop a small prototype of the well-known game Arcanoid . For a start, let's try to heed the advice of the distinguished crmMaster and try to figure out what IwGl is and how it can be used. True, we will not pull the textures on the cube today. We must start with a simple one, and today we will learn to draw triangles.
So, we know about Open GL that he can draw triangles. We also know that he can draw them with a beautiful gradient fill, quickly and quite a lot. Knowing how to quickly draw a lot of triangles, you can draw anything.
Let's start as usual with the mkb file:
')
Here we announce that we intend to use IwGl to display the graphics, and also define several files with the source text that we intend to write today.
The Main module, traditionally, will contain the main application loop, as well as the initialization and deinitialization of all subsystems.
I tried to hide all the marmalade code, scattering it across various subsystems. The simplest of these subsystems is the IO module. His task, for today, is handling the keyboard state. As I said earlier, we have to handle pressing the “Back” button in order to correctly terminate the application on the Android platform.
Having finished with the boring part, go to the Desktop module. He will be engaged in the actual drawing of IwGl frames, as well as recalculating some abstract coordinates (in which the model will work) into physical ones, depending on the screen size of the device on which we launched the application.
On the code of recalculation of logical coordinates in the screen, while you can not pay attention. We will need it when we learn to download the level description.
Attention should be paid to how the frame is redrawn in the update method. The image is initially built in a hidden buffer, after which the hidden and visible buffers are switched by calling IwGLSwapBuffers. Screen cleaning and camera setup for 2D images are carried out in the update method (I’ll say right away that I looked at all this code in the standard example IwGL / IwGLVirtualRes). From this, it is clear that the update method should be called before drawing any primitives, and refresh when done, to redraw the screen.
The second point I overlooked in IwGLVirtualRes is the way to quickly output an array of triangles. This task will be handled by the Quads module.
Any display object, for its drawing, can request from the Quads module a set of pairs of triangles, changing their parameters accordingly. Upon completion, Quads will display all the triangles that have been changed in a single call to glDrawElements. In this way, the Bricks module will be able to draw several rectangles on the screen.
We use two colors to draw gradient rectangles.
Now that we have coped with the rectangles, we have a more interesting task. We need, using triangles, to draw a ball (well, well, not a ball, but a circle, with a nice gradient fill representing a highlight).
Recalling the school trigonometry course, we divide the circle into segments. In order to simulate a flare, move the top of all segments slightly to the right and down from the center of the circle. Well, in order not to deal with all this trigonometry with each redrawing, we calculate all coordinates once, in the init method.
Implementing the remaining Board module, for now, is trivial.
It remains to make the necessary settings in app.icf:
and run the program for execution:
In the next article , we will learn how to download a level description from a YAML file.
We will set a goal, and develop a small prototype of the well-known game Arcanoid . For a start, let's try to heed the advice of the distinguished crmMaster and try to figure out what IwGl is and how it can be used. True, we will not pull the textures on the cube today. We must start with a simple one, and today we will learn to draw triangles.
So, we know about Open GL that he can draw triangles. We also know that he can draw them with a beautiful gradient fill, quickly and quite a lot. Knowing how to quickly draw a lot of triangles, you can draw anything.
Let's start as usual with the mkb file:
')
arcanoid.mkb
#!/usr/bin/env mkb options { } subprojects { iwgl } includepath { ./source/Main ./source/Model } files { [Main] (source/Main) Main.cpp Main.h Quads.cpp Quads.h Desktop.cpp Desktop.h IO.cpp IO.h [Model] (source/Model) Bricks.cpp Bricks.h Ball.cpp Ball.h Board.cpp Board.h } assets { } Here we announce that we intend to use IwGl to display the graphics, and also define several files with the source text that we intend to write today.
The Main module, traditionally, will contain the main application loop, as well as the initialization and deinitialization of all subsystems.
Main.cpp
#include "Main.h" #include "s3e.h" #include "IwGL.h" #include "Desktop.h" #include "IO.h" #include "Quads.h" #include "Board.h" Board board; void init() { desktop.init(); io.init(); quads.init(); board.init(); } void release() { io.release(); desktop.release(); } int main() { init(); { while (!s3eDeviceCheckQuitRequest()) { io.update(); if (io.isKeyDown(s3eKeyAbsBSK) || io.isKeyDown(s3eKeyBack)) break; quads.update(); desktop.update(); board.update(); board.refresh(); quads.refresh(); io.refresh(); desktop.refresh(); } } release(); return 0; } I tried to hide all the marmalade code, scattering it across various subsystems. The simplest of these subsystems is the IO module. His task, for today, is handling the keyboard state. As I said earlier, we have to handle pressing the “Back” button in order to correctly terminate the application on the Android platform.
IO.h
#ifndef _IO_H_ #define _IO_H_ class IO { public: void init() {} void release() {} void update(); void refresh() {} bool isKeyDown(s3eKey key) const; }; extern IO io; #endif // _IO_H_ IO.cpp
#include "s3e.h" #include "IO.h" IO io; void IO::update() { s3eKeyboardUpdate(); } bool IO::isKeyDown(s3eKey key) const { return (s3eKeyboardGetState(key) & S3E_KEY_STATE_DOWN) == S3E_KEY_STATE_DOWN; } Having finished with the boring part, go to the Desktop module. He will be engaged in the actual drawing of IwGl frames, as well as recalculating some abstract coordinates (in which the model will work) into physical ones, depending on the screen size of the device on which we launched the application.
Desktop.h
#ifndef _DESKTOP_H_ #define _DESKTOP_H_ class Desktop { private: int width; int height; int vSize; int duration; public: void init(); void release(); void update(); void refresh(); int getWidth() const {return width;} int getHeight() const {return height;} void setVSize(int v) {vSize = v;} int toRSize(int x) const; }; extern Desktop desktop; #endif // _DESKTOP_H_ Desktop.cpp
#include "IwGL.h" #include "s3e.h" #include "Desktop.h" Desktop desktop; void Desktop::init() { IwGLInit(); glClearColor(0, 0, 0, 0); width = IwGLGetInt(IW_GL_WIDTH); height = IwGLGetInt(IW_GL_HEIGHT); vSize = 0; duration = 1000 / 60; } void Desktop::release() { IwGLTerminate(); } void Desktop::update() { glClear(GL_COLOR_BUFFER_BIT | GL_DEPTH_BUFFER_BIT); glMatrixMode(GL_PROJECTION); glLoadIdentity(); glOrthof(0, (float)width, (float)height, 0, -10.0f, 10.0f); glViewport(0, 0, width, height); } void Desktop::refresh() { IwGLSwapBuffers(); s3eDeviceYield(duration); } int Desktop::toRSize(int x) const { if (vSize == 0) return x; return (x * width) / vSize; } On the code of recalculation of logical coordinates in the screen, while you can not pay attention. We will need it when we learn to download the level description.
Attention should be paid to how the frame is redrawn in the update method. The image is initially built in a hidden buffer, after which the hidden and visible buffers are switched by calling IwGLSwapBuffers. Screen cleaning and camera setup for 2D images are carried out in the update method (I’ll say right away that I looked at all this code in the standard example IwGL / IwGLVirtualRes). From this, it is clear that the update method should be called before drawing any primitives, and refresh when done, to redraw the screen.
The second point I overlooked in IwGLVirtualRes is the way to quickly output an array of triangles. This task will be handled by the Quads module.
Quads.h
#ifndef _QUADS_H_ #define _QUADS_H_ #define MAX_QUADS 2000 class Quads { private: int16 Verts[MAX_QUADS * 4 * 2]; uint16 Inds[MAX_QUADS * 6]; uint32 Cols[MAX_QUADS * 4]; int outQuad; public: void init(); void update() {outQuad = 0;} void refresh(); int16* getQuadPoints(); uint32* getQuadCols(); }; extern Quads quads; #endif // _QUADS_H_ Quads.cpp
#include "IwGL.h" #include "s3e.h" #include "Quads.h" Quads quads; void Quads::init() { uint16* inds = Inds; for (int n = 0; n < MAX_QUADS; n++) { uint16 baseInd = n*4; //Triangle 1 *inds++ = baseInd; *inds++ = baseInd+1; *inds++ = baseInd+2; //Triangle 2 *inds++ = baseInd; *inds++ = baseInd+2; *inds++ = baseInd+3; } glVertexPointer(2, GL_SHORT, 0, Verts); glEnableClientState(GL_VERTEX_ARRAY); glColorPointer(4, GL_UNSIGNED_BYTE, 0, Cols); glEnableClientState(GL_COLOR_ARRAY); } void Quads::refresh() { glDrawElements(GL_TRIANGLES, outQuad*6, GL_UNSIGNED_SHORT, Inds); } int16* Quads::getQuadPoints() { if (outQuad >= MAX_QUADS) return NULL; return Verts + 2 * 4 * outQuad; } uint32* Quads::getQuadCols() { if (outQuad >= MAX_QUADS) return NULL; return Cols + 4 * outQuad++; } Any display object, for its drawing, can request from the Quads module a set of pairs of triangles, changing their parameters accordingly. Upon completion, Quads will display all the triangles that have been changed in a single call to glDrawElements. In this way, the Bricks module will be able to draw several rectangles on the screen.
Bricks.h
#ifndef _BRICKS_H_ #define _BRICKS_H_ #include "IwGL.h" #include "s3e.h" #include "Desktop.h" #define BRICK_COLOR_1 0xffffff00 #define BRICK_COLOR_2 0xff50ff00 #define BRICK_HALF_WIDTH 20 #define BRICK_HALF_HEIGHT 10 #include <vector> using namespace std; class Bricks { private: struct SBrick { SBrick(int x, int y): x(x), y(y), hw(BRICK_HALF_WIDTH), hh(BRICK_HALF_HEIGHT), ic(BRICK_COLOR_1), oc(BRICK_COLOR_2) {} SBrick(const SBrick& p): x(px), y(py), hw(p.hw), hh(p.hh), ic(p.ic), oc(p.oc) {} int x, y, hw, hh, ic, oc; }; vector<SBrick> bricks; public: Bricks(): bricks() {} void refresh(); void clear(){bricks.clear();} void add(SBrick& b); typedef vector<SBrick>::iterator BIter; friend class Board; }; #endif // _BRICKS_H_ Bricks.cpp
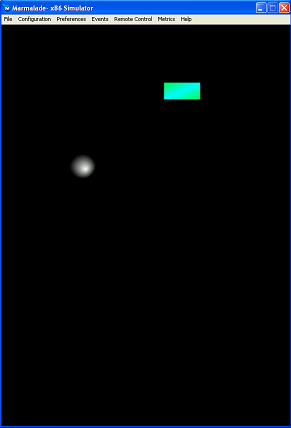
#include "Bricks.h" #include "Quads.h" void Bricks::refresh() { for (BIter p = bricks.begin(); p != bricks.end(); ++p) { CIwGLPoint point(p->x, p->y); point = IwGLTransform(point); int16* quadPoints = quads.getQuadPoints(); uint32* quadCols = quads.getQuadCols(); if ((quadPoints == NULL) || (quadCols == NULL)) break; *quadPoints++ = point.x - p->hw; *quadPoints++ = point.y + p->hh; *quadCols++ = p->ic; *quadPoints++ = point.x + p->hw; *quadPoints++ = point.y + p->hh; *quadCols++ = p->oc; *quadPoints++ = point.x + p->hw; *quadPoints++ = point.y - p->hh; *quadCols++ = p->ic; *quadPoints++ = point.x - p->hw; *quadPoints++ = point.y - p->hh; *quadCols++ = p->oc; } } void Bricks::add(SBrick& b) { bricks.push_back(b); } We use two colors to draw gradient rectangles.
Now that we have coped with the rectangles, we have a more interesting task. We need, using triangles, to draw a ball (well, well, not a ball, but a circle, with a nice gradient fill representing a highlight).
Ball.h
#ifndef _BALL_H_ #define _BALL_H_ #include <vector> #include "IwGL.h" #include "s3e.h" #include "Desktop.h" #define MAX_SEGMENTS 7 #define BALL_COLOR_1 0x00000000 #define BALL_COLOR_2 0xffffffff #define BALL_RADIUS 15 using namespace std; class Ball { private: struct Offset { Offset(int dx, int dy): dx(dx), dy(dy) {} Offset(const Offset& p): dx(p.dx), dy(p.dy) {} int dx, dy; }; vector<Offset> offsets; int x; int y; public: void init(); void refresh(); virtual void setXY(int X, int Y); typedef vector<Offset>::iterator OIter; }; #endif // _BALL_H_ Ball.cpp
#include "Ball.h" #include "Quads.h" #include "Desktop.h" #include <math.h> #define PI 3.14159265f void Ball::init(){ x = desktop.getWidth() / 2; y = desktop.getHeight()/ 2; float delta = PI / (float)MAX_SEGMENTS; float angle = delta / 2.0f; float r = (float)desktop.toRSize(BALL_RADIUS); for (int i = 0; i < MAX_SEGMENTS; i++) { offsets.push_back(Offset((int16)(cos(angle) * r), (int16)(sin(angle) * r))); angle = angle + delta; offsets.push_back(Offset((int16)(cos(angle) * r), (int16)(sin(angle) * r))); angle = angle + delta; offsets.push_back(Offset((int16)(cos(angle) * r), (int16)(sin(angle) * r))); } } void Ball::setXY(int X, int Y) { x = X; y = Y; } void Ball::refresh() { CIwGLPoint point(x, y); point = IwGLTransform(point); OIter o = offsets.begin(); int r = desktop.toRSize(BALL_RADIUS); for (int i = 0; i < MAX_SEGMENTS; i++) { int16* quadPoints = quads.getQuadPoints(); uint32* quadCols = quads.getQuadCols(); if ((quadPoints == NULL) || (quadCols == NULL)) break; *quadPoints++ = point.x + (r / 4); *quadPoints++ = point.y + (r / 4); *quadCols++ = BALL_COLOR_2; *quadPoints++ = point.x + o->dx; *quadPoints++ = point.y + o->dy; *quadCols++ = BALL_COLOR_1; o++; *quadPoints++ = point.x + o->dx; *quadPoints++ = point.y + o->dy; *quadCols++ = BALL_COLOR_1; o++; *quadPoints++ = point.x + o->dx; *quadPoints++ = point.y + o->dy; *quadCols++ = BALL_COLOR_1; o++; } } Recalling the school trigonometry course, we divide the circle into segments. In order to simulate a flare, move the top of all segments slightly to the right and down from the center of the circle. Well, in order not to deal with all this trigonometry with each redrawing, we calculate all coordinates once, in the init method.
Implementing the remaining Board module, for now, is trivial.
Board.h
#ifndef _BOARD_H_ #define _BOARD_H_ #include "Bricks.h" #include "Ball.h" class Board { private: Bricks bricks; Ball ball; public: void init(); void refresh(); void update() {} }; #endif // _BOARD_H_ Board.cpp
#include "Board.h" void Board::init() { // DEBUG: Bricks::SBrick b(200, 80); bricks.add(b); // ball.init(); } void Board::refresh() { bricks.refresh(); ball.refresh(); } It remains to make the necessary settings in app.icf:
[S3E] SysGlesVersion=1 DispFixRot=FixedPortrait DataDirIsRAM=1 and run the program for execution:
In the next article , we will learn how to download a level description from a YAML file.
Source: https://habr.com/ru/post/165667/
All Articles