NooLite - radio control lighting system, or the first step to a smart home
A week has passed, and Box Overview is again ready to please you with a new review! This time - NooLite lighting control system from the Belarusian company Nootech.
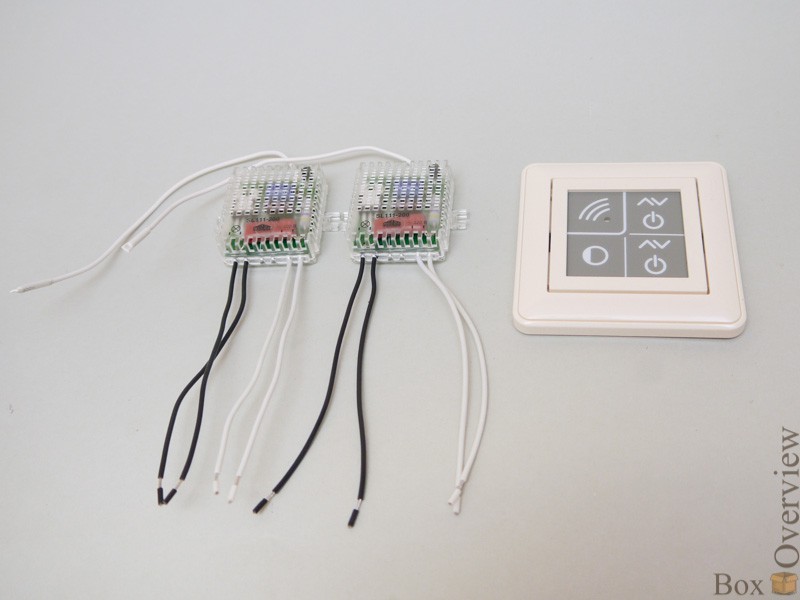
The system includes several types of switches (those that are hung on the wall), and several types of power units (those through which the lamps are connected). Connecting all this results in a lighting control system in the whole house, which can control each lamp individually or all the lamps in the room or in the whole house. The system is well expandable, has the ability to customize the scenarios up to the brightness of each channel.
Well, enoughadvertising description, let's see what the system can in action.
The system is positioned as a replacement for conventional switches. For example, if you have two chandeliers with a bunch of lamps, and there is only one wire from the switch. But you really want to be able to turn on the chandeliers individually, and even better - both the chandeliers individually, and one lamp separately, such as a night light. This problem is such a system and is designed to solve.
Well, I promised less descriptions. Let's figure out what the system is.
Cthulhu unit :
If you look closely, there is a symbol on it:
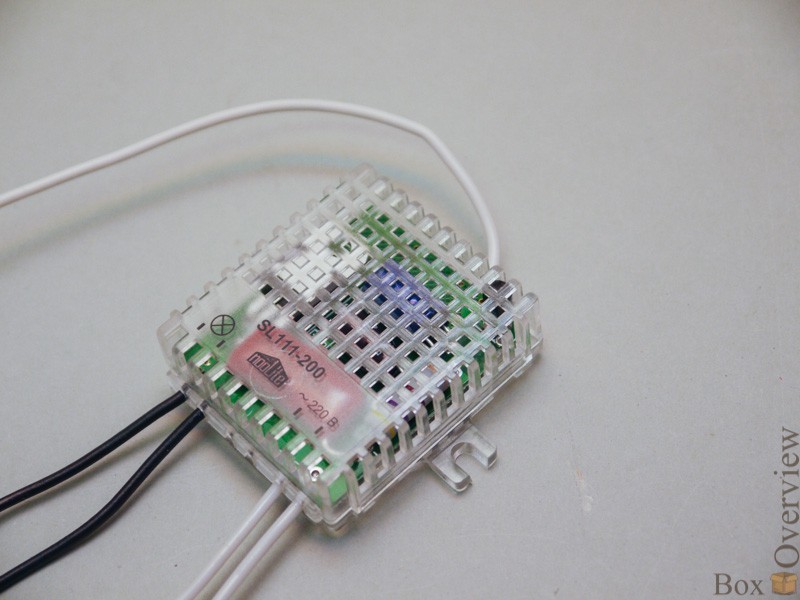
SL-111-200. The first two letters are a block type, it means which lamps can be connected to this block.
')
SN - Incandescent lamps, halogen lamps, including 12 volts (through a transformer).
ST - Halogen lamps at 12 volts (electronic power supply).
SL - Fluorescent and energy-saving lamps, LED lamps, and any other load.
The first two support brightness control, while the latter type does not. But through it you can connect fluorescent lamps.
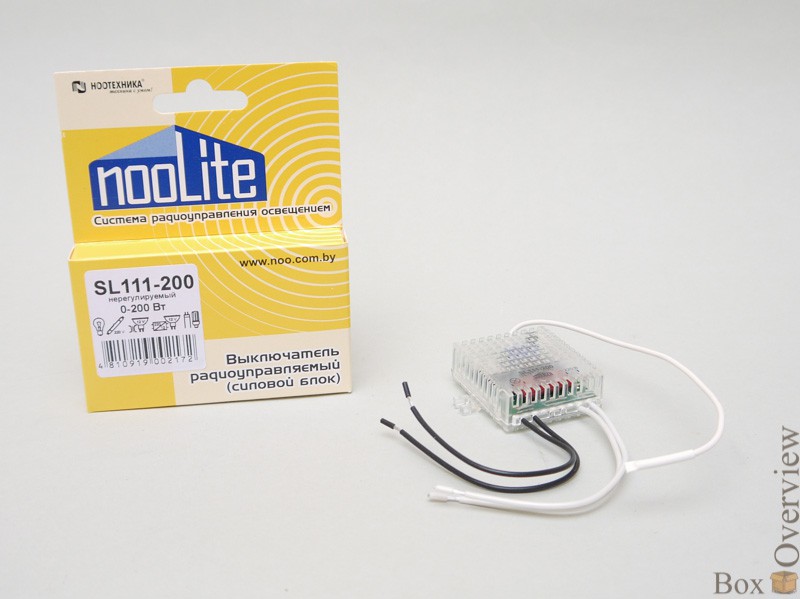
The last digits indicate the power that can be connected through such a unit. 200 is 200 watts, there are 300, 500 and as many as 3 and 5 kilowatts. Even the searchlights and heaters can be switched on through the last two, so that such a need arises.
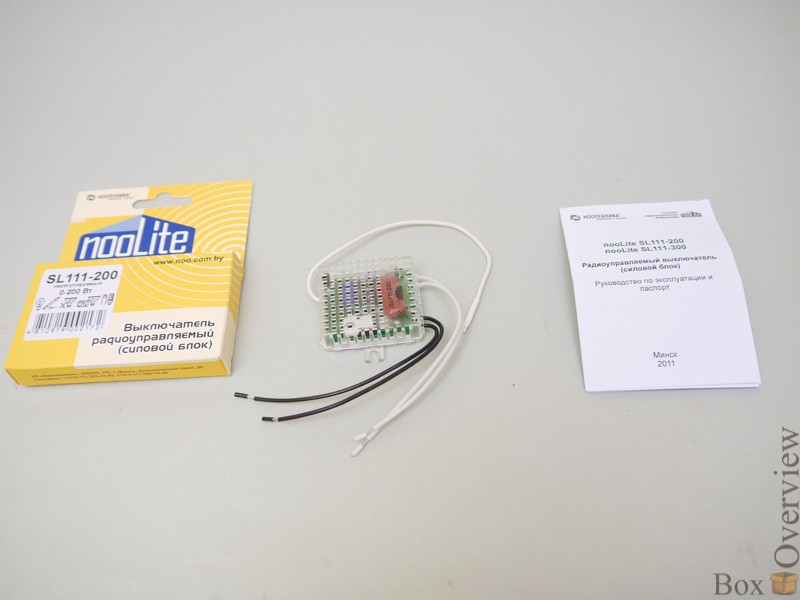
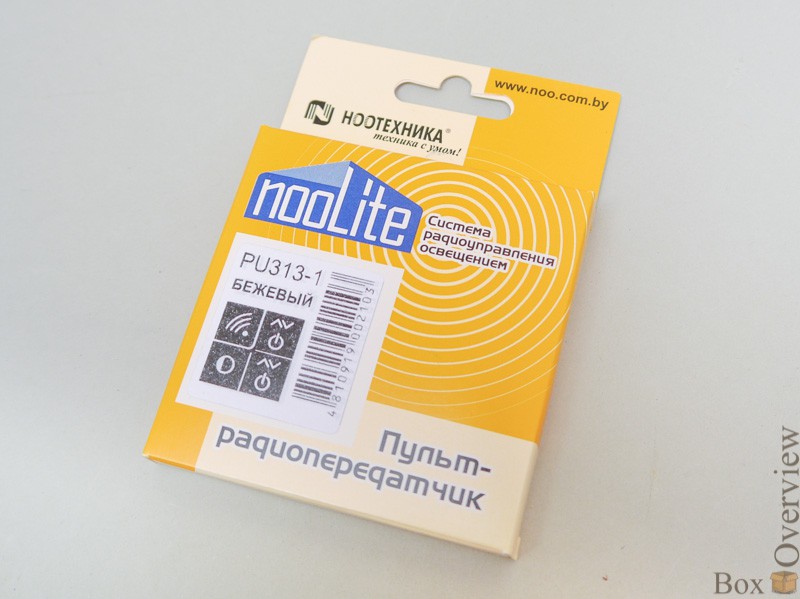
Each unit comes in a box like this:
With a story on the back side, why is this system the best:

And with enough detailed instructions inside:
Connect is easy.
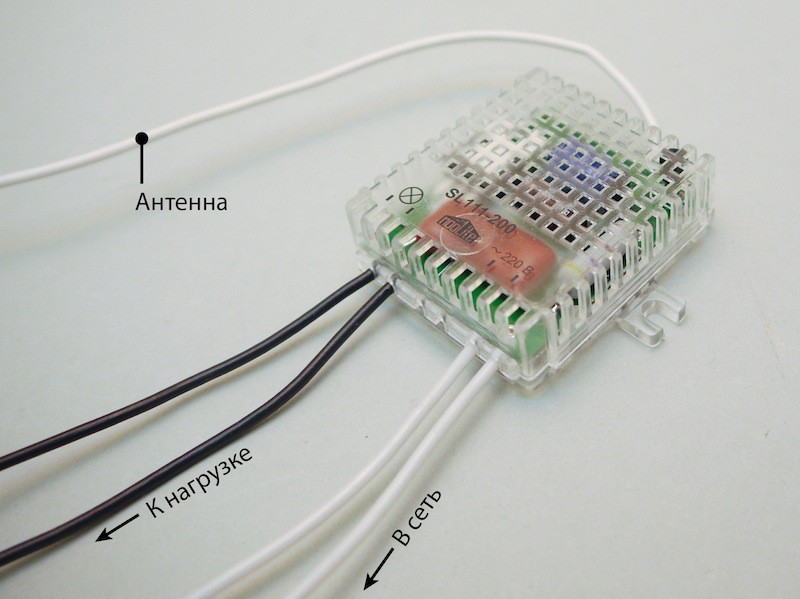
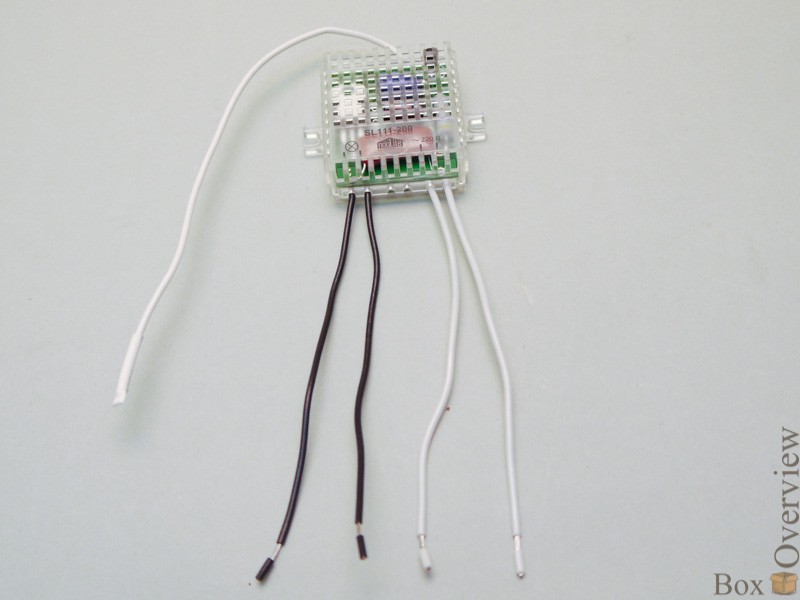
Where the crossed out circle and black wires - connect the lamp. Where is written 220 volts and white wires - this end is connected to the network. The location of the phase does not matter. One white wire is an antenna, you do not need to connect it anywhere, just pull it out. If you strongly bend or wrap around the case - it will not work, it simply will not accept the signal from the console. One inconvenience - the wires are stranded, and just do not insert into my favorite terminal blocks . I had to fool :)
Open by pushing the latches on the side:
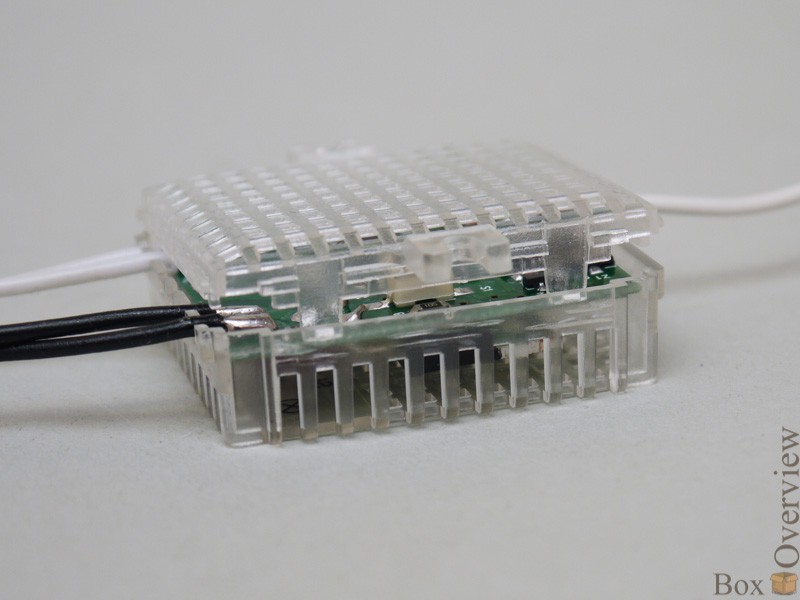
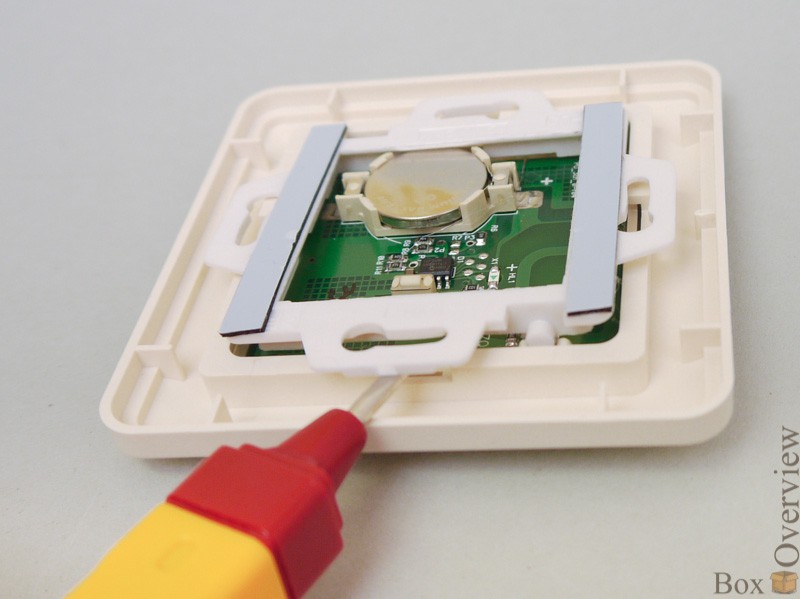
We remember that without disassembling the device, you can not be considered its full-fledged owner, right? :) Inside this shawl:
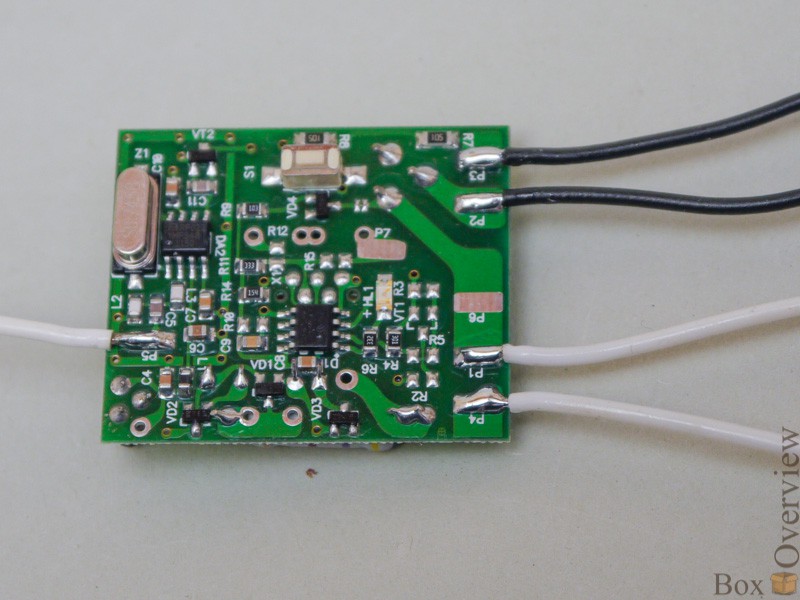
Two chips, a little bit loose, quartz, LED, button. On the other side:
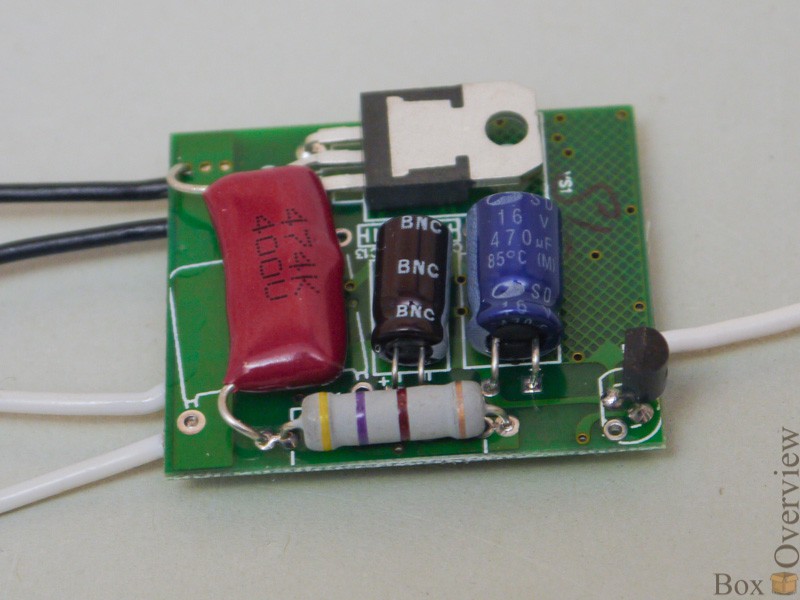
Triac, resistor, three capacitors. Condenser power, therefore. Accordingly, all parts of the system can potentially be energized, I do not recommend opening the case and touching the insides with your fingers if both wires are not disconnected.
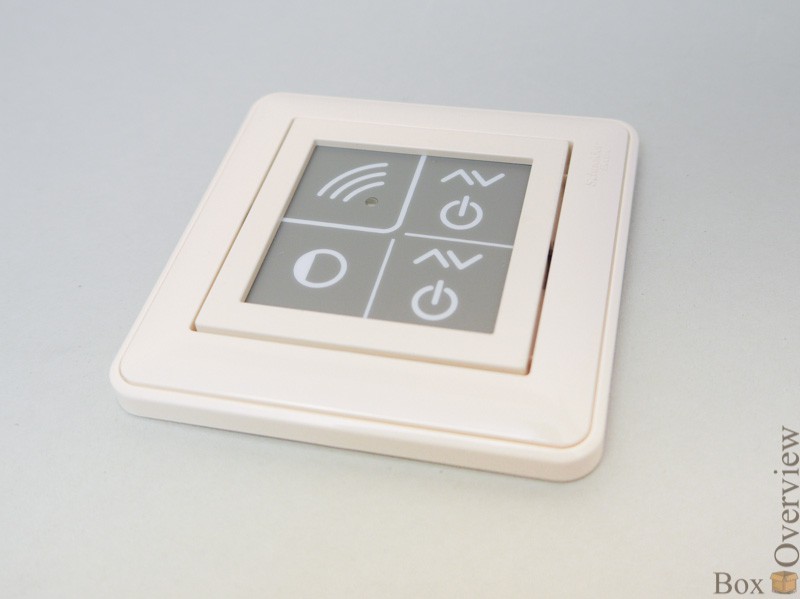
Flat thing with three touch buttons. Box:
Inside is also a guide:
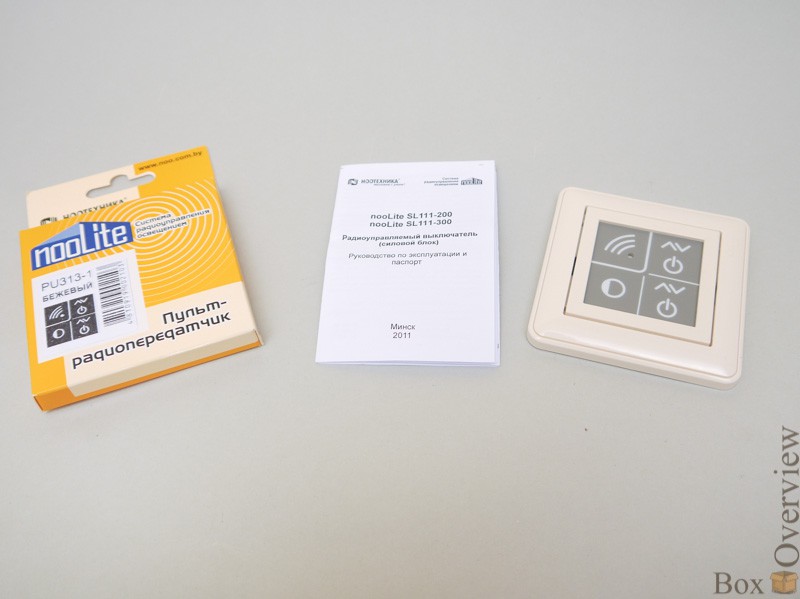
If anyone is curious to read, at the end of the article there is a link to the electronic version for the entire system, and in the album - a photo of the complete manuals.
There are three buttons in each remote, but the characters vary depending on the model. In the upper left corner just the LED:
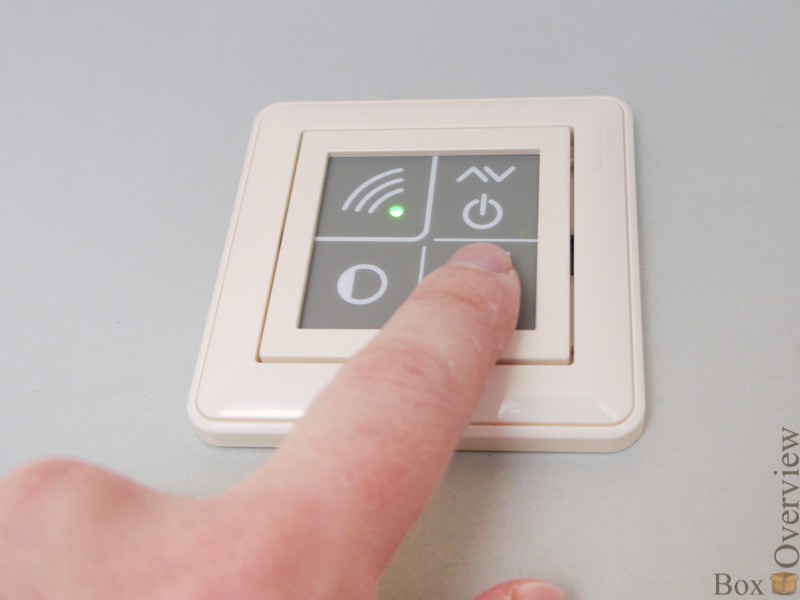
It lights up when you press any button, and also serves as an indicator of some modes. Turn over:

Board, fasteners for the screw, strips of adhesive tape for fasteners on flat surfaces.
Hook a screwdriver to learn more:
Frame, fasteners, and the remote control itself:
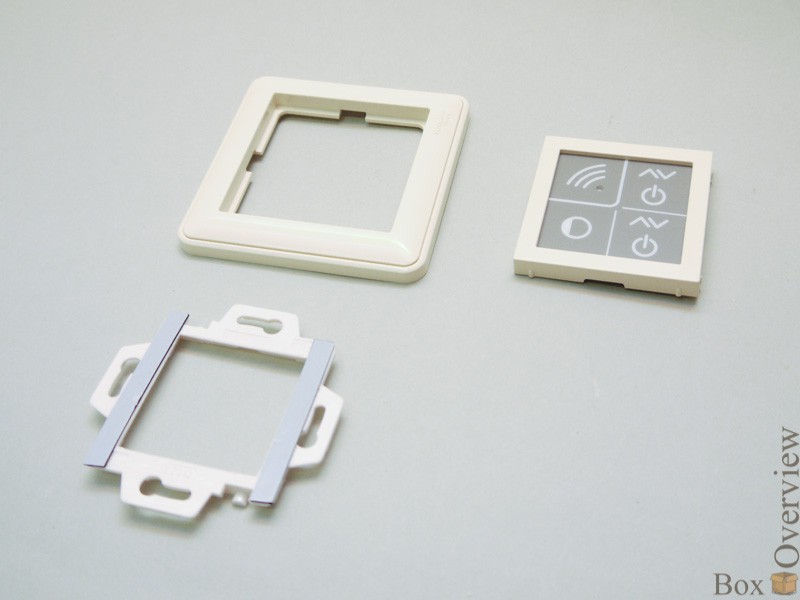
The console, in turn, also understands into three parts:

Frame, board, and plastic with images. To disassemble it, you need to carefully pick up two drops of hot melt glue that hold this sandwich together. Remote control board:
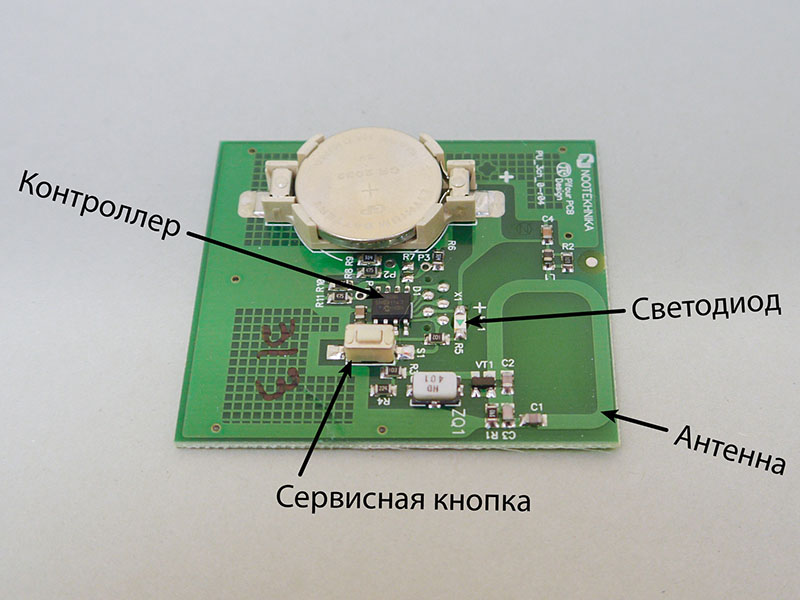
They promise that the battery (standard CR2032) will work for a year, with 4 taps per day. In principle, the promise is not so unfulfilled - the controller sleeps most of the time, and wakes up only to transmit a signal. The power of the transmitter is scanty.
Touch buttons:
Push - LED lights up.
So nothing is broken in the process of disassembly. Putting it back.
I am not particularly enthusiastic about the fully touch control, yet even a small clock button has a better tactile response. Well, that is, that is. I got used to it in a week :)

As befits a technophile, no chandeliers with curls, and two normal fluorescent lamps with electronic ballasts, each with two tubes of 36 watts.
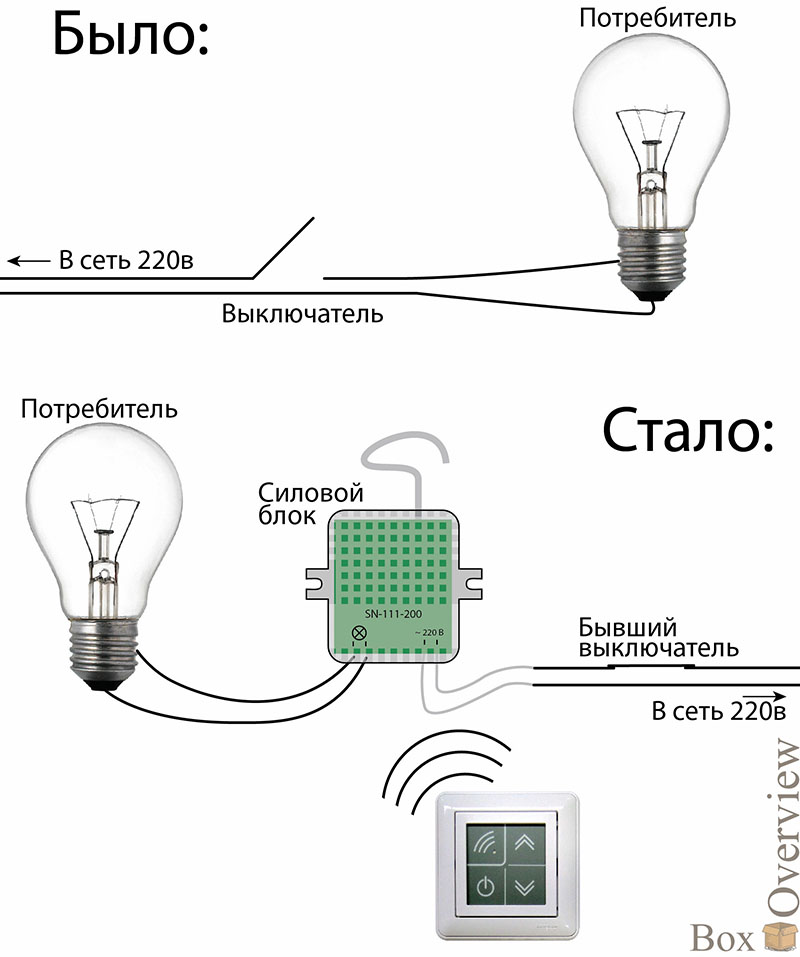
That's just the problem. It all shines like a few hundred-watt incandescent lamps, i.e. pretty bright. No, I don't mind, but at night, when everyone is sleeping, it would be good to leave only one lamp for the workers. The usual way to do this will not work - the switch and the wire in the wall is only one, the builders did not consider this option. And since I have already finished the repair, I don’t intend to hollow the walls anyway. This is where the system came in handy.
Hide it inside the lamp:
The main thing - do not forget to straighten the antenna. For the first time, I can’t understand why my console was buggy - it turned on a second time. It turned out the antenna was bent a couple of times, and even too close to the metal platform. Straightened, put away - everything works like a clock.
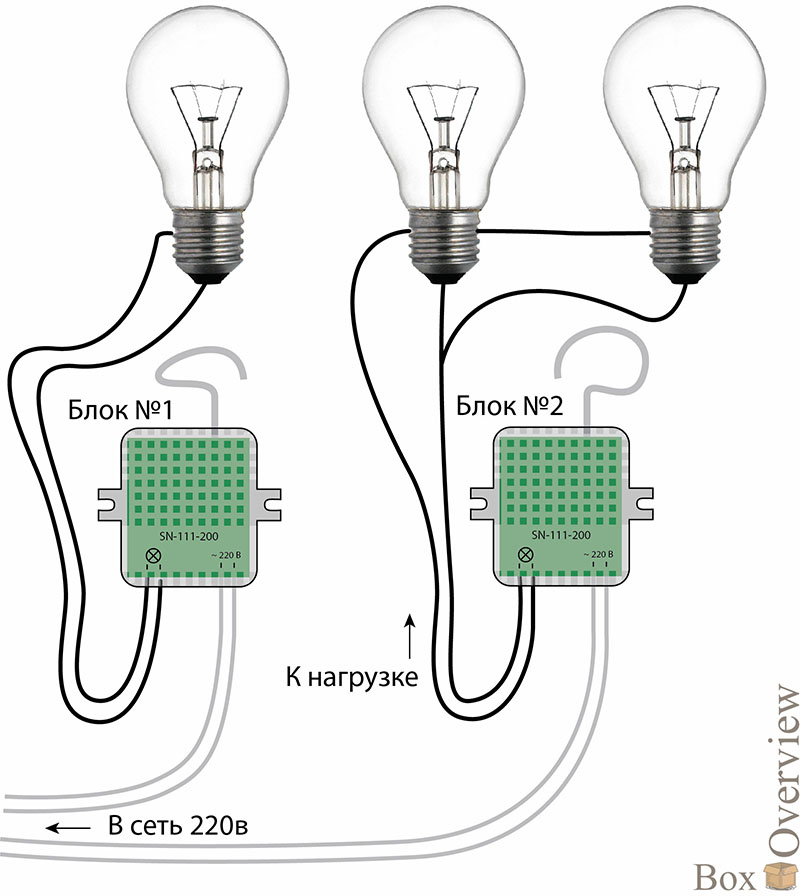
In general, the connection scheme looks like this:
In the off state, the power units glow green:
In fact, not so bright, I shot it at a shutter speed of a couple of seconds. Noticeable, but not in the way. It will interfere - to seal the tape with LED labor will not make.
We short the wires on each other - as if the switch was on all the time. We don't need it anymore. All switching will occur within the power blocks, which we set in the previous step.
We put a new switch. First - the mounting socket:

Then - attach the switch with the frame:
By itself, it is not necessary to put it in the same place - it will work from any place. I did so in order to close the traces of the last switch :) If you wish, you can put two switches and three - for the ability to turn on the light from any part of the hall or corridor, for example.
Now, using the button from the third item, you can turn on or off (or adjust the lighting - depending on the remote control) the unit from the first item.
That's it, we can turn the lights on and off in a new way. One lamp or another. Or both at once:

That is, it turned out like this:
I assigned to each lamp button:

The third button, on which a partially filled circle is drawn, is a scenario one. This means that it is possible to tie not only the switching on or off of the light, but any state of the system or of a separate unit. You can take a separate remote with three scenario buttons, and assign to one switch on the whole world, on the second - turn off, and on the third - turn on one lamp, comfortable for watching TV, for example.
This is also very simple. First you need to bind each block that will participate in future scenarios to this button. Everything is the same, but after pressing the service button, we press the scenario button, wait for confirmation, exit the binding mode. Repeat with all blocks. Then we turn on / off / adjust the brightness of all the lamps with other buttons, and write the script - press and hold the scenario button. After two seconds, all the blocks blink light - the script is recorded. Now, when you press this button, all the blocks will accept the state they were in at the time of recording — turn on, turn off, or set brightness.
It is worth saying that the installation time was spent about four hours, including photographing.
$ 17.5 + $ 17.5 + $ 16 = $ 51. Yes, a little more than 10 meters of wire and switch, but without wiring over the wallpaper or shtenleniya walls. Yes, and the installation is quite convenient.
Review from AlexeyNadezhin
Review from LLeo Kaganov
Application in the project MajorDomo
NooLite System User Guide
If you do not have an account on Habrahabr, you can read and comment on our articles on BoxOverview.com
The system includes several types of switches (those that are hung on the wall), and several types of power units (those through which the lamps are connected). Connecting all this results in a lighting control system in the whole house, which can control each lamp individually or all the lamps in the room or in the whole house. The system is well expandable, has the ability to customize the scenarios up to the brightness of each channel.
Well, enough
The system is positioned as a replacement for conventional switches. For example, if you have two chandeliers with a bunch of lamps, and there is only one wire from the switch. But you really want to be able to turn on the chandeliers individually, and even better - both the chandeliers individually, and one lamp separately, such as a night light. This problem is such a system and is designed to solve.
Well, I promised less descriptions. Let's figure out what the system is.
About power units
The power unit is such aIf you look closely, there is a symbol on it:
SL-111-200. The first two letters are a block type, it means which lamps can be connected to this block.
')
SN - Incandescent lamps, halogen lamps, including 12 volts (through a transformer).
ST - Halogen lamps at 12 volts (electronic power supply).
SL - Fluorescent and energy-saving lamps, LED lamps, and any other load.
The first two support brightness control, while the latter type does not. But through it you can connect fluorescent lamps.
The last digits indicate the power that can be connected through such a unit. 200 is 200 watts, there are 300, 500 and as many as 3 and 5 kilowatts. Even the searchlights and heaters can be switched on through the last two, so that such a need arises.
Each unit comes in a box like this:
With a story on the back side, why is this system the best:
And with enough detailed instructions inside:
Connect is easy.
Where the crossed out circle and black wires - connect the lamp. Where is written 220 volts and white wires - this end is connected to the network. The location of the phase does not matter. One white wire is an antenna, you do not need to connect it anywhere, just pull it out. If you strongly bend or wrap around the case - it will not work, it simply will not accept the signal from the console. One inconvenience - the wires are stranded, and just do not insert into my favorite terminal blocks . I had to fool :)
Open by pushing the latches on the side:
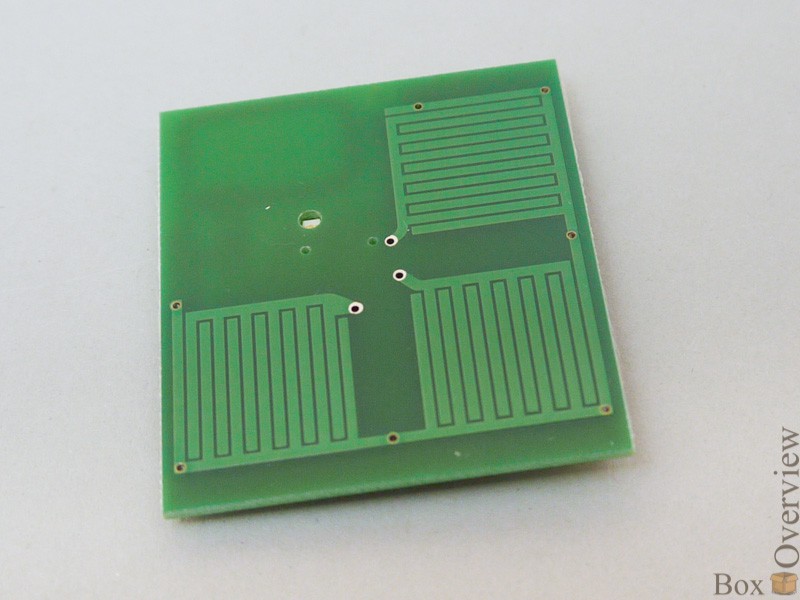
We remember that without disassembling the device, you can not be considered its full-fledged owner, right? :) Inside this shawl:
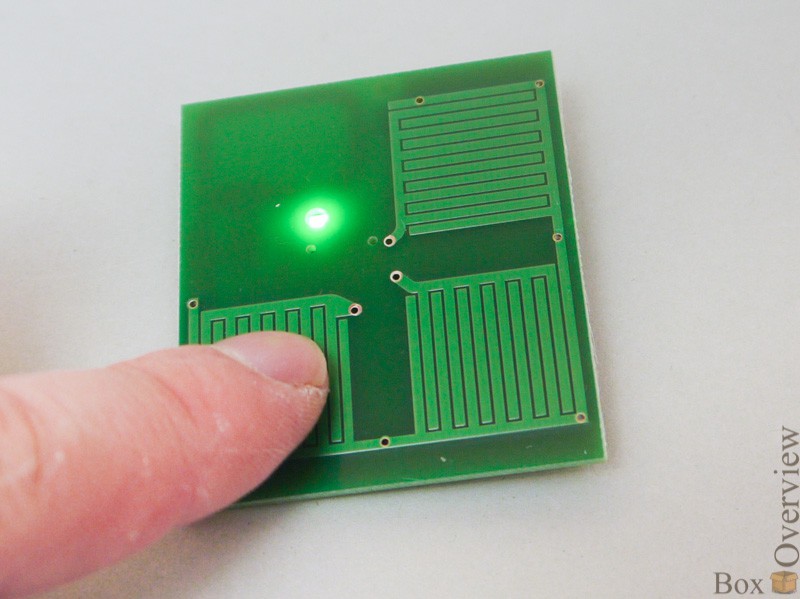
Two chips, a little bit loose, quartz, LED, button. On the other side:
Triac, resistor, three capacitors. Condenser power, therefore. Accordingly, all parts of the system can potentially be energized, I do not recommend opening the case and touching the insides with your fingers if both wires are not disconnected.
About switches:
Switch, or rather the remote control:Flat thing with three touch buttons. Box:
Inside is also a guide:
If anyone is curious to read, at the end of the article there is a link to the electronic version for the entire system, and in the album - a photo of the complete manuals.
There are three buttons in each remote, but the characters vary depending on the model. In the upper left corner just the LED:
It lights up when you press any button, and also serves as an indicator of some modes. Turn over:
Board, fasteners for the screw, strips of adhesive tape for fasteners on flat surfaces.
Hook a screwdriver to learn more:
Frame, fasteners, and the remote control itself:
The console, in turn, also understands into three parts:
Frame, board, and plastic with images. To disassemble it, you need to carefully pick up two drops of hot melt glue that hold this sandwich together. Remote control board:
They promise that the battery (standard CR2032) will work for a year, with 4 taps per day. In principle, the promise is not so unfulfilled - the controller sleeps most of the time, and wakes up only to transmit a signal. The power of the transmitter is scanty.
Touch buttons:
Push - LED lights up.
So nothing is broken in the process of disassembly. Putting it back.
I am not particularly enthusiastic about the fully touch control, yet even a small clock button has a better tactile response. Well, that is, that is. I got used to it in a week :)
Connection
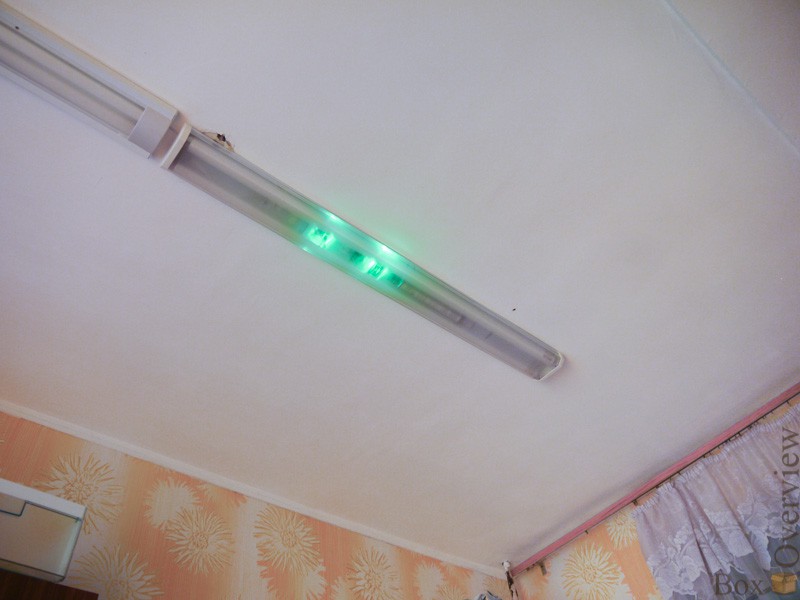
Of course, a review of such a thing without use is garbage, not a review. Yes, and it would be foolish to photograph it, do not install. So, my kitchen:As befits a technophile, no chandeliers with curls, and two normal fluorescent lamps with electronic ballasts, each with two tubes of 36 watts.
That's just the problem. It all shines like a few hundred-watt incandescent lamps, i.e. pretty bright. No, I don't mind, but at night, when everyone is sleeping, it would be good to leave only one lamp for the workers. The usual way to do this will not work - the switch and the wire in the wall is only one, the builders did not consider this option. And since I have already finished the repair, I don’t intend to hollow the walls anyway. This is where the system came in handy.
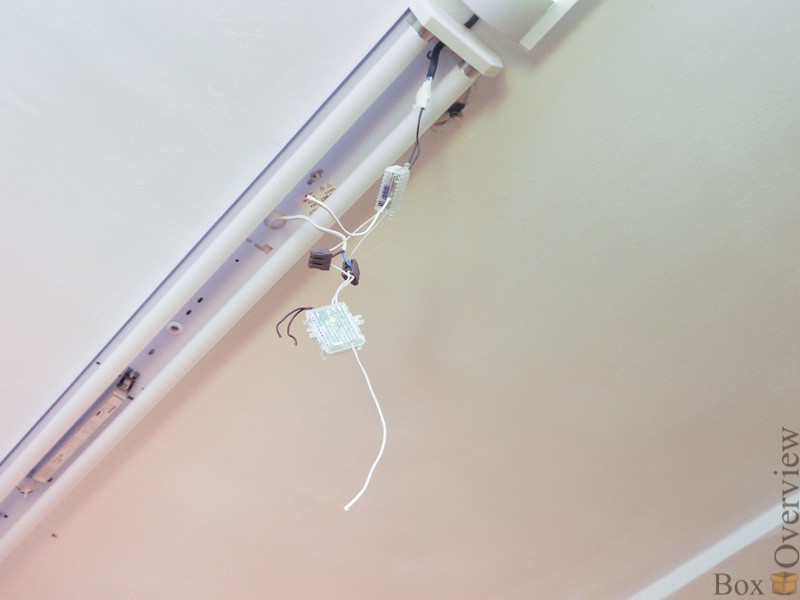
We do it once:
We remove the cover, we connect two power units to two lamps:Hide it inside the lamp:
The main thing - do not forget to straighten the antenna. For the first time, I can’t understand why my console was buggy - it turned on a second time. It turned out the antenna was bent a couple of times, and even too close to the metal platform. Straightened, put away - everything works like a clock.
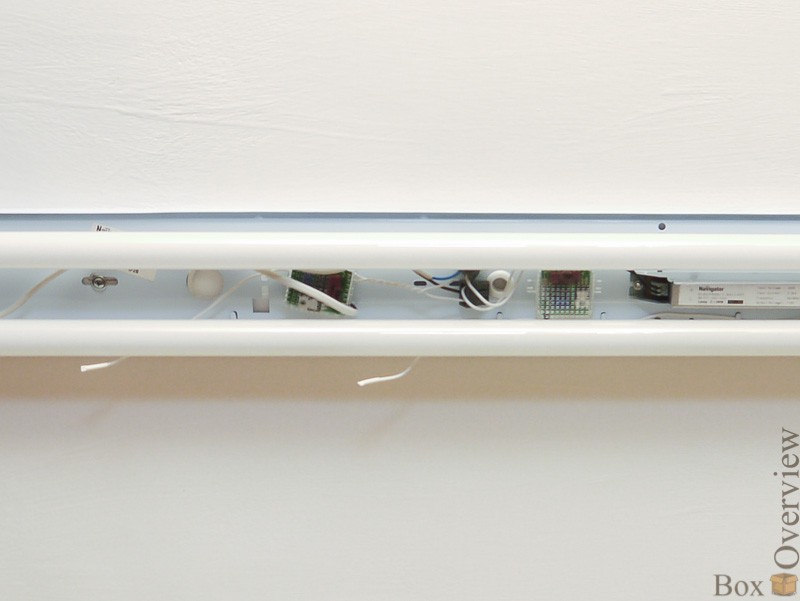
In general, the connection scheme looks like this:
In the off state, the power units glow green:
In fact, not so bright, I shot it at a shutter speed of a couple of seconds. Noticeable, but not in the way. It will interfere - to seal the tape with LED labor will not make.
Making two:
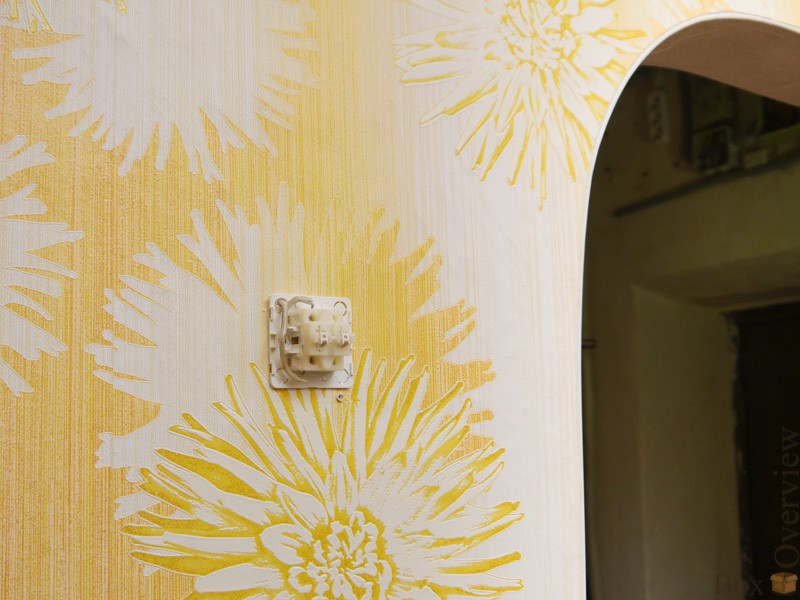
Remove the old switch:We short the wires on each other - as if the switch was on all the time. We don't need it anymore. All switching will occur within the power blocks, which we set in the previous step.
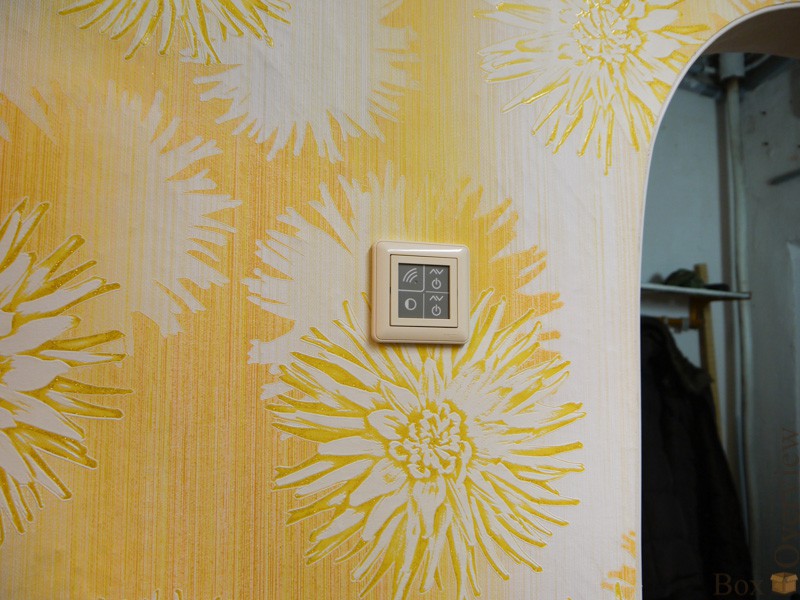
We put a new switch. First - the mounting socket:
Then - attach the switch with the frame:
By itself, it is not necessary to put it in the same place - it will work from any place. I did so in order to close the traces of the last switch :) If you wish, you can put two switches and three - for the ability to turn on the light from any part of the hall or corridor, for example.
Do three:
Bind the switch to the power units. If you have a set (there are 7 sets, for the most common applications), then you don’t need to do anything - the remote control and the unit are already connected. If you have purchased them separately, they must be linked before use. This is done simply:- We press the button on the power unit (the back surface is flexible, and it is not necessary to disassemble it - just squeeze it from two sides). The LED on it will start flashing slowly.
- Press the service button on the remote control. The LED on the remote control lights up.
- Click the button that we want to assign to this power unit. The LED on the remote control will go out, and on the unit it will blink quickly.
- Confirm the binding by clicking the button on the block again. The LED on the unit will begin to flash slowly - waiting for another binding. You can connect to it another button, or another remote. If you do not need it - press the button again, the block goes out of the binding mode.
Now, using the button from the third item, you can turn on or off (or adjust the lighting - depending on the remote control) the unit from the first item.
That's it, we can turn the lights on and off in a new way. One lamp or another. Or both at once:
That is, it turned out like this:
I assigned to each lamp button:
The third button, on which a partially filled circle is drawn, is a scenario one. This means that it is possible to tie not only the switching on or off of the light, but any state of the system or of a separate unit. You can take a separate remote with three scenario buttons, and assign to one switch on the whole world, on the second - turn off, and on the third - turn on one lamp, comfortable for watching TV, for example.
This is also very simple. First you need to bind each block that will participate in future scenarios to this button. Everything is the same, but after pressing the service button, we press the scenario button, wait for confirmation, exit the binding mode. Repeat with all blocks. Then we turn on / off / adjust the brightness of all the lamps with other buttons, and write the script - press and hold the scenario button. After two seconds, all the blocks blink light - the script is recorded. Now, when you press this button, all the blocks will accept the state they were in at the time of recording — turn on, turn off, or set brightness.
It is worth saying that the installation time was spent about four hours, including photographing.
Cost of
On the website of Nootekhnika such a set that I used is worth$ 17.5 + $ 17.5 + $ 16 = $ 51. Yes, a little more than 10 meters of wire and switch, but without wiring over the wallpaper or shtenleniya walls. Yes, and the installation is quite convenient.
References:
Official siteReview from AlexeyNadezhin
Review from LLeo Kaganov
Application in the project MajorDomo
NooLite System User Guide
If you do not have an account on Habrahabr, you can read and comment on our articles on BoxOverview.com
Source: https://habr.com/ru/post/165131/
All Articles