Creating a TV channel on the Internet using a home computer
I somehow fired up with the thought of creating my own TV channel, rummaged around the Internet well, and ran into several technical problems that could not be solved or were solved, but very expensive for the hobby of an ordinary citizen. And I abandoned this idea literally until the middle of last summer until I learned that there are no more barriers to creating my own TV.
Now let's start talking about everything and in order:
The first thing I would like to tell about is the technical difficulties that I encountered in the past, the most insurmountable and expensive in my opinion was the problem that by creating any less decent broadcast you can show it only to a limited circle of people. But with the advent of torrent stream broadcasts, everything has changed.
Option 1 (budget and with the lowest load on the machine) - VLC media player, acestream (torrentstream). Everything will work on both Windows and Linux.
')
Variant 2 (under Windows only) - VLC media player, acestream (torrentstream), XSplit Broadcaster and / or VH Screen Capture driver, as well as Virtual Audio Cable.
Consider first a simpler option but a bit limited in capabilities.
- Installing and running Torrentstream with it will immediately become the VLC media player.
- Run VLC (hereinafter referred to as the WLC).
- Add to the playlist folder with the video you want to play. (I’ll make a reservation at once why the folder, in the WLC there is a glitch when adding a new streaming broadcast to the playlist, it starts to automatically play the last added, instead of adding it to the queue, so if you don’t want the audience to start a new movie in half of the movie from the video and then run it all into the stream and then work with the playlist)
- In the playlist, right-click on the folder with the video and select - Stream.
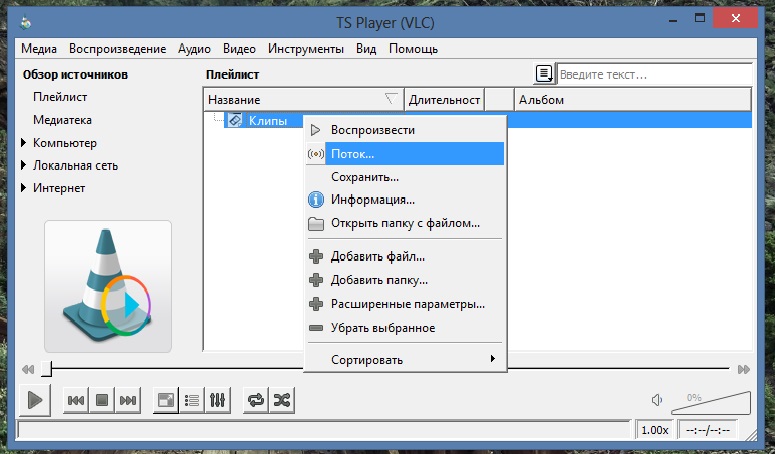
- Further, if we are familiar with broadcasting in the WLC, we set up the video for ourselves (but definitely in mpeg and with ts encapsulation), and if not, then click twice (the next one) until such a window appears

- and insert this text there:
: sout = # transcode {width = 1024, height = 576, vcodec = h264, vb = 1900, deinterlace, fps = 25, acodec = mp3, ab = 96, channels = 2, samplerate = 44100, venc = x264 {vbv- bufsize = 5000, vbv-maxrate = 2100, ref = 1, subme = 1, keyint = 50}}: std {access = http, mux = ts, dst =: 8089 /}
In short, it means that the video you are broadcasting will look like:
video 1024x576, transfer rate 1900
audio stream rate 96, frequency 44100
dst =: 8089 is the port on which the broadcast will occur, can be changed to arbitrary.
- So streaming went. To view it and make sure that it goes, we include one more WLC and select Media / Open URL / Network where we enter http: // (your ip address): 8089 / if you changed the port instead of 8089, insert your own.
Example: (http://93.70.212.105:8089/)
This method of broadcasting is universal in that any video format can be used as a video material, but transcoding video WLC spends quite a lot of processor power, if you want to reduce costs, you need to transcode video to any type with characteristics that suit you and start encapsulation mux = ts.
Example code for broadcasting in the WLC:
: sout = # std {access = http, mux = ts, dst =: 8089 /}
- Right-click on the icon torren stream near the clock. and click Broadcasting.
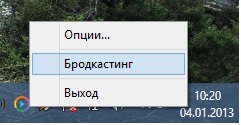
- Next, in the Internet browser, a window will unfold in which we enter the characteristics of our broadcast.

Name: our broadcast name
Cache directory: Leave unchanged.
Source (MPEG-TS HTTP stream): the address of the stream you created http: // (your ip address): 8089 /
Bitrate (kbit / s): the bitrate of your broadcast, I usually have 5000
300-500kbit 480x270 (360x240)
Timeshift (HH: MM: SS): no touch
Piece length: optional
Trackers: leave them though you can add others if you want.
Port: also optional
Host: if there is a router, and without it we enter your ip address without http: // numbers only (example: 98.77.45.122)
- Click createstream
Now your broadcast is distributed using torrent stream technology, which means that the more users will watch your TV, the more stable its signal will be (in theory). After the broadcast was created in the browser, a new window will pop up a little later:
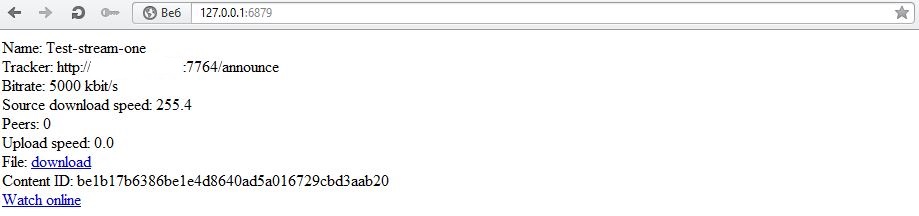
where will go your broadcast, as well as a link to the online player with it.
Detailed instructions for launching a torrent stream under Linux can be found here: wiki.acestream.org/wiki/index.php/Streaming#Timeshift
Next, we place our TV on yet the only known site for me battery torrent broadcasts torrent-tv.ru
Or on any other site by inserting the player code, a description of how to do it here: wiki.acestream.org/wiki/index.php/WebPlugin
And everything would be fine, but VLTS with its playlist is not the program that I would like to see as the control panel of my TV channel. Certainly it has many advantages, you can insert a logo, adjust color gamuts, put a huge number of filters, and in the end for those who are friends with the code, you can manually register anything you want.
But laziness is laziness and I just wanted to be able to start the broadcast as easy as adding your favorite music to Winamp on your desktop. for which I had to dance a little with Buna, to turn everything out, to get the processor load by almost 90%, but to achieve my goal.
So what is my second option.
Vlc is remarkable for the fact that it can send a stream and with DiretShow, tobish just showing your desktop on which you can turn on video in your favorite player. But here, too, there is a problem if there is video on the table where to work and conjure video by frame? In this, XSplit Broadcaster and / or VH Screen Capture driver came to the rescue, as well as optional Virtual Audio Cable.
- Create a virtual monitor.
- Open the "Screen Resolution"
- We are looking for the "Find" button
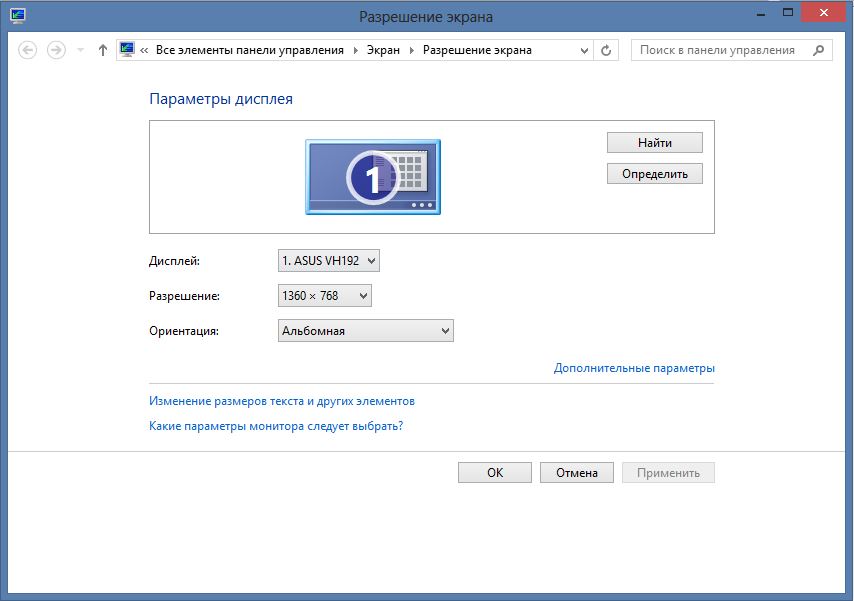
- Click on the empty display.
- Choose to try anyway
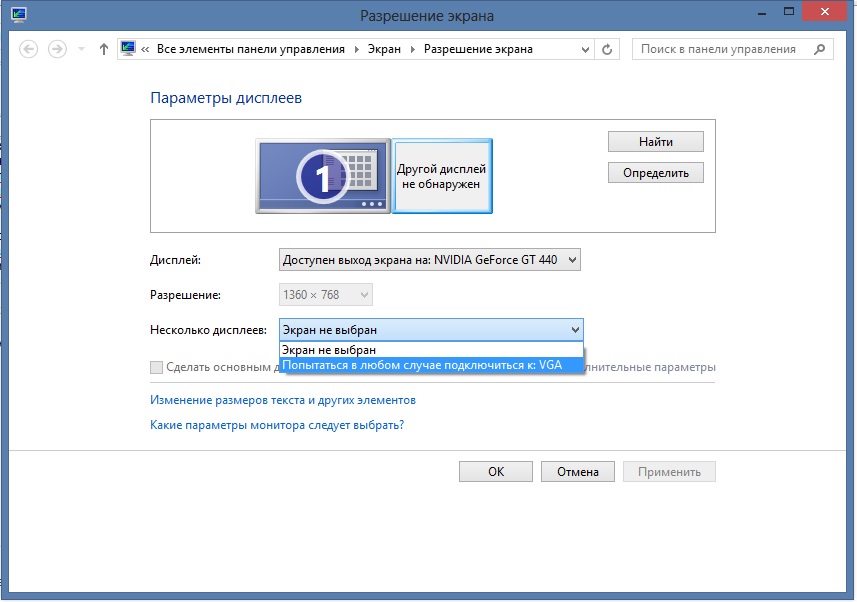
- Click to apply
- Next, choose to expand the screen
- Click to apply
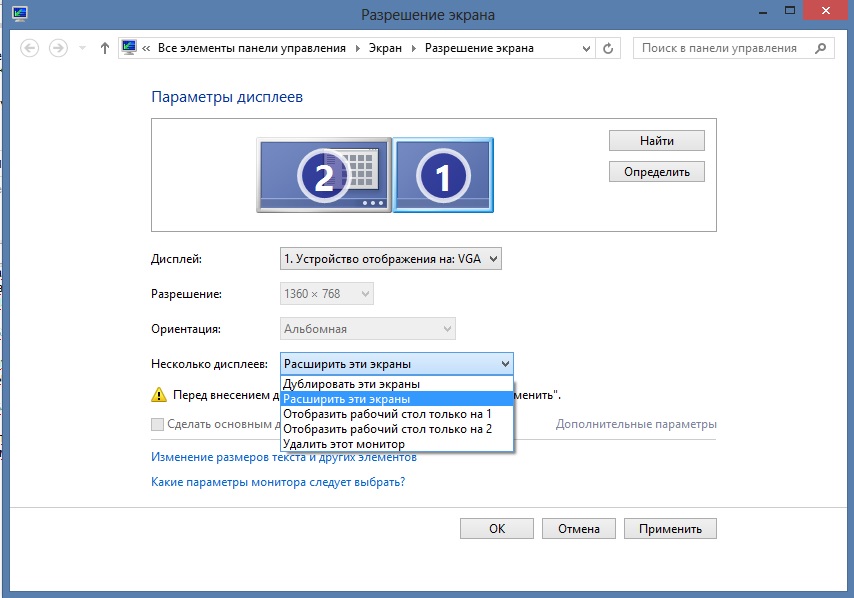
- We choose the resolution of the virtual monitor, I have 1280x720 (any other can be, the resolution of the video you are broadcasting will depend on this)
- Click OK.
So the virtual monitor is created, then install the program VH Screen Capture driver. XSplit Broadcaster is her older brother, but in the first program there is still no watermark implementation in the free version, so we take it.
- From the whole established package we start “Config”
- Choose “create new one”
- Go to Capture, select Track screen and Select. Then we take the mouse to the right on the second screen and click on it.

- Next, go to the second tab and set the video resolution of what size you want to get at the output, the number of frames from 24 to 90 (I advise you to put more than 30 then the picture does not slow down), select black and remove all the checkboxes in the left column except “show mouse "

- We do not close the whole program, we leave it hanging on the table.
- Now run the WLC and click on Media / Streaming / Capture Resistance
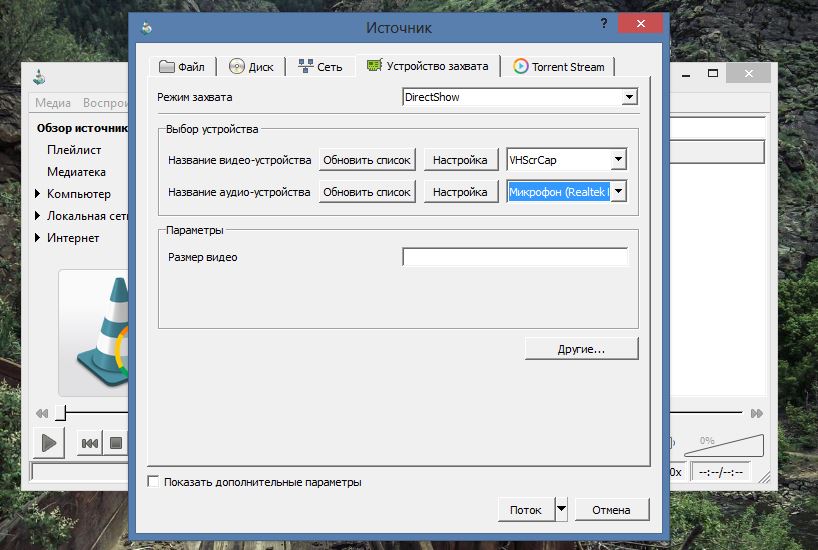
- Select DiretShow, and in it the video VHScrCap, audio, select the "microphone"
(It is possible in the advanced settings to change the video ratio from the default 4: 3 to 16: 9)
- Next, click "stream" and do everything according to the scheme described in the first part of this post.
Yes, for normal audio playback, you need to connect the output cord to the speakers and the microphone input with a physical cord (select the right jacks and check if the sound on the mixer shows the volume before the broadcast), you can also use Virtual Audio Cable if you do not want to connect physically.
Well, that's it, now we launch your favorite video player and ask it a playlist (by the way, it is better to detach it) drag the video player to the second virtual screen and expand it.
P.S
I have not touched the XSplit Broadcaster program, although it also deserves attention, but you can choose it as the source of image and sound in the WLC, I think it will not be more difficult.
Now let's start talking about everything and in order:
The first thing I would like to tell about is the technical difficulties that I encountered in the past, the most insurmountable and expensive in my opinion was the problem that by creating any less decent broadcast you can show it only to a limited circle of people. But with the advent of torrent stream broadcasts, everything has changed.
So, if you want to organize your own TV channel on the Internet, we will need a list of necessary programs for this:
Option 1 (budget and with the lowest load on the machine) - VLC media player, acestream (torrentstream). Everything will work on both Windows and Linux.
')
Variant 2 (under Windows only) - VLC media player, acestream (torrentstream), XSplit Broadcaster and / or VH Screen Capture driver, as well as Virtual Audio Cable.
Let's get started
Consider first a simpler option but a bit limited in capabilities.
- Installing and running Torrentstream with it will immediately become the VLC media player.
- Run VLC (hereinafter referred to as the WLC).
- Add to the playlist folder with the video you want to play. (I’ll make a reservation at once why the folder, in the WLC there is a glitch when adding a new streaming broadcast to the playlist, it starts to automatically play the last added, instead of adding it to the queue, so if you don’t want the audience to start a new movie in half of the movie from the video and then run it all into the stream and then work with the playlist)
- In the playlist, right-click on the folder with the video and select - Stream.
- Further, if we are familiar with broadcasting in the WLC, we set up the video for ourselves (but definitely in mpeg and with ts encapsulation), and if not, then click twice (the next one) until such a window appears
- and insert this text there:
: sout = # transcode {width = 1024, height = 576, vcodec = h264, vb = 1900, deinterlace, fps = 25, acodec = mp3, ab = 96, channels = 2, samplerate = 44100, venc = x264 {vbv- bufsize = 5000, vbv-maxrate = 2100, ref = 1, subme = 1, keyint = 50}}: std {access = http, mux = ts, dst =: 8089 /}
In short, it means that the video you are broadcasting will look like:
video 1024x576, transfer rate 1900
audio stream rate 96, frequency 44100
dst =: 8089 is the port on which the broadcast will occur, can be changed to arbitrary.
- So streaming went. To view it and make sure that it goes, we include one more WLC and select Media / Open URL / Network where we enter http: // (your ip address): 8089 / if you changed the port instead of 8089, insert your own.
Example: (http://93.70.212.105:8089/)
This method of broadcasting is universal in that any video format can be used as a video material, but transcoding video WLC spends quite a lot of processor power, if you want to reduce costs, you need to transcode video to any type with characteristics that suit you and start encapsulation mux = ts.
Example code for broadcasting in the WLC:
: sout = # std {access = http, mux = ts, dst =: 8089 /}
The minus of pure broadcasting in the form is a limited number of viewers, so we proceed to launch this broadcast through the torrent stream.
For Windows.
- Right-click on the icon torren stream near the clock. and click Broadcasting.
- Next, in the Internet browser, a window will unfold in which we enter the characteristics of our broadcast.
Name: our broadcast name
Cache directory: Leave unchanged.
Source (MPEG-TS HTTP stream): the address of the stream you created http: // (your ip address): 8089 /
By the way, if you have a dynamic type of IP , you should think about DynDNS (like www.no-ip.com ), because go broadcast if it’s gone or you restart it, it will remain unchanged only if all the specified data will be the same. And without a permanent ID, viewers won't find your channel.
Bitrate (kbit / s): the bitrate of your broadcast, I usually have 5000
300-500kbit 480x270 (360x240)
500-800kbit 640x360 (480x360)
800-1200kbit 768x432 (640x480)
1200-2000kbit 1024x576 (720x576)
2000-5000kbit 1280x720 HD720p
5000-12000kbit 1920x1080 FullHD 1080p
Timeshift (HH: MM: SS): no touch
Piece length: optional
Trackers: leave them though you can add others if you want.
Port: also optional
Host: if there is a router, and without it we enter your ip address without http: // numbers only (example: 98.77.45.122)
- Click createstream
Now your broadcast is distributed using torrent stream technology, which means that the more users will watch your TV, the more stable its signal will be (in theory). After the broadcast was created in the browser, a new window will pop up a little later:
where will go your broadcast, as well as a link to the online player with it.
For Linux
Detailed instructions for launching a torrent stream under Linux can be found here: wiki.acestream.org/wiki/index.php/Streaming#Timeshift
We place our television
Next, we place our TV on yet the only known site for me battery torrent broadcasts torrent-tv.ru
Or on any other site by inserting the player code, a description of how to do it here: wiki.acestream.org/wiki/index.php/WebPlugin
And nothing but ...
And everything would be fine, but VLTS with its playlist is not the program that I would like to see as the control panel of my TV channel. Certainly it has many advantages, you can insert a logo, adjust color gamuts, put a huge number of filters, and in the end for those who are friends with the code, you can manually register anything you want.
But laziness is laziness and I just wanted to be able to start the broadcast as easy as adding your favorite music to Winamp on your desktop. for which I had to dance a little with Buna, to turn everything out, to get the processor load by almost 90%, but to achieve my goal.
So what is my second option.
Vlc is remarkable for the fact that it can send a stream and with DiretShow, tobish just showing your desktop on which you can turn on video in your favorite player. But here, too, there is a problem if there is video on the table where to work and conjure video by frame? In this, XSplit Broadcaster and / or VH Screen Capture driver came to the rescue, as well as optional Virtual Audio Cable.
And now about everything in order
- Create a virtual monitor.
- Open the "Screen Resolution"
- We are looking for the "Find" button
- Click on the empty display.
- Choose to try anyway
- Click to apply
- Next, choose to expand the screen
- Click to apply
- We choose the resolution of the virtual monitor, I have 1280x720 (any other can be, the resolution of the video you are broadcasting will depend on this)
- Click OK.
So the virtual monitor is created, then install the program VH Screen Capture driver. XSplit Broadcaster is her older brother, but in the first program there is still no watermark implementation in the free version, so we take it.
- From the whole established package we start “Config”
- Choose “create new one”
- Go to Capture, select Track screen and Select. Then we take the mouse to the right on the second screen and click on it.
- Next, go to the second tab and set the video resolution of what size you want to get at the output, the number of frames from 24 to 90 (I advise you to put more than 30 then the picture does not slow down), select black and remove all the checkboxes in the left column except “show mouse "
- We do not close the whole program, we leave it hanging on the table.
- Now run the WLC and click on Media / Streaming / Capture Resistance
- Select DiretShow, and in it the video VHScrCap, audio, select the "microphone"
(It is possible in the advanced settings to change the video ratio from the default 4: 3 to 16: 9)
- Next, click "stream" and do everything according to the scheme described in the first part of this post.
Yes, for normal audio playback, you need to connect the output cord to the speakers and the microphone input with a physical cord (select the right jacks and check if the sound on the mixer shows the volume before the broadcast), you can also use Virtual Audio Cable if you do not want to connect physically.
Well, that's it, now we launch your favorite video player and ask it a playlist (by the way, it is better to detach it) drag the video player to the second virtual screen and expand it.
These dances with a tambourine need to be done in order to create your own Internet TV for an unlimited number of viewers, then the broadcast depends only on your imagination.
Good luck.
P.S
I have not touched the XSplit Broadcaster program, although it also deserves attention, but you can choose it as the source of image and sound in the WLC, I think it will not be more difficult.
Source: https://habr.com/ru/post/164889/
All Articles