Programming for Android for beginners. Part 1
Hello. Today I came across a post about the Android programming course on the Linux Foundation site, and with it a lot of comments about how I would like to see the translation of these lessons. Since I now, after four years of development for microcontrollers, began to study and programming for mobile devices, I simultaneously decided to translate the first part of the lesson.
Android smartphones and tablets are increasingly found in our bags and pockets, and Android programming is also becoming more and more popular. This is a great development platform - the API is well documented and easy to use, and it’s just fun to create something that you can run on your smartphone. Initially, you can do without it by creating and testing the code using an emulator on your Linux PC. The first of the two parts of this introduction explains how to create a simple application with a timer, as well as provides initial information about the Android API. The course implies the presence of initial ideas about Java, XML and programming technologies, but nevertheless feel free to try even if you have a very vague idea about this.
')
A bit about versions: the latest version of Android is 4.2 (Jelly Bean), but, as you can see from this diagram , it is still not widespread. It is best to start development under one of the versions: 4.0 (Ice Cream Sandwich) or 2.3 (Gingerbeard), especially since Android versions support backward compatibility (i.e., your code for version 2.3 will work on 4.2), and Applications developed for later versions will not always work on the old ones. The code given here should work on versions 4.0 and 2.3.
The easiest way to get a development environment is to install the Android Bundle, which can be downloaded here . You will also need JDK 6 (not just JRE). Do not forget that Android is not compatible with gcj. If you already use Eclipse or another IDE, then you can try to configure it for Android. How to do it - described here . Now create a project called Countdown using Eclipse , or from the command line . I installed BuildSDK 4.0.3 and minimum SDK 2.2 in the settings, and (in Eclipse) I used the BlankActivity template.
Our first Android program will be a timer showing a countdown from 10 seconds after a button is pressed. Before writing the code, you need to create an interface - what the user sees by running our application. You need to open res / layout / activity_countdown.xml and create an XML template — use the Eclipse editor or the text / XML editor to enter the following:
Pay attention to string / start and string / __ 00_30. Their values will be located in res / values / strings.xml:
This is a common way to access resources in Android: it is better to use references to string variables than hard-coded strings.
Now let's open the file CountdownActivity.java in the editor - and we are ready to write the code of our application. You should see the automatically generated stub of the onCreate () method. It is always called as soon as the Activity object is created, and in it you can put any functions that should be executed when the application starts. (Eclipse can also create an empty onCreateOptionsMenu () method, but we will not pay attention to it yet). Enter the following code:
You see how easy it turned out to create our first project: Android API includes CountDownTimer, which we can use. We declared it and the countdown display field as private properties of the Activity class. In the onCreate () method, we used the setContentView method to include our XML template. This R.foo.bar syntax is the standard way to access XML resources on Android, and we will meet with it many more times.
findViewById is another method you'll use often. Here it returns links to the timer output field and the Start button described in the XML template. For a button, so that we can handle its pressing, the OnClickListener interceptor and its onClick () method must be specified. Here he simply calls the showTimer () method with the specified number of milliseconds (now hardcoded in the code).
So, what showTimer () does:
The CountDownTimer class does almost all the work for us, which is very nice. In the beginning, we check to see if the timer already exists, and if it exists, then reset it. Next, we create a new timer with the specified number of milliseconds for the countdown (from the parameter of the showTimer () method) and with the specified number of milliseconds between the intervals. When the time between intervals expires, the onTick () method is called.
CountDownTimer is an abstract class, and the __onTick () and __onFinish () methods must be implemented in its subclass. We override the onTick () method, which reduces the displayed number by one after each interval, and the onFinish () method, which displays a message about the end of the countdown. Then start () starts the timer.
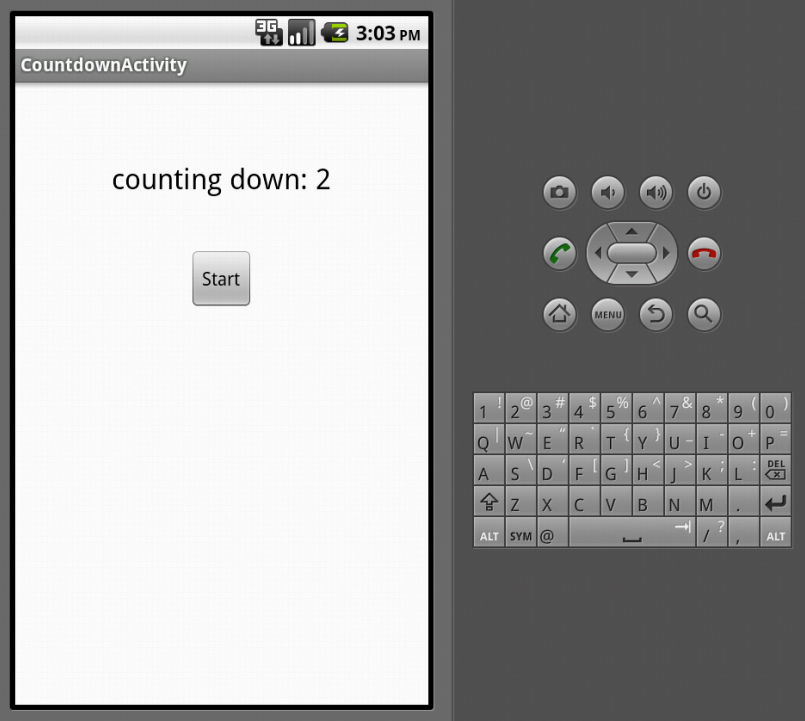
Using the “Run” command in Eclipse, you can run the created application, and the Android emulator will automatically start. Check out the Android documentation if you want to learn more about setting up an emulator , or running applications from the command line .
Congratulations, you have just created your first Android application. In the second part of this introduction, we will take a closer look at the structure of the Android application, and make some improvements to our program: entering the countdown time, the Stop button, and the menu. We will also run it on a real device, and not on an emulator.
For more information, see the Linux Foundation's Android Development Training site on the Linux training website .
Juliet Kemp
Original article
Programming for Android for beginners. Part 1
Android smartphones and tablets are increasingly found in our bags and pockets, and Android programming is also becoming more and more popular. This is a great development platform - the API is well documented and easy to use, and it’s just fun to create something that you can run on your smartphone. Initially, you can do without it by creating and testing the code using an emulator on your Linux PC. The first of the two parts of this introduction explains how to create a simple application with a timer, as well as provides initial information about the Android API. The course implies the presence of initial ideas about Java, XML and programming technologies, but nevertheless feel free to try even if you have a very vague idea about this.
')
Getting started and development environment
A bit about versions: the latest version of Android is 4.2 (Jelly Bean), but, as you can see from this diagram , it is still not widespread. It is best to start development under one of the versions: 4.0 (Ice Cream Sandwich) or 2.3 (Gingerbeard), especially since Android versions support backward compatibility (i.e., your code for version 2.3 will work on 4.2), and Applications developed for later versions will not always work on the old ones. The code given here should work on versions 4.0 and 2.3.
The easiest way to get a development environment is to install the Android Bundle, which can be downloaded here . You will also need JDK 6 (not just JRE). Do not forget that Android is not compatible with gcj. If you already use Eclipse or another IDE, then you can try to configure it for Android. How to do it - described here . Now create a project called Countdown using Eclipse , or from the command line . I installed BuildSDK 4.0.3 and minimum SDK 2.2 in the settings, and (in Eclipse) I used the BlankActivity template.
My first Android project: interface
Our first Android program will be a timer showing a countdown from 10 seconds after a button is pressed. Before writing the code, you need to create an interface - what the user sees by running our application. You need to open res / layout / activity_countdown.xml and create an XML template — use the Eclipse editor or the text / XML editor to enter the following:
<RelativeLayout xmlns:android="http://schemas.android.com/apk/res/android" xmlns:tools="http://schemas.android.com/tools" android:layout_width="match_parent" android:layout_height="match_parent" > <TextView android:id="@+id/time_display_box" android:layout_width="wrap_content" android:layout_height="wrap_content" android:layout_alignParentTop="true" android:layout_centerHorizontal="true" android:layout_marginTop="60dp" android:text="@string/_00_30" android:textAppearance="?android:attr/textAppearanceLarge"/> <Button android:id="@+id/startbutton" android:layout_width="wrap_content" android:layout_height="wrap_content" android:layout_below="@+id/time_display_box" android:layout_centerHorizontal="true" android:layout_marginTop="41dp" android:text="@string/start" /> </RelativeLayout> Pay attention to string / start and string / __ 00_30. Their values will be located in res / values / strings.xml:
<string name="start">Start</string> <string name="_00_30">00:30</string> This is a common way to access resources in Android: it is better to use references to string variables than hard-coded strings.
My first Android project: code
Now let's open the file CountdownActivity.java in the editor - and we are ready to write the code of our application. You should see the automatically generated stub of the onCreate () method. It is always called as soon as the Activity object is created, and in it you can put any functions that should be executed when the application starts. (Eclipse can also create an empty onCreateOptionsMenu () method, but we will not pay attention to it yet). Enter the following code:
public class CountdownActivity extends Activity { private static final int MILLIS_PER_SECOND = 1000; private static final int SECONDS_TO_COUNTDOWN = 30; private TextView countdownDisplay; private CountDownTimer timer; @Override public void onCreate(Bundle savedInstanceState) { super.onCreate(savedInstanceState); setContentView(R.layout.activity_countdown); countdownDisplay = (TextView) findViewById(R.id.time_display_box); Button startButton = (Button) findViewById(R.id.startbutton); startButton.setOnClickListener(new View.OnClickListener() { public void onClick(View view) { try { showTimer(SECONDS_TO_COUNTDOWN * MILLIS_PER_SECOND); } catch (NumberFormatException e) { // method ignores invalid (non-integer) input and waits // for something it can use } } }); } } You see how easy it turned out to create our first project: Android API includes CountDownTimer, which we can use. We declared it and the countdown display field as private properties of the Activity class. In the onCreate () method, we used the setContentView method to include our XML template. This R.foo.bar syntax is the standard way to access XML resources on Android, and we will meet with it many more times.
findViewById is another method you'll use often. Here it returns links to the timer output field and the Start button described in the XML template. For a button, so that we can handle its pressing, the OnClickListener interceptor and its onClick () method must be specified. Here he simply calls the showTimer () method with the specified number of milliseconds (now hardcoded in the code).
So, what showTimer () does:
private void showTimer(int countdownMillis) { if(timer != null) { timer.cancel(); } timer = new CountDownTimer(countdownMillis, MILLIS_PER_SECOND) { @Override public void onTick(long millisUntilFinished) { countdownDisplay.setText("counting down: " + millisUntilFinished / MILLIS_PER_SECOND); } @Override public void onFinish() { countdownDisplay.setText("KABOOM!"); } }.start(); } The CountDownTimer class does almost all the work for us, which is very nice. In the beginning, we check to see if the timer already exists, and if it exists, then reset it. Next, we create a new timer with the specified number of milliseconds for the countdown (from the parameter of the showTimer () method) and with the specified number of milliseconds between the intervals. When the time between intervals expires, the onTick () method is called.
CountDownTimer is an abstract class, and the __onTick () and __onFinish () methods must be implemented in its subclass. We override the onTick () method, which reduces the displayed number by one after each interval, and the onFinish () method, which displays a message about the end of the countdown. Then start () starts the timer.
Using the “Run” command in Eclipse, you can run the created application, and the Android emulator will automatically start. Check out the Android documentation if you want to learn more about setting up an emulator , or running applications from the command line .
Congratulations, you have just created your first Android application. In the second part of this introduction, we will take a closer look at the structure of the Android application, and make some improvements to our program: entering the countdown time, the Stop button, and the menu. We will also run it on a real device, and not on an emulator.
For more information, see the Linux Foundation's Android Development Training site on the Linux training website .
Juliet Kemp
Original article
Source: https://habr.com/ru/post/164853/
All Articles