Writing a clone game Fruit Ninja (part 1)
 In this wonderful tutorial from Allan Tan, we will create our own game similar to Fruit Ninja from Halfbrick Studios using Cocos2D and Box2D.
In most of these games, when a player cuts a sprite, it is divided into two previously prepared sprites; regardless of exactly where we cut the object.
However, in this tutorial we will do the thing more abruptly. Our fruit can be cut into several pieces, and they will be cut depending on where the player’s finger passed!
Obviously, this guide is not for beginners and requires advanced knowledge of Cocos2D and Box2D. If you’ve just started programming under iOS, then you'd better, at a minimum, go over your eyes on the introduction to Cocos2D and Box2D .
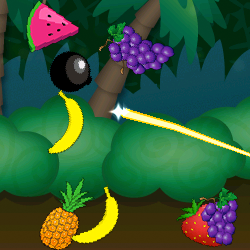
And here is the video game we will create using some cool tricks!
')
All interested in asking under the cat! Warning: a lot of translated text!
Note: the cut on the fruit appears where the player holds a finger. And as the fruit is cut into several pieces, we can crumble them into pieces!
Today we will add a cool cutting effect, a system of particles, the logic of the game and, of course, the sound of dismembering fruit.
This tutorial is divided into three parts:
- In the first part, we will create a base for the game and learn how to use texture polygons.
- In the second part, we learn how to chop and split textures.
- In the third part, we will add the gameplay and fun effects to the game.
Enough words - let's get down to business!
Let's begin: we start the project
We will use Cocos2D 2.X, so download it if you have not done so already. You can use Cocos2D 1.X, instead of 2.X. With version 1.X, you can skip the step of adapting PRKit and CCBlade for Cocos2D 2.X, but make sure that you fully understand the differences between the ported classes.
After downloading, unzip and install the templates using the following commands in the terminal:
cd ~/Downloads/cocos2d-iphone-2.0-beta ./install-templates.sh -f -u Launch Xcode and create a new iOS / cocos2d v2.x \ cocos2d iOS project with the Box2D template, name it CutCutCut.
Now our project should look like this:

First we need to clear the template to create a good project base.
Open HelloWorldLayer.h and delete the following line:
CCTexture2D *spriteTexture_;// weak ref Go to HelloWorldLayer.mm and make the following changes:
Click me
// #import "PhysicsSprite.h" // init - (id)init { if( (self=[super init])) { // enable events self.isTouchEnabled = YES; self.isAccelerometerEnabled = YES; CGSize s = [CCDirector sharedDirector].winSize; // [self initPhysics]; [self scheduleUpdate]; } return self; } // - (void)createMenu { // } - (void)addNewSpriteAtPosition:(CGPoint)p methods { // } // ccTouchesEnded [self addNewSpriteAtPosition: location]; We have removed all references to PhysicsSprite from the HelloWorldLayer, but have not yet deleted the files from the project. Later we will need to copy one method from PhysicsSprite.mm, so let's leave it as it is.
Click Command + R to start the project, and you should see a black screen with a green frame around:

The remaining code starts debug mode: draws a green frame around all Box2D objects on the screen. See that green line around the screen? These are walls created by the initPhysics template method.
Carefully inspect the remaining code, make sure you fully understand it. We initialize the world of Box2D, install walls (green lines), start debug mode, etc. This “almost empty” project is convenient for working with Box2D.
Resource pack
Next, download the resource pack for this project and unzip the files.
Do not add anything to the project yet; Some files may not be useful to you at all. However, keep your daddy close at hand - as you go through the tutorial, we will add files to the project.
The starter kit includes the following:
- Background Caritne; fruits painted by wiki ; some other pictures in the Images folder
- Background music created with gomix.it in the Sounds folder
- Sound effects created with bfxr or downloaded from freesound in the Sounds folder
- All particle systems created with Particle Designer are in the Particles folder.
- The PLIST file created with the help of PhysicsEditor , containing vertices for the fruit and bombs class, in the Misc folder
- Classes of fruits and bombs in the folder Classes
- Versions of PRKit and CCBlade in the Classes folder
We draw texture polygons with PRKit
Our goal is to cut the sprites into several pieces. A typical CCSprite contains a texture and a collision frame (bounding box) that does not depend on the actual image. This does not suit us, since it is important for us to know the real size of the image in order to create sprites that can be sliced, shredded and divided.
We need to create texture polygons that:
- Create a relationship between a polygon / shape and a picture (Texture Mapping)
- Shows only those parts of the image that fall within the polygon frame (Texture Filling)
Neither Cocos2D nor Box2D has any built-in classes that perform the actions we need. Usually, in such cases, it is better to write your own drawing code on OpenGL.
Sounds hard?
Fortunately, all the complex calculations and the necessary drawing code are already written by the good guys from Precognitive Research . They created an additional Cocos2D library that performs the actions we need, and called it PRKit.
To start working with texture polygons, download PRKit , unpack it and transfer the PRKit folder to your project. Make sure that the “Copy items into destination groups folders” and “Create groups for any added folders” checkboxes are ticked.
Note that PRKit is developed by Precognitive Research, so it is updated frequently. To avoid differences in versions, our set of resources contains the necessary version of PRKit for this tutorial.
Our project should now include the following files:

Start the game, you will find the following errors:

Errors occur because PRKit was developed for Cocos2D 1.X, which uses OpenGL ES 1.1, while we use Cocos2D 2.X with OpenGL ES 2.0. And they are significantly different from each other.
To fix this, open PRFilledPolygon.m and make the following changes:
Click me
// initWithPoints: andTexture: usingTriangulator: self.shaderProgram = [[CCShaderCache sharedShaderCache] programForKey:kCCShader_PositionTexture]; // calculateTextureCoordinates - (void)calculateTextureCoordinates { for (int j = 0; j < areaTrianglePointCount; j++) { textureCoordinates[j] = ccpMult(areaTrianglePoints[j],1.0f/texture.pixelsWide*CC_CONTENT_SCALE_FACTOR()); textureCoordinates[j].y = 1 - textureCoordinates[j].y; } } // draw - (void)draw { CC_NODE_DRAW_SETUP(); ccGLBindTexture2D( self.texture.name ); glTexParameteri(GL_TEXTURE_2D, GL_TEXTURE_WRAP_S, GL_REPEAT); glTexParameteri(GL_TEXTURE_2D, GL_TEXTURE_WRAP_T, GL_REPEAT); ccGLBlendFunc( blendFunc.src, blendFunc.dst); ccGLEnableVertexAttribs( kCCVertexAttribFlag_Position | kCCVertexAttribFlag_TexCoords ); glVertexAttribPointer(kCCVertexAttrib_Position, 2, GL_FLOAT, GL_FALSE, 0, areaTrianglePoints); glVertexAttribPointer(kCCVertexAttrib_TexCoords, 2, GL_FLOAT, GL_FALSE, 0, textureCoordinates); glDrawArrays(GL_TRIANGLES, 0, areaTrianglePointCount); } Let's go step by step through the changes.
First, every CCNode in Cocos2D has an attached OpenGL ES 2.0 shader program. To draw a PRFilledPolygon, we need to tie in the built-in “Position / Texture” shader, which we implement in the init method.
Next, we need to set the correct texture coordinates for each point in the polygon. To do this, we need to make a couple of changes to the calculateTextureCoordinates method:
- Resize: Since this class performs its own calculations of texture coordinates, it does not support Retina displays. To fix this, we simply multiply texture.pixelsWide by CC_CONTENT_SCALE_FACTOR - the coefficient provided by the Cocos2D developers to convert the values for conventional and Retina displays.
- Expand Y: For some reason, PRFIlledPolygon renders textures upside down, so we just expand the value of y.
In the end, we updated the code for OpenGL ES 2.0. We also changed the drawing in CCSprite for Cocos2D 2.X:
- We start by resizing with CC_NODE_DRAW_SETUP () to prepare the sprite for rendering.
- The calls glDisableClientState () and glEnableClientState () are obsolete and ignored.
- Both glVertexPointer () and glTexCoordPointer () are replaced by glVertexAttribPointer (), which takes a vertex position or texture coordinate with the first argument.
- The launch of the function glTexEnvf (), which is responsible for repeating the image, if the polygon turned out to be more texture, is replaced by calls to glTexParameteri ().
If something is not clear to you, then you can watch tutorials on OpenGL ES 2.0 for iPhone and custom shaders in Cocos2D 2.X. But you don’t need to worry too much about it, because now we’re just porting classes to Cocos2D 2.X:]
Run the project and PRKit errors should disappear!
It's time to start using PRKit. We will create a subclass of PolygonSprite class PRFilledPolygon, which will draw our fruit.
PolygonSprite is built on the basis of PRFilledPolygon by adding the Box2D body to the sprite, adding some other variables and methods to the implementation.
Let's do that. Click Command + N and create a new file using the template iOS \ cocos2d v2.x \ CCNode. Subclass it to PRFilledPolygon and name it PolygonSprite.m .
Switch to PolygonSprite.h and make the following changes:
Click me
// #import "Box2D.h" #import "PRFilledPolygon.h" #define PTM_RATIO 32 // @interface b2Body *_body; BOOL _original; b2Vec2 _centroid; // @interface @property(nonatomic,assign)b2Body *body; @property(nonatomic,readwrite)BOOL original; @property(nonatomic,readwrite)b2Vec2 centroid; // @end - (id)initWithTexture:(CCTexture2D*)texture body:(b2Body*)body original:(BOOL)original; - (id)initWithFile:(NSString*)filename body:(b2Body*)body original:(BOOL)original; + (id)spriteWithFile:(NSString*)filename body:(b2Body*)body original:(BOOL)original; + (id)spriteWithTexture:(CCTexture2D*)texture body:(b2Body*)body original:(BOOL)original; - (id)initWithWorld:(b2World*)world; + (id)spriteWithWorld:(b2World*)world; - (b2Body*)createBodyForWorld:(b2World*)world position:(b2Vec2)position rotation:(float)rotation vertices:(b2Vec2*)vertices vertexCount:(int32)count density:(float)density friction:(float)friction restitution:(float)restitution; - (void)activateCollisions; - (void)deactivateCollisions; This code declares the base variables and methods that we need to create a PolygonSprite:
- body: This is the Box2D body attached to our sprite. It is necessary for the simulation of physics.
- original: Both the whole and cut pieces will be objects of the PolygonSprite class, so it is important for us to somehow distinguish them. If the value is YES, then the piece is whole, otherwise it is just a piece of the whole.
- centroid: The center of the polygon is not always the center of the picture, so it is very convenient to use this variable.
- properties: We give access to our variables.
- init / spriteWith *: Our main initialization methods.
- other methods: These methods create Box2D bodies and operate with them and their variables.
- PTM_RATIO: Matching pixels and meters. Box2D uses meters instead of pixels.
Switch to PolygonSprite.m and rename it to PolygonSprite.mm . All classes that contain both Objective-C (Cocos2D) and C ++ (Box2D) must have the extension “.mm”.
Next, make the following changes to PolygonSprite.mm :
Click me
// @implementation @synthesize body = _body; @synthesize original = _original; @synthesize centroid = _centroid; + (id)spriteWithFile:(NSString *)filename body:(b2Body *)body original:(BOOL)original { return [[[self alloc]initWithFile:filename body:body original:original] autorelease]; } + (id)spriteWithTexture:(CCTexture2D *)texture body:(b2Body *)body original:(BOOL)original { return [[[self alloc]initWithTexture:texture body:body original:original] autorelease]; } + (id)spriteWithWorld:(b2World *)world { return [[[self alloc]initWithWorld:world] autorelease]; } - (id)initWithFile:(NSString*)filename body:(b2Body*)body original:(BOOL)original { NSAssert(filename != nil, @"Invalid filename for sprite"); CCTexture2D *texture = [[CCTextureCache sharedTextureCache] addImage: filename]; return [self initWithTexture:texture body:body original:original]; } - (id)initWithTexture:(CCTexture2D*)texture body:(b2Body*)body original:(BOOL)original { // Box2D b2Fixture *originalFixture = body->GetFixtureList(); b2PolygonShape *shape = (b2PolygonShape*)originalFixture->GetShape(); int vertexCount = shape->GetVertexCount(); NSMutableArray *points = [NSMutableArray arrayWithCapacity:vertexCount]; for(int i = 0; i < vertexCount; i++) { CGPoint p = ccp(shape->GetVertex(i).x * PTM_RATIO, shape->GetVertex(i).y * PTM_RATIO); [points addObject:[NSValue valueWithCGPoint:p]]; } if ((self = [super initWithPoints:points andTexture:texture])) { _body = body; _body->SetUserData(self); _original = original; // _centroid = self.body->GetLocalCenter(); // (anchor point) self.anchorPoint = ccp(_centroid.x * PTM_RATIO / texture.contentSize.width, _centroid.y * PTM_RATIO / texture.contentSize.height); // , PolygonSprite } return self; } - (id)initWithWorld:(b2World *)world { // return nil; } Just like Cocos2D, all spriteWith * methods are just autorelease of the initWith * methods. So far, there is no use of the initWithWorld method, but later we will actively use it.
The initWithFile and initWithTexture methods contain several changes. The process of creating a fruit follows the following algorithm:

- initWithWorld: This method does not return anything yet. We will work with him later.
- initWithFile: This method adds a texture from the file and passes it to the initWithTexture method.
- initWithTexture: Our main method. PRFilledPolygon gets the texture and vertices of the polygon. So, as the previous step has already processed the texture, in this method we will work with vertices: we will assemble them into one Box2D body. After passing them to the PRFillePolygon, we initialize the necessary variables that we announced earlier.
- initWithPoints: Everything that does this method is associated with PRKit. Most likely, you will no longer need to use PRKit.
Still PolygonSprite.mm add the following methods:
Click me
- (void)setPosition:(CGPoint)position { [super setPosition:position]; _body->SetTransform(b2Vec2(position.x/PTM_RATIO,position.y/PTM_RATIO), _body->GetAngle()); } - (b2Body*)createBodyForWorld:(b2World *)world position:(b2Vec2)position rotation:(float)rotation vertices:(b2Vec2*)vertices vertexCount:(int32)count density:(float)density friction:(float)friction restitution:(float)restitution { b2BodyDef bodyDef; bodyDef.type = b2_dynamicBody; bodyDef.position = position; bodyDef.angle = rotation; b2Body *body = world->CreateBody(&bodyDef); b2FixtureDef fixtureDef; fixtureDef.density = density; fixtureDef.friction = friction; fixtureDef.restitution = restitution; fixtureDef.filter.categoryBits = 0; fixtureDef.filter.maskBits = 0; b2PolygonShape shape; shape.Set(vertices, count); fixtureDef.shape = &shape; body->CreateFixture(&fixtureDef); return body; } - (void)activateCollisions { b2Fixture *fixture = _body->GetFixtureList(); b2Filter filter = fixture->GetFilterData(); filter.categoryBits = 0x0001; filter.maskBits = 0x0001; fixture->SetFilterData(filter); } - (void)deactivateCollisions { b2Fixture *fixture = _body->GetFixtureList(); b2Filter filter = fixture->GetFilterData(); filter.categoryBits = 0; filter.maskBits = 0; fixture->SetFilterData(filter); } In this code, we first load the setPosition method into CCNode so that when we update the position of the sprite, the body of Box2D is also updated.
Next, we create a method for creating and declaring the body of Box2D. To create a body, we need to declare its object, shape, and texture. So far we have not announced anything complicated, since this method will be used a little later.
The only thing you need to pay attention to is categoryBits and maskBits. We use them to filter collisions between objects so that if the category and mask match, then a collision will occur between the two objects. We set these values to 0, since we do not need collisions as soon as the objects are initialized.
After that, we declare two methods that simply replace categoryBits and maskBits so that we can activate and deactivate the collisions of our PolygonSprite whenever we want.
There is one more thing worth adding to PolygonSprite.mm :
Click me
-(CGAffineTransform) nodeToParentTransform { b2Vec2 pos = _body->GetPosition(); float x = pos.x * PTM_RATIO; float y = pos.y * PTM_RATIO; if ( !isRelativeAnchorPoint_ ) { x += anchorPointInPoints_.x; y += anchorPointInPoints_.y; } // float radians = _body->GetAngle(); float c = cosf(radians); float s = sinf(radians); if( ! CGPointEqualToPoint(anchorPointInPoints_, CGPointZero) ){ x += c*-anchorPointInPoints_.x+ -s*-anchorPointInPoints_.y; y += s*-anchorPointInPoints_.x+ c*-anchorPointInPoints_.y; } // transform_ = CGAffineTransformMake( c, s, -s,c, x,y ); return transform_; } Remember how I mentioned something about PhysicsSprite? Good, here it is. All that is happening here is to check that the position of the Box2D form and the position of the sprite are the same.
After copying the code above, you can remove PhysicsSprite.h and PhysicsSprite.mm from the project, since we have reduced their use to zero.
Run the project, everything should go like clockwork. We ended up with PolygonSprite for a bit.
Mark up the fruit
Before creating a class for our fruits, we need to fully define the rules that our pictures and their forms will follow. Since we are going to trim our textures to polygon shapes, we also need to add some Box2D polygon restrictions. You need to keep two things in mind:
- The polygons should be convex , the inner corners should not be more than 180 degrees.
- There should be no more than 8 vertices in polygons.
In general, we can work outside these limitations, for example, if our body consists of several forms. Box2D can work with concave shapes if we use the triangular method and create concave shapes from several triangles, but this is outside the tutorial topic.
To simplify the tutorial as much as possible, we will adhere to the rule: one body - one form.
Note: PhysicsEditor, a tool that we will look at later, already contains code that automatically converts concave shapes using the triangular method. However, we are still trying to simplify the tutorial as much as possible, so we will only use convex shapes.
Take a look at these two fruits:

Using a banana is not a good idea, because it is initially concave. Watermelon, on the contrary, is a great idea because it is convex and very closely follows the shape of the polygon.
If we want to declare the shapes of the polygons that follow the Box2D rules for both fruits, we will eventually come to this:

Watermelon polygons are perfect for a picture, while there is a huge gap in the shape of a banana.
Box2D will recognize this gap as part of our object, and the collision of a banana with other objects, its cutting will not be natural enough.
This does not mean that we cannot use a banana, it is not recommended just to do it yet.
Create the first fruit
It's time to create our first fruit: watermelon (at least its piece).
When thinking about initializing our PolygonSprite class object, we recall that initWithTexture is waiting for the Box2D body, but a step before that, in initWithFile, there is no body yet.
The reason for this is that we need to create and declare a body individually for each fruit, so this will be the very first step in initWithWorld that creates the body and sets the parameters for it.
To create a Box2D body, we need to know the vertices of the polygon shape we want to create. There are different ways to solve this problem, but in this tutorial we will use a tool called PhysicsEditor. This tool is simply filled with different capabilities, but we will only use it to get the coordinates of the vertices of our polygon.
If you don’t have one yet, download PhysicsEditor , install it and run it. You will see an empty project with three panels.
Working with PhysicsEditor is pretty obvious. On the left we have all the pictures with which we work. In the middle, we visually determine the polygon for our image. On the right, we set the parameters for the body.

Drag watermelon.png from the resource folder to the left pane. You should now see a watermelon in the center panel.
Zoom to the level you want by dragging the slider at the bottom of the window. Click the polygon at the top of this panel to create a polygon.
Right-click the polygon and select “Add Vertex”. Repeat until you have 5-8 vertices. Move the tops around the watermelon so that:
- The landfill was convex.
- All the watermelon pixels were inside the polygon.
Note: Another way to draw shapes is to select the “magic wand tool” in PhysicsEditor. Just set the number of vertices to 5-8 and use this tool.
Add polygons to all fruits and bombs from the Images folder in the resources folder.
You must make the following form of pictures:
- banana.png
- bomb.png
- grapes.png
- pineapple.png
- strawberry.png
- watermelon.png
When you're done, change the value in the upper right corner to Exporter in “Box2D generic (PLIST)”, and you should get something like this:

Click “Publish” or “Publish As” to export a PLIST file with vertex information. Save this file as fruits.plist.
As an example, fruits.plist, which we use in this tutorial, is located inside the Misc folder of our resource pack.
We need it only to understand the structure of the file, so do not add it to the project. Instead, open it in Xcode and look at the contents.
Click on the triangle near the “bodies” to open the corresponding section and you will see a list of pictures with which we betrayed the form values. Click on watermelon to access the tops of the watermelon:

Expand watermelon / fixtures / Item 0 / polygons and you should see another Item 0 value, which is an array. This array is our form. If you did everything right, you should see only one array.
If you see more than one array (for example: Item 0, Item 1), then you either created more than 8 vertices, or used a concave shape. If this happens, go back to PhysicsEditor and correct the form.
Next, expand Item 0 to see the final list of contents. These are our vertices and their values in the format {x, y}.
, , .
Xcode iOS\cocos2d v2.x\CCNode Class. PolygonSprite Watermelon. Watermelon.h :
// #import "PolygonSprite.h" Watermelon.m , Watermelon.mm , init:
// @implementation - (id)initWithWorld:(b2World *)world { int32 count = 7; NSString *file = @"watermelon.png"; b2Vec2 vertices[] = { b2Vec2(5.0/PTM_RATIO,15.0/PTM_RATIO), b2Vec2(18.0/PTM_RATIO,7.0/PTM_RATIO), b2Vec2(32.0/PTM_RATIO,5.0/PTM_RATIO), b2Vec2(48.0/PTM_RATIO,7.0/PTM_RATIO), b2Vec2(60.0/PTM_RATIO,14.0/PTM_RATIO), b2Vec2(34.0/PTM_RATIO,59.0/PTM_RATIO), b2Vec2(28.0/PTM_RATIO,59.0/PTM_RATIO) }; CGSize screen = [[CCDirector sharedDirector] winSize]; b2Body *body = [self createBodyForWorld:world position:b2Vec2(screen.width/2/PTM_RATIO,screen.height/2/PTM_RATIO) rotation:0 vertices:vertices vertexCount:count density:5.0 friction:0.2 restitution:0.2]; if ((self = [super initWithFile:file body:body original:YES])) { // - } return self; } , ( 7). , , , PLIST . , , PolygonSprite.
, , , .
, , , Box2D — .
, .
, “Add Files to CutCutCut”. Images . , “Copy items into destination group's folder” “Create groups for any added folders” .
, , .
. , , , .
, .
, - ! :]
Switch to HelloWorldLayer.h and make the following changes:
// #import "PolygonSprite.h" // @interface CCArray *_cache; // @interface @property(nonatomic,retain)CCArray *cache; Switch back to HelloWorldLayer.mm and make the following changes:
Click me
// #import "Watermelon.h" // @implementation @synthesize cache = _cache; // init, [self initPhysics] [self initSprites]; // dealloc, [super dealloc] [_cache release]; _cache = nil; // - @implementation @end - (void)initSprites { _cache = [[CCArray alloc] initWithCapacity:53]; // . . PolygonSprite *sprite = [[Watermelon alloc] initWithWorld:world]; [self addChild:sprite z:1]; [sprite activateCollisions]; [_cache addObject:sprite]; } -, , . , . activeteCollisions, .
, , .

, . , Box2D , . , .
What's next?
.
. , .
, Box2D, PRKit , Box2D. !
, !
Translator's Note
raywenderlich.com .
iOS !
, .
, , .
!
Source: https://habr.com/ru/post/164599/
All Articles