Smart charging Kweller X-1800. Charge nickel correctly
Again Monday, and again something interesting on our table in Box Overview ! At this time - an intelligent charger for Ni-Mh batteries size AAA and AA.
Why intellectual?
Unlike conventional chargers, which are sold cheaply by the Chinese or are included in kits like “10 cheap batteries and cheap charging for 2000 rubles”, and charged in a “drop” way, this charger has a controller in which fast charging programs are incorporated , and some other chips - such as determining the capacity and "training" of batteries to restore capacity.
Ni-MH , Nickel-Metal Hydride Battery. The cathode is nickel oxide (NiO), the anode is the lanthanum-nickel-cobalt alloy, the electrolyte is the same as in Ni-Cd.
')
99% of batteries sold in AA or AAA form factor stores are Ni-MH. This is due to more attractive consumer qualities - less noticeable memory effect, large capacity. True, along with these characteristics, the kit also includes a fast self-discharge (when after a while unused batteries have to be recharged).
LSD Ni-MH - Ni-MH with low self-discharge. Despite the intriguing abbreviation in the title, it is just a cut from Low Self-Discharge :) Despite this, they have several other advantages - greater discharge currents, the ability to work at low temperatures, and an increased number of operating cycles.
You can charge nickel batteries in different ways. By the way, it should be noted that charging designed for Ni-MH can charge Ni-Cd, but not vice versa. If you manage to find in the bins a charge specifically designed for nickel-cadmium batteries, you should not try to charge it with Ni-MH - it may end badly. But I probably 5 years have not seen such chargers.
So, about the methods of charge. The simplest - drop, or a small current.
In this mode, the battery is charged with a fixed current of 1 / 10C, or 0.1C. As we remember from the terminology, C is the numerical value of the battery capacity, which means, even theoretically, charging should last no less than 10 hours. In practice, no one has 100% efficiency, which means that the charge time increases to at least 15 hours. In reality, this time will be even longer, since the charges are “stupid” and can only control the current. Accordingly, it is impossible to know in advance which battery will charge - 600mAh or 2700mAh. For the first, the required current will be 60mA, and for the second - 270mA.
The processes occurring during charge are such that just the current in 0.1C after a set of full capacity of the battery is able to digest without consequences in the form of explosions and fire - just turning into heat, which without consequences is carried away by air flow. And if this current is exceeded, the battery will start to heat up too much, and it may well jerk.
Do you understand what I'm getting at? You can not charge the battery at 600mAh with a current of 270mA, but the battery at 2700mAh with a current of 60mA is completely. Subsequently, all charges of this type limit the charge current to 60-100mA. And if for a battery of 600mAh the time for a full charge is 15 hours recommended, then for a more capacious battery of 2700mAh you will need at least a day and a half minimum. In general, everything is clear, and only those who use batteries in consoles for TVs can use this charger.
Medium current charge with temperature control.
In this mode, the battery is charged already with currents from 1 / 3C to 1 / 2C, which allow charging in just a reasonable time - from 5 hours. When charged with such currents, the battery begins to heat up after the end of the charge, which can cause it to explode. Therefore, in such charges near the battery is a temperature sensor that monitors a sharp increase in temperature, and stops the charge. If charging is still a bit “smarter”, it first discharges the battery to get rid of the memory effect, and then starts charging it. Some models still consider the time from the beginning of the charge, which makes it possible to indirectly judge whether the battery is working - if the charge is over for a much shorter time (an hour or a half), then the battery is faulty, which the charging signals.
Charge by high currents with -ΔV control and temperature
The fastest charge technology. The battery is charged with high currents (from 1C to 2C), allowing you to charge the battery in an hour or two.

The basic principle of this technology is that before the end of the charge, the voltage always increases, and immediately after a full charge it decreases. Not much, tens or even millivolts. The controller in the charger constantly monitors the voltage on the battery and after a voltage jump down - reduces the charge current to about 10mA - to compensate for self-discharge - so that the batteries are always ready, even if they are left in charge for a day.
There is a danger not to notice this moment, and to seriously overheat the battery at such currents, therefore, temperature protection is additionally integrated into all chargers - thermal sensors for each battery that temporarily turn off the charging process if the battery is very hot.
As a rule, manufacturers are not limited to just this mode - if you build in a controller, then you can hang several more functions on it - current control, to determine the actual battery capacity, exercise function - when the battery is charged and discharged several times to compensate for the memory effect, and others functions.

With inscriptions in three languages:

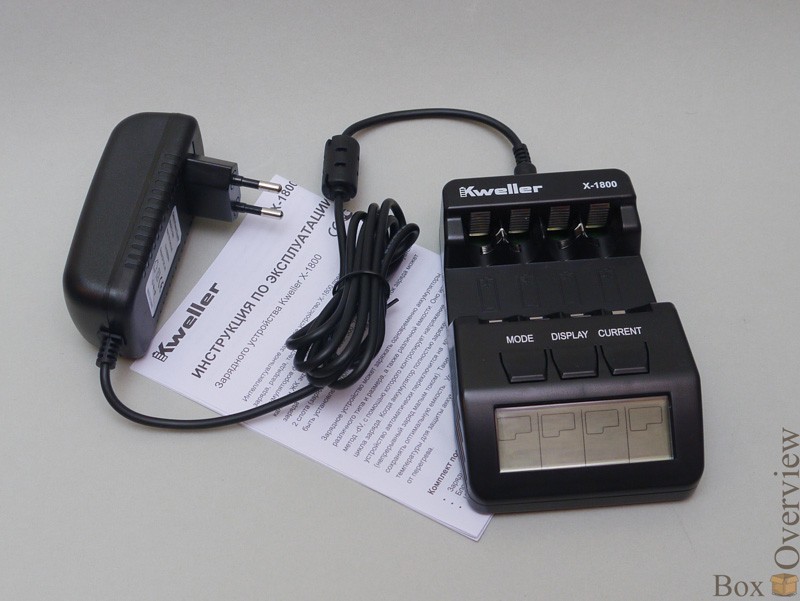
Inside the box you can find the power supply, the charger itself, and the manual. All components have their own packaging, and the charger - even personal pimples on the bag.

Power supply 3 volts and already 4 amps.

Manual, and the charger itself:

On the reverse side of charging - description, model, icons. The rest of the space is covered with rows of vents.

On the back side - power supply connector:

From the sides there is nothing interesting:

All controls are concentrated on the front panel, there are also battery sockets:

The control is carried out by three buttons - Mode, Display, Current. The first is responsible for the selection of modes, the second - for the display on the screen of parameters, and the third sets the charge current.

Then remove the back cover:

You can see the board, which is also attached with 4 screws:
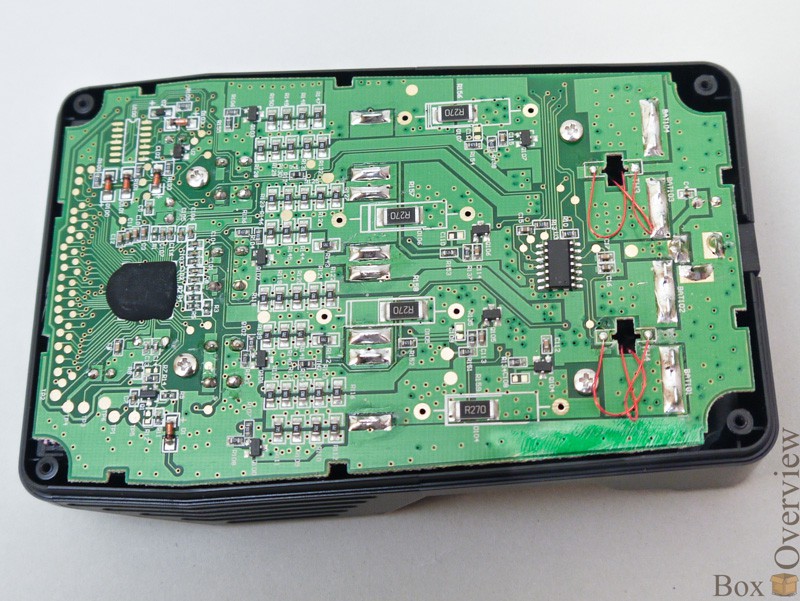
But to pull out the board, only unscrewing the screws will not succeed. Still it is necessary to unsolder in 4 points, marked by arrows of the wire of thermal sensors.

And here they are:

It should be noted that they are not just pressed, but tightly glued (or even glued) in metal plates with heat-conducting sealant. Two sensors - each is responsible for two batteries.
Accumulators are pressed against these plates - for better temperature control.

White - just thermograms. Here is the fee:

The upper side is not very interesting - some polygons, contacts, connector, three buttons and a screen. Which can be easily removed from the board:

But the reverse side is much more interesting, there is a microcontroller (blue) that controls all charging functions:

Slightly lower are the ballast resistors (red) for test and recovery modes (batteries are discharged on them), yellow ones are shunts, the exact resistors on which the voltage drop is measured to control the current during charge and discharge, blue is the operational amplifier for temperature sensors.

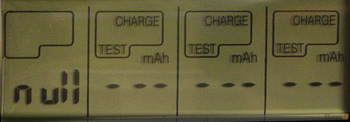
After switching on without accumulators on all 4 displays the inscription null lights up.

If you insert a charged battery - the inscription Full. If not fully charged, it will show the current voltage, and the default mode is Charge.

If you do not press any buttons, then after 4 seconds, the current will show - by default 200mA, and after another 4 - it will blink and switch to charging mode. Thus, you can simply stick the batteries in there and leave - the charging mode will turn on automatically.

When working with the Display button, you can cycle through the current-voltage-charge-time modes from the beginning of the process.


If you press Current within 5 seconds, you can select a charge or discharge current - 200-500-700-1000mA. If 1 or 2 batteries are installed in the charging into the first or last compartment, it becomes possible to choose a current of 1500 or 1800mA.
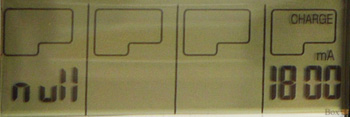
After the selection, you do not need to do anything - 10 seconds after pressing the last button, the mode with the selected current will turn on.
Use the Mode button to select the operating mode — Charge, Discharge, Test, Refresh. To select, you have to hold the button for 2 seconds, after which you can select the mode by single pressing. The first mode is Charge. It is installed by default and simply charges the batteries to full capacity. The second - Discharge, discharges, and then charges the battery. The third - charges the battery, if it was not charged, then discharges, in the process of measuring the capacity, then charges again. Recovery - the fourth mode, cyclically discharges and charges the batteries, as long as the capacity does not stop changing.


As I understand it, the point of using this is that if you need to charge the batteries quickly, then it’s enough to insert them and choose a charge current. And if time suffers - for example, if the batteries are useful only in the morning, it is better to choose the mode of discharge or testing - the batteries will discharge, and then automatically fully charged. Thus, both the wolves are fed and the sheep are safe - the batteries will be charged without your intervention, and the discharge-charge scenario will eliminate the memory effect.
The test mode for time is longer, because to determine the capacity, you must first fully charge the batteries. But after it is over, you will receive information about the capacity of the accumulator, and in which case, you can replace the dead battery in time (this is any better than learning about it during operation).
I told about the main functions, everything else is in the manual:


Very “well” at a sale in a computer store, I came across a new package of GP2700 batteries for 200 rubles. Having bought by inserting into charging, I realized that it was not for nothing that they were so cheaply priced:

“You wouldn’t chase a priest for cheapness ...” Instead of the designated 2700mAh, the batteries showed completely different numbers - two around 1000mAh, and the other two - only 100mAh. Maybe they stored it incorrectly, maybe they themselves died of self-discharge. I had nothing to lose, they did not accept the sale goods back, and I didn’t really hope to turn on the Refresh mode, put the charge on the shelf and forget about it.
Three days later, when I needed to charge the battery pack from the flash, I took charge from the shelf, and I saw completely different numbers:
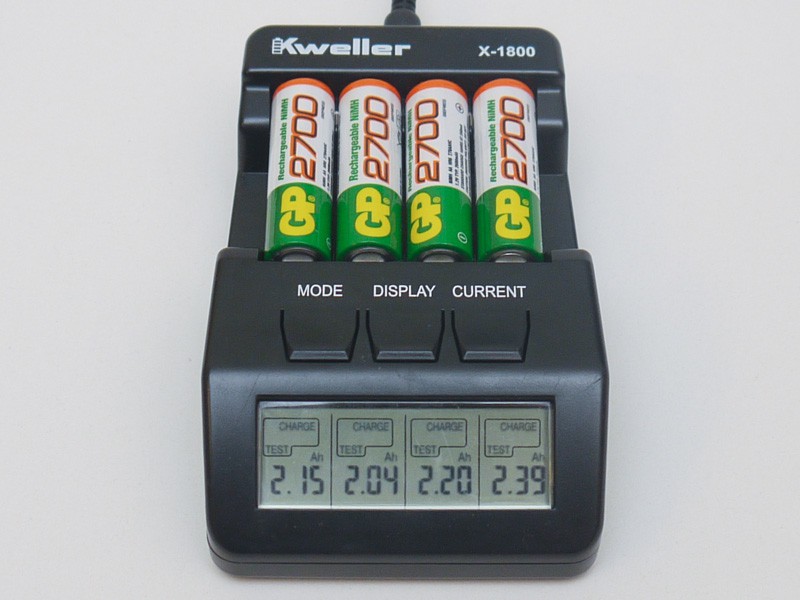
Like this. The battery with the result of 984mAh turned into 2150mAh, 117mAh - at 2040mAh, 116mAh - at 2200mAh, and 1093mAh at 2390mAh.
Of course, the capacity not specified by the manufacturer, but I will not guarantee that the measured capacity of completely new batteries will be equal to the declared capacity - everyone lies.
The main thing is that the recovery function works fine. I'll go walk through familiar photographers, take away a bunch of “dead” batteries from them. Surely some of them will be quite working :)
Hardware Portal Overview
Review on fonarevka.ru
View all photos, including those not included in the review, in the original resolution can be in the Picasa-album . You can also ask a question or leave a comment.
If you do not have an account on Habrahabr, you can read and comment on our articles on BoxOverview.com
Why intellectual?
Unlike conventional chargers, which are sold cheaply by the Chinese or are included in kits like “10 cheap batteries and cheap charging for 2000 rubles”, and charged in a “drop” way, this charger has a controller in which fast charging programs are incorporated , and some other chips - such as determining the capacity and "training" of batteries to restore capacity.
About terminology
Ni-Cd , nickel-cadmium battery. A battery in which Ni (OH) 2 acts as a cathode, a Cd (OH) 2 anode, and KOH as an electrolyte. They are distinguished by a large number of charge-discharge cycles, and the possibility of storage in a discharged form.Ni-MH , Nickel-Metal Hydride Battery. The cathode is nickel oxide (NiO), the anode is the lanthanum-nickel-cobalt alloy, the electrolyte is the same as in Ni-Cd.
')
99% of batteries sold in AA or AAA form factor stores are Ni-MH. This is due to more attractive consumer qualities - less noticeable memory effect, large capacity. True, along with these characteristics, the kit also includes a fast self-discharge (when after a while unused batteries have to be recharged).
LSD Ni-MH - Ni-MH with low self-discharge. Despite the intriguing abbreviation in the title, it is just a cut from Low Self-Discharge :) Despite this, they have several other advantages - greater discharge currents, the ability to work at low temperatures, and an increased number of operating cycles.
More terms for those who have not read the article about charging lithium batteries.
- A (Ampere (A), or milliamperes - mA , microampere - µA ) is the value of the current strength in the conductor. It can be both big and small. The current in 100A can weld sheets of iron, but if you take the wires from BP 5V 100A in your hands, you will not feel anything, because no 100A will pass through your skin - the body’s resistance is too large for current to flow.
- B (Volt (V), or millivolt - mV , microvolt - µV ) is the voltage value. A large voltage will create a long spark, but with a small current source you will only crack, but will not turn into a handful of ashes. An example is static electricity, the voltage is up to 10kV, and the currents are meager.
- Ohm (Ohm (Ohm), or kilo- kOhm , megohm- MOhm ) - the value of resistance. It is the high resistance of your body (approximately 15 kΩ) that allows you to hold the wires from the first point. Passing through a wire that has resistance (and all wires have resistance, and the thinner the wire is
from the province of China, the higher it is), the voltage drops by a certain amount, which depends on the strength of the current. Therefore, a thick wire is needed for the heater, and a thin one for the bulb, even though the voltage in both cases is 220V. With regard to batteries and batteries (and indeed to all current sources), we can talk about internal resistance. This resistance will not allow you to get a large current in a short time, although a battery during a short circuit tends to do this very much - the spark that occurs when the terminals are closed is just a few amperes of current at a voltage less than a volt. This is due to the fact that the rate of ions inside the battery is not very high.Get stuck, poor things, knee-deep in polymer - Watt (Watt (W), or milliwatts - mW , then you understand, yes?) - in the simplest representation, DC power, calculated by multiplying volts by amps. For example, a laptop's PSU, which outputs 3A at a voltage of 20V, and a laboratory power supply unit that delivers 3V, at a current of 20A, will give to the load the same power of 60W. They will consume more from the network, due to the fact that their efficiency is not 100% - some of the energy will be transferred to heat.
- W · h (Watt-hour) - a measure of energy. From the name it should be clear that 1 W · h is the energy that someone will receive (or give), receiving (or giving) a power of 1W for an hour. Or 60W in a minute. Here is the BP above, it just gives every hour 60W · h. This is the “right” capacity, which does not give information about the battery itself, but gives a complete picture of its capacity.
There are kilowatt-hours, kWh - they are written in the receipts. If you leave the power supply turned on, it will consume energy for a month at 60W · h * 24 * 30, i.e. approximately 43kWh, or 73 rubles. Of course, that which gives the power supply at the output (those 20B and 3A) should be consumed by someone, well, we don’t forget about efficiency, I simplified it. - A · h (ampere-hours) - Charge. It is generally accepted, albeit erroneously called capacity. Why wrong? Because without voltage, according to one 5A · h number, nothing can be understood - it only says that, for example, a battery can deliver a current of 5 amperes per hour. Or one amp for 5 hours. But how much energy will be given during this hour depends on the supply voltage ... Simply put, A · h is the W · h of which volts are tore (W - B * A, if B is removed, A will remain). It would seem that it could be simpler - 2A · h, 3.7V is written on the battery, multiply 2 by 3.7, get 7.4W · h and rejoice. But there is a nuance (s). Here he is:
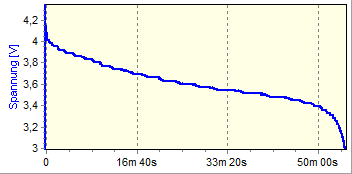
This is a graph of the discharge of a lithium battery, which shows that the voltage decreases by the end of the discharge. This means that a simple multiplication of · h by B (which would work in the case of a power supply that yields a stable voltage) gives an energy value with a very large error. In order to find out how many watt-hours a battery has, for example, you can build a graph of power (which can be obtained by multiplying the instantaneous values of current and voltage) and then find the area under the curve of this graph:
This is more complicated, but as a result we get watt-hours. - xC - just convenient designation of the charge or discharge current of the battery. When they talk about charging with 2C or 0.1C, they usually mean that the current should be (2 * battery capacity) / h or (0.1 * battery capacity) / h.
For example, a battery with a capacity of 720mAh, for which the charge current is 0.5C, must be charged with a current of 0.5 * 720mAh / h = 360mA
About smart and stupid charge
You can charge nickel batteries in different ways. By the way, it should be noted that charging designed for Ni-MH can charge Ni-Cd, but not vice versa. If you manage to find in the bins a charge specifically designed for nickel-cadmium batteries, you should not try to charge it with Ni-MH - it may end badly. But I probably 5 years have not seen such chargers.
So, about the methods of charge. The simplest - drop, or a small current.
In this mode, the battery is charged with a fixed current of 1 / 10C, or 0.1C. As we remember from the terminology, C is the numerical value of the battery capacity, which means, even theoretically, charging should last no less than 10 hours. In practice, no one has 100% efficiency, which means that the charge time increases to at least 15 hours. In reality, this time will be even longer, since the charges are “stupid” and can only control the current. Accordingly, it is impossible to know in advance which battery will charge - 600mAh or 2700mAh. For the first, the required current will be 60mA, and for the second - 270mA.
The processes occurring during charge are such that just the current in 0.1C after a set of full capacity of the battery is able to digest without consequences in the form of explosions and fire - just turning into heat, which without consequences is carried away by air flow. And if this current is exceeded, the battery will start to heat up too much, and it may well jerk.
Do you understand what I'm getting at? You can not charge the battery at 600mAh with a current of 270mA, but the battery at 2700mAh with a current of 60mA is completely. Subsequently, all charges of this type limit the charge current to 60-100mA. And if for a battery of 600mAh the time for a full charge is 15 hours recommended, then for a more capacious battery of 2700mAh you will need at least a day and a half minimum. In general, everything is clear, and only those who use batteries in consoles for TVs can use this charger.
Medium current charge with temperature control.
In this mode, the battery is charged already with currents from 1 / 3C to 1 / 2C, which allow charging in just a reasonable time - from 5 hours. When charged with such currents, the battery begins to heat up after the end of the charge, which can cause it to explode. Therefore, in such charges near the battery is a temperature sensor that monitors a sharp increase in temperature, and stops the charge. If charging is still a bit “smarter”, it first discharges the battery to get rid of the memory effect, and then starts charging it. Some models still consider the time from the beginning of the charge, which makes it possible to indirectly judge whether the battery is working - if the charge is over for a much shorter time (an hour or a half), then the battery is faulty, which the charging signals.
Charge by high currents with -ΔV control and temperature
The fastest charge technology. The battery is charged with high currents (from 1C to 2C), allowing you to charge the battery in an hour or two.
The basic principle of this technology is that before the end of the charge, the voltage always increases, and immediately after a full charge it decreases. Not much, tens or even millivolts. The controller in the charger constantly monitors the voltage on the battery and after a voltage jump down - reduces the charge current to about 10mA - to compensate for self-discharge - so that the batteries are always ready, even if they are left in charge for a day.
There is a danger not to notice this moment, and to seriously overheat the battery at such currents, therefore, temperature protection is additionally integrated into all chargers - thermal sensors for each battery that temporarily turn off the charging process if the battery is very hot.
As a rule, manufacturers are not limited to just this mode - if you build in a controller, then you can hang several more functions on it - current control, to determine the actual battery capacity, exercise function - when the battery is charged and discharged several times to compensate for the memory effect, and others functions.
About charging
Box of cardboard:With inscriptions in three languages:
Inside the box you can find the power supply, the charger itself, and the manual. All components have their own packaging, and the charger - even personal pimples on the bag.
Power supply 3 volts and already 4 amps.
Manual, and the charger itself:
On the reverse side of charging - description, model, icons. The rest of the space is covered with rows of vents.
On the back side - power supply connector:
From the sides there is nothing interesting:
All controls are concentrated on the front panel, there are also battery sockets:
The control is carried out by three buttons - Mode, Display, Current. The first is responsible for the selection of modes, the second - for the display on the screen of parameters, and the third sets the charge current.
Internals:
As usual, we are curious about what is inside. We unscrew 4 screws around the perimeter:Then remove the back cover:
You can see the board, which is also attached with 4 screws:
But to pull out the board, only unscrewing the screws will not succeed. Still it is necessary to unsolder in 4 points, marked by arrows of the wire of thermal sensors.
And here they are:
It should be noted that they are not just pressed, but tightly glued (or even glued) in metal plates with heat-conducting sealant. Two sensors - each is responsible for two batteries.
Accumulators are pressed against these plates - for better temperature control.
White - just thermograms. Here is the fee:
The upper side is not very interesting - some polygons, contacts, connector, three buttons and a screen. Which can be easily removed from the board:
But the reverse side is much more interesting, there is a microcontroller (blue) that controls all charging functions:
Slightly lower are the ballast resistors (red) for test and recovery modes (batteries are discharged on them), yellow ones are shunts, the exact resistors on which the voltage drop is measured to control the current during charge and discharge, blue is the operational amplifier for temperature sensors.
Fast start:
After switching on without accumulators on all 4 displays the inscription null lights up.
If you insert a charged battery - the inscription Full. If not fully charged, it will show the current voltage, and the default mode is Charge.
If you do not press any buttons, then after 4 seconds, the current will show - by default 200mA, and after another 4 - it will blink and switch to charging mode. Thus, you can simply stick the batteries in there and leave - the charging mode will turn on automatically.
When working with the Display button, you can cycle through the current-voltage-charge-time modes from the beginning of the process.
If you press Current within 5 seconds, you can select a charge or discharge current - 200-500-700-1000mA. If 1 or 2 batteries are installed in the charging into the first or last compartment, it becomes possible to choose a current of 1500 or 1800mA.
After the selection, you do not need to do anything - 10 seconds after pressing the last button, the mode with the selected current will turn on.
Use the Mode button to select the operating mode — Charge, Discharge, Test, Refresh. To select, you have to hold the button for 2 seconds, after which you can select the mode by single pressing. The first mode is Charge. It is installed by default and simply charges the batteries to full capacity. The second - Discharge, discharges, and then charges the battery. The third - charges the battery, if it was not charged, then discharges, in the process of measuring the capacity, then charges again. Recovery - the fourth mode, cyclically discharges and charges the batteries, as long as the capacity does not stop changing.
As I understand it, the point of using this is that if you need to charge the batteries quickly, then it’s enough to insert them and choose a charge current. And if time suffers - for example, if the batteries are useful only in the morning, it is better to choose the mode of discharge or testing - the batteries will discharge, and then automatically fully charged. Thus, both the wolves are fed and the sheep are safe - the batteries will be charged without your intervention, and the discharge-charge scenario will eliminate the memory effect.
The test mode for time is longer, because to determine the capacity, you must first fully charge the batteries. But after it is over, you will receive information about the capacity of the accumulator, and in which case, you can replace the dead battery in time (this is any better than learning about it during operation).
I told about the main functions, everything else is in the manual:
Testing recovery function:
Very “well” at a sale in a computer store, I came across a new package of GP2700 batteries for 200 rubles. Having bought by inserting into charging, I realized that it was not for nothing that they were so cheaply priced:
“You wouldn’t chase a priest for cheapness ...” Instead of the designated 2700mAh, the batteries showed completely different numbers - two around 1000mAh, and the other two - only 100mAh. Maybe they stored it incorrectly, maybe they themselves died of self-discharge. I had nothing to lose, they did not accept the sale goods back, and I didn’t really hope to turn on the Refresh mode, put the charge on the shelf and forget about it.
Three days later, when I needed to charge the battery pack from the flash, I took charge from the shelf, and I saw completely different numbers:
Like this. The battery with the result of 984mAh turned into 2150mAh, 117mAh - at 2040mAh, 116mAh - at 2200mAh, and 1093mAh at 2390mAh.
Of course, the capacity not specified by the manufacturer, but I will not guarantee that the measured capacity of completely new batteries will be equal to the declared capacity - everyone lies.
The main thing is that the recovery function works fine. I'll go walk through familiar photographers, take away a bunch of “dead” batteries from them. Surely some of them will be quite working :)
Cost:
In the store la-crosse.ru this charger costs 1300 rubles .Related Links:
Review on mysku.ruHardware Portal Overview
Review on fonarevka.ru
Conclusion:
Convenient, well-assembled device for charging batteries. I think the price of the device will quickly pay off with the convenience of work and several battery restorations, instead of buying new ones.View all photos, including those not included in the review, in the original resolution can be in the Picasa-album . You can also ask a question or leave a comment.
If you do not have an account on Habrahabr, you can read and comment on our articles on BoxOverview.com
Source: https://habr.com/ru/post/164459/
All Articles