LED Christmas tree on the Arduino in one evening

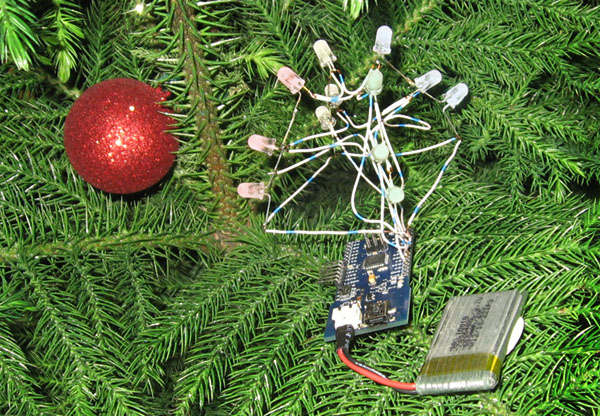
This mess of wires and LEDs is actually a distant relative of the New Year tree. True, the Christmas tree is not aware of this yet, but we will not ask them.
The pursued goal - to quickly collect something New Year's glowing from a minimum of scrap materials that everyone has.
Prologue
Rummaging through the drawers of the table, I came across a handful of multi-colored LEDs that were “unclear why” (part of my wife’s slang) bought on eBay.
It was getting dark, fluffy snow was falling outside the window, the fireplace warmly warmed the fifth point ... That is, everything was arranged for taking a soldering iron and
In the end, I managed to catch the tail of the idea to make a LED Christmas tree on the Arduino.
Idea
The idea, although it was fun, offered me the following simple concept: to combine several LEDs in the form of a matrix and on a frame made from single-core wires like 24 AWG to build something a bit like a Christmas tree.
The LEDs are connected in four groups. Each group consists of three LEDs with a common
The scheme is approximately the same (add resistors to taste):

The rows go to the Arduino digital outputs, I connected the groups to the analog outputs (in theory, they can also be digital, but I didn’t have suitable current-limiting resistors and I decided to just limit the brightness by fast-switching).
That is, when the row at output 0, then you can control the LEDs in the group. When row 1, the LEDs are patiently silent and wait for their turn.
')
PS: Only I couldn’t think of something how to accurately hang one LED (white?) In the form of a star on top. Is that just hang up separately, but the design will not be very stable. I leave it as a homework for a curious reader. Suggestions in the comments are welcome.
We will need
- The desire and time to deal with this nonsense
- A handful of LEDs (I used 5 mm LEDs of different colors - 3 red, 3 yellow, 3 blue and 3 green)
- Arduino or any other suitable board with a microcontroller (I use the Arduino Fio because it is convenient to power it from a Lipo battery)
- Single core wire for carcass
- Soldering tools
Assembly
To begin with, I decided to process the LEDs with sandpaper, as I would like them to diffuse light a little:

Fotik old, hands are shaking, the horizon is overwhelmed - unfortunately, this is reflected in all the pictures. But I hope that the transfer process turned out.
I started the assembly itself with the formation and soldering of individual rows.
The bottom row has a side of about 60mm, the middle row of about 50mm, and the top one turned out to be about 30mm.
So look separately collected three rows:

We solder the first chain of LEDs and form there our “type of Christmas tree”:

Next is easier. Here the second chain of LEDs is soldered (photo from a distant relative):

Thus we solder the remaining LED chains on the frame.
Check and code
I checked on the Arduino Mega2560, since this is the only Arduino board that agreed to this dangerous experiment (everyone else hid somewhere when they found out that I decided to stir up):

The code can be downloaded on Github'e: github.com/nochkin/ardutree
The code itself, of course, does not pretend to genius, but I tried to simplify it as I could, so that it would be easier for others to modify it.
There you can set your own programs and sequences.
Result
After debugging and testing, I transferred all this disgrace to the Arduino Fio with a Lipo battery in order to give a certain completeness and mobility of the design:

Required video:
Patient congratulations on the upcoming New Year!
Source: https://habr.com/ru/post/164385/
All Articles