Aruba Networks - Part 2: Building a secure wireless infrastructure
Introduction
Greetings to all who read this post!
Earlier, I talked about Aruba Networks in “general terms” , and in the same place I promised to write a separate post about security aspects. Immediately I warn you - the post is big. Comparisons with any vendors will not be; The purpose of the post is to show the capabilities of a specific vendor. All features described below are supported by all Aruba controllers. Meet
At first, I just wanted to write a post-listing of possibilities, with some technical details. But this idea quickly disliked. It seems to me that instead of a dry description of the capabilities of the controllers, which you can easily read in datasheets / marketing materials / sweet-talking sales managers / other persons and materials, it will be much more interesting to consider them on the example of infrastructure deployment. Let's imagine some abstract organization, headquartered in Moscow or St. Petersburg, with branches in large cities where there is a normal Internet, and in cities where the connection, to put it mildly, does not work 24/7. But at the same time there is a need for centralized management and control of equipment operation. Schematically imagine it this way:
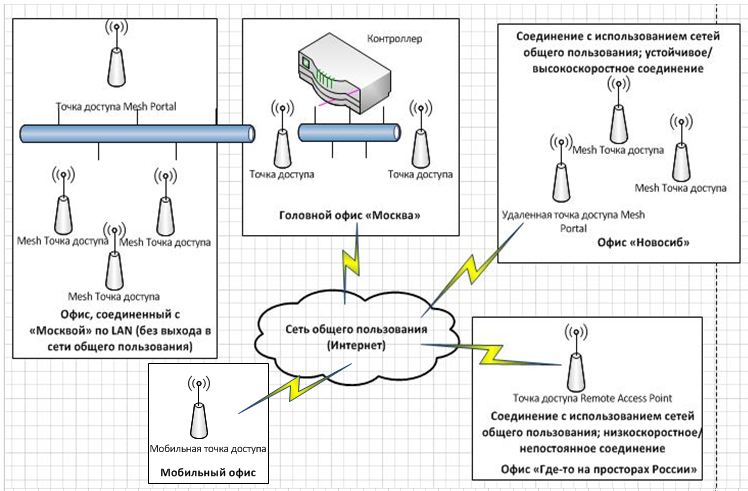
(The names of the offices are taken from the ceiling).
In the office "Moscow" we have a high-speed permanent connection, as well as an office connected via LAN to it; We communicate with other offices through data transmission over the Internet. In this regard, the office of "Novosibirsk" does not represent anything super interesting from itself - it also has a permanent high-speed connection. The only thing is that it is necessary to secure the transmission of data via the Internet, plus to ensure centralized management and control from Moscow.
The most interesting office - "Somewhere in the expanses of Russia." Where, as you know, is not everywhere high-speed Internet. And there is not always a stable connection.
')
, ( "- " " ", . ( ) "" "". . We need to implement, for a minimum of time and money (as usual, in general ...), with minimal use of additional software and hardware:
- Provide access to the Internet and corporate network to all employees. But at the same time, access to confidential materials is only provided that employees use certain devices and correct credentials. Employees using their devices are denied access to confidential data.
- Provide Internet access to guests of the organization. At the same time, guests should not have access to corporate secrets.
- Prohibit connecting to "foreign" wireless networks.
- To ensure the functioning of wireless VoIP phones.
- Ensure the operation of a wireless video surveillance system.
- Compliance with the company's security policy (you can not connect to any Internet resources).
- Provide WIPS (Wireless Intrusion Prevention System - Wireless Intrusion Prevention System) functionality.
- The ability to see where the wireless device of interest is on the floor plan.
- The ability to assign different security policies for different offices.
- The possibility of centralized network management.
- The ability to quickly create a mobile wireless infrastructure - under the organization's security policies.
Next, we will look at how infrastructure is built in all these offices; I will try to go from "simple to complex": first comes the story of the basic features, then we will dig deeper. That is, everything that is applicable in Moscow is applicable in other offices. What is applicable in the next office, it is applicable in Novosibirsk; etc. This statement works in the opposite direction, but the application of such solutions is not always advisable.
Office "Moscow"
Here we have a controller, as well as access points (TD), connected to it via LAN. In addition to the wireless controller itself, there are other servers in the head office, such as a VoIP server, a domain controller, an authorization server, etc. The controller can be located both in the DMZ (and act as a wired router) and behind the DMZ, but in this case, you need to ensure that the controller is visible to the TDs using a public network to communicate with it.
The following networks will be raised: a guest network giving access through the authorization portal (captive portal), a network for employees of an organization with different levels of privileges (the level of privileges depends on the authorization method and / or a specific login), a separate network for the operation of wireless VoIP phones, a separate a network for the operation of wireless surveillance cameras (of course, some server should be raised for VoIP, for example, Asterisk). All these networks will work as virtual TDs (each with its own BSSID).
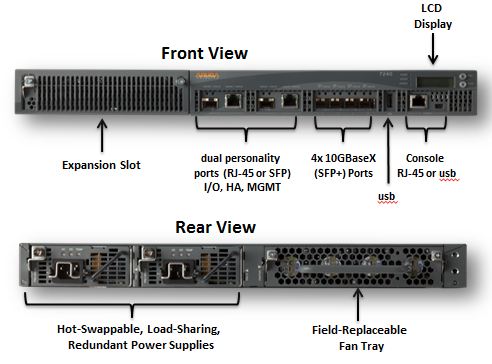
The controller here looks like this:
And the access point is:

When you turn off the access point, we do not have any information about which networks and with which policies it provided.
The download process is as follows:
- Loaded controller (about 10 minutes).
- TDs find a controller using the Aruba Discovery Protocol or a static IP controller.
- Established connection TD-controller with the construction of the GRE tunnel.
- From the TD controller, it receives information about service networks, virtual networks, security policies, and other parameters.
- You can connect!
. (AP Provision) " " " ". - , . ( Aruba Discovery Protocol) , , GRE - , "" LAN . Now we have a “clean” controller. Well, maybe, with the initial initialization performed, we got some one simple network. Hardware all functions. You need to make a secure infrastructure that meets the above requirements.
We set up the infrastructure in the office "Moscow"
This is the longest and most important stage. Here we make all the settings on the controller. And prepare a springboard for easy "raising" remote offices.
To begin with, we create all the necessary VLANs. In our case it will be:

For simplicity, there are 3 VLANs created here, and traffic to the Internet passes through VLAN 1 and traffic from remote offices passes through it, which is not good.
Next, create virtual access points for VoIP, video surveillance, guest access and for employees. There are options, you can create with a separate BSSID for each, you can build SSIDs on one BSSID. TDs support up to 8 BSSIDs in general. Some up to 16. Access points are grouped together; we can create different groups for different offices.
Next, we need to decide on the authentication method and user roles. Each role has certain access rights; You can create additional roles, for example, “employee from corporate device” and “employee from personal device”, with different access rights to the network.
But, before you rush into the jungle of settings, you need to understand how everything works. The controller operates under its own OS ArubaOS.
A little bit about Aruba OS 6.1
The main “loose change” here is the profile. A profile contains a group of settings, for example, AAA protocol settings or specific wireless network settings. Conventionally, profiles can be divided into 2 large groups: Group 1 - profiles that are responsible for the actual functioning of the wireless network (information about SSIDs, hardware settings of the AP, control of the radio environment), intrusion prevention functions; and the 2nd group - profiles that are responsible for detailed authentication settings and additional hardware features. Profiles in each group are hierarchical; those. if there is no “lower” profile, the network will not take off. In principle, with the initial configuration of the controller (and further use of the network creation wizard) all the necessary profiles are created, so the bulk of the work falls on editing existing profiles. To make it clearer, I will provide a profile tree (taken from free documentation on Aruba Networks website).
WLAN functioning profile tree:

Tree "other" profiles:

It is easy to see that, in terms of authentication, AAA profiles refer to profiles from the Other group.
The firewall is “tied” here by assigning policies to user roles; User roles are assigned based on authentication results. However, the authentication issue is not as transparent as it seems; we will look at this below. Now briefly describe the firewall. The firewall is a session-level firewall (stateful firewall), it is possible to detect simple DOS-attacks (SYN TCP, IP spoofing) with blocking the attacking device (for a while or until manual removal from the black list by the administrator). Supports ipv4 and ipv6, "white" access lists.
Setting up a firewall does not present any difficulties: policies contain a set of simple rules; the rule consists of IP Version (protocol version) fields, outgoing source (you can create your sources), destination source (you can also create your own), network services (again, they are created out of the box, most of the network services are used), various actions (accept, reject, tunnel, etc.), mirroring and logging options, rule priority, etc. It is possible to apply different rules in the policy depending on the time / day of the week. Time is taken from the controller; this should be taken into account when creating time ranges for objects located in another time zone.
It should be noted here that one not very pleasant moment for some, characteristic of Aruba OS: in fact, the firewall settings are much wider than that provided by the web interface; when using CLI - you can set more fine-tuning. Another question is that there the settings are already closer to the finer routing of traffic, and not everyone needs them and not everyone. You can connect to the CLI either using a direct connection (to the controller port) or via SSH / Telnet. In the latter case, it is possible to limit the IP addresses from which connection is possible. Also in the web interface itself there is the possibility of a virtual Java-based CLI. But it pulls the installation of the JRE, and besides (theoretically) it is exposed to all the vulnerabilities of Java. In general, it will probably be better to connect with “traditional” SSH Putty clients.
On this I propose to finish the excursion into Aruba OS; some technical details will be explained further as needed. How the firewall works here, I think everyone understands; there is nothing trivial here. Let's see, how do we still assign roles?
User Authentication
Let's first look at the authentication process diagram (I apologize in advance for the block diagram drawn not by canon):

Here is an authentication scheme using machine authentication. This means that if the device is not authorized for use on this network, the user will not get full access, even if the authentication server responds positively. Machine authentication can be implemented, for example, using certificates — appropriate controls are provided.
Of course, you can create more simplified authentication schemes.
This scheme works as follows: we have 3 roles defined: for example, full access, limited (say, there is access to materials that do not contain confidential data) and guest access. Naturally, confidential materials should be on separate servers; issues of control of confidential materials are beyond the scope of this post; we will not consider them now.
Depending on how successful the authentication is, appropriate roles are provided. There are some nuances in the assignment of roles, but in general they have little effect on the process.
Available authentication options:
- RADIUS
- Ldap
- TACACS +
- NTLM (Windows)
- 802.1X
- Internal DB
- Customizable web portal (Captive Portal)
- XML-API servers (in fact, self-made connectors)
Internal DB is not very recommended for authentication; exception is creating guest accounts. Aruba OS is quite a convenient tool for creating guest accounts, with the possibility of automatic notification of the login / password / name of the wireless network via email of the person for whom access is being made. Guest accounting is limited in time of action, after which it is automatically turned off (but remains in the internal database; on the one hand, it is convenient, on the other - there is a need to manually delete unwanted entries).
The main reason why it is not recommended to use the database for employee authentication is its impossibility of integration (let's say ... conditional impossibility, API, in general, can be found) with account management systems; and just in this case, the administration of the system becomes more expensive. Why is it if you can take data, for example, from AD?
The authentication mechanism, I think, is generally understood. Let's move on to the Wireless Intrusion Prevention System (WIPS) subsystem.
WIPS subsystem; location tracking; event logging
In this section I will describe the work of WIPS, which is closely intertwined with the RTLS (Real-Time Location System) system, which can be indirectly attributed to systems that allow you to ensure physical security; and for RTLS there is no need to install any additional computing systems. The only "BUT": controller computing resources are not enough to track a large number of devices; therefore, if it is necessary to organize constant monitoring of customers and “enemy” devices, it is better to use Aruba AirWave software. But this is optional.
Also, in order to increase the overall security level, it is desirable to limit the connection of “foreign” devices to our wireless networks, as well as to prohibit the connection of devices that are in the area of “their” network to “foreign” wireless networks. For normal operation of WIPS, you must first specify the parameters in the IDS profile, such as the criteria by which the detected devices are considered “enemy” (rogue), the types of forbidden connections within the controlled area (controlled area - the area covered by our TD), etc. . Aruba can suppress the Ad-Hoc networks created by devices inside the monitored zone, identify incorrect MAC addresses (at the same time excluding the well-known MAC addresses of VMWare virtual devices, for example). When the controller is connected to the local network, it is possible to control the wired part of the network visible to the controller; This is a basic control - we can track the connection of an unauthorized device and block access to the wired network segment (provided that the controller is additionally assigned the functions of a router), or alert the administrator.
: (, Ad-Hoc , , , )? : .91: - , , , , . 57: - . , . , . , ; . What can we do in the wireless areas? Here's what:
- Detect unauthorized connection and suppress it.
- Detect unauthorized ad-hoc network, bridge.
- Detect unauthorized access point.
- Determine the location of the wireless device.
- Suppress the connection to "foreign" networks.
- Suppress the connection of "foreign" clients to their networks.
Detection and calculation of the location on the floor plan is carried out by using triangulation; Access points whose coordinates are known act as base stations with known coordinates. At the same time, access points continue to perform their basic functions - in fact, provide access to the network.
To improve the quality of detection, you can use a special operating mode TD - AirMonitor. It is designed to monitor the radio and perform office operations, such as network optimization, detection of illegal devices, etc .; however, when operating in this mode, the TD stops providing clients access to the network. It is worth noting that in some cases it is possible to create “hybrid” TD: some of the time they work in the AirMonitor mode, and some time in the normal mode.
“Enemy” devices are searched in the range in which the TD operates. Since most TDs can operate simultaneously in the 2.4 and 5 GHz bands, both bands are monitored. Below is a sign of which channels are monitored (taken from freely distributed documentation):

After activating WIPS mode, the controller uses the AP to acquire data about the surrounding devices and classifies them according to the parameters configured in the IDS profile for each group of APs. Depending on the profile settings, it is possible to either automatically suppress connections or simply display information about “enemy” devices on the dashboard.
Suppression of wireless devices occurs with the help of Tarpit Shield technology; the essence of this technology is that the "enemy" client impose a connection to the head of the wrong BSSID or channel; Together with this, there is a deassociation (disconnection) of the client from the TD of our network. When you try to connect to a "foreign" network, data is intercepted and then a false route is imposed on you.
From the user's side, this is seen as an endless reconnection to the network; with a large network load, some packets can “skip”, but the percentage of losses is quite high (say, performing ping for 10 requests will return 90-97% of losses); When trying to connect to our access points, it is possible to add the device to the "black list".
When AirWave is installed and the monitor mode is on, we will see such a picture (when using the controller, the picture will be almost the same, but you will have to select the device of interest in order to see its location):

Red triangles indicate “enemy” TDs, yellow circles with laptops are legal customers.
When setting up WIPS in a zone with a large radio disturbance, some time should be allocated for training the system - so that it remembers the "neutral" TDs of its neighbors, and does not suppress the connection of neighboring devices to them; To exclude the connection of “their” devices to the neighbors, you should fine-tune the IDS profile for the corresponding AP, in particular, to determine the maximum signal level of a device connecting to the “forbidden” network (since neighbor devices in most cases will obviously have more weak signal than "their").
The final touch of setting in the head office should be the restriction of access to the controller (with the possible sending to the "black list" of devices that tried to connect to the controller from unauthorized IP). If necessary, you can enter the requirement to encrypt client traffic.
If there is an installed SIEM system, then you can send logs directly to it (Syslog protocol).
Go to the office next to the "Moscow".
Neighboring office
Previously, we created the necessary roles and policies;in general, everything here is almost the same, except for one thing: for some reason, it was not possible to lay the power cable to every point, but there were 220V sockets in abundance. Therefore, we decided to build a Mesh-network.
The point is very simple: an additional invisible service network (Mesh network) is created, one point assumes the role of a gateway (portal) between all other points and the wired part of the network.
The service information exchanged between the points is encrypted; In order to avoid connecting unauthorized TDs, you can use the TPM - module integrated into them.
The main problems when using this configuration:
- The load on the portal increases; therefore, although the portal can perform the functions of an AP, it should be borne in mind that clients connected to it may have problems with speed
- If the portal crashes, the network will collapse. Therefore, it is desirable to take care of redundancy; besides, it will allow to unload the primary portal and parallelize the load on the wired part of the network
Otherwise, for customers there is no particular difference - the “traditional” or “mesh” network.
Access points are picked up automatically; but they must be configured accordingly. But there is a nuance: the mesh will always build up to the controller exclusively GRE tunnels (and be considered a LAN-connected AP), while the TD connected in the “traditional” way can be represented as “remote” if there are any special considerations in In terms of security, there are concerns about losing large packages.
Let's now consider the option for Novosibirsk - with connection through public networks.
Office "Novosib"
This office is far from our headquarters; LAN is not stretched out, so you have to use public networks. I just want to stipulate that here we are considering a semi-autonomous option (there is no controller, if the controller is dropped at the head office, the network will work for some time ... until the first reboot). If you need a standalone option - it is described for the office "Somewhere in the vastness of Russia."
As you already understood, without the construction of a VPN, we can not do here. But VPN VPN is different. The first and obvious option - to drive all traffic (including Internet requests) through the head office is not a good solution. Although you can implement and such. Probably, it would be more correct to send to the head office the traffic intended for corporate LAN, and, of course, service information:

In this embodiment, traffic destined for the Internet will go to the Internet without running to the head office; however, when using non-autonomous TDs, we lose some of the features, such as authentication using a web portal, and the system remains dependent on the host controller.
On the other hand, from the point of view of network management, we work as if the Novosibirsk office is located in the neighboring building. We can configure this TD as a mesh portal and build a network similar to the one that was built in the office next to Moscow. With the only difference that the VPN tunnel (IPSEC) now goes to the controller, respectively, the controller must either be seen from the outside or somehow be redirected to it by requests from the TD.
In terms of configuration, everything can be done near the controller, then given to installers, with an indication of what AP to connect to the LAN. As you can see, there is nothing difficult in terms of settings here.
Further it will be even easier.
Office "Somewhere in the open spaces of Russia", as well as "Mobile Office"
Here the situation is somewhat more complicated: the Internet is slower, communication breaks are not a rare phenomenon. A separate controller can be put there, but expensive. Points, as we set in "Novosibirsk" are not suitable because of non-autonomy. But we have a way out - use autonomous access points. For example, such (the second option of autonomous TD will be discussed even lower - in the section about “mobile office”):

Such APs are called RAP (Remote Access Point) in Aruba terminology. For normal operation, the RAP TD must be entered into the controller’s white list; This is necessary to prevent unauthorized connections. After installing the VPN connection, the AP receives all the necessary information from the controller (policies, etc.) and saves them. RAP TD has a built-in DHCP server; It is also possible to configure in such a way that when the controller is unavailable, the AP will work as a normal router, providing access to the Internet. However, at the same time, of course, the corporate network will be inaccessible.
If the local provider is not satisfied with something, or you need to deploy a mobile office, it is possible to use a cellular connection via a USB GPRS / 3G / 4G modem. For this we use the following RAP TD:

It has USB ports to which you can connect either a USB modem (although profiles need to be created for modems, but some work right away, for example, Huawei), or a USB printer or NAS disk. Thus, you can easily deploy a full mini-office in any convenient place.
In case of using these TDs it is possible to use a web portal.
VoIP and video surveillance
The implementation is very simple. Only wireless cameras and telephones are needed. For VoIP, you can create all the necessary policies in semi-automatic mode (you only need to specify the PBX address). For video traffic, you will have to prescribe the appropriate routing rules to the server that processes video stream from cameras.
With this, I will finish this part; due to a sufficiently large amount of material, I could miss some details that may be of interest to readers, but I did not write about them; I ask to inform in comments about such cases.
Thank you all for your attention!
Source: https://habr.com/ru/post/164113/
All Articles