PHDays CTF Quals: BINARY 500, or how to hide the flag below the baseboard
On December 15-17, 2012, qualifying competitions called PHDays CTF Quals were held . More than 300 teams competed for the right to participate in the PHDays III CTF competition, which will be held in May 2013 as part of the PHDays III international forum. Over the past two months, our team has been hard at work developing assignments for qualifying competitions, and we decided to devote this article to parsing one of them - Binary 500. This application is very unusual, so no team was able to get the flag hidden in its depths.
The executable file is an MBR bootkit using hardware virtualization technology (Intel VT-x). In this regard, we decided to immediately warn users that the application could harm the system, and that it should be launched on a virtual machine or emulator.

')
Warning and License Agreement
Let's start with a dropper review that installs a job on a computer. The main task of this module is quite trivial. It consists in writing files extracted from the resources section to a self-made hidden file system, and also rewriting the original loader (MBR) with its own. In addition, the dropper creates a copy of the original MBR and stores it in the file system.
The module uses several techniques that complicate its analysis. First, it is written in C ++ using STL, OOP and virtual functions. Therefore, all function calls are implicit and use virtual method tables.


Calling virtual methods in IDA Pro
The second approach, which complicates the analysis of this file, is reading and writing files. All hard disk operations are carried out directly via a SCSI controller. Instead of calling the standard ReadFile / WriteFile, we used the DeviceIoControl function with the control code SCSI_PASS_THROUGH_DIRECT, which allows you to interact with the hard disk at a lower level.
Also, all the files in the resources are encrypted using a 256-bit key.
We now turn to the description of the hidden file system. Its structure is quite simple. The growth of the system occurs from the end and is recorded for 2 sectors to the end of the hard disk. The first DWORD contains the number of files in the file system, added by the XOR operation with the constant 0x8FC54ED2. Next comes the file description directory:
The file index is simply some constant representing the file in the file system (instead of the name). Offset to file is measured in bytes relative to the beginning of the file system.

MiniFs file system structure
After the dropper has completed its work, it becomes clear that we have nothing more to do in the operating system, we need to reboot and debug the modified boot record. You can debug the MBR in several ways. Of course, this can be done on a real machine using a hardware debugger, but it is inconvenient and expensive. In this regard, we suggest using a VMWare virtual machine (you need to prescribe some virtual machine settings) by connecting to it using the GDB debugger (this method has significant drawbacks, which will be discussed later), or a Bochs emulator. The advantage of these two methods is that it can be analyzed using the IDA Pro debugger. This is very convenient, although here we are faced with big problems.
Finding out what tools we can debug this code, let's get down to business. The first part of the MBR is very simple, and its analysis should not cause any problems. The only thing it does is read the second part of our MBR (Extended MBR) from the hard disk by calling the 0x42 function of the 0x13 BIOS interrupt handler and write it to the address 0x7e00 (immediately after the first part of the bootloader). This action is necessary because the BIOS copies into memory only 512 bytes of the bootloader, and our code exceeds this size.
Once on the extended part of the bootloader, an experienced technician will immediately suspect that something is wrong, namely that the bootloader is obfuscated.
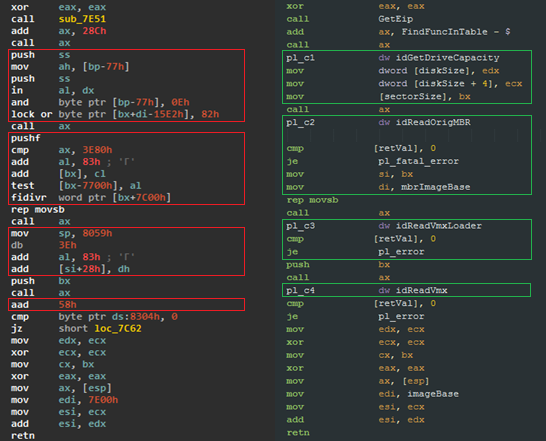
Comparing bootloader source with IDA Pro analysis result
The whole complexity of obfuscation is in function calls, since they occur implicitly. From the very beginning, the address of the function that searches for the called function in the special table associating the index of the function (two-byte constant) with its offset relative to this field of the table is entered into the register AX. This function takes the return address and reads the WORD, which is responsible for the function index. Next, an offset is searched in the table and control is transferred to this function. At the very end, control is returned for a constant with the index of the function being called (return address + 2).

Function table in MBR

Schematic representation of the MBR obfuscation algorithm
The boot sector code itself is fairly simple:
It is worth mentioning that a set of bytes from the Bochs emulator BIOS was used to encrypt the boot loader and the hypervisor body. Thus, the task turned out sharpened by this emulator. This was done for several reasons. First, debugging of hardware virtualization Intel VT-x is possible only on a real machine or on Bochs (since version 2.4.5). The first method within PHDays CTF Quals is very difficult. Thus, from the very beginning we were tied to the use of this emulator. Secondly, we did not want this task to be investigated only with the help of static analysis, so it was decided that encryption using a key from the BIOS would force players to use dynamic analysis. Thirdly, we decided to play it safe: in case of a random launch of the program on a real machine, the bootloader would not be decrypted, and control would be transferred to the original boot record, which would not damage the system.
To facilitate the work of the players, we laid out in advance the information that to solve one of the tasks they would need to build Bochs, as well as a working image of the operating system.
Hardware virtualization today is not a new concept. It became widespread in 2006–2007, when manufacturers of the most well-known processors on the market of AMD and Intel workstations began to produce processors supporting the corresponding functions. You will learn more about the virtual machine monitor (also known as the hypervisor) in the next section. This section will briefly review the verification of hardware virtualization on a test system.
As mentioned earlier, debugging an application using Intel VT-x hardware virtualization can be done only on a real machine or on a Bochs emulator (starting with version 2.4.5), but this does not end the problem. The standard emulator build does not support hardware virtualization. That is why we compiled a special assembly Bochs , a link to which we gave in the first hint to the task.
The main task of the hypervisor loader is to transfer the body of the hypervisor above the first megabyte and transfer control to it. However, on the way he makes several non-trivial operations, which should be discussed separately.
At the entrance, the hypervisor loader takes several parameters. Among them is the address to which it was downloaded. This address is used as the base of the code segment, which is set by the far jump.
Further, the CPUID instruction checks that the code is executed on the Intel-system (function 0), and that this system supports hardware virtualization (function 1). The check is as follows: if, when calling the CPUID in the EAX register, the value is 1, then the output in bit 5 of the ECX register will be the VMX flag. If the flag is on, virtualization is supported. To check if virtualization is blocked early in the boot phase (BIOS), you must read the MSR register number 0x3A. If the output of the RDMSR instruction in the EAX register is set to bit 0 and bit 2 is reset, then virtualization is disabled.
At the next stage, the function of reading the system memory card is called. This is achieved by calling the 0x15 interrupt loop with the 0xE820 parameter in the EAX register. At the same time, a set of records is stored in the buffer, describing the memory areas: base, length, type, additional type (if BIOS is supported). Next, the resulting map is examined for the presence of a section of free memory for the body of the monitor. The monitor itself currently takes about 20KB of space, but 2MB is saved (for convenience of working with memory). If such a memory is found, then it is marked as occupied.
In order to move the body of the monitor above the first megabyte, it is necessary to switch from real mode of operation to protected or long. Since in the future the monitor should work in a long mode (the documentation states that the monitor can remain in protected mode, but there is not much point in this), a transition to a long mode occurs. To do this, several conditions must be fulfilled: prepare page structures (PML4, PDPT, some PD for 2MB pages), coax the PAE bit in CR4 register, write the address of the PML4 table to CR3 register, set GDTR with long mode segment descriptors, turn LMA bit on in the MSR EFER register, set the PG and PE bits in the CR0 register. If after that you execute the instruction of the far transition, then there will be a switch from real mode to long.
It was noticed that the IDA 6.1 disassembler does not work correctly with the Bochs emulator and after switching to the long mode it starts producing strange values (in IDA 6.3 this error was fixed). Perhaps he independently calculates the values of the registers and does not contact Bochs for the corresponding services. However, he is not able to properly handle the direct switch from real mode to long.
Next, the hypervisor is copied to the destination address, and control is transferred to it.
A thin hypervisor was written especially for this task, which:
The main task facing the researcher of this code is to find the address from which the exit handlers from the guest system are started.
Reaching the exit handler of the virtual machine, the participant went to the finish line, and before receiving the coveted flag it remained to solve a small puzzle.
From the handler's code, it is easy to see that if the output was made according to the CPUID instruction, and the EIP register is equal to a certain value, then processing of some event begins. From the values of the EAX, ECX, EDX, EBX, ESI, EDI, ESP and EBP registers, the vector is filled (32 bytes), and then this vector is checked for validity. The test consists in substituting the vector (x_0, ..., x_31) into a system of equations of the following form:

If the equality holds, then the entered vector is correct and is used as a key to decrypt the buffer. Thus, the player needs to solve a system of equations of 32 equations with 32 unknowns and obtain an encryption key. The only complication of this test is that it was written using the instructions of the mathematical coprocessor (FPU).
In the encrypted buffer is another MBR, in which the flag is in clear form. Such a boot loader is registered to the original location, and a forced reboot is called, after which the MBR displays the flag on the screen.

An example of the displayed flag
Especially for testing, we wrote a small application that allocates memory at a given address, writes down the required offset (address + offset = required value of the EIP register) of the CPUID command and some more instructions, fills the general-purpose registers with the necessary values and transfers control to the desired address. Thus, when executing the CPUID instruction, the hypervisor intercepts the control, checks the flags, and reboots the system, displaying the flag on the screen.

Sample test program
Creating this application, we wanted to develop something non-standard, a program that would be interesting to analyze in a team, because to solve this task, you need to know the reverse analysis of Win32 applications, analysis of the real-mode processor loader, analysis of obfuscation and encryption principles. To solve, it is necessary to combine both static and dynamic analysis, as well as to study the basic principles of hardware virtualization, x86-64 assembler and apply the initial mathematical knowledge to obtain the flag.
We sincerely hope that we have managed to interest both the participants and those who read this review!
We decided to write this task three weeks before the start of qualifying competitions and were confident that we would finish it fairly quickly, but everything turned out to be very unexpected. We passed the task just a few hours before the start of qualifying competitions, not having time to test it. At the time of delivery, we were only sure that the participants had the opportunity to get a flag. However, the system, which was launched in a virtual environment, constantly produced errors and periodically fell into the blue screen of death, after which it refused to load at all. At the time of writing this article, we had a bit of time to correct a number of shortcomings and make a more stable version of the task. And yet, there was not enough time for the full stabilization of the OS operation, so we are sharing a new version of the task, as well as a video, demonstrating the work of the task and the test program. Thanks to all!
Archive with the task
Video
Maxim Grigoriev ( Slim_d0g ), Kovalev Sergey
Research Center Positive Research
The executable file is an MBR bootkit using hardware virtualization technology (Intel VT-x). In this regard, we decided to immediately warn users that the application could harm the system, and that it should be launched on a virtual machine or emulator.
')
Warning and License Agreement
Dropper
Let's start with a dropper review that installs a job on a computer. The main task of this module is quite trivial. It consists in writing files extracted from the resources section to a self-made hidden file system, and also rewriting the original loader (MBR) with its own. In addition, the dropper creates a copy of the original MBR and stores it in the file system.
The module uses several techniques that complicate its analysis. First, it is written in C ++ using STL, OOP and virtual functions. Therefore, all function calls are implicit and use virtual method tables.
Calling virtual methods in IDA Pro
The second approach, which complicates the analysis of this file, is reading and writing files. All hard disk operations are carried out directly via a SCSI controller. Instead of calling the standard ReadFile / WriteFile, we used the DeviceIoControl function with the control code SCSI_PASS_THROUGH_DIRECT, which allows you to interact with the hard disk at a lower level.
Also, all the files in the resources are encrypted using a 256-bit key.
We now turn to the description of the hidden file system. Its structure is quite simple. The growth of the system occurs from the end and is recorded for 2 sectors to the end of the hard disk. The first DWORD contains the number of files in the file system, added by the XOR operation with the constant 0x8FC54ED2. Next comes the file description directory:
struct MiniFsFileEntry { DWORD fileIndex; DWORD fileOffset; DWORD fileSize; }; The file index is simply some constant representing the file in the file system (instead of the name). Offset to file is measured in bytes relative to the beginning of the file system.
MiniFs file system structure
MBR
After the dropper has completed its work, it becomes clear that we have nothing more to do in the operating system, we need to reboot and debug the modified boot record. You can debug the MBR in several ways. Of course, this can be done on a real machine using a hardware debugger, but it is inconvenient and expensive. In this regard, we suggest using a VMWare virtual machine (you need to prescribe some virtual machine settings) by connecting to it using the GDB debugger (this method has significant drawbacks, which will be discussed later), or a Bochs emulator. The advantage of these two methods is that it can be analyzed using the IDA Pro debugger. This is very convenient, although here we are faced with big problems.
Finding out what tools we can debug this code, let's get down to business. The first part of the MBR is very simple, and its analysis should not cause any problems. The only thing it does is read the second part of our MBR (Extended MBR) from the hard disk by calling the 0x42 function of the 0x13 BIOS interrupt handler and write it to the address 0x7e00 (immediately after the first part of the bootloader). This action is necessary because the BIOS copies into memory only 512 bytes of the bootloader, and our code exceeds this size.
Once on the extended part of the bootloader, an experienced technician will immediately suspect that something is wrong, namely that the bootloader is obfuscated.
Comparing bootloader source with IDA Pro analysis result
The whole complexity of obfuscation is in function calls, since they occur implicitly. From the very beginning, the address of the function that searches for the called function in the special table associating the index of the function (two-byte constant) with its offset relative to this field of the table is entered into the register AX. This function takes the return address and reads the WORD, which is responsible for the function index. Next, an offset is searched in the table and control is transferred to this function. At the very end, control is returned for a constant with the index of the function being called (return address + 2).
Function table in MBR
Schematic representation of the MBR obfuscation algorithm
The boot sector code itself is fairly simple:
- getting hard disk parameters;
- reading the original boot record into memory from a hidden file system;
- Replacing our boot record with the original one at 0x7c00;
- reading from the file system and decrypting the bootloader hypervisor;
- reading from the file system and decrypting the body of the hypervisor;
- preparation of parameters and transfer of control to the hypervisor loader.
It is worth mentioning that a set of bytes from the Bochs emulator BIOS was used to encrypt the boot loader and the hypervisor body. Thus, the task turned out sharpened by this emulator. This was done for several reasons. First, debugging of hardware virtualization Intel VT-x is possible only on a real machine or on Bochs (since version 2.4.5). The first method within PHDays CTF Quals is very difficult. Thus, from the very beginning we were tied to the use of this emulator. Secondly, we did not want this task to be investigated only with the help of static analysis, so it was decided that encryption using a key from the BIOS would force players to use dynamic analysis. Thirdly, we decided to play it safe: in case of a random launch of the program on a real machine, the bootloader would not be decrypted, and control would be transferred to the original boot record, which would not damage the system.
To facilitate the work of the players, we laid out in advance the information that to solve one of the tasks they would need to build Bochs, as well as a working image of the operating system.
Hypervisor loader
Hardware virtualization today is not a new concept. It became widespread in 2006–2007, when manufacturers of the most well-known processors on the market of AMD and Intel workstations began to produce processors supporting the corresponding functions. You will learn more about the virtual machine monitor (also known as the hypervisor) in the next section. This section will briefly review the verification of hardware virtualization on a test system.
As mentioned earlier, debugging an application using Intel VT-x hardware virtualization can be done only on a real machine or on a Bochs emulator (starting with version 2.4.5), but this does not end the problem. The standard emulator build does not support hardware virtualization. That is why we compiled a special assembly Bochs , a link to which we gave in the first hint to the task.
The main task of the hypervisor loader is to transfer the body of the hypervisor above the first megabyte and transfer control to it. However, on the way he makes several non-trivial operations, which should be discussed separately.
At the entrance, the hypervisor loader takes several parameters. Among them is the address to which it was downloaded. This address is used as the base of the code segment, which is set by the far jump.
Further, the CPUID instruction checks that the code is executed on the Intel-system (function 0), and that this system supports hardware virtualization (function 1). The check is as follows: if, when calling the CPUID in the EAX register, the value is 1, then the output in bit 5 of the ECX register will be the VMX flag. If the flag is on, virtualization is supported. To check if virtualization is blocked early in the boot phase (BIOS), you must read the MSR register number 0x3A. If the output of the RDMSR instruction in the EAX register is set to bit 0 and bit 2 is reset, then virtualization is disabled.
At the next stage, the function of reading the system memory card is called. This is achieved by calling the 0x15 interrupt loop with the 0xE820 parameter in the EAX register. At the same time, a set of records is stored in the buffer, describing the memory areas: base, length, type, additional type (if BIOS is supported). Next, the resulting map is examined for the presence of a section of free memory for the body of the monitor. The monitor itself currently takes about 20KB of space, but 2MB is saved (for convenience of working with memory). If such a memory is found, then it is marked as occupied.
In order to move the body of the monitor above the first megabyte, it is necessary to switch from real mode of operation to protected or long. Since in the future the monitor should work in a long mode (the documentation states that the monitor can remain in protected mode, but there is not much point in this), a transition to a long mode occurs. To do this, several conditions must be fulfilled: prepare page structures (PML4, PDPT, some PD for 2MB pages), coax the PAE bit in CR4 register, write the address of the PML4 table to CR3 register, set GDTR with long mode segment descriptors, turn LMA bit on in the MSR EFER register, set the PG and PE bits in the CR0 register. If after that you execute the instruction of the far transition, then there will be a switch from real mode to long.
It was noticed that the IDA 6.1 disassembler does not work correctly with the Bochs emulator and after switching to the long mode it starts producing strange values (in IDA 6.3 this error was fixed). Perhaps he independently calculates the values of the registers and does not contact Bochs for the corresponding services. However, he is not able to properly handle the direct switch from real mode to long.
Next, the hypervisor is copied to the destination address, and control is transferred to it.
Hypervisor
A thin hypervisor was written especially for this task, which:
- logs in to VMX root mode;
- configures the VMCS structure for running the guest system in real mode from the address 0x7C00;
- installs guest exit handlers;
- starts the guest with the VMLAUNCH instruction.
The main task facing the researcher of this code is to find the address from which the exit handlers from the guest system are started.
Flag
Reaching the exit handler of the virtual machine, the participant went to the finish line, and before receiving the coveted flag it remained to solve a small puzzle.
From the handler's code, it is easy to see that if the output was made according to the CPUID instruction, and the EIP register is equal to a certain value, then processing of some event begins. From the values of the EAX, ECX, EDX, EBX, ESI, EDI, ESP and EBP registers, the vector is filled (32 bytes), and then this vector is checked for validity. The test consists in substituting the vector (x_0, ..., x_31) into a system of equations of the following form:
If the equality holds, then the entered vector is correct and is used as a key to decrypt the buffer. Thus, the player needs to solve a system of equations of 32 equations with 32 unknowns and obtain an encryption key. The only complication of this test is that it was written using the instructions of the mathematical coprocessor (FPU).
In the encrypted buffer is another MBR, in which the flag is in clear form. Such a boot loader is registered to the original location, and a forced reboot is called, after which the MBR displays the flag on the screen.
An example of the displayed flag
Test application
Especially for testing, we wrote a small application that allocates memory at a given address, writes down the required offset (address + offset = required value of the EIP register) of the CPUID command and some more instructions, fills the general-purpose registers with the necessary values and transfers control to the desired address. Thus, when executing the CPUID instruction, the hypervisor intercepts the control, checks the flags, and reboots the system, displaying the flag on the screen.
Sample test program
Conclusion
Creating this application, we wanted to develop something non-standard, a program that would be interesting to analyze in a team, because to solve this task, you need to know the reverse analysis of Win32 applications, analysis of the real-mode processor loader, analysis of obfuscation and encryption principles. To solve, it is necessary to combine both static and dynamic analysis, as well as to study the basic principles of hardware virtualization, x86-64 assembler and apply the initial mathematical knowledge to obtain the flag.
We sincerely hope that we have managed to interest both the participants and those who read this review!
From the authors
We decided to write this task three weeks before the start of qualifying competitions and were confident that we would finish it fairly quickly, but everything turned out to be very unexpected. We passed the task just a few hours before the start of qualifying competitions, not having time to test it. At the time of delivery, we were only sure that the participants had the opportunity to get a flag. However, the system, which was launched in a virtual environment, constantly produced errors and periodically fell into the blue screen of death, after which it refused to load at all. At the time of writing this article, we had a bit of time to correct a number of shortcomings and make a more stable version of the task. And yet, there was not enough time for the full stabilization of the OS operation, so we are sharing a new version of the task, as well as a video, demonstrating the work of the task and the test program. Thanks to all!
Archive with the task
Video
Maxim Grigoriev ( Slim_d0g ), Kovalev Sergey
Research Center Positive Research
Source: https://habr.com/ru/post/164057/
All Articles