Authentication of SUSE Linux file servers in an AD-based Windows domain
Samba Domain Domain Authentication
We continue a series of articles about the interaction of Linux and Windows. Now we will consider the task of introducing a server with the SUSE Linux operating system (version 12.1) into a Windows 2008 domain. Immediately it should be mentioned that we will use the standard means of openSUSE Linux - the utility for configuring and managing the YaST packages. Read more about YaST on the site.
On the openSuSE project site, you can find information on configuring Samba, but this information mainly concerns older versions (openSuSE 11) and covers a small number of configuration examples.
To organize a test network, we will use the VMware VSphere 5 virtual environment, which is based on the ESXi hypervisor architecture. However, one could use the well-proven Microsoft Hyper-V, as well as any other similar solution.
The test environment is an Active Directory-based domain network (Active Directory Domain Services - AD DS), which consists of two infrastructure servers running MS Windows Server2008 R2 EE and one client machine — MS Windows 7 Professional. IP addresses from subnet 192.168.7.0/24 are used.
Domain Name - LAB.LOCAL
ForefrontThreat Management Gateway (TMG) 2010 Server - LAB-TMG.lab.local
Client - LAB-CL1.lab.local
Roles are installed on LAB-DC1:
Active Directory Certificate Services (AD CS);
Active Directory Domain Services (Active Directory Domain Services - AD DS);
DHCP server (Scope name: LAB.LOCAL; Address pool: 192.168.7.20–192.168.7.70);
DNS server (Type: AD-Integrated; Dynamic updates: Secure only);
Web Services (IIS).
Test network and interaction protocol descriptions are given in the article . In contrast to the previous article , we will try to solve the same problem, without resorting to editing files and using the command line in Linux.
Network adapter configuration
After we installed SUSE Linux, you need to configure the network connection. Note that we use static IP addresses.
Through the Network Devices section, select the Network Settings item. YaST will offer us a list of available network adapters; select the required and press the Edit button. Now we will enter the necessary data, as shown in Fig. one.

We set the static IP address to 192.168.7.9 with a mask of 255.255.255.0. This is one of the most common options for setting up a network connection. Depending on the network configuration, these settings may vary.
In addition to the IP address, you must specify the DNS settings (see Figure 2).
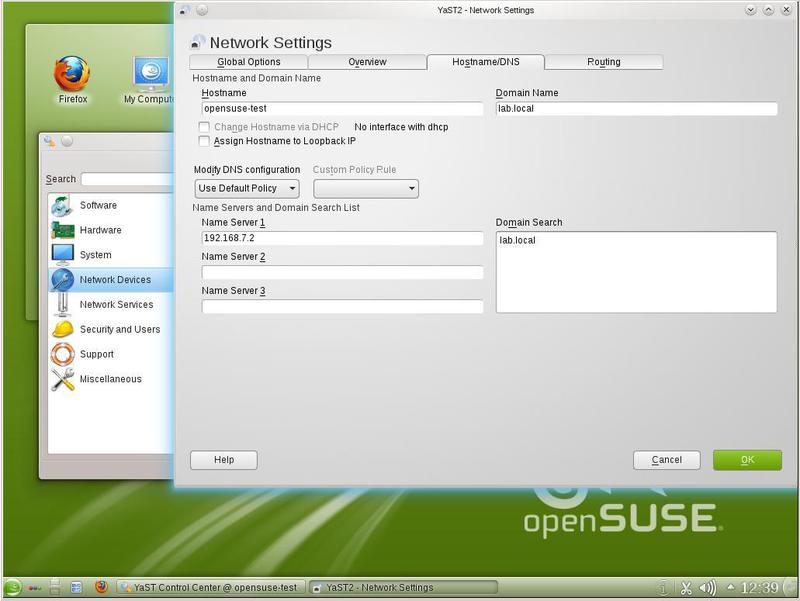
The default router settings are set depending on your network configuration. We have his address 192.168.7.3.
Click OK and wait for the system to be configured. To check the correctness of the work, it is better to reboot. Rebooting the system is not mandatory, but when rebooting we will be able to verify the correctness of the startup files. You can restart the necessary services (network) manually.
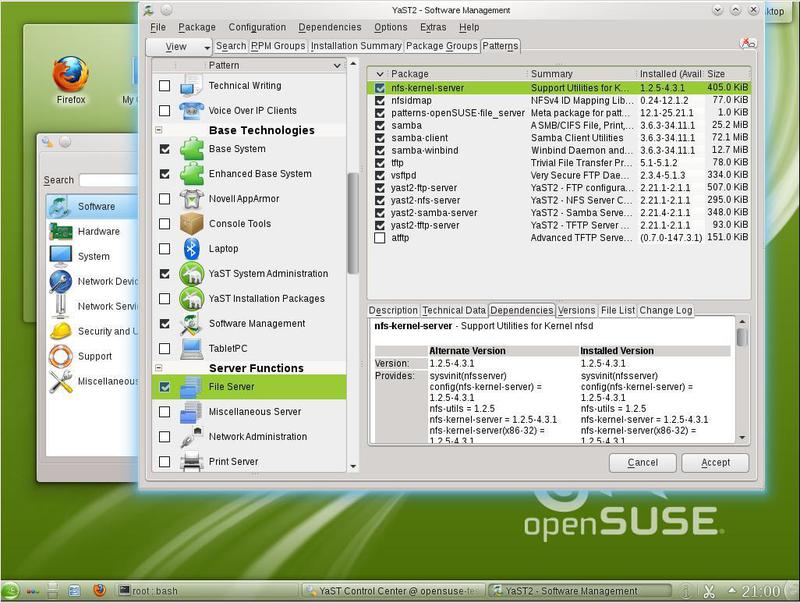
Required Packages
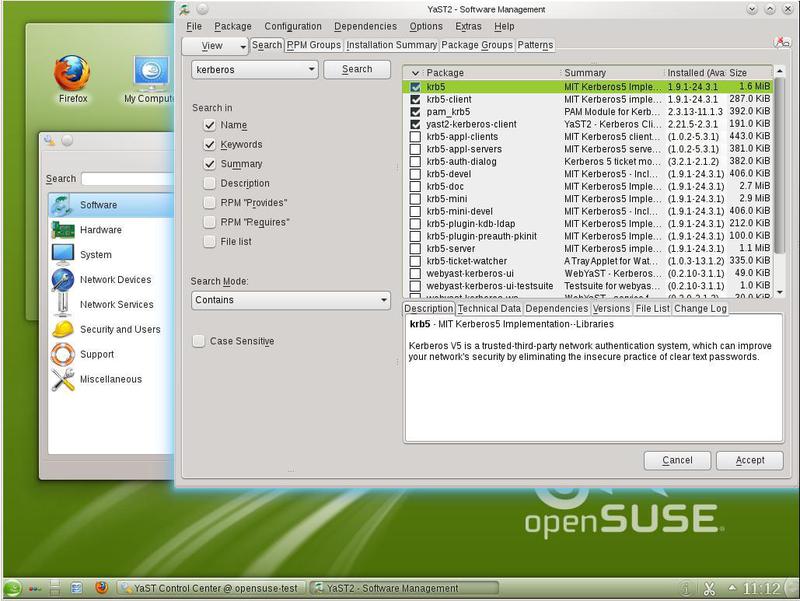
As already mentioned in previous articles, besides Samba, for the work we need LDAP and Kerberos. Of course, these packages should be selected when installing the system. But YaST allows you to install packages as needed - as long as the repositories are available where these packages are stored. Using the Software section in YaST and the Software Management item, check which packages we have installed.
Samba first (Fig. 3).
Do not forget about Kerberos (Fig. 4).
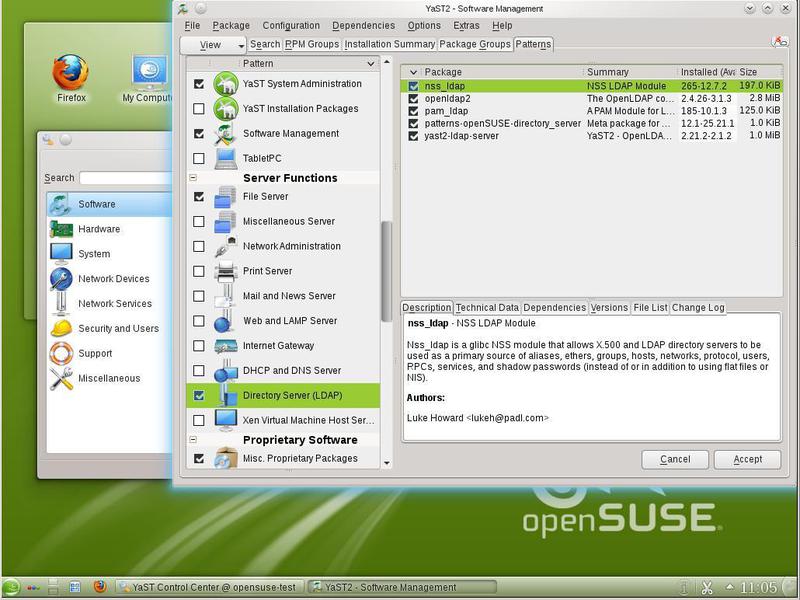
In the presence of LDAP there is no serious need, but we still put it: it will be useful to us in the future, with a possible expansion of the functionality of our server. For example, we can get through LDAP lists of users to configure mail systems. In fig. 5 shows a list of LDAP packages, but it is wider than the minimum required set.
')
NTP configuration
All packages are installed in the system, and we can proceed with the configuration. Let's start with the correct time setting. In YaST, choose Network Services> NTP Configuration. Do not forget that our domain controller 192.168.7.2 is also an NTP server. The result of the setting is the following picture (Fig. 6). Recall that the correct time synchronization with the domain controller is necessary for the correct operation of Kerberos.
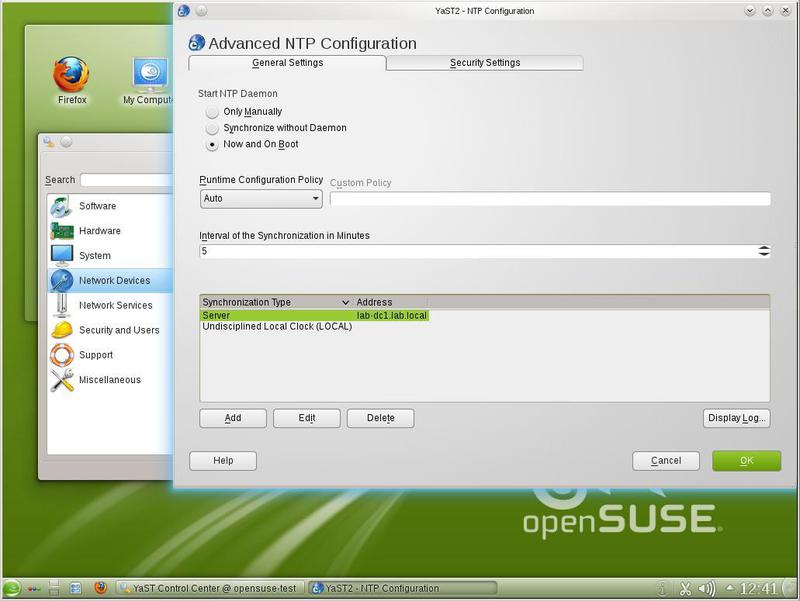
By selecting the “Now and On Boot” button, we launch the NTP daemon on our SUSE Linux server. Thus, our server can act as a time server. By selecting the “Synchronize without Daemon” item, we will launch a periodic (once every 5 minutes) update of the time of our server from the domain controller via crontab. The choice of time synchronization method depends on how our SUSE Linux server will be used in the future.
Kerberos Setup
Now we need to configure Kerberos. In YaST, choose Network Services> Kerberos Client. We should get the result shown in fig. 7
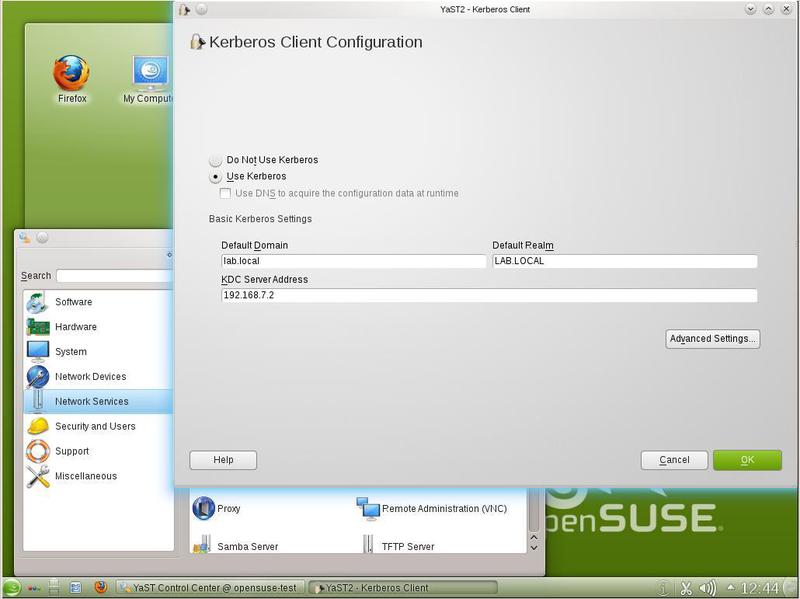
Now we will not dwell on “Advanced Settings” - various parameters are set there, both for the Kerberos client and for the authentication methods in the system. While it is better not to touch this item.
LDAP configuration
It is time to configure LDAP. As mentioned earlier, this is not necessary for Samba to work, because Samba has its own LDAP implementation. But we still show how to configure LDAP and what features we can use in the future.
Our LDAP server is a domain controller (Figure 8).
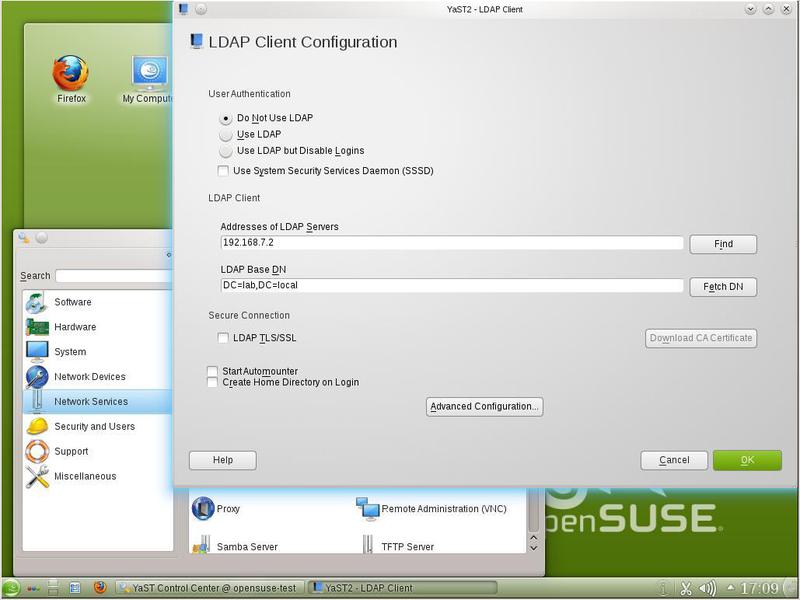
There are several modes of LDAP. The phrase “Do Not Use LDAP” says that LDAP is configured but not used when the system is running. “Use LDAP but Disable Login” does not use LDAP when authenticating to the system. And if you select “Use LDAP” to log in (Window Manager, ssh and other services), an LDAP server (that is, a domain controller) can be used. Using LDAP to log in is not the best option in our case - the functions of our server (file storage) do not require this method of authentication. But everything will depend on how the server will be used.
After we have specified the LDAP server, you can also reboot the machine to make sure that it works correctly. After reboot, call YaST and LDAP Client Configuration again. We will see that the address of the LDAP server is preserved, and click on the “Fetch DN” button. As a result, we are what is shown in Fig. 9 (LDAP configuration. Data request).
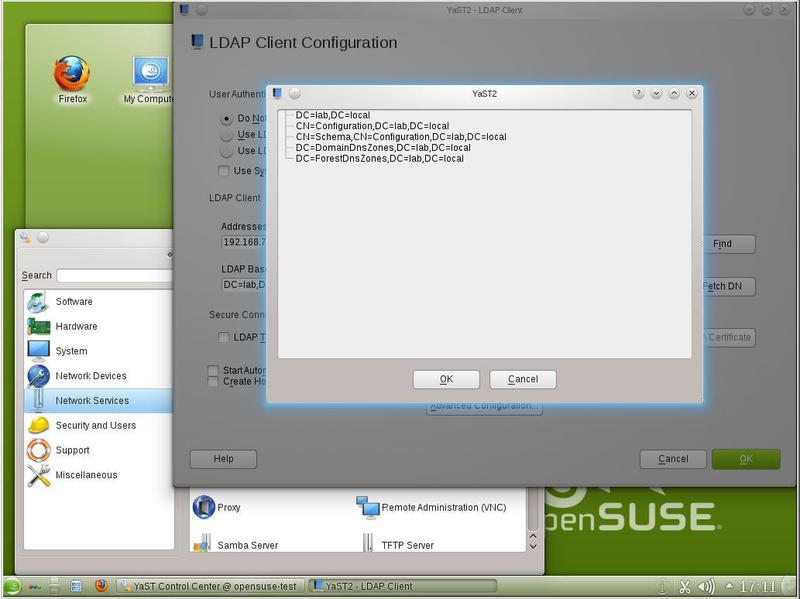
We received domain information from the LDAP server. So, everything works well, and you can continue configuring LDAP. Select “Advanced Configuration” in the LDAP Client configuration and see the image shown in Figure 2. ten.
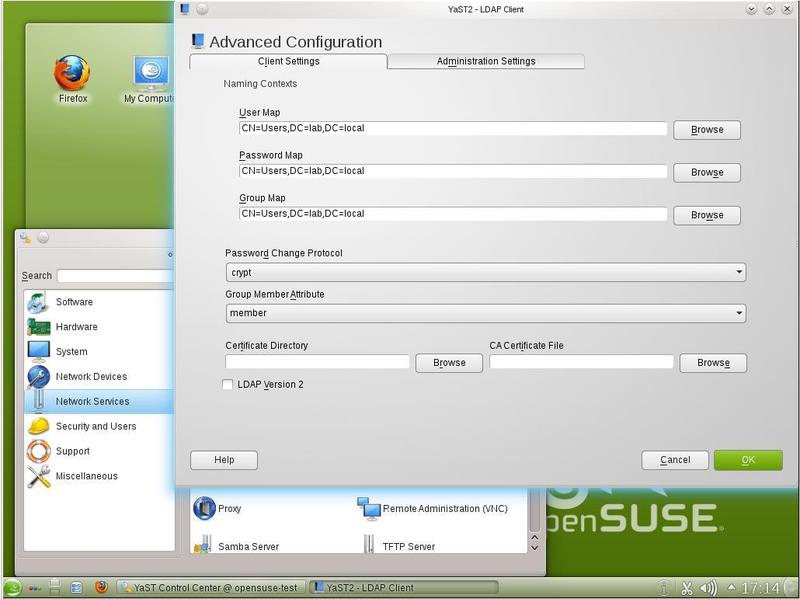
In this figure, the User Map, Password Map, and Group Map fields are already filled. You can edit them manually, or you can select the Administration Setting tab and enter the name of the administrator (Fig. 11).

After entering the administrator name and selecting other items (for example, Configure User Management Setting - just to see it), you will be prompted to enter the administrator password (Figure 12).

What is all this for? And you need this in order (we repeat: this is not necessary) so that our SUSE Linux server can receive various information from a domain controller. Go back to the Client Settings tab and click the Browse button near the User Map. The result will be as in fig. 13 (Retrieving information from an LDAP server.).

We received information from the domain controller about the objects stored in the LDAP database about users, and now we can use it; for example, for email services on Linux.
In addition to the LDAP Client, you can also launch the LDAP Browser through YaST to view more detailed information provided by a domain controller — for example, similar to that shown in Figure. 14.

To connect to an LDAP domain controller, the Browser asks for a user password (Figure 15).

Samba Setup
Now it's time to move on to configuring Samba.
In YaST, select the Network Services section and the Samba Server item. First, you will be prompted to select the Samba startup method (Manual or During Boot). (See fig. 16.)
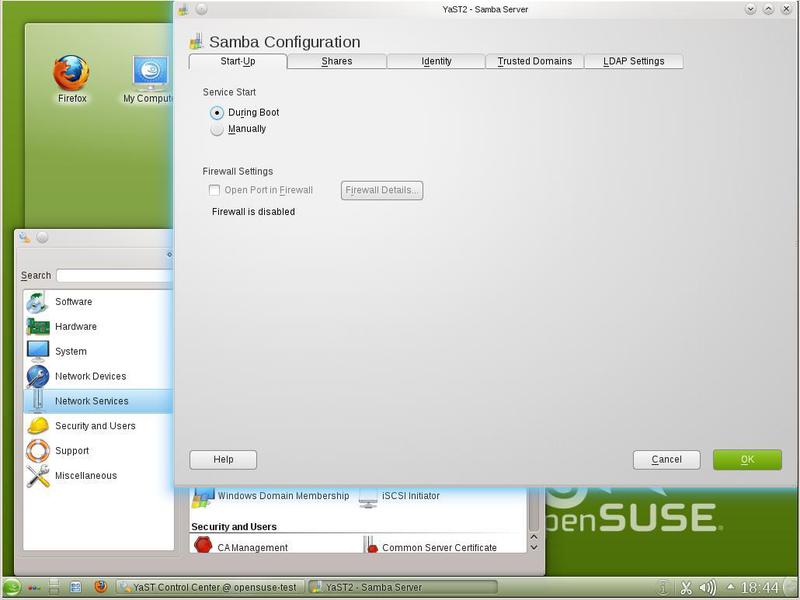
When you select During Boot, the Samba server starts during the system startup, with Manual you need to start Samba manually. It should be noted that the During Boot mode can be installed during the installation of Samba packages, and then there is no question of choice. Now you need to specify the name of the Windows domain (Fig. 17).

Samba can work as an NT4 domain controller. The next window (Fig. 18) will be asked to choose whether Samba will be a domain controller or not. And if so, the primary or secondary controller?

In our case, we select Not a Domain Controller. As an NT4 domain controller, Samba works well with Windows XP / 2000/2003 operating systems, but there will be some difficulties with Windows 7 in AD mode. Working Samba as a domain controller is the subject of a separate discussion. Some information about the operation of a domain controller on Samba with Windows 7 clients is presented here.
Now you need to specify shared resources (Shared folders) on the Samba server (Fig. 19).

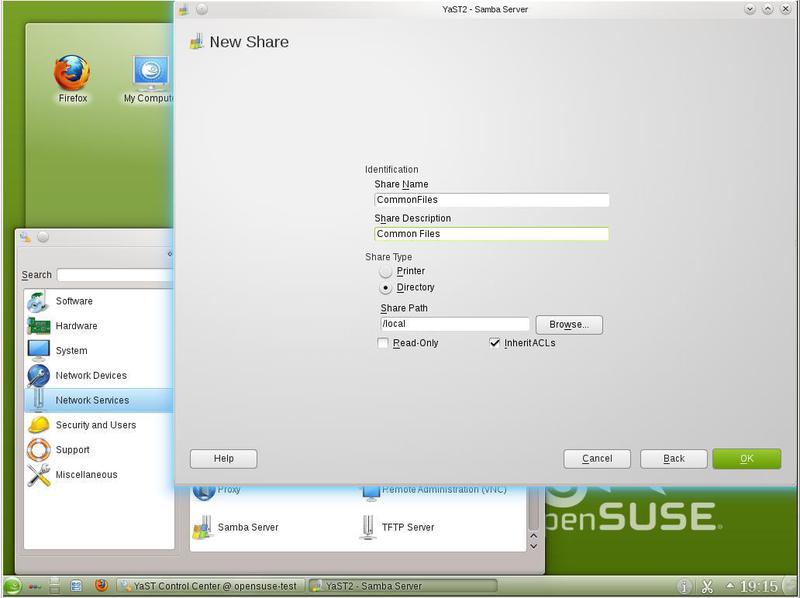
As you can see, now we do not have those, and the available resource netlogon has the status Disabled. When installing Samba, a configuration file from the distribution can be installed, where shared resources are already specified. If we need to add more resources (folders), then select the Add item, and we will be asked to enter the parameters of the new shared resource (Fig. 20).
Now the list of shared resources on the server looks like in fig. 21.

On the Shares tab, you can specify access modes to shared directories. You can allow users to provide access to home directories and allow guest access.
Now it is time to enter some identification parameters on the Identity tab (Fig. 22).
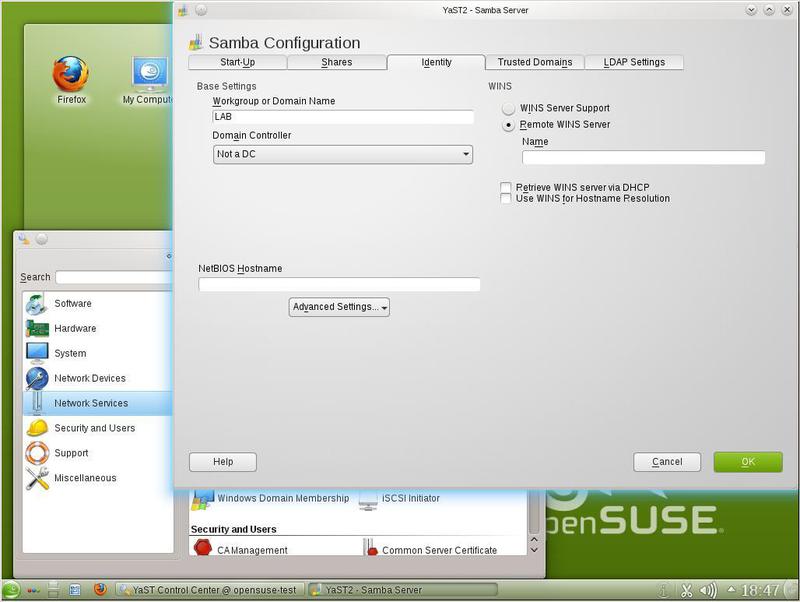
Here we already see the domain name LAB. It is advisable to specify the name of Netbios and, possibly, to clarify some parameters by clicking on the Advanced Settings button.
You can enable WINS support, which resolves NetBIOS names to IP addresses. Read more about WINS here .
You also need to enter LDAP settings on the LDAP Settings tab (Figure 23).
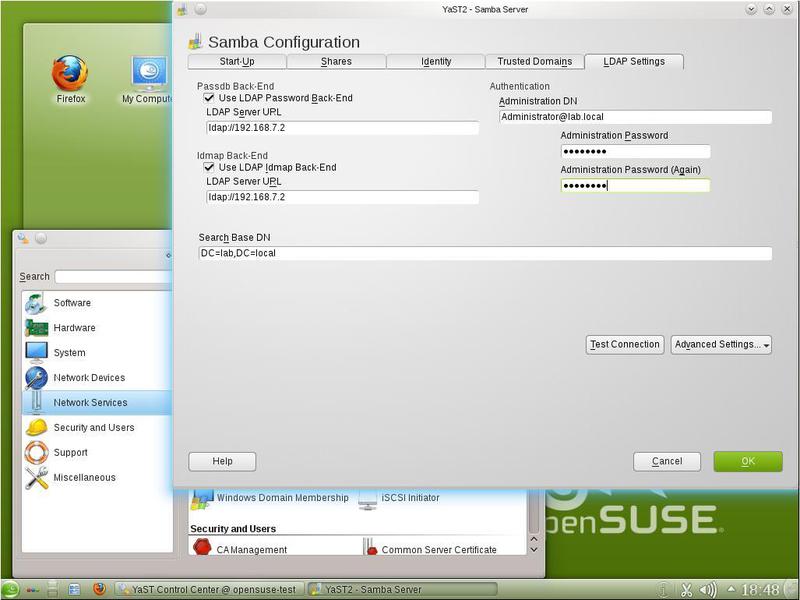
The LDAP Password Backend and LDAP Idmap Backend parameters will be automatically selected, Samba will determine the name of the LDAP server itself. We will only need to enter a unique name (DN - from the Distinguished Name) administrator and his password. But there may be a problem. The fact is that when specifying a domain name (see Figure 1) ending in .local, SUSE Linux connects to the mDNS service. And if mDNS does not find the server name, an error will occur. One way out of this situation is to manually edit the nsswitch.conf file, or specify the IP address of the LDAP server. More information about mDNS can be found on the website .
To test the correctness of the work, click Test Connection and see that everything is in order (Fig. 24).

As you can see, everything turned out. Now you can click OK everywhere, the server configuration will be saved. To make sure that our server is working properly, you can also restart the machine. It should be noted that after clicking OK you may be prompted to connect to the Windows domain. We do not recommend doing this from the Samba Server window. It would be better to call the Windows Domain Membership item in the YaST Network Services section (Figure 25). When using this item offers a more complete diagnosis of problems. In addition, customization using Windows Domain Membership offers more customization options.

In the Windows Domain Membership window, you can specify a number of parameters. At the bottom, you can refine the NTP settings, allow users to share their directories, and allow guest access to the server, as well as setting up shared Samba directories.
Much more interesting options are listed at the top of the window. By ticking Use SMB Information for Linux Authentication, we enable SUSE Linux user authentication in the Windows domain. When specifying this option, users should specify domain names and passwords when accessing the graphical shell, to the command line, and to other services. It is necessary to carefully set this option, because not all window display managers (for example, KDM and XDM) presented in the SUSE Linux distribution can support authentication through the Windows domain. We will leave this option for further discussion.
Clicking OK, we will receive a proposal to include our server in the Windows domain (Fig. 26).
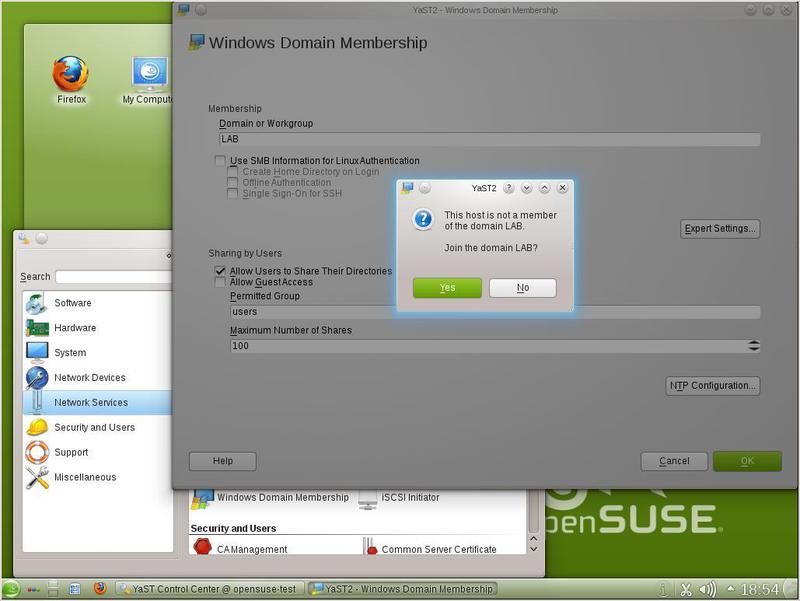
Agreeing with the proposal, select Yes and receive an invitation to enter the administrator password in fig. 27.

Some time after entering the password, we should receive confirmation of the inclusion of our server in the domain and see the modified Windows domain membership window (Fig. 28).
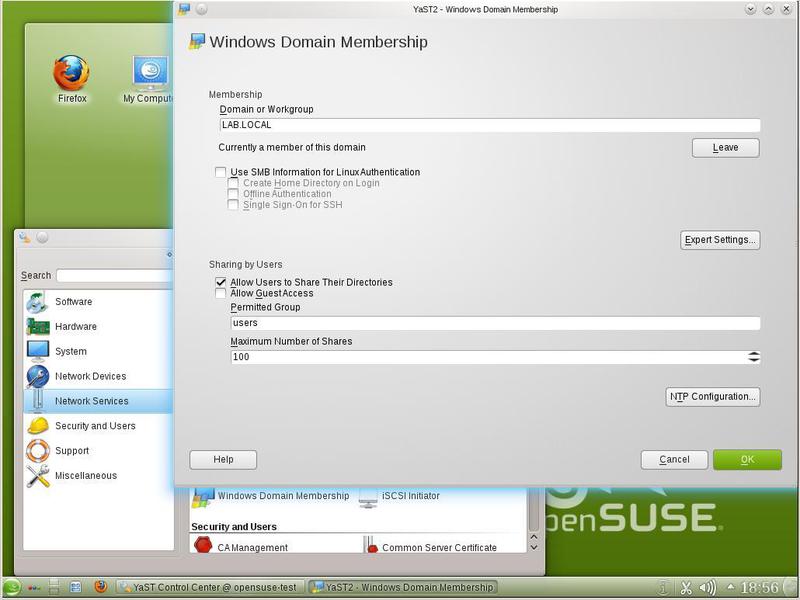
As you can see, the domain name has changed (it coincides with the Kerberos realm) and the Leave button has appeared - disconnect from the domain. This indicates the correctness of inclusion in the domain.
Health check
With the correct inclusion in the domain, on the domain controller we will see our SUSE Linux server (Fig. 29).
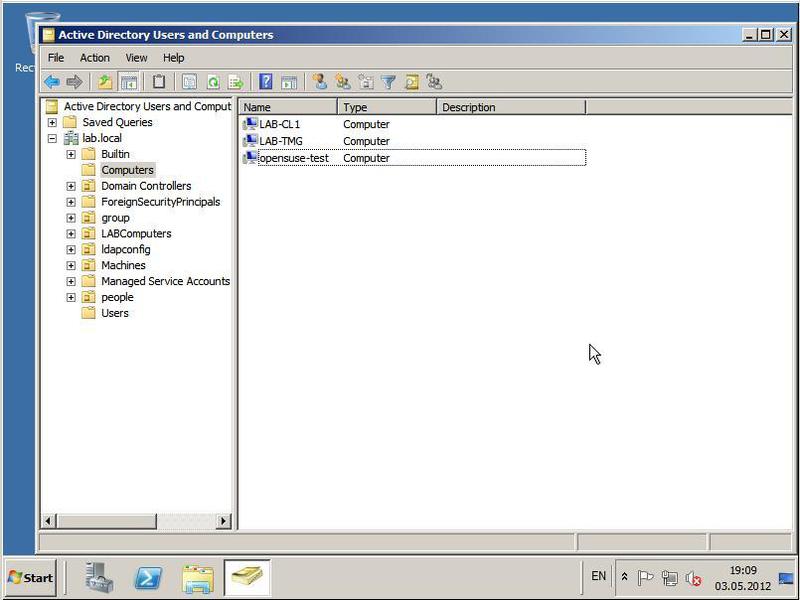
We can say that the task is completed. Now you can work with our new server. In the following, we will look at possible problems that appear when SUSE Linux is enabled in the domain, and how to resolve them.
Some common problems and solutions
For Samba to work correctly in the Windows 2008 R2 domain, it is very important that the names are resolved correctly. This includes forward and reverse name resolution, domain name resolution, Kerberos services, and LDAP services. One solution to this problem is to specify the IP addresses when configuring Linux, and not the names, even though the names are resolved correctly when installing Samba. It is important to make sure that the Use Kerberos mode is enabled on the Kerberos Client tab. It is very important to use the latest version of Samba and other packages.
Conclusion
The work was performed on the basis of the Information Computing Center of the Moscow Power Engineering Institute.
We welcome your comments and suggestions. We have the ability to build a test network and debug various options and system configurations on it to ensure their interaction.
Source: https://habr.com/ru/post/164053/
All Articles