Android: Quick control menu
Anyone wishing to use the menu from the browser and the new camera
welcome under cat.
')
While working on one of the applications, the question was how to make a menu for the user. Having played enough with the Browser application for ICS, it was decided to use its optional component PieMenu. In another project, there was a need for a menu that not only appears nicely, but also knows how to do it in an arbitrary place.
For me, it remains a big mystery why the menu data was not added to the API: quite a large number of people like these menus, and the developers would not need to reinvent the wheel.
So, my path lay on the AOSP (Android Open Source Project). The search for application data source was a success. Both versions of the menu were taken from the master branch.
 Further, all bindings to the application were removed: fields, methods, listeners, etc. (and the code is really very connected with the application components, i.e. it is trivial to take and declare an object not work). For ease of use, the side menu has added the ability to install separate Listeners on different menu items, adding
This menu supports sub-menu display. From the code side, it looks like adding an item to another
Important point : set the number of submenus for each item'a coinciding with any ring. For example, you have 3 item in the first ring and 2 in the second. Then on the item'a submenu of the 1st ring, you can put either 2 elements (since only 2 positions will remain during deployment), or 2 elements of the 2nd ring (since they can be completely replaced). Initially, the code in violation of this condition went to the Apostle Peter and complained that he was forced to do terrible things. However, now you can experiment with how the code will behave without fear of Exception.
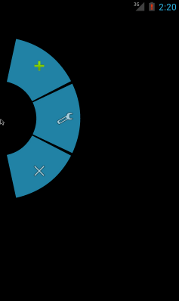
This class allows you to implement a side menu.
Let's declare the successor of this class and override the methods of
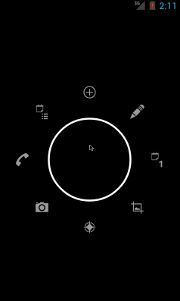
This class allows you to implement a circular menu from the Camera application. To use it, in my opinion, is much easier than PieControl. Conceptually, this menu is different from the sidebar: you can attach it not to any
Create a
The source of the resulting library can be pulled from here .
Runs on Android 2.2.1 and higher (theoretically it works on Android 1.0 and higher).
Thank you for your attention and have a nice day!
Update:
Thanks to Prototik for the hint about the ported Animation classes. The menu now also works on older APIs: JakeWharton indicates a minimum API 1.0, but I was able to check for 2.2.1 and higher.
welcome under cat.
')
Prehistory
While working on one of the applications, the question was how to make a menu for the user. Having played enough with the Browser application for ICS, it was decided to use its optional component PieMenu. In another project, there was a need for a menu that not only appears nicely, but also knows how to do it in an arbitrary place.
For me, it remains a big mystery why the menu data was not added to the API: quite a large number of people like these menus, and the developers would not need to reinvent the wheel.
Sources
So, my path lay on the AOSP (Android Open Source Project). The search for application data source was a success. Both versions of the menu were taken from the master branch.
Modification of the side menu
Further, all bindings to the application were removed: fields, methods, listeners, etc. (and the code is really very connected with the application components, i.e. it is trivial to take and declare an object not work). For ease of use, the side menu has added the ability to install separate Listeners on different menu items, adding Item 's from the List . In the initial implementation, the level parameter in the constructor did not work at all. He is responsible for the number of the ring in the menu, where the 1st ring with the minimum radius, and with increasing level the radius increases. After studying the code, it turned out that Path , which draws the background for the icon, was reassigned for each new ring in the drawing method, which made it impossible to use the multi-level menu. This deficiency has been eliminated.This menu supports sub-menu display. From the code side, it looks like adding an item to another
Item .Important point : set the number of submenus for each item'a coinciding with any ring. For example, you have 3 item in the first ring and 2 in the second. Then on the item'a submenu of the 1st ring, you can put either 2 elements (since only 2 positions will remain during deployment), or 2 elements of the 2nd ring (since they can be completely replaced). Initially, the code in violation of this condition went to the Apostle Peter and complained that he was forced to do terrible things. However, now you can experiment with how the code will behave without fear of Exception.
PieControl
This class allows you to implement a side menu.Let's declare the successor of this class and override the methods of
populateMenu() . I also advise you to add setListeners() for conveniently installing Listener clicks. The PieItem element PieItem created using makeItem() . As parameters, we specify the resource icon and level (ring number). Then we create an object of our new class, bind it to the frame via attachToContainer() and install the Listeners by calling the setListeners() method.Heir example:
private class TestMenu extends PieControl { List<PieItem> plus_sub; List<PieItem> minus_sub; public TestMenu(Activity activity) { super(activity); } protected void populateMenu() { PieItem plus = makeItem(android.R.drawable.ic_input_add,1); { plus_sub = new ArrayList<PieItem>(2); plus_sub.add(makeItem(android.R.drawable.ic_input_add,2)); plus_sub.add(makeItem(android.R.drawable.ic_input_add, 2)); plus.addItems(plus_sub); } PieItem minus = makeItem(android.R.drawable.ic_menu_preferences,1); { minus_sub = new ArrayList<PieItem>(2); minus_sub.add(makeItem(android.R.drawable.ic_menu_preferences,1)); minus_sub.add(makeItem(android.R.drawable.ic_menu_preferences, 1)); minus.addItems(minus_sub); } PieItem close = makeItem(android.R.drawable.ic_menu_close_clear_cancel,1); mPie.addItem(plus); mPie.addItem(minus); mPie.addItem(close); PieItem level2_0 = makeItem(android.R.drawable.ic_menu_report_image, 2); mPie.addItem(level2_0); PieItem level2_1 = makeItem(android.R.drawable.ic_media_next, 2); mPie.addItem(level2_1); } public void setListeners() { this.setClickListener(plus_sub.get(0),new View.OnClickListener() { @Override public void onClick(View view) { Toast.makeText(getApplicationContext(),"Clicked plus 1", Toast.LENGTH_SHORT).show(); } }); this.setClickListener(plus_sub.get(1), new View.OnClickListener() { @Override public void onClick(View view) { Toast.makeText(getApplicationContext(),"Clicked plus 2", Toast.LENGTH_SHORT).show(); } }); this.setClickListener(minus_sub.get(0), new View.OnClickListener() { @Override public void onClick(View view) { Toast.makeText(getApplicationContext(),"Clicked minus 1", Toast.LENGTH_SHORT).show(); } }); this.setClickListener(minus_sub.get(1), new View.OnClickListener() { @Override public void onClick(View view) { Toast.makeText(getApplicationContext(),"Clicked minus 2", Toast.LENGTH_SHORT).show(); } }); this.setClickListener(close, new View.OnClickListener() { @Override public void onClick(View view) { finish(); } }); } } Example of declaring a menu:
TestMenu testMenu = new TestMenu(this); testMenu.attachToContainer(some_container); testMenu.setListeners(); PieRenderer
This class allows you to implement a circular menu from the Camera application. To use it, in my opinion, is much easier than PieControl. Conceptually, this menu is different from the sidebar: you can attach it not to any ViewGroup heirs, but only to a special RenderOverlay (which is actually a regular FrameLayout with a small set of additional methods, but this is inner workings). To RenderOverlay you can bind objects of the Renderer type, the heir of which is PieRenderer . We need it to draw the menu. We also need the PieController class to add items to the menu. So let's get started:Create a
PieRenderer object, a PieController object, menu items using the makeItem method in PieController . Add menu items to PieRenderer via addItem. Then we create the RenderOverlay object (or find it via findViewById , if you like to define everything in xml). Add PieRendere to RenderOverlay via addRenderer . Now the final touch: in onTouchEvent send an event to the PieRenderer handler PieRendererSample Activity Code:
public class MainActivity extends Activity { private static float FLOAT_PI_DIVIDED_BY_TWO = (float) Math.PI / 2; private final static float sweep = FLOAT_PI_DIVIDED_BY_TWO / 2; private PieRenderer pieRenderer; public void onCreate(Bundle savedInstanceState) { super.onCreate(savedInstanceState); requestWindowFeature(Window.FEATURE_NO_TITLE); setContentView(R.layout.main); pieRenderer = new PieRenderer(getApplicationContext()); PieController pieController = new PieController(this, pieRenderer); RenderOverlay renderOverlay = (RenderOverlay) findViewById(R.id.render_overlay); PieItem item0 = pieController.makeItem(android.R.drawable.arrow_up_float); item0.setFixedSlice(FLOAT_PI_DIVIDED_BY_TWO, sweep); item0.setOnClickListener(new PieItem.OnClickListener() { @Override public void onClick(PieItem item) { Toast.makeText(getApplicationContext(), "some cmd", Toast.LENGTH_SHORT).show(); } }); PieItem item1 = pieController.makeItem(android.R.drawable.arrow_up_float); item1.setFixedSlice(FLOAT_PI_DIVIDED_BY_TWO + sweep, sweep); item1.setOnClickListener(new PieItem.OnClickListener() { @Override public void onClick(PieItem item) { Toast.makeText(getApplicationContext(), "some cmd 2", Toast.LENGTH_SHORT).show(); } }); PieItem item7 = pieController.makeItem(android.R.drawable.arrow_up_float); item7.setFixedSlice(FLOAT_PI_DIVIDED_BY_TWO - sweep, sweep); item7.setOnClickListener(new PieItem.OnClickListener() { @Override public void onClick(PieItem item) { Toast.makeText(getApplicationContext(), "some cmd 7", Toast.LENGTH_SHORT).show(); } }); pieRenderer.addItem(item0); pieRenderer.addItem(item1); pieRenderer.addItem(item7); PieItem item0_0 = pieController.makeItem(android.R.drawable.ic_menu_add); item0_0.setFixedSlice(FLOAT_PI_DIVIDED_BY_TWO, sweep); item0_0.setOnClickListener(new PieItem.OnClickListener() { @Override public void onClick(PieItem item) { Toast.makeText(getApplicationContext(), "some cmd", Toast.LENGTH_SHORT).show(); } }); PieItem item0_6 = pieController.makeItem(android.R.drawable.ic_menu_add); item0_6.setFixedSlice(FLOAT_PI_DIVIDED_BY_TWO + sweep, sweep); item0_6.setOnClickListener(new PieItem.OnClickListener() { @Override public void onClick(PieItem item) { Toast.makeText(getApplicationContext(), "some cmd 2", Toast.LENGTH_SHORT).show(); } }); PieItem item0_7 = pieController.makeItem(android.R.drawable.ic_menu_add); item0_7.setFixedSlice(FLOAT_PI_DIVIDED_BY_TWO - sweep, sweep); item0_7.setOnClickListener(new PieItem.OnClickListener() { @Override public void onClick(PieItem item) { Toast.makeText(getApplicationContext(), "some cmd 7", Toast.LENGTH_SHORT).show(); } }); item0.addItem(item0_0); item0.addItem(item0_6); item0.addItem(item0_7); renderOverlay.addRenderer(pieRenderer); } @Override public boolean onTouchEvent(MotionEvent event) { pieRenderer.onTouchEvent(event); return super.onTouchEvent(event); } } Afterword
The source of the resulting library can be pulled from here .
Runs on Android 2.2.1 and higher (theoretically it works on Android 1.0 and higher).
Thank you for your attention and have a nice day!
Update:
Thanks to Prototik for the hint about the ported Animation classes. The menu now also works on older APIs: JakeWharton indicates a minimum API 1.0, but I was able to check for 2.2.1 and higher.
Source: https://habr.com/ru/post/164035/
All Articles