Electric demon and carbon dioxide
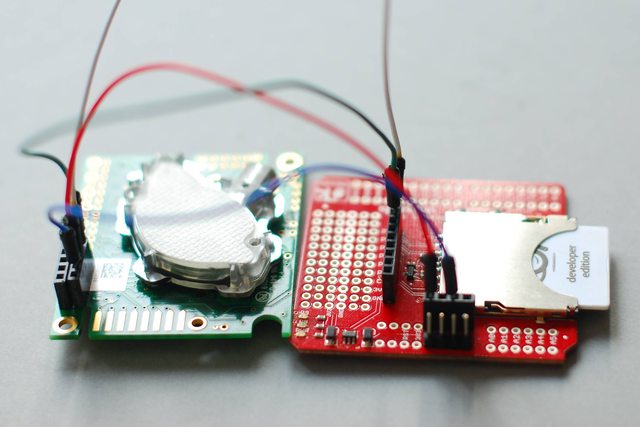
Recently, two curious devices arrived from America: the electric imp microcomputer and the K30 optical sensor for carbon dioxide in the air. Each of them is curious in its own way, I will tell a little about each of them and about their connection.
')
Imps are a kind of imp in German folklore. As well as an abbreviation for the Interface Message Processor, one of the predecessor projects for the Internet . The creators of the system recognize both predecessors. In life, this thing turned out to be a rather docile, well-documented platform for developing embedded applications.
The article-review of Internet announcements can be read in the article on Habré , I will try to tell you about the specifics and subtleties that became clear in the process.

Grandma feeds imps, source: Wikipedia
The system consists of three parts:
1. Imp itself . It was all seen in the photos, this is the same SD card with LEDs inside and a photodiode on the “top” (opposite to the contacts) end, through which the wifi network configuration is written into it.


I will repeat the main characteristics of the “SD-patches” filling:
Power supply - 3.3V, maximum - 3.6V, logic is not 5V tolerant. On my shawl with a connector is a voltage regulator, so it can be powered by any voltage, but the signals must be 3.3V.
Imp performance is a separate, interesting topic. ARM promises for the Cortex-M3 12.5 DMIPS / mW, whatever that means. In the coming days I want to measure the performance of the processor and the wifi of the imp with any tests, I will be grateful to the readers, who will tell me where to look for generally accepted speed tests for embedded platforms. Well, or just advise how to do it better.
Imp program is programmed in the squirrel language, about which I can not say anything bad. This is such a "scripting C". Those. syntax - from C, dynamic types, automatic memory management - from scripts. The interpreter and bytecode compiler are 7K lines in C ++. The interpreter can be downloaded as a source under linux or installed from macport on a poppy. Classes related to the imp itself are described in the development wiki.
2. Impee, "impuleable . " This is the plug into which the imp is inserted. Each slot has an impedance identification chip ( ATSHA204 ), which is involved in encrypting the traffic from the imp to the Scheduler. In the scheduler, impee is displayed in the form of rectangles, and not imps. And your code, or as they call it, “firmware” (firmware), is downloaded when you turn on impee with any imp inserted. That is, the imps can be freely rearranged, if the saved wifi configuration allows them to connect to the network. Immediately after switching on and establishing a connection, the firmware inserted into the inserted imp will be flooded, which in Scheduler is associated with this impee. After uploading the firmware, the connection with the Internet can be disconnected, imp will continue to work, but there will be no connection with the outside world, respectively. There are no firmware downloads from the local network and they will not do it.
3. Planner . This is the cloud service that all electric imp-a reviews mention. Free for developer imps, and I haven’t yet seen others on sale.
It performs two independent functions: creating and editing firmware for imps and combining imps and wimps (virtual imps). Virtual imps are currently modules run on the electricimp.com server, written by the electrical impovtsami themselves. You cannot load your code as a virtual imp yet. Now there are exactly 10 WIMPs, of which practically useful are three: sending and receiving an HTTP request, as well as publishing data on the cosm.com service.

The startup sequence of a working ipma looks like this.
1. Imp must commission, put into operation. To do this, it must be inserted into the connector (impee), with flashes (blink up) to transfer the configuration of the wifi network to it. Live it looks like this:
2. After that, a new blue rectangle corresponding to impee will appear in the Scheduler. In the menu, you can select the firmware designed for this device.
3. The firmware must be written and debugged. This can be done directly in the corresponding scheduler interface. It is divided into two parts, the code is written at the top, error messages and the operation logs of the imp are displayed at the bottom.
My code for imp-a , receiving and publishing on cosm.com data from the CO2 sensor, as well as a screenshot of the editor in the charger with the output log imp-a. Please note that there are no procedures in the code related to communication with the cosm. This communication takes place through the output interface, to which a virtual imp (vimp) is connected to the scheduler, in the screenshot above it is light green.


It is interesting to measure the level of CO2 in a room for three reasons.
First, in itself, this gas in elevated concentrations is not useful. Weak excess leads to a feeling of stale head and stale air. A significant increase in CO2 levels (up to 0.2–0.5%) leads to heart palpitations, loss of concentration and mild nausea. Levels greater than 0.5% are considered toxic, more than 4% are life-threatening.
Secondly, in ventilation systems, CO2 sensors are used as “canaries in the mine”. It turns out that, as a rule, elevated CO2 levels are accompanied by elevated levels of other air pollutants, such as phenols and natural gases. Those. CO2 sensor can be considered as a common "air quality sensor".
Third, it is convenient to measure CO2 by the optical method (NDIR), which gives exceptionally good temporal, temperature, and selective (ie, insensitivity to other impurities) stability.
The K30 sensor is the cheapest ($ 65) CO2 level meter based on the nondispersive infrared sensor (NDIR, en.wikipedia.org/wiki/Nondispersive_infrared_sensor ). It can be said that the NDIR sensor is a spectrometer that measures the absorption of light of a single wavelength, depending on the concentration of the gas being measured. For CO2, an infrared LED with a wavelength of 4 micrometers is used.
In addition to the analog output, the sensor can communicate with the outside world using the I2C and RS-232 protocols. I could not connect to it via i2c, neither imp-ohm, nor arduinoy uno. At the same time, I took the code for the Arduin from the manufacturer's datasheets, but I could not receive a single byte (and it seems to even successfully send, which is quite surprising) from the sensor. I do not have a logic analyzer, so I didn’t get an accurate diagnosis, but most of all it was like the incompatibility of the i2c protocol implementations with the sensor and controllers. Documentation of the i2c interface of the imp additionally also lies - the write method returned -2, although I had to -1 for unsuccessful sending, in general, I decided to refer to the good old RS232.
Unfortunately, it is necessary to communicate with the sensor using a heavy industrial protocol ModBus . Luckily, the datasheet results in a magic string of bytes, which must be sent to read CO2 measurement data. So I did not go deep into the industrial protocols, sent a magic string and got a normal answer!
Now the level of carbon dioxide in the room where my imp are located and the sensor can be viewed here . Now the sensor is periodically in a state of "guts out" and disconnected from the cosmos, but I hope that when you read this article, it will be online.
I liked electric imp for its originality and well-thought-out concept, as well as the lack of glitch. Its cloudy part, including documentation, still carries traces of stormy refinement, but I hope that the guys will get on and we will be able to use imps where it’s appropriate and convenient: in home automation, robots and monitoring systems.
The K30 carbon dioxide sensor is convenient and reliable when communicating with it via the RS-232 interface. I2C requires debugging, I am not the only one who has encountered this problem.
Electric imp
')
Imps are a kind of imp in German folklore. As well as an abbreviation for the Interface Message Processor, one of the predecessor projects for the Internet . The creators of the system recognize both predecessors. In life, this thing turned out to be a rather docile, well-documented platform for developing embedded applications.
The article-review of Internet announcements can be read in the article on Habré , I will try to tell you about the specifics and subtleties that became clear in the process.
How it all works.
Grandma feeds imps, source: Wikipedia
The system consists of three parts:
1. Imp itself . It was all seen in the photos, this is the same SD card with LEDs inside and a photodiode on the “top” (opposite to the contacts) end, through which the wifi network configuration is written into it.
I will repeat the main characteristics of the “SD-patches” filling:
| CPU: | Cortex M3 32 bit |
| Wifi: | b / g / n (!), WEP, WPA, WPA2, WPS, WPS-PIN. |
| I / O: | 6 legs that can be configured for GPIO or embedded RS-232, I2C, SPI, PWM and ADC. There is a built-in pulse counter and interrupt handling of events on the first leg. The assignment of the legs can be changed during the execution of the program. |
Power supply - 3.3V, maximum - 3.6V, logic is not 5V tolerant. On my shawl with a connector is a voltage regulator, so it can be powered by any voltage, but the signals must be 3.3V.
Imp performance is a separate, interesting topic. ARM promises for the Cortex-M3 12.5 DMIPS / mW, whatever that means. In the coming days I want to measure the performance of the processor and the wifi of the imp with any tests, I will be grateful to the readers, who will tell me where to look for generally accepted speed tests for embedded platforms. Well, or just advise how to do it better.
Imp program is programmed in the squirrel language, about which I can not say anything bad. This is such a "scripting C". Those. syntax - from C, dynamic types, automatic memory management - from scripts. The interpreter and bytecode compiler are 7K lines in C ++. The interpreter can be downloaded as a source under linux or installed from macport on a poppy. Classes related to the imp itself are described in the development wiki.
2. Impee, "impuleable . " This is the plug into which the imp is inserted. Each slot has an impedance identification chip ( ATSHA204 ), which is involved in encrypting the traffic from the imp to the Scheduler. In the scheduler, impee is displayed in the form of rectangles, and not imps. And your code, or as they call it, “firmware” (firmware), is downloaded when you turn on impee with any imp inserted. That is, the imps can be freely rearranged, if the saved wifi configuration allows them to connect to the network. Immediately after switching on and establishing a connection, the firmware inserted into the inserted imp will be flooded, which in Scheduler is associated with this impee. After uploading the firmware, the connection with the Internet can be disconnected, imp will continue to work, but there will be no connection with the outside world, respectively. There are no firmware downloads from the local network and they will not do it.
3. Planner . This is the cloud service that all electric imp-a reviews mention. Free for developer imps, and I haven’t yet seen others on sale.
It performs two independent functions: creating and editing firmware for imps and combining imps and wimps (virtual imps). Virtual imps are currently modules run on the electricimp.com server, written by the electrical impovtsami themselves. You cannot load your code as a virtual imp yet. Now there are exactly 10 WIMPs, of which practically useful are three: sending and receiving an HTTP request, as well as publishing data on the cosm.com service.
Imp programming
The startup sequence of a working ipma looks like this.
1. Imp must commission, put into operation. To do this, it must be inserted into the connector (impee), with flashes (blink up) to transfer the configuration of the wifi network to it. Live it looks like this:
2. After that, a new blue rectangle corresponding to impee will appear in the Scheduler. In the menu, you can select the firmware designed for this device.
3. The firmware must be written and debugged. This can be done directly in the corresponding scheduler interface. It is divided into two parts, the code is written at the top, error messages and the operation logs of the imp are displayed at the bottom.
My code for imp-a , receiving and publishing on cosm.com data from the CO2 sensor, as well as a screenshot of the editor in the charger with the output log imp-a. Please note that there are no procedures in the code related to communication with the cosm. This communication takes place through the output interface, to which a virtual imp (vimp) is connected to the scheduler, in the screenshot above it is light green.
CO2 sensor
It is interesting to measure the level of CO2 in a room for three reasons.
First, in itself, this gas in elevated concentrations is not useful. Weak excess leads to a feeling of stale head and stale air. A significant increase in CO2 levels (up to 0.2–0.5%) leads to heart palpitations, loss of concentration and mild nausea. Levels greater than 0.5% are considered toxic, more than 4% are life-threatening.
Secondly, in ventilation systems, CO2 sensors are used as “canaries in the mine”. It turns out that, as a rule, elevated CO2 levels are accompanied by elevated levels of other air pollutants, such as phenols and natural gases. Those. CO2 sensor can be considered as a common "air quality sensor".
Third, it is convenient to measure CO2 by the optical method (NDIR), which gives exceptionally good temporal, temperature, and selective (ie, insensitivity to other impurities) stability.
The K30 sensor is the cheapest ($ 65) CO2 level meter based on the nondispersive infrared sensor (NDIR, en.wikipedia.org/wiki/Nondispersive_infrared_sensor ). It can be said that the NDIR sensor is a spectrometer that measures the absorption of light of a single wavelength, depending on the concentration of the gas being measured. For CO2, an infrared LED with a wavelength of 4 micrometers is used.
In addition to the analog output, the sensor can communicate with the outside world using the I2C and RS-232 protocols. I could not connect to it via i2c, neither imp-ohm, nor arduinoy uno. At the same time, I took the code for the Arduin from the manufacturer's datasheets, but I could not receive a single byte (and it seems to even successfully send, which is quite surprising) from the sensor. I do not have a logic analyzer, so I didn’t get an accurate diagnosis, but most of all it was like the incompatibility of the i2c protocol implementations with the sensor and controllers. Documentation of the i2c interface of the imp additionally also lies - the write method returned -2, although I had to -1 for unsuccessful sending, in general, I decided to refer to the good old RS232.
Unfortunately, it is necessary to communicate with the sensor using a heavy industrial protocol ModBus . Luckily, the datasheet results in a magic string of bytes, which must be sent to read CO2 measurement data. So I did not go deep into the industrial protocols, sent a magic string and got a normal answer!
Now the level of carbon dioxide in the room where my imp are located and the sensor can be viewed here . Now the sensor is periodically in a state of "guts out" and disconnected from the cosmos, but I hope that when you read this article, it will be online.
findings
I liked electric imp for its originality and well-thought-out concept, as well as the lack of glitch. Its cloudy part, including documentation, still carries traces of stormy refinement, but I hope that the guys will get on and we will be able to use imps where it’s appropriate and convenient: in home automation, robots and monitoring systems.
The K30 carbon dioxide sensor is convenient and reliable when communicating with it via the RS-232 interface. I2C requires debugging, I am not the only one who has encountered this problem.
Source: https://habr.com/ru/post/163751/
All Articles