Do I need to calibrate color printers?
The question of calibrating a color printer is often quite tough, because the quality of printing in color can be quite dependent on how well the printer is calibrated. Calibration of most color printers consists of two automatic color adjustment operations:

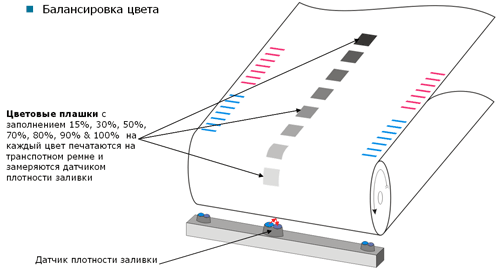
Adjust the color balance. This adjustment is made in order to ensure the correct color and tint on the printer. It is made as follows: the printer applies 7 small rectangles to the transport belt with varying degrees of filling with each of the colors. The fill density sensor, located under the transport belt, checks the density of each of the rectangles and the printer determines how correctly each one of them is drawn. If the sensor reading does not match the reference values, then the printer makes color balance adjustment. As a result, a properly adjusted printer will print color images in which three color components present in the image in the same quantity will be printed as neutral gray images.

')
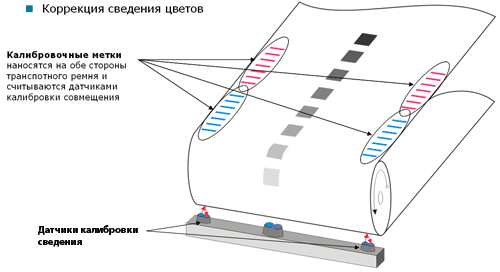
Adjustment of combination of flowers. This adjustment is made to ensure that each of the 4 primary colors present in the printer and applied to the paper with its printing mechanism exactly falls into its place on the paper, resulting in a clear image without color differences. Like the color balance, the alignment adjustment is also performed on the transport belt. At the same time, small calibration marks are applied to each of its edges with each of the colors, and sensors located under the belt read the position of each label and, if necessary, regulate the application of all colors to the paper, which will ensure correct mixing of the color components of the printed image.
These adjustments are automatically made after turning on the printer, after closing the top cover and after replacing any consumable material, as well as every 500 sheets during normal operation (adjustments are not made during printing). By performing these calibrations, the printer constantly keeps itself fully operational, ensuring the stability and quality of color printing throughout its life. This is confirmed by the experience of numerous users of our printers.
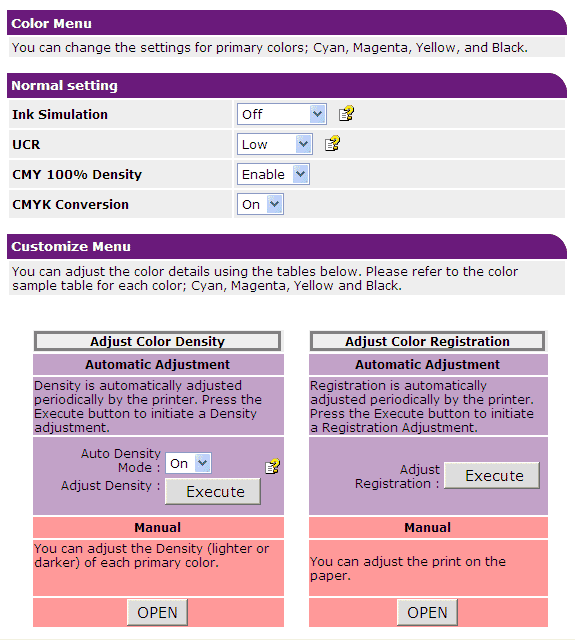
Please note: if the resource of at least one of the consumables ends, automatic calibration is NOT PERFORMED and therefore with a small balance of the consumables resource, color balancing or color blemish defects may appear! Such defects can be corrected by manually starting the automatic calibration procedure. This can be done through the printer menu or through its internal web site (in Administrator mode, this is done through the menu Printer -> Color Menu):

Automatic calibration at the end of the consumables resource is turned off in order to save the resource of these consumables, which is spent in the calibration process. In particular, during calibration 2 pages are taken away from the resources of the drums and the transport belt, and the toner consumption is such that every 5 calibrations are equivalent to printing one sheet with 5% coverage for each color.
In addition to automatic calibrations, many LED printers (I can only speak for OKI for sure) use a simple but original solution that ensures a constant gap between the LED ruler and the photo film surface. It is obvious that the rays of light from the LEDs, after passing through the ruler's focusing GRD-lenses, should fall on the surface of the drum, passing a clearly defined distance - the focusing distance. Only in this case a clear focused point on the drum and, subsequently, on the print can be provided. To ensure this distance, 4 precision elements are used in the printer: two on the LED line and two on the cartridge. In the ruler, these are eccentric rollers located on both sides of the ruler:

Their position is established at the factory during the production process and fixed with a staple and paint. The rollers located on the LED ruler when closing the lid abut the second element - a precision stamped fluoroplastic insert, which is placed on both sides of the photo film in the cartridge and directly rests on it.

The springs located above the ruler firmly squeeze these two elements, ensuring the constancy of the gap between the ruler and the surface of the fototal and, thus, precise and constant focusing of light from the LEDs on the fototal surface.
Sergey Lebedev, OKI Marketing Director

Adjust the color balance. This adjustment is made in order to ensure the correct color and tint on the printer. It is made as follows: the printer applies 7 small rectangles to the transport belt with varying degrees of filling with each of the colors. The fill density sensor, located under the transport belt, checks the density of each of the rectangles and the printer determines how correctly each one of them is drawn. If the sensor reading does not match the reference values, then the printer makes color balance adjustment. As a result, a properly adjusted printer will print color images in which three color components present in the image in the same quantity will be printed as neutral gray images.

')
Adjustment of combination of flowers. This adjustment is made to ensure that each of the 4 primary colors present in the printer and applied to the paper with its printing mechanism exactly falls into its place on the paper, resulting in a clear image without color differences. Like the color balance, the alignment adjustment is also performed on the transport belt. At the same time, small calibration marks are applied to each of its edges with each of the colors, and sensors located under the belt read the position of each label and, if necessary, regulate the application of all colors to the paper, which will ensure correct mixing of the color components of the printed image.
These adjustments are automatically made after turning on the printer, after closing the top cover and after replacing any consumable material, as well as every 500 sheets during normal operation (adjustments are not made during printing). By performing these calibrations, the printer constantly keeps itself fully operational, ensuring the stability and quality of color printing throughout its life. This is confirmed by the experience of numerous users of our printers.
Please note: if the resource of at least one of the consumables ends, automatic calibration is NOT PERFORMED and therefore with a small balance of the consumables resource, color balancing or color blemish defects may appear! Such defects can be corrected by manually starting the automatic calibration procedure. This can be done through the printer menu or through its internal web site (in Administrator mode, this is done through the menu Printer -> Color Menu):

Automatic calibration at the end of the consumables resource is turned off in order to save the resource of these consumables, which is spent in the calibration process. In particular, during calibration 2 pages are taken away from the resources of the drums and the transport belt, and the toner consumption is such that every 5 calibrations are equivalent to printing one sheet with 5% coverage for each color.
In addition to automatic calibrations, many LED printers (I can only speak for OKI for sure) use a simple but original solution that ensures a constant gap between the LED ruler and the photo film surface. It is obvious that the rays of light from the LEDs, after passing through the ruler's focusing GRD-lenses, should fall on the surface of the drum, passing a clearly defined distance - the focusing distance. Only in this case a clear focused point on the drum and, subsequently, on the print can be provided. To ensure this distance, 4 precision elements are used in the printer: two on the LED line and two on the cartridge. In the ruler, these are eccentric rollers located on both sides of the ruler:

Their position is established at the factory during the production process and fixed with a staple and paint. The rollers located on the LED ruler when closing the lid abut the second element - a precision stamped fluoroplastic insert, which is placed on both sides of the photo film in the cartridge and directly rests on it.

The springs located above the ruler firmly squeeze these two elements, ensuring the constancy of the gap between the ruler and the surface of the fototal and, thus, precise and constant focusing of light from the LEDs on the fototal surface.
Sergey Lebedev, OKI Marketing Director
Source: https://habr.com/ru/post/163289/
All Articles