LED strip as room lighting
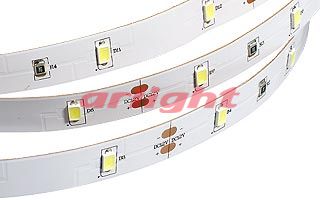
Initially, for the main lighting of one of the rooms where the overhaul was going, a regular chandelier was planned. But recently, I came across an ultra-bright Ultra 5000 LED strip with smd 5630 LEDs from the Arlight brand. The decision was made quickly, finally and irrevocably - I want such a tape as the main light in the room.
')
The manufacturer stated that the tape Ultra 5000 smd 5630 provides a luminous flux as much as 1200 lm per meter. For comparison, the luminous flux of a 100-watt incandescent lamp is about 1600 lm.
In my case, 15 meters of tape laid along the entire perimeter should have been used for a room of 14 square meters. The resulting luminous flux, it seems, cannot be counted by simply multiplying lumens by meters.
It was decided to be puzzled how to correctly calculate the total luminous flux, but, by googling, I realized that this task was not solved with a swoop. It is necessary to spend the n-th time to study the theory of lighting calculations using the method of using the luminous flux and somewhere to find some data unknown to me:
In the end, I decided that I would just do it and see what came out. But, just in case, I also purchased a dimmer for LED strips at the same time. Suddenly it will be too bright :)
Bright LEDs are, of course, cool. But one thing is brightness, and the other is the spectrum of light.
If we compare it again with an incandescent lamp, it is good because it emits light in a wide range, its spectrum is relatively uniform and in some part is close to the spectrum of sunlight. Such light is familiar and pleasant to the eye, it is not annoying and not tiring.
The spectrum of white LEDs is significantly different from the spectrum of an incandescent lamp, and not for the better:

White LEDs in this case, the phosphor type, two humps on the spectral characteristics are formed from the emission of a blue LED (blue region of the spectrum) and a phosphor (yellow region of the spectrum).
With my lower brain, I realized that it was worthwhile to be careful with the use of LED lighting and leave, including the usual chandelier. Who knows how the eyes react to such a spectrum. To calculate this in advance is also hardly possible.
According to the color temperature, I chose the average tape from the three options offered by the manufacturer - the so-called. Day White, 4000 K. Just seemed the most pleasant.
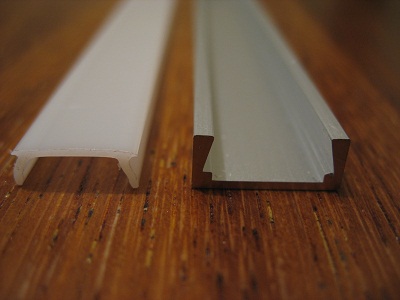
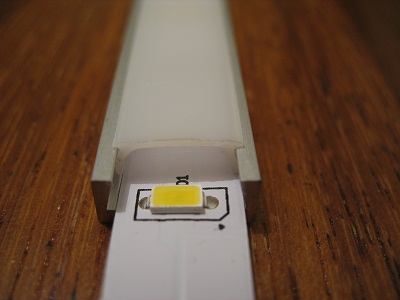
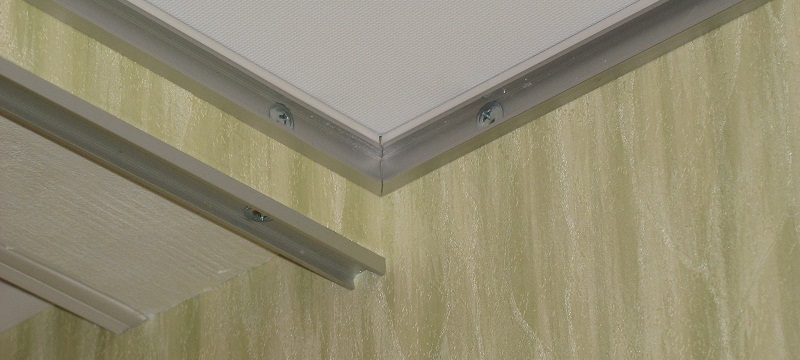
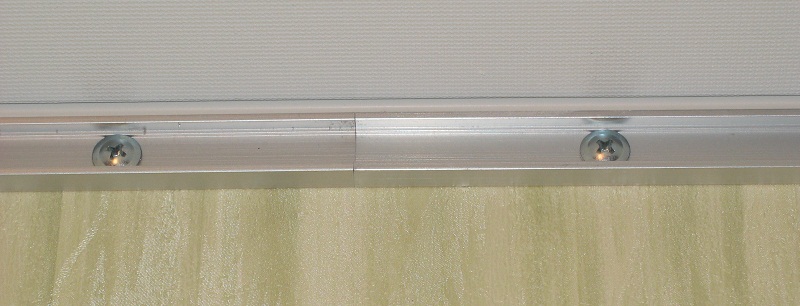
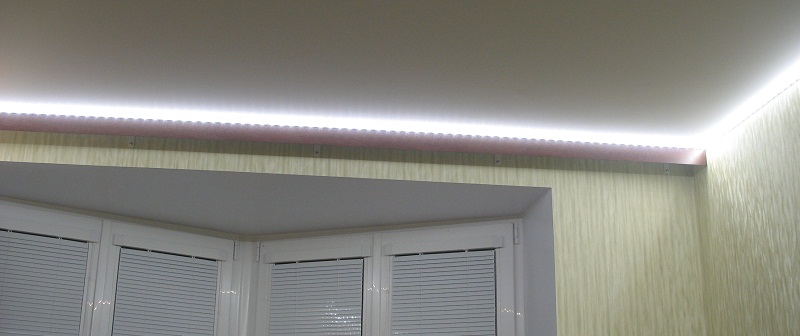
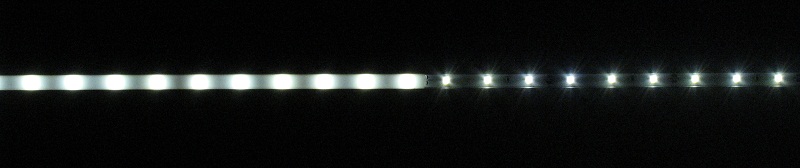
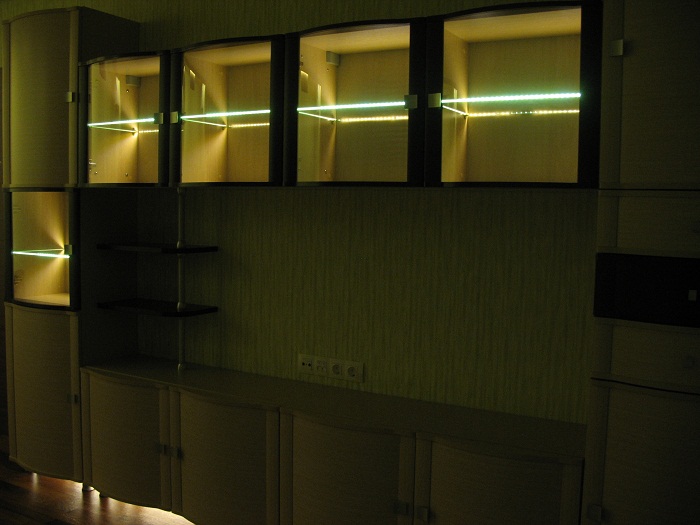
I have a simple stretch fabric ceiling, without any multilevels and curtain rods, and since the lighting perimeter tape was planned to be positioned under the ceiling in plain sight, it was necessary to elevate its appearance, but to make it as inconspicuous as possible. Thought which profile to use, straight or angular? It turned out that the intensity and uniformity of illumination visually did not change in any way from the direction of the glow of the LEDs of the tape located near the ceiling. That down along the wall, along the ceiling, that at an angle to them - the same. This is understandable, the passport angle of illumination of these LEDs is 120 °, but in reality it turned out to be close to 180. Therefore, the angle of the tape was not important, and I chose the straight profile as the most compact:
The Ultra 5000 tape comes from the factory on 5 meters spools, the cut frequency of the tape is 10 cm, the store cuts for sale in multiples of a meter. In my case I didn’t have to cut, I took three whole packs:

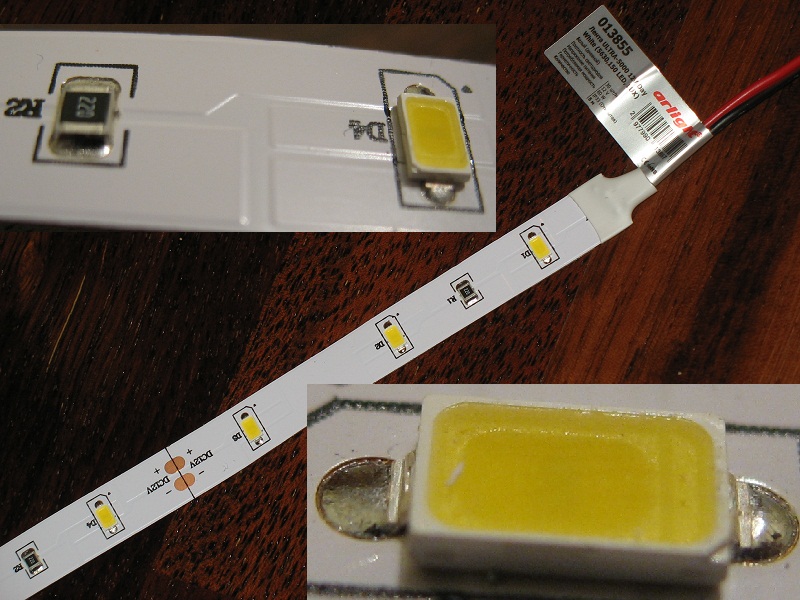
The width of the tape is 12 mm, it doesn’t fit in the chosen profile, but fits:
Passport power consumption of 15 meters of a tape - 240 W. Calculated from the actual measurement - 180 W (measured on the 3-meter segment, the current consumption was 3 A).
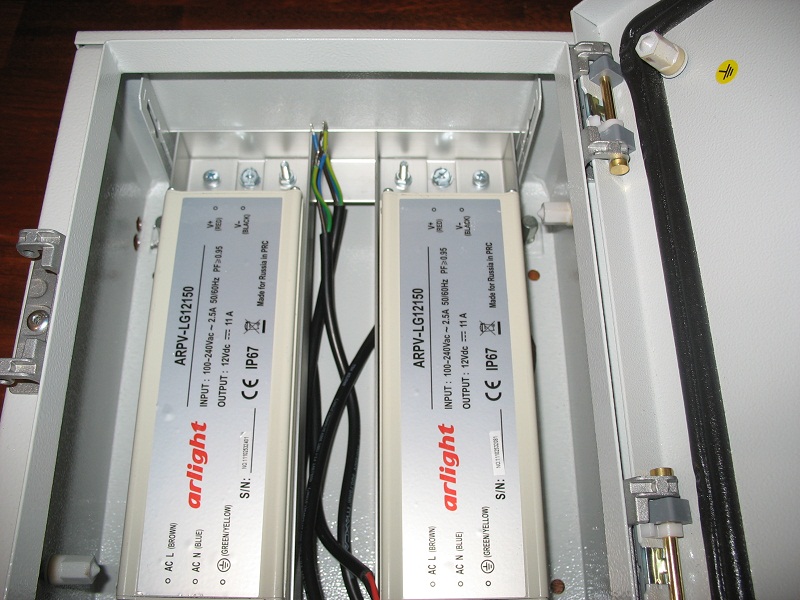
But, besides the power consumption, there is also the factor of voltage drop along the tape, which leads to a gradual decrease in the brightness of the glow to its end. The power supply for LED strips (I don’t know everything or not, but those that I took, yes) allow us to supply one common load in parallel. To equalize the brightness along long, powerful ribbons, instead of one power supply, one end includes two less powerful power supplies from the two ends of the tape, and in particularly difficult cases, also in the middle of the tape. In my case, the perimeter is closed, I divided it in half, and just took two power supply units of 130 W each and connected to each of them 7.5 meters of tape:

The choice of sealed power supplies was due to the fact that they have significantly smaller dimensions compared to open and do not have coolers, that is, they do not make noise, which is important. In addition, I planned to place them all in an airtight (for fire safety) shield, located in a hidden place inside the closet, where there is a problem with the heat sink.
The dimmer, which I liked the most by the functionality of those that were available, was originally designed for wall mounting:
This dimmer has a mechanical brightness control, and with a remote control. Moreover, in addition to the smooth adjustment, there are four buttons on the preset brightness levels (25%, 50% 75% and 100%), and four more buttons for programming user levels.
But to connect it requires four wires, which were not laid into my walls. So I decided that I would install the dimmer in the dashboard along with the power supplies. Mechanical adjustment of the brightness level will set only the starting level when the tape is turned on, and the desired brightness will be adjusted with the remote control.
But for this you need to drop the IR receiver:
take it out on the wire from the shield and place it in a convenient, inconspicuous place. Will it work like that? Checked works:
Looking ahead, I note that the dimmer has one major drawback.
The role of memory installed before turning off the brightness level performs a potentiometer. When applying 12 volts to the dimmer, the tape is switched on to the brightness level that was set by the potentiometer. After that, the brightness can be changed with the remote and potentiometer. But, regardless of how the potentiometer was installed, at the first instant when the dimmer is turned on, the PWM does not immediately start, and a clean 12 volt rod is out. At the moment of switching on, the tape always flashes for a fraction of a second to its maximum brightness, and then set to the specified one. Unpleasant hit in the eyes.
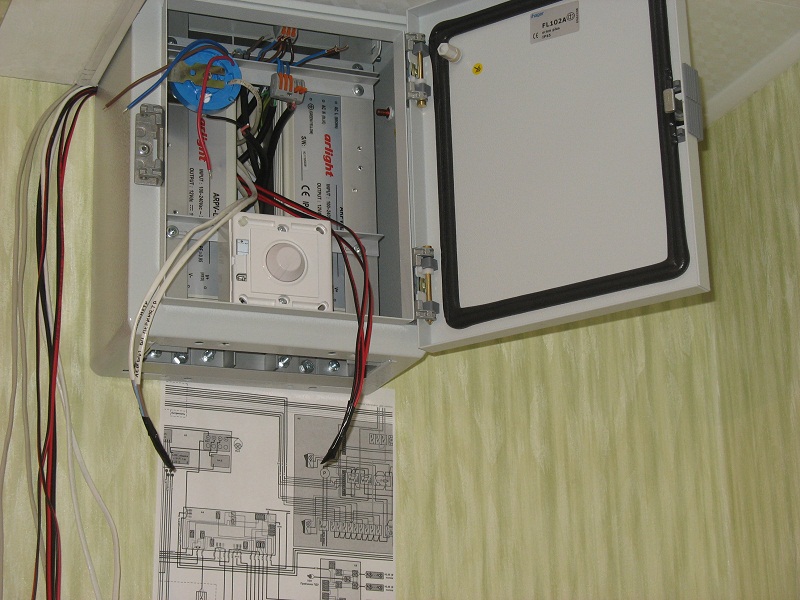
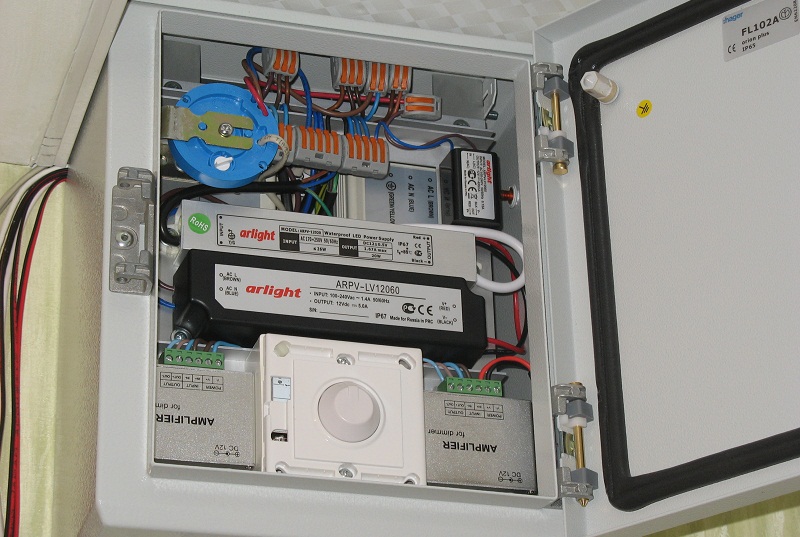
The dimmer power was insufficient for my tapes. I had to additionally buy amplifiers for it - one for each power supply:
In addition to the main lighting, I decided to use another 3 meters of the same tape for local lighting above the cabinet, with a separate wall switch and limit switches in sliding doors. And I also had planned a decorative light from a simple LED strip and a night light on a short piece of dull tape switched on from the photorelay. All this is not directly related to this article, but since it was necessary to place three additional power supplies in the dashboard, it should be mentioned. Initially, the photorelay has a rather large size and an unaesthetic appearance, which is why it was also desirable to hide it in the shield so that it does not loom in front of our eyes:
I did the same with him as with the dimmer - I dropped out the sensor and carried it out on the wire, after checking that it would work too:
Found a sealed shield of suitable size:
Zatar corners and fasteners:
And proceeded to the installation:
Scutell ready:
To increase the light output, it would be advisable to mount the tape not close to the ceiling, but slightly lower, at least by centimeters by 5. In this case, the reflection of the tape light from the ceiling will be better. But I had no such opportunity for some subjective reasons, so I mounted close to the ceiling.
On the left, a piece of profile for a tape of local lighting above the cabinet, mounted on the lower end of the eaves, behind which will be located a ribbon of decorative lighting:
Cutting the profile with a hacksaw on a metal with a fine tooth at exactly 45 ° is easy, if you use a block, for example:
The profile was fastened with hygrochny 32 mm long self-tapping screws directly into the drywall, without dowels (the drywall is glued to the walls on Perlfiks), having previously drilled holes in it (in the profile) in half a meter:
Then put the tape in the profile, soldered the power wires. I didn’t close the perimeter profile with the diffuser (the store didn’t provide part of the diffuser yet), closed only the profile of local lighting above the cabinet:
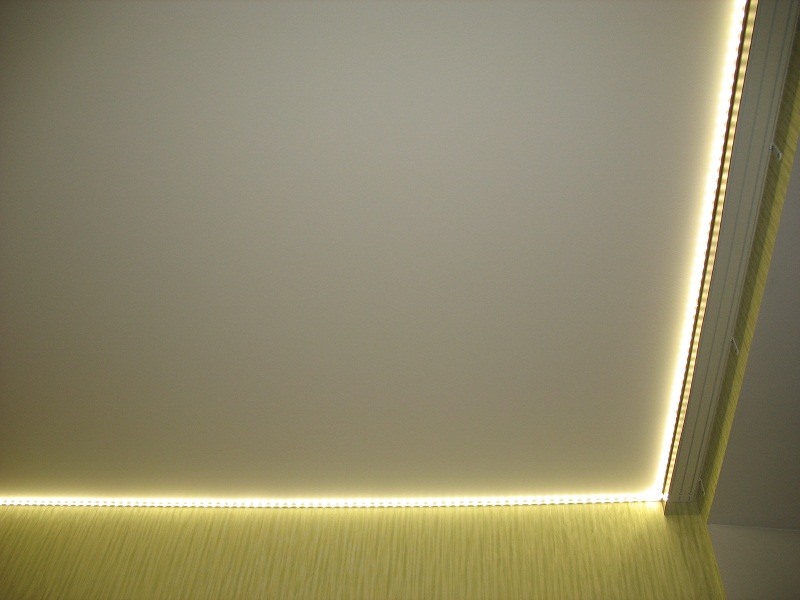
So - turn on!
Wow! This is awesome!
Of course, I'm not blind from the brightness. Bright, yes, but not beyond the limits. And very beautiful!
Photo with flash:
No flash:
View from the street (4th floor):
I tried to capture the difference in illumination between the ribbon and the incandescent lamp of 200 W, which is still hanging in my place instead of a chandelier. Fixed the fotik settings with one light source, launched the fotik on a series of shots, meanwhile switched the light source. That's what happened.
At first I tuned in to the incandescent light and launched a series, the first photo was a lamp, the second one was a ribbon:
Now, on the contrary, the first is a ribbon, the second is a lamp:
An interesting effect - when the light of the tape is almost no vertical shadows. This can be seen, for example, through the shadow of a horizontal pipe and the missing shadow of a vertically positioned knob of the regulator on it.
These pics show that 15 meters of tape shines brighter than a 200 watt incandescent lamp. But it seems like not much. In fact, to compare so certainly not quite right. The light bulb is a point source, and the tape is distributed. By the light of the lamp in the corners of the room it is much darker than in the center, and by the light of the tape located along the perimeter it is equally bright everywhere.
Made measurements of illumination luxometer:
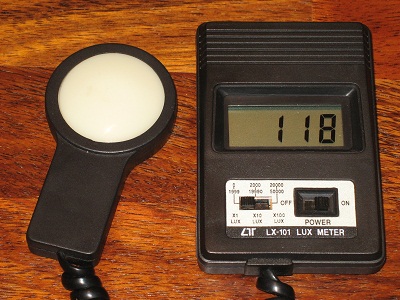
Here are the results in numbers:
As can be seen from the table, the illumination in the light of the tape is slightly different between the different measuring points in the room, what is near the floor, what is at eye level, what is in the corners or in the center - the difference is no more than 2-3 times. Of course, this is a consequence of the uniform distribution of a large number of point light sources along the perimeter of the room. What is not observed in the bulb, which hangs in the center of the ceiling - the difference at different points reaches almost 30 times.
With simultaneous switching on, both the lamps and their luminance tapes were simply summed.
If someone explains to me on the fingers why lumens do not fold directly (or fold?), And the suites fold (can this be a result of a large difference in the spectral characteristics of the LED and the lamp in the long-wave region?), And as with the declared luminous intensity of 1200 lumens per meter when measured at a distance of 1 meter from a piece of tape with a length of 4 meters is obtained illumination of just 530 lux, I will be very grateful.
In a short stretch I put a diffuser on the profile, taking a picture of the difference at a short shutter speed:
Measured at some distance: without a lens 600 lx, with a lens 520 lx at the same distance. Absorbs more than 10%. It is a pity, while there is no scatterer for the entire perimeter, do not appreciate the overall decrease in illumination.
The voltage along the tape drops significantly.
At the beginning, it was 11.5 V, and at the end of the 7.5-meter segment, it was already 8.5 V. Total - 0.4 Volts per meter.
The drop in brightness does not catch the eye, but if you specifically compare, you can see that the ribbon in one corner is much brighter than the other.
Measurements with a luxometer at a distance of about 30 cm in opposite corners of the perimeter gave results of 1600 and 600 lux, a difference of more than 2.5 times. Measurements at other distances yielded the same difference 2.5–3 times. Therefore, the value of 530 lux in the table for measurement at a distance of 1 meter from the tape is a kind of average value, measured at a distance of about 2 meters from the beginning of the tape.
The tape is heated, and heated noticeably.
At the beginning of the tape, the temperature of the aluminum profile was 55 ... 57 ° C, but at the end it was already quite cool, about 30 ° C. When the diffuser is installed on the profile, the temperature is not significantly different.
Inside the airtight shield at maximum load (which is unlikely in reality), the temperature also did not rise above 57 ° C after a 4-hour run. This is slightly higher than the rated operating temperature of the power supply, but it didn’t get burnt; everything worked. In the normal operating mode, when only the perimeter tape is turned on, the temperature in the shield is set exactly at the level of the passport value of the power supplies at 45 ° C. It is quite satisfactory.
I am quite satisfied with the technical side of the LED lighting system. Convenient and simple installation, high-quality execution of components, the inclusion of light without delay (which does not provide all the power supplies for LED strips), quiet operation, moderate heat, low consumption with a large light output. Two minuses only, but both are solved in principle - the voltage drop along the tape (although the total illumination in the room is quite enough), and the dimmer does not work correctly at the moment of switching on (it can be solved by introducing a tape turn-on delay scheme after turning on the dimmer, but then This is the delay, I do not know what is best).
It’s too early to talk about the operational side, it takes time.
The first impression is this light is completely different. And you can not say it is better or worse. Just another.
For several days I was engaged in assembling furniture when lighting the tape, I did not feel any discomfort. In general, while I like everything.
I didn’t like the financial side - the whole system cost me about 20 thousand rubles. The cost of a meter of tape in the profile is about 1 thousand rubles. Plus power supplies and other equipment. The truth is not known how long it will work. For LEDs claimed service life of about 100 thousand hours, by this time they lose up to 30% brightness. If you use the tape on average for 5 hours a day, then it should be enough for 50 years. Let's see.
Under the spoilers, there are several subposts that are not directly related to the topic of this article, but are directly related to it.
UPD 01/27/2013
Finally, I received a long-awaited profile diffusers. Installing them turned out to be a very time consuming task - it is necessary to make a very big effort to snap them into the profile. Uncomfortable under the ceiling to do this. It’s ok to wear a few more meters, but at 15 meters I even rested a couple of times, since the fingers are usually heavier than the keyboard buttons, they are not tight :)
The result is contradictory.
Of course, it became darker, noticeably darker. I measured the illumination once more before putting on the diffuser, and after that, here's what happened:
That is, it became darker by 30%.
But on the other hand, the light itself has changed, and changed for the better. First, it became warmer in color temperature. During the installation of the diffusers, I noticed a difference in color on the ceiling - where the diffuser was already dressed, the shade of light was more yellow. For the eyes, this color has become even more pleasant. Secondly, maybe this is a consequence of the first, the color rendition has improved. Before, everything seemed greenish to me in this light, but with diffusers this effect disappeared, now the colors of the objects have become more natural. And thirdly, the tape began to look aesthetically pleasing, not contrasting bright points on a dark background, but more blurred on a lighter background.
, . , . , . , , . .
:
No flash:
( ):
UPD 09.03.2017
:
geektimes.ru/post/257720/#comment_9935472
')
Theoretical brightness
The manufacturer stated that the tape Ultra 5000 smd 5630 provides a luminous flux as much as 1200 lm per meter. For comparison, the luminous flux of a 100-watt incandescent lamp is about 1600 lm.
In my case, 15 meters of tape laid along the entire perimeter should have been used for a room of 14 square meters. The resulting luminous flux, it seems, cannot be counted by simply multiplying lumens by meters.
It was decided to be puzzled how to correctly calculate the total luminous flux, but, by googling, I realized that this task was not solved with a swoop. It is necessary to spend the n-th time to study the theory of lighting calculations using the method of using the luminous flux and somewhere to find some data unknown to me:
- the reflectivity of the walls, ceiling and other objects;
- honest luminous flux of one LED strip;
- characteristics of the diffuser profile, which was planned to place the tape;
- voltage drop along the tape and the dependence of the LED light flux on it.
In the end, I decided that I would just do it and see what came out. But, just in case, I also purchased a dimmer for LED strips at the same time. Suddenly it will be too bright :)
Theoretical spectrum
Bright LEDs are, of course, cool. But one thing is brightness, and the other is the spectrum of light.
If we compare it again with an incandescent lamp, it is good because it emits light in a wide range, its spectrum is relatively uniform and in some part is close to the spectrum of sunlight. Such light is familiar and pleasant to the eye, it is not annoying and not tiring.
The spectrum of white LEDs is significantly different from the spectrum of an incandescent lamp, and not for the better:
White LEDs in this case, the phosphor type, two humps on the spectral characteristics are formed from the emission of a blue LED (blue region of the spectrum) and a phosphor (yellow region of the spectrum).
With my lower brain, I realized that it was worthwhile to be careful with the use of LED lighting and leave, including the usual chandelier. Who knows how the eyes react to such a spectrum. To calculate this in advance is also hardly possible.
According to the color temperature, I chose the average tape from the three options offered by the manufacturer - the so-called. Day White, 4000 K. Just seemed the most pleasant.
Accessories
Profile
I have a simple stretch fabric ceiling, without any multilevels and curtain rods, and since the lighting perimeter tape was planned to be positioned under the ceiling in plain sight, it was necessary to elevate its appearance, but to make it as inconspicuous as possible. Thought which profile to use, straight or angular? It turned out that the intensity and uniformity of illumination visually did not change in any way from the direction of the glow of the LEDs of the tape located near the ceiling. That down along the wall, along the ceiling, that at an angle to them - the same. This is understandable, the passport angle of illumination of these LEDs is 120 °, but in reality it turned out to be close to 180. Therefore, the angle of the tape was not important, and I chose the straight profile as the most compact:
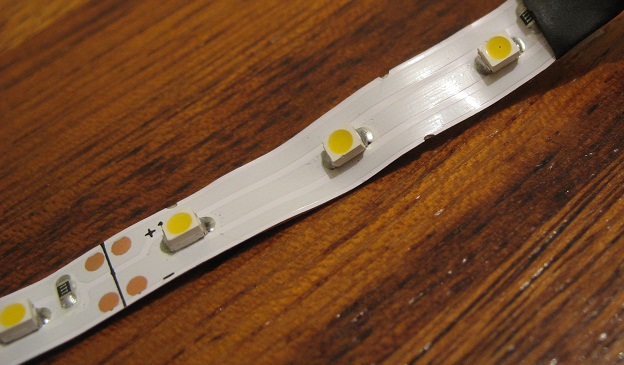
Tape
The Ultra 5000 tape comes from the factory on 5 meters spools, the cut frequency of the tape is 10 cm, the store cuts for sale in multiples of a meter. In my case I didn’t have to cut, I took three whole packs:
The width of the tape is 12 mm, it doesn’t fit in the chosen profile, but fits:
Power supplies
Passport power consumption of 15 meters of a tape - 240 W. Calculated from the actual measurement - 180 W (measured on the 3-meter segment, the current consumption was 3 A).
But, besides the power consumption, there is also the factor of voltage drop along the tape, which leads to a gradual decrease in the brightness of the glow to its end. The power supply for LED strips (I don’t know everything or not, but those that I took, yes) allow us to supply one common load in parallel. To equalize the brightness along long, powerful ribbons, instead of one power supply, one end includes two less powerful power supplies from the two ends of the tape, and in particularly difficult cases, also in the middle of the tape. In my case, the perimeter is closed, I divided it in half, and just took two power supply units of 130 W each and connected to each of them 7.5 meters of tape:
The choice of sealed power supplies was due to the fact that they have significantly smaller dimensions compared to open and do not have coolers, that is, they do not make noise, which is important. In addition, I planned to place them all in an airtight (for fire safety) shield, located in a hidden place inside the closet, where there is a problem with the heat sink.
Dimmer
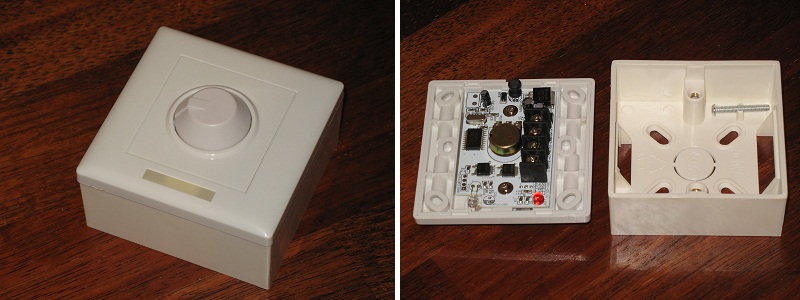
The dimmer, which I liked the most by the functionality of those that were available, was originally designed for wall mounting:
This dimmer has a mechanical brightness control, and with a remote control. Moreover, in addition to the smooth adjustment, there are four buttons on the preset brightness levels (25%, 50% 75% and 100%), and four more buttons for programming user levels.
But to connect it requires four wires, which were not laid into my walls. So I decided that I would install the dimmer in the dashboard along with the power supplies. Mechanical adjustment of the brightness level will set only the starting level when the tape is turned on, and the desired brightness will be adjusted with the remote control.
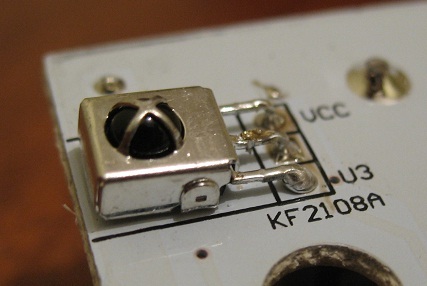
But for this you need to drop the IR receiver:
take it out on the wire from the shield and place it in a convenient, inconspicuous place. Will it work like that? Checked works:
Looking ahead, I note that the dimmer has one major drawback.
The role of memory installed before turning off the brightness level performs a potentiometer. When applying 12 volts to the dimmer, the tape is switched on to the brightness level that was set by the potentiometer. After that, the brightness can be changed with the remote and potentiometer. But, regardless of how the potentiometer was installed, at the first instant when the dimmer is turned on, the PWM does not immediately start, and a clean 12 volt rod is out. At the moment of switching on, the tape always flashes for a fraction of a second to its maximum brightness, and then set to the specified one. Unpleasant hit in the eyes.
Amplifiers
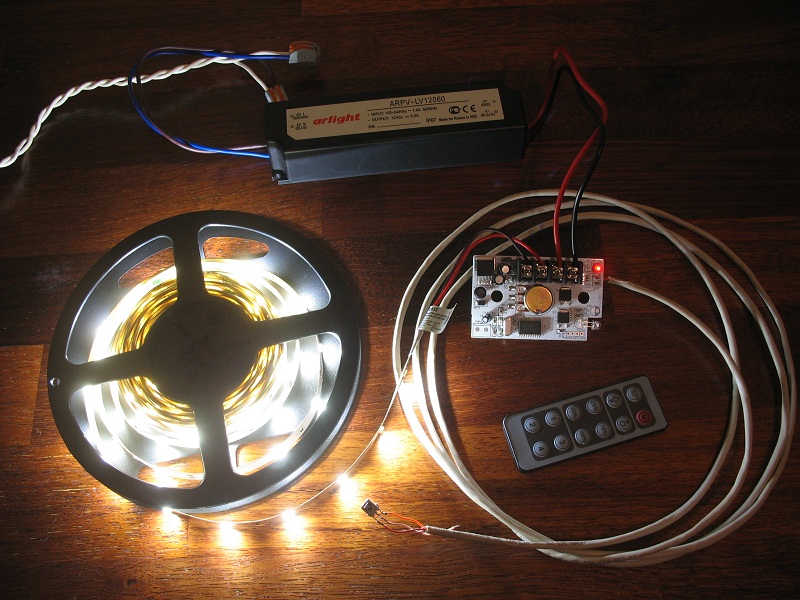
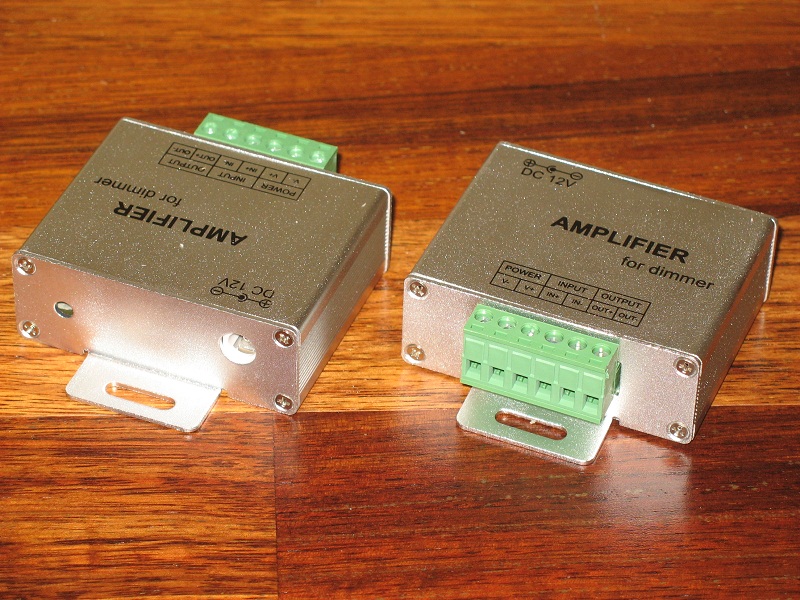
The dimmer power was insufficient for my tapes. I had to additionally buy amplifiers for it - one for each power supply:
Panel mounting
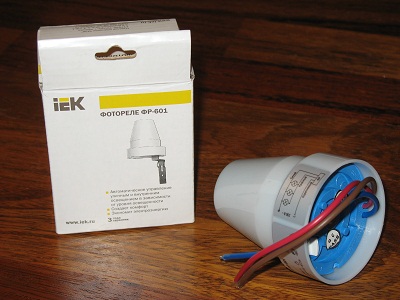
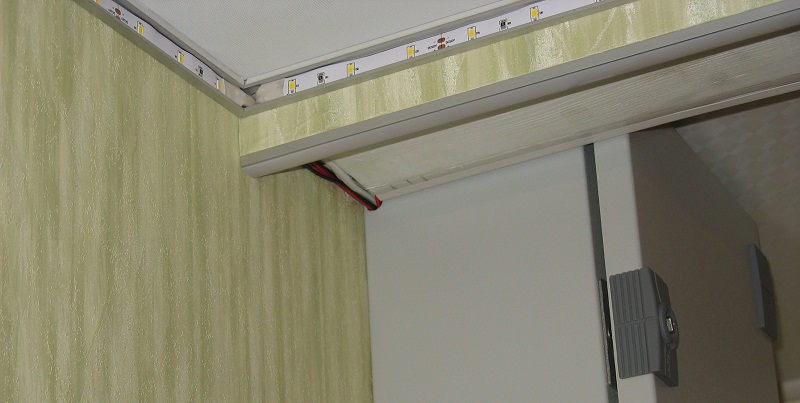
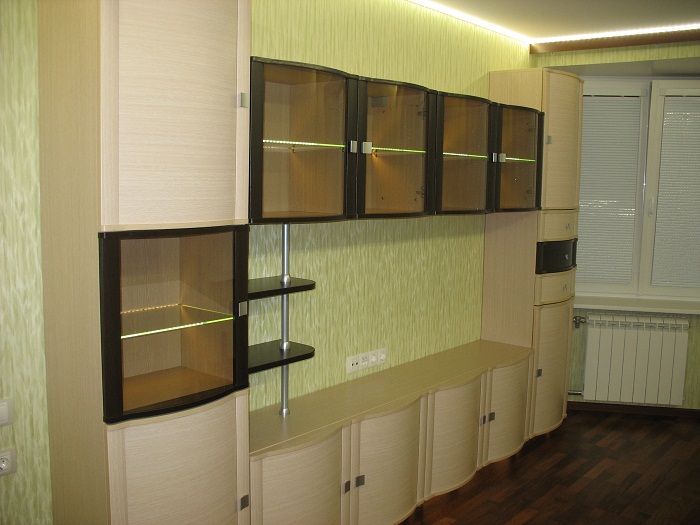
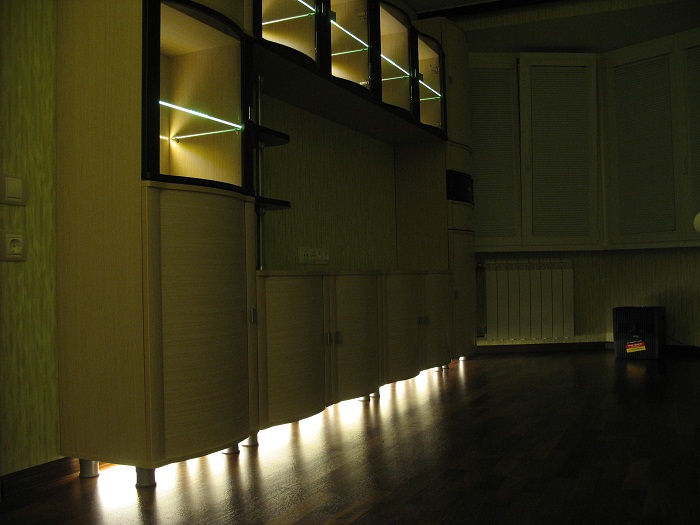
In addition to the main lighting, I decided to use another 3 meters of the same tape for local lighting above the cabinet, with a separate wall switch and limit switches in sliding doors. And I also had planned a decorative light from a simple LED strip and a night light on a short piece of dull tape switched on from the photorelay. All this is not directly related to this article, but since it was necessary to place three additional power supplies in the dashboard, it should be mentioned. Initially, the photorelay has a rather large size and an unaesthetic appearance, which is why it was also desirable to hide it in the shield so that it does not loom in front of our eyes:
I did the same with him as with the dimmer - I dropped out the sensor and carried it out on the wire, after checking that it would work too:
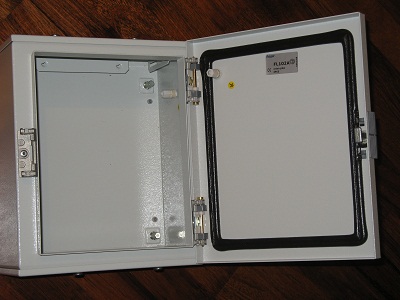
Found a sealed shield of suitable size:
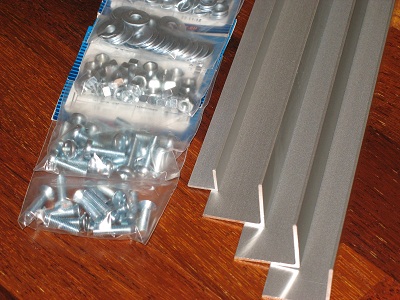
Zatar corners and fasteners:
And proceeded to the installation:
Scutell ready:
Mounting profile and tape
To increase the light output, it would be advisable to mount the tape not close to the ceiling, but slightly lower, at least by centimeters by 5. In this case, the reflection of the tape light from the ceiling will be better. But I had no such opportunity for some subjective reasons, so I mounted close to the ceiling.
On the left, a piece of profile for a tape of local lighting above the cabinet, mounted on the lower end of the eaves, behind which will be located a ribbon of decorative lighting:
Cutting the profile with a hacksaw on a metal with a fine tooth at exactly 45 ° is easy, if you use a block, for example:
The profile was fastened with hygrochny 32 mm long self-tapping screws directly into the drywall, without dowels (the drywall is glued to the walls on Perlfiks), having previously drilled holes in it (in the profile) in half a meter:
Then put the tape in the profile, soldered the power wires. I didn’t close the perimeter profile with the diffuser (the store didn’t provide part of the diffuser yet), closed only the profile of local lighting above the cabinet:
First start
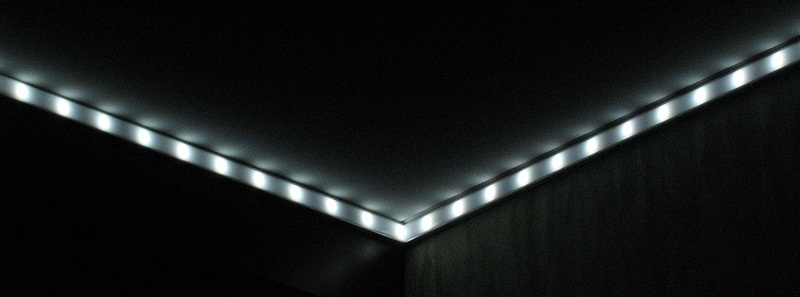
So - turn on!
Wow! This is awesome!
Of course, I'm not blind from the brightness. Bright, yes, but not beyond the limits. And very beautiful!
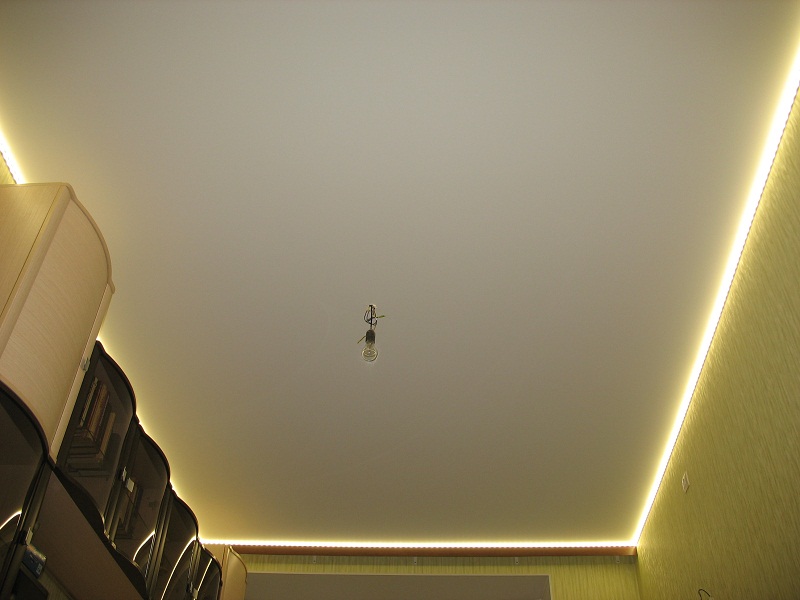
Photo with flash:
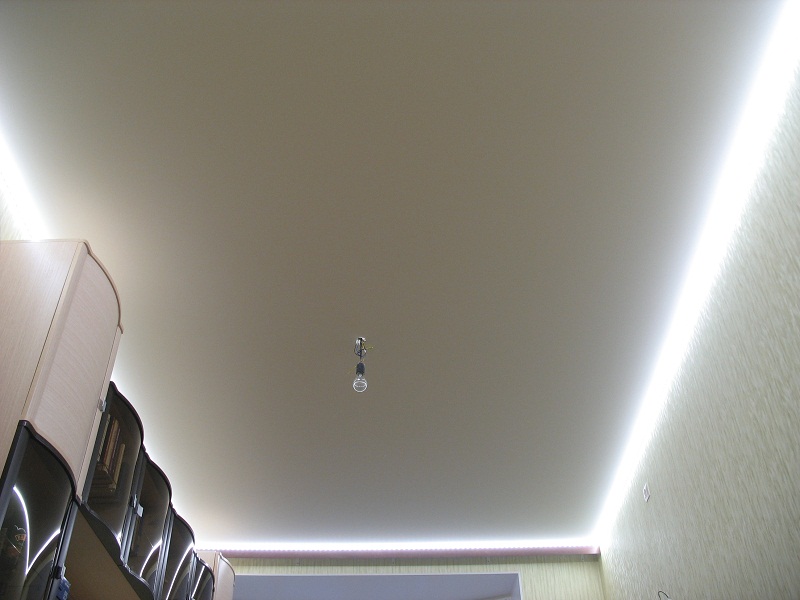
No flash:
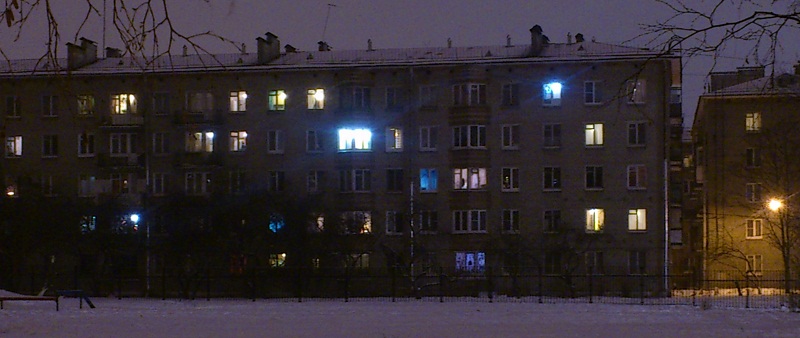
View from the street (4th floor):
I tried to capture the difference in illumination between the ribbon and the incandescent lamp of 200 W, which is still hanging in my place instead of a chandelier. Fixed the fotik settings with one light source, launched the fotik on a series of shots, meanwhile switched the light source. That's what happened.
At first I tuned in to the incandescent light and launched a series, the first photo was a lamp, the second one was a ribbon:
Now, on the contrary, the first is a ribbon, the second is a lamp:
An interesting effect - when the light of the tape is almost no vertical shadows. This can be seen, for example, through the shadow of a horizontal pipe and the missing shadow of a vertically positioned knob of the regulator on it.
These pics show that 15 meters of tape shines brighter than a 200 watt incandescent lamp. But it seems like not much. In fact, to compare so certainly not quite right. The light bulb is a point source, and the tape is distributed. By the light of the lamp in the corners of the room it is much darker than in the center, and by the light of the tape located along the perimeter it is equally bright everywhere.
Made measurements of illumination luxometer:
Here are the results in numbers:
| Measuring point | Lamp 200 W, lx | LED tape 15m, lx | Lamp + tape, lx |
|---|---|---|---|
| In the center of the room at floor level | 121 | 240 | 358 |
| In the center of the room at eye level | 1200 | 300 | 1500 |
| In the corner of the room at floor level | 58 | 152 | 205 |
| In the corner of the room at eye level | 43 | 382 | 428 |
| At a distance of 1 meter from the source | 323 | 530 | - |
| Close to the source | 90000 | 150 | - |
With simultaneous switching on, both the lamps and their luminance tapes were simply summed.
If someone explains to me on the fingers why lumens do not fold directly (or fold?), And the suites fold (can this be a result of a large difference in the spectral characteristics of the LED and the lamp in the long-wave region?), And as with the declared luminous intensity of 1200 lumens per meter when measured at a distance of 1 meter from a piece of tape with a length of 4 meters is obtained illumination of just 530 lux, I will be very grateful.
In a short stretch I put a diffuser on the profile, taking a picture of the difference at a short shutter speed:
Measured at some distance: without a lens 600 lx, with a lens 520 lx at the same distance. Absorbs more than 10%. It is a pity, while there is no scatterer for the entire perimeter, do not appreciate the overall decrease in illumination.
Voltage drop
The voltage along the tape drops significantly.
At the beginning, it was 11.5 V, and at the end of the 7.5-meter segment, it was already 8.5 V. Total - 0.4 Volts per meter.
The drop in brightness does not catch the eye, but if you specifically compare, you can see that the ribbon in one corner is much brighter than the other.
Measurements with a luxometer at a distance of about 30 cm in opposite corners of the perimeter gave results of 1600 and 600 lux, a difference of more than 2.5 times. Measurements at other distances yielded the same difference 2.5–3 times. Therefore, the value of 530 lux in the table for measurement at a distance of 1 meter from the tape is a kind of average value, measured at a distance of about 2 meters from the beginning of the tape.
Heating the tape, the temperature in the shield
The tape is heated, and heated noticeably.
At the beginning of the tape, the temperature of the aluminum profile was 55 ... 57 ° C, but at the end it was already quite cool, about 30 ° C. When the diffuser is installed on the profile, the temperature is not significantly different.
Inside the airtight shield at maximum load (which is unlikely in reality), the temperature also did not rise above 57 ° C after a 4-hour run. This is slightly higher than the rated operating temperature of the power supply, but it didn’t get burnt; everything worked. In the normal operating mode, when only the perimeter tape is turned on, the temperature in the shield is set exactly at the level of the passport value of the power supplies at 45 ° C. It is quite satisfactory.
Summary
I am quite satisfied with the technical side of the LED lighting system. Convenient and simple installation, high-quality execution of components, the inclusion of light without delay (which does not provide all the power supplies for LED strips), quiet operation, moderate heat, low consumption with a large light output. Two minuses only, but both are solved in principle - the voltage drop along the tape (although the total illumination in the room is quite enough), and the dimmer does not work correctly at the moment of switching on (it can be solved by introducing a tape turn-on delay scheme after turning on the dimmer, but then This is the delay, I do not know what is best).
It’s too early to talk about the operational side, it takes time.
The first impression is this light is completely different. And you can not say it is better or worse. Just another.
For several days I was engaged in assembling furniture when lighting the tape, I did not feel any discomfort. In general, while I like everything.
I didn’t like the financial side - the whole system cost me about 20 thousand rubles. The cost of a meter of tape in the profile is about 1 thousand rubles. Plus power supplies and other equipment. The truth is not known how long it will work. For LEDs claimed service life of about 100 thousand hours, by this time they lose up to 30% brightness. If you use the tape on average for 5 hours a day, then it should be enough for 50 years. Let's see.
Under the spoilers, there are several subposts that are not directly related to the topic of this article, but are directly related to it.
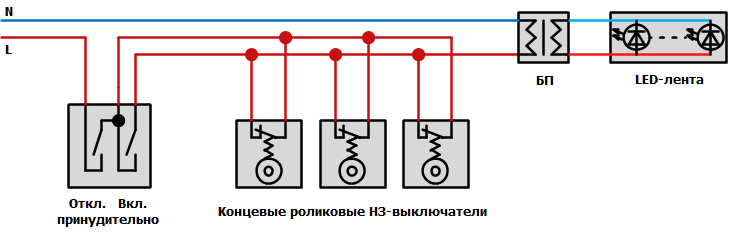
Control of the inclusion of chandeliers and ribbons
Not knowing in advance whether we would like to live under the light of the LEDs, as I already mentioned, it was decided to use together with the LED tape and the usual chandelier.
But to always include both things in parallel is silly. To throw the wires in the switch is also not ice. I wanted to be able to turn on the tape and the chandelier separately, and both together. Unfortunately, the LED strip appeared already after the electrical wiring was laid in the walls. And the overhead light now began to consist of two different sources, which I wanted to control separately.
To any kind of wireless solutions in this area, I am extremely skeptical. Yes, there are a variety of off-the-shelf systems with controllers and remote wireless switches. But I think that such an approach is from a cannon on sparrows, or in the absence of other options for implementation. And the need to change the batteries in the remote switches are not tempting. It was necessary to find a simple, oak solution.
Initially, three lighting control points were laid on the wiring - above the sofa and at the two doors of the room (the room is through). From each point it was possible to independently turn on or off the overhead light. And above the sofa, one could additionally include some other, secondary sources of light (decorative lights, wall lamps), creating a variety of lighting scenarios in the room.
Breaking the brain over the possibilities of using existing wiring, I got a scheme in which from all three points you can turn off absolutely all light sources with one click. It seemed more convenient if you need to quickly extinguish the whole world. In the main control point (which is above the sofa), in addition to this, each light source has its own separate key, including a separate one for the chandelier, and a separate one for the ribbon.
But there was one pitfall that could cause some inconvenience to use. If at the main control point all light sources are turned off with personal keys, then the switches at the doors cannot turn on any light at all, and you have to first make your way through the room to the sofa in the dark.
It was necessary to find an option in which it would be possible to switch on at least one light source from any point, regardless of whether it was previously turned off by its personal switch or not. Using all the same, already laid the wiring, and without resorting to redundant wireless technologies.
The solution was found in the application of a conventional electromagnetic switching relay, used as a memory cell with self-resetting. The light control logic now looks like this.
We decide which of the light sources will be “main”, that is, turn on by default under any conditions. And we connect it to the power supply via NC relays. To turn off only one of this “main” light source, instead of a simple key switch, use the HP-button. The button controls the switching on of the relay, which is placed on the power supply, simultaneously opening the power circuit of the “main” light source. And it is in this state until the moment of full shutdown of the whole world, after which it is reset to its original state, closing the NC contacts, and allowing the next time to turn on the “main” light source.
This solution has one minus - in order to turn it on again after switching off the “main” light source button, you need to double-throw the main switch. Of course, it would be possible to build a T-trigger on several relays, but the simplest reliable circuit would require as many as 5 relays, and the starting state of the trigger would be undefined and could be anything:
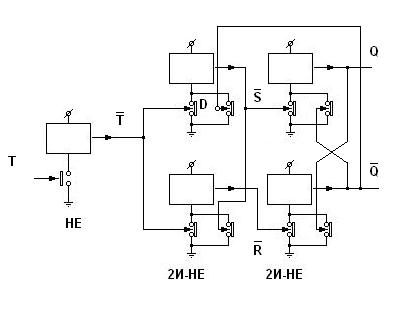
It was obvious that in order to refine the circuit to provide a certain starting state, several more relays would be required, in the end, all of this would have resulted in an unnecessarily cumbersome design. Therefore, I decided to come to terms with this minus.
A schematic diagram of the control of two light sources from three points with the choice of the desired light source in one of the points looks like this:
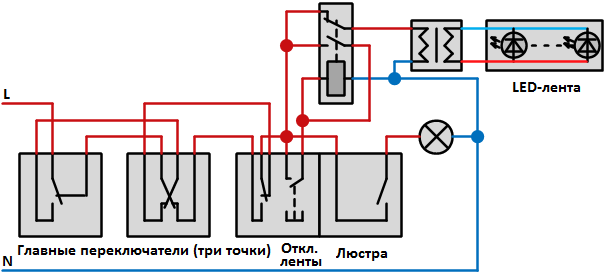
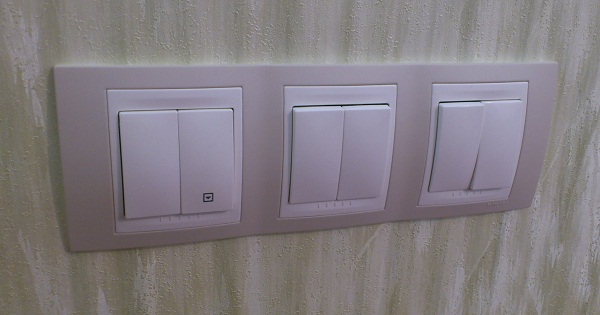
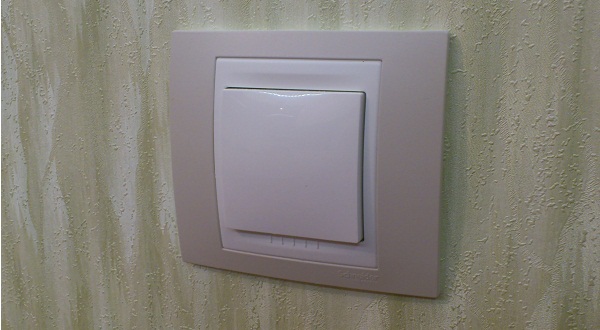
I chose the tape as the “main” light source, if I don’t like it, then it’s easy to rewire the wiring. When you turn on the light in any of the three points, the tape necessarily turns on. The chandelier has its own simple key switch. The tape can be turned off with the key-button.
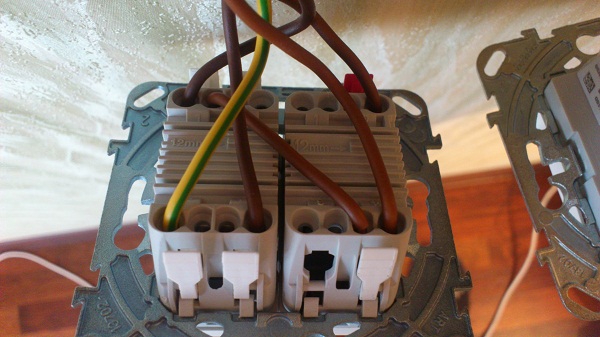
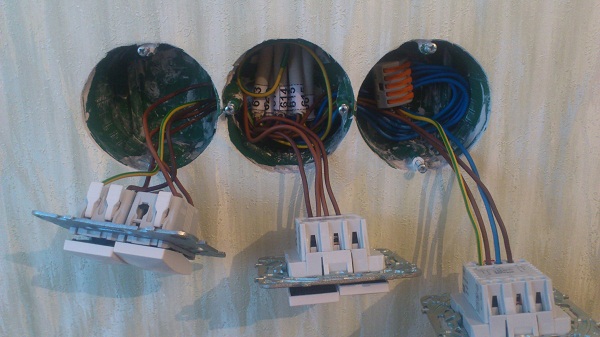
Making a button from a conventional key switch is easy. For such transformations, my favorite Unica wiring series from Schneider Electric fits perfectly. The switches of this (and maybe not only this) series have a modular design; in each post (on one frame) you can install one or two narrow modules of different functionality. Yes, and the modules themselves are assembled from unified parts. Using the details of various modules, you can even assemble the devil in a mortar. All the elements are fastened with snap fasteners, everything can be easily disassembled and it is assembled back without any problems.
In this series there is a standard position - Switches for blinds, catalog number MGU5.207.18ZD. The only position where non-lockable buttons are applied, and where there is the right size of the spring :) Well, then as fantasy tells you, there are many options. I will not go into details of the disassembly, who will climb - he will understand everything himself, everything is simple there. And since it is not the first time since I myself have been re-arranging Unica switches and sockets, I have some spare parts in the form of semi-assembled modules. , , , , — -:
:
:
— . — . ( ). — .
— , , :
:
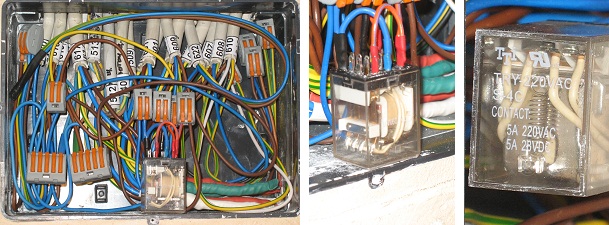
TRY-220VAC-S-4C . , . , , , .
, . , .
Prehistory
Not knowing in advance whether we would like to live under the light of the LEDs, as I already mentioned, it was decided to use together with the LED tape and the usual chandelier.
But to always include both things in parallel is silly. To throw the wires in the switch is also not ice. I wanted to be able to turn on the tape and the chandelier separately, and both together. Unfortunately, the LED strip appeared already after the electrical wiring was laid in the walls. And the overhead light now began to consist of two different sources, which I wanted to control separately.
To any kind of wireless solutions in this area, I am extremely skeptical. Yes, there are a variety of off-the-shelf systems with controllers and remote wireless switches. But I think that such an approach is from a cannon on sparrows, or in the absence of other options for implementation. And the need to change the batteries in the remote switches are not tempting. It was necessary to find a simple, oak solution.
Initially, three lighting control points were laid on the wiring - above the sofa and at the two doors of the room (the room is through). From each point it was possible to independently turn on or off the overhead light. And above the sofa, one could additionally include some other, secondary sources of light (decorative lights, wall lamps), creating a variety of lighting scenarios in the room.
Decision
Breaking the brain over the possibilities of using existing wiring, I got a scheme in which from all three points you can turn off absolutely all light sources with one click. It seemed more convenient if you need to quickly extinguish the whole world. In the main control point (which is above the sofa), in addition to this, each light source has its own separate key, including a separate one for the chandelier, and a separate one for the ribbon.
But there was one pitfall that could cause some inconvenience to use. If at the main control point all light sources are turned off with personal keys, then the switches at the doors cannot turn on any light at all, and you have to first make your way through the room to the sofa in the dark.
It was necessary to find an option in which it would be possible to switch on at least one light source from any point, regardless of whether it was previously turned off by its personal switch or not. Using all the same, already laid the wiring, and without resorting to redundant wireless technologies.
The solution was found in the application of a conventional electromagnetic switching relay, used as a memory cell with self-resetting. The light control logic now looks like this.
Work algorithm
We decide which of the light sources will be “main”, that is, turn on by default under any conditions. And we connect it to the power supply via NC relays. To turn off only one of this “main” light source, instead of a simple key switch, use the HP-button. The button controls the switching on of the relay, which is placed on the power supply, simultaneously opening the power circuit of the “main” light source. And it is in this state until the moment of full shutdown of the whole world, after which it is reset to its original state, closing the NC contacts, and allowing the next time to turn on the “main” light source.
This solution has one minus - in order to turn it on again after switching off the “main” light source button, you need to double-throw the main switch. Of course, it would be possible to build a T-trigger on several relays, but the simplest reliable circuit would require as many as 5 relays, and the starting state of the trigger would be undefined and could be anything:
It was obvious that in order to refine the circuit to provide a certain starting state, several more relays would be required, in the end, all of this would have resulted in an unnecessarily cumbersome design. Therefore, I decided to come to terms with this minus.
Final implementation
A schematic diagram of the control of two light sources from three points with the choice of the desired light source in one of the points looks like this:
I chose the tape as the “main” light source, if I don’t like it, then it’s easy to rewire the wiring. When you turn on the light in any of the three points, the tape necessarily turns on. The chandelier has its own simple key switch. The tape can be turned off with the key-button.
Making a button from a conventional key switch is easy. For such transformations, my favorite Unica wiring series from Schneider Electric fits perfectly. The switches of this (and maybe not only this) series have a modular design; in each post (on one frame) you can install one or two narrow modules of different functionality. Yes, and the modules themselves are assembled from unified parts. Using the details of various modules, you can even assemble the devil in a mortar. All the elements are fastened with snap fasteners, everything can be easily disassembled and it is assembled back without any problems.
In this series there is a standard position - Switches for blinds, catalog number MGU5.207.18ZD. The only position where non-lockable buttons are applied, and where there is the right size of the spring :) Well, then as fantasy tells you, there are many options. I will not go into details of the disassembly, who will climb - he will understand everything himself, everything is simple there. And since it is not the first time since I myself have been re-arranging Unica switches and sockets, I have some spare parts in the form of semi-assembled modules. , , , , — -:
:
:
— . — . ( ). — .
— , , :
:
TRY-220VAC-S-4C . , . , , , .
, . , .
Control of local lighting closet
, Ultra 5000 -, . .
. , . , .
, , , . , , . , , , — , .
:
, . . — , , . , , . , . «» «» «» .
. , . , .
, , , . , , . , , , — , .
:
, . . — , , . , , . , . «» «» «» .
LED lighting as main light
. ( ). . , :
, , , , :) , - , - — :)
, . , , :
, :
. . :) , . , , , «» :)
, , , , :) , - , - — :)
, . , , :
, :
. . :) , . , , , «» :)
UPD 01/27/2013
Finally, I received a long-awaited profile diffusers. Installing them turned out to be a very time consuming task - it is necessary to make a very big effort to snap them into the profile. Uncomfortable under the ceiling to do this. It’s ok to wear a few more meters, but at 15 meters I even rested a couple of times, since the fingers are usually heavier than the keyboard buttons, they are not tight :)
The result is contradictory.
Of course, it became darker, noticeably darker. I measured the illumination once more before putting on the diffuser, and after that, here's what happened:
| Measuring point | Without diffuser, lx | With spreader, lx |
| In the center of the room at floor level | 246 | 165 |
| In the center of the room at eye level | 312 | 215 |
That is, it became darker by 30%.
But on the other hand, the light itself has changed, and changed for the better. First, it became warmer in color temperature. During the installation of the diffusers, I noticed a difference in color on the ceiling - where the diffuser was already dressed, the shade of light was more yellow. For the eyes, this color has become even more pleasant. Secondly, maybe this is a consequence of the first, the color rendition has improved. Before, everything seemed greenish to me in this light, but with diffusers this effect disappeared, now the colors of the objects have become more natural. And thirdly, the tape began to look aesthetically pleasing, not contrasting bright points on a dark background, but more blurred on a lighter background.
, . , . , . , , . .
:
No flash:
( ):
UPD 09.03.2017
:
geektimes.ru/post/257720/#comment_9935472
Source: https://habr.com/ru/post/163097/
All Articles