Digitization of large negatives
Good day, dear% username%. This post was originally a commentary on the article “ Digitizing 35mm film ”, but in the process of writing it, I realized that there are many points that I would like to reveal and I will not have enough commentary. It will be about digitizing large negatives . Under the cat a lot of photos, examples, description of the digitizing technique and the algorithm for post-processing the resulting image. In general, who wants to see his old archive of photos in digital form, but wants to do it without the help of photo salons - I ask under the cat.
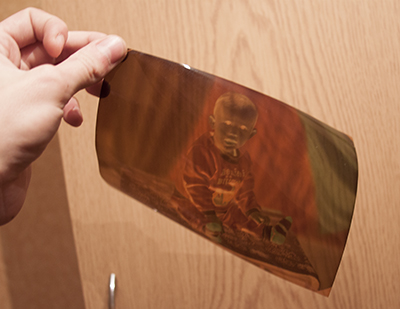
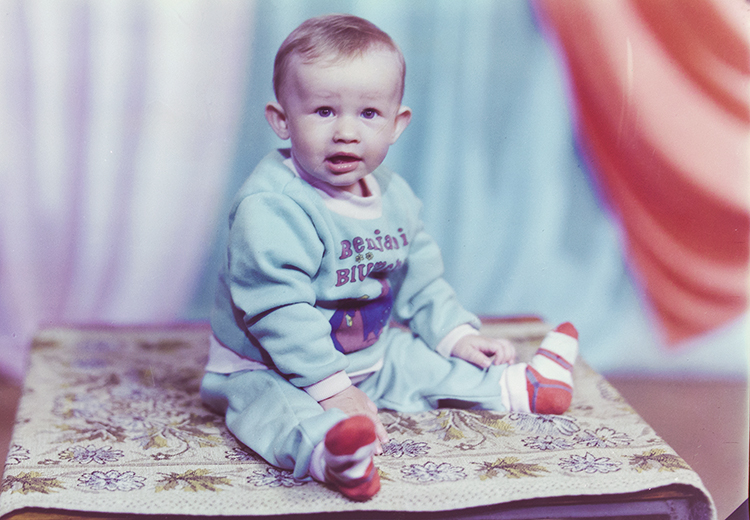
Here we found at home somewhere in the corner this is such a negative:
')
The digitization method proposed by zDmitriy will not work without refinement. Yes, and from an external flash to get uniform coverage of such a negative will be difficult. Thinking about how to highlight it, I found the simplest solution - the LCD monitor.
Pros:
I found only one minus - with a strong magnification of the photo, individual pixels are visible, however, a sheet of acrylic or any similar material planted under the negative allows you to forget about it.
So, for our digitization method, we need:
Also, some accessories for the camera will facilitate the process:
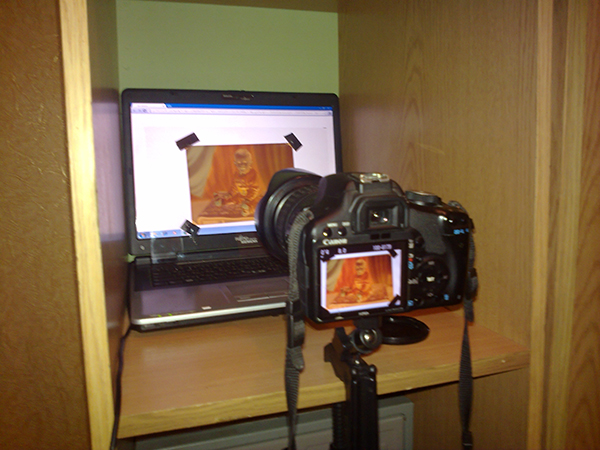
Install the monitor (I used a laptop) so that in front of it you could mount the camera on a tripod.
We clean the monitor, camera lens, glass, with which we will press the negative, and of necessity the negative itself (mine was stored in a suitcase with old photos, and was rather dirty, with fingerprints and other unpleasant moments) - we don’t want to remove each speck of dust.
We press the negative with glass to the monitor and fix all the clothespins, not forgetting to put a sheet of acrylic between the monitor and the negative. Or as an option: neatly, with pieces of electrical tape we attach the negative to the glass by the corners of the negative.
We install the camera on a tripod, fix, focus, set the save to RAW format (I will explain later), turn on the remote control mode (if there is no remote control, set the self-timer) and, if available, turn on the “ pre-mirror ” function in the camera (in my Canon EOS 500D, it is called “Mirror lock”) - this will allow us to reduce camera shake when taking pictures. We need the sharpest shots, right?
Also, do not forget to turn off all the extraneous light in the room, so that there is no glare from the glass, reflections of yourself, and in general, the extraneous light can make its own adjustments to the White Balance (further BB ), which will not help us much.
As a result, everything looks like this (I apologize for the quality of the photo, shot on the phone):
(I used a mini tripod with a clip, instead of a full-sized one. I recommend the most comfortable thing)
Then everything is simple: set the shooting parameters (I used ISO 200, 1/3, f: 8 ) take the remote control and shoot (or just press a button on the camera and wait for the timer to work)
We look at the result, if everything is good - we transfer the image to the computer. Now you can proceed to post-processing.
Open the resulting image in Photoshop (hereinafter referred to as PS), the Camera RAW itself will open (well, PS doesn’t know how to work with the RAW format right away).
Immediately go to the Tone Curve tab and select the Point mode, and simply invert the curve. Right end down, left up. We receive the inverted image. Do not be alarmed if it is all blue or green.

Go back to the basic settings:
And we adjust further. Do not forget that the photo is inverted through the curves and the effect of some parameters can also be inverted. For example, by moving the exposure slider to + 1Ev, you will get the opposite effect - the photo will become darker. The main parameter for obtaining normal colors BB, also known as Temperature
My options are as follows:

You can also play around with the HSL / Grayscale settings (more accurate color correction). Well, in general, by any parameters, if they can help you achieve the desired result.
They finished here, feel free to click the “ Open Image ” button in the lower right corner of Camera Raw, after which PS will open.
Now we need to correct the perspective (I mistakenly shot the frame at a slight angle), cut off the excess and, like the final chord, remove those “pixels” from the monitor. Let's get started
Let's start with circumcision. To do this, use the Crop Tool , and, moving the corners, we form our photo:
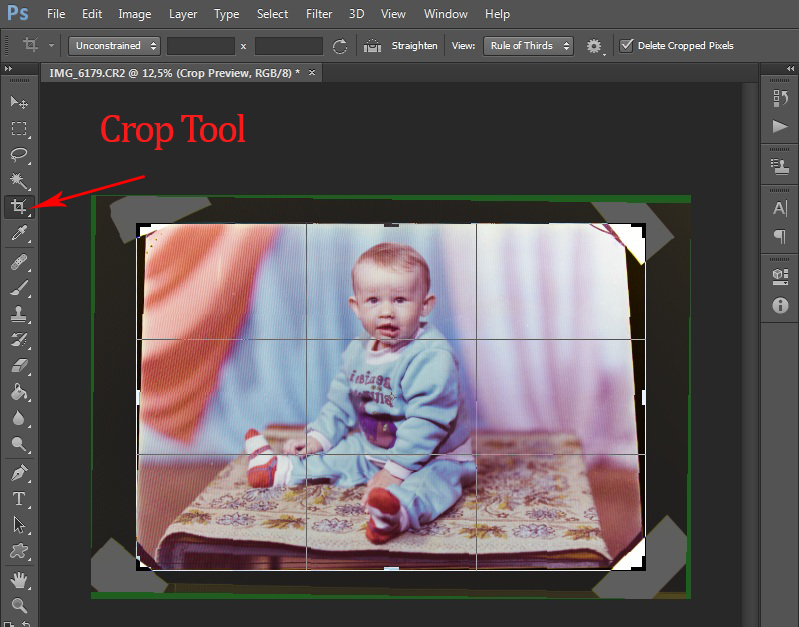
As you can see, we need to correct the perspective, to do this, select the Rectangular Marquee Tool , select all the photos, right-click and select Free Transform . Further once again we press PKM and we select Perspective . Now we pull the corners to be corrected, in our case we need to stretch the top of the photo.

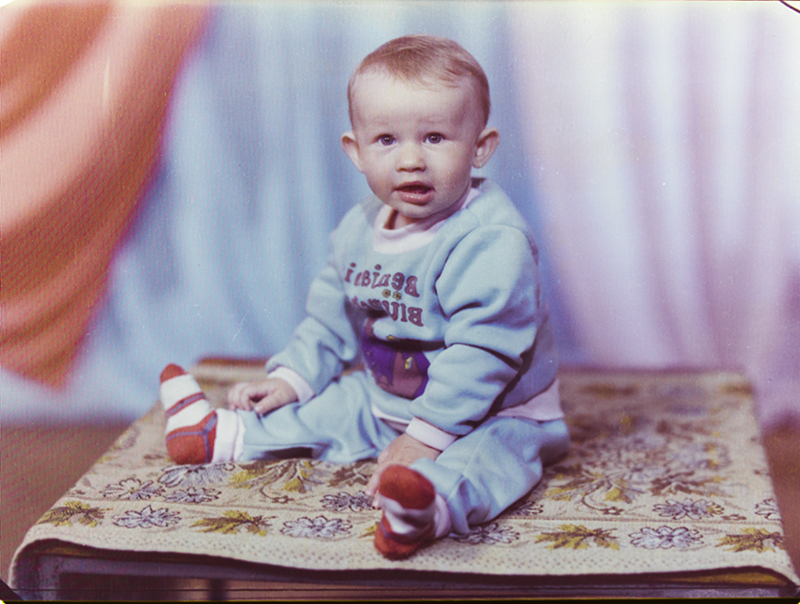
Now once again use the Crop Tool to remove these parasitic white corners, inherited from the original.
It's time to remove pixelation in the photo. The easiest way to do this is to use a Gaussian Blur filter. To do this, open the menu Filter -> Blur -> Gaussian Blur. Choose the effect strength with one single slider and click OK.
You can also clean the photo of unnecessary defects, stains and scratches using the Healing Brush Tool , but if you start explaining, the topic can already be renamed “Photo Processing in Adobe Photoshop”.
What we had:

What got in the end:
And what happened after the correction and refinement of the method:
View full size here
Hints and Tips:
Conclusion : This method of digitizing at home is available to everyone, does not require any special skills and allows you to plunge into the memories in the process.
UPD Thank you amarao and Juggler for the advice and comments, everything is fixed. As a result, it was decided to add between the negative and the monitor a sheet of thin white acrylic, as a result the “moire” disappeared. Post updated
Also, thanks to kraleksandr for multiple corrections on the part of the text.
Here we found at home somewhere in the corner this is such a negative:
')
The digitization method proposed by zDmitriy will not work without refinement. Yes, and from an external flash to get uniform coverage of such a negative will be difficult. Thinking about how to highlight it, I found the simplest solution - the LCD monitor.
Pros:
- Everyone has something that cannot be said about an external flash.
- Uniform light throughout the monitor
- Does not require any modifications
I found only one minus - with a strong magnification of the photo, individual pixels are visible, however, a sheet of acrylic or any similar material planted under the negative allows you to forget about it.
So, for our digitization method, we need:
- Camera (preferably DSLR, but generally possible soap box, although the post is designed specifically for DSLR)
- Any LCD display (monitor, laptop, tablet, and even a smartphone will be suitable for digitizing 35mm film)
- Regular glass is about the size of a monitor (we will press the negative to the display with it).
- Clothespins household (for pressing the glass to the monitor)
- Any pure white image on the monitor (for example, jpg image in slideshow mode)
- Adobe Photoshop CS6 + Camera RAW
- white acrylic sheet (we put it under the negative)
Also, some accessories for the camera will facilitate the process:
- Remote control
- Tripod
- Optics cleaning kit
Training
Install the monitor (I used a laptop) so that in front of it you could mount the camera on a tripod.
We clean the monitor, camera lens, glass, with which we will press the negative, and of necessity the negative itself (mine was stored in a suitcase with old photos, and was rather dirty, with fingerprints and other unpleasant moments) - we don’t want to remove each speck of dust.
We press the negative with glass to the monitor and fix all the clothespins, not forgetting to put a sheet of acrylic between the monitor and the negative. Or as an option: neatly, with pieces of electrical tape we attach the negative to the glass by the corners of the negative.
We install the camera on a tripod, fix, focus, set the save to RAW format (I will explain later), turn on the remote control mode (if there is no remote control, set the self-timer) and, if available, turn on the “ pre-mirror ” function in the camera (in my Canon EOS 500D, it is called “Mirror lock”) - this will allow us to reduce camera shake when taking pictures. We need the sharpest shots, right?
Also, do not forget to turn off all the extraneous light in the room, so that there is no glare from the glass, reflections of yourself, and in general, the extraneous light can make its own adjustments to the White Balance (further BB ), which will not help us much.
As a result, everything looks like this (I apologize for the quality of the photo, shot on the phone):
(I used a mini tripod with a clip, instead of a full-sized one. I recommend the most comfortable thing)
Then everything is simple: set the shooting parameters (I used ISO 200, 1/3, f: 8 ) take the remote control and shoot (or just press a button on the camera and wait for the timer to work)
We look at the result, if everything is good - we transfer the image to the computer. Now you can proceed to post-processing.
Post processing
Open the resulting image in Photoshop (hereinafter referred to as PS), the Camera RAW itself will open (well, PS doesn’t know how to work with the RAW format right away).
Immediately go to the Tone Curve tab and select the Point mode, and simply invert the curve. Right end down, left up. We receive the inverted image. Do not be alarmed if it is all blue or green.
Go back to the basic settings:
And we adjust further. Do not forget that the photo is inverted through the curves and the effect of some parameters can also be inverted. For example, by moving the exposure slider to + 1Ev, you will get the opposite effect - the photo will become darker. The main parameter for obtaining normal colors BB, also known as Temperature
My options are as follows:
You can also play around with the HSL / Grayscale settings (more accurate color correction). Well, in general, by any parameters, if they can help you achieve the desired result.
They finished here, feel free to click the “ Open Image ” button in the lower right corner of Camera Raw, after which PS will open.
Now we need to correct the perspective (I mistakenly shot the frame at a slight angle), cut off the excess and, like the final chord, remove those “pixels” from the monitor. Let's get started
Let's start with circumcision. To do this, use the Crop Tool , and, moving the corners, we form our photo:
As you can see, we need to correct the perspective, to do this, select the Rectangular Marquee Tool , select all the photos, right-click and select Free Transform . Further once again we press PKM and we select Perspective . Now we pull the corners to be corrected, in our case we need to stretch the top of the photo.
Now once again use the Crop Tool to remove these parasitic white corners, inherited from the original.
It's time to remove pixelation in the photo. The easiest way to do this is to use a Gaussian Blur filter. To do this, open the menu Filter -> Blur -> Gaussian Blur. Choose the effect strength with one single slider and click OK.
You can also clean the photo of unnecessary defects, stains and scratches using the Healing Brush Tool , but if you start explaining, the topic can already be renamed “Photo Processing in Adobe Photoshop”.
Before and after
What we had:
What got in the end:
And what happened after the correction and refinement of the method:
View full size here
Hints and Tips:
- Shoot in RAW format - it has great opportunities in post-processing, rather than already compressed JPG.
- If you are using a tripod, do not be afraid of long exposures; in this example, the 1/3 shutter speed was used.
- Decide in advance what kind of result you want to get after post-processing. Decide whether you need to bring the colors to perfectly accurate, or whether you should leave them as they are, in the original.
- Also, this method can be used to digitize 35 mm film, only you need to have a lens with a focal length of 135 mm, or macro. Here you just need to solve the problem with pixels appearing in the photo. As an option to enclose acrylic under the negative, but this is not the final version. Suggest ideas.
Conclusion : This method of digitizing at home is available to everyone, does not require any special skills and allows you to plunge into the memories in the process.
UPD Thank you amarao and Juggler for the advice and comments, everything is fixed. As a result, it was decided to add between the negative and the monitor a sheet of thin white acrylic, as a result the “moire” disappeared. Post updated
Also, thanks to kraleksandr for multiple corrections on the part of the text.
Source: https://habr.com/ru/post/162773/
All Articles