AdMob integration into Cocos2d-x
Dear Hobrazhiteli, in this article I want to share my experience on integrating the AdMob banner network into an Android game, written using the Cocos2d-x engine.
Interest in mobile development in recent years is high and many independent developers and companies are eager to master a part of this market. This creates high competition and even a good application can get lost in the market. It may take a long time for your application to reach high positions in the ranking. And time is money. It is important to get a good position in the ranking, as this leads to further downloads. This makes positioning the application as free a good strategy. However, application development is a costly task, especially if you are a company or use part of the work through outsourcing. But even if all the development was done by one participant, the developer’s plans were to simply leave his mark on the app store. I want to get at least some kind of material return. Thus, we come to two strategies for monetizing applications. Freemium model is a free application plus additional functionality for a fee, through in-app purchases. Either monetization due to advertising built into the application. In this article we will consider the introduction of advertising in the application.
So let's say that you already have an application or game for Android written using Cocos2d-x 2.0.4. Not? Well then, let's take as a basis the examples bundled with the Cocos2d-x SDK. Still not installed SDK? Then we go to the github section , where the source code of the framework is stored (at the time of this writing, the official web site of the cocos2d-x.org project was unavailable). AdMob SDK can be found on admob.com .
')
The code in the project using the framework is written in C ++. However, the AdMob SDK is a Java language library. How to use this library in our project? In fact, everything is much easier than it might seem at first glance. And all this thanks to the capabilities of the Android SDK. The fact is that the View object in which the graphics implemented in C ++ is displayed is also a Java object, and here we are free to build the configuration we need for various View.
The first thing that comes to mind is the stack from View, let's say the banner above and below the game window. This can be done using the LinearLayout object in which to place the AdView object and Cocos2dxGLSurfaceView. All this will work, the only problem will arise at the moment when you want to be able to remove the banner, for example, after paying for the purchase inside the application. The problem is that the OpenGL view in Cocos2d-x does not support resizing the viewport.
Another solution is to use RelativeLayout and display a banner on top of the OpenGL view of the game. In this case, the display area of the game will take all the available space on the screen and will not change, and the area with the banner will be superimposed on top. Drop fears, it will not cause image distortion or flicker.
If you are familiar with the development under Android, then you know that usually the parameters of the display area are described in a special XML file. In programs on Cocos2d-x 1.0 it was. However, you will not find this file in the latest version of Cocos2d-x. For some reason unknown to me, the description of the display areas was transferred to the Java code. It does not cause any difficulties, you just need to know where these files are located (cocos2dx-2.0.4 / cocos2dx / platform / android / java / src / org / cocos2dx / lib). The code turns out a little more, but we have the ability to dynamically create the necessary display configuration. Unfortunately, without modifying the library files, it will not be possible to connect the viewport we need - the members of the class we need are declared private. In my project, I made a radical decision to completely copy this code into my project, instead of referring to the framework files. Since now all the code was now in the repository of my project, it gave me a free hand and I made all the necessary code modifications right in the Cocos2dxActivity class.
So let's get started. First of all, copy the test project folder, for example HelloCpp in HelloAdMob in the same folder. Next, copy the AdMob SDK files HelloAdMob / proj.android / AdMob. Now we will create the HelloAdMob / proj.android / cocos_java folder and copy the files from cocos2dx-2.0.4 / cocos2dx / platform / android / java / src including the subdirectories into it.
Next, open the project in Eclipse, or in another environment of your choice (notepad? ;-). Project properties should look like the screenshots below.
You will need to add the cocos_java folder to the project,
as well as the AdMob library.
and mark the AdMob library for export.
You also need to change the version of the Android SDK, since AdMob requires version 3.2 or higher. Do not worry, support for versions from Android 2.2 will remain. Modify the project.properties file by installing the appropriate version
Next, open the AndroidManifest.xml file as text, correct the line of the target SDK
the minimum version is left old. Below we will add the necessary permissions so that AdMob can download the banner from the network.
You also need to declare AdMob in the manifest file. I did this after announcing the activity class of the game.
Now we modify the Cocos2dxActivity.java file - add AdMob import sinks:
add a field for the ad unit to the class
now after the lines
insert the following code:
Publisher ID you get after registering on admob.com and adding information about your program. The device ID will be displayed in the logcat console, it needs to be copied and pasted into the code, because of random clicks on your own banner, you can be banned (sorry for the pun) in the admob system, and if you logged in with a Google account, you can this account is also blocked, with all the ensuing consequences.
Next, you need to add the created viewport to the class hierarchy. This should be done after adding the OpenGL region, otherwise your banner will be blocked by it. After the line
add our code:
Everything, it is possible to start assembly. Do not forget to build the native library using the Android NDK, after which you can build the project in Eclipse (or in your favorite environment) and enjoy the result.

Introduction
Interest in mobile development in recent years is high and many independent developers and companies are eager to master a part of this market. This creates high competition and even a good application can get lost in the market. It may take a long time for your application to reach high positions in the ranking. And time is money. It is important to get a good position in the ranking, as this leads to further downloads. This makes positioning the application as free a good strategy. However, application development is a costly task, especially if you are a company or use part of the work through outsourcing. But even if all the development was done by one participant, the developer’s plans were to simply leave his mark on the app store. I want to get at least some kind of material return. Thus, we come to two strategies for monetizing applications. Freemium model is a free application plus additional functionality for a fee, through in-app purchases. Either monetization due to advertising built into the application. In this article we will consider the introduction of advertising in the application.
Theory and training tools
So let's say that you already have an application or game for Android written using Cocos2d-x 2.0.4. Not? Well then, let's take as a basis the examples bundled with the Cocos2d-x SDK. Still not installed SDK? Then we go to the github section , where the source code of the framework is stored (at the time of this writing, the official web site of the cocos2d-x.org project was unavailable). AdMob SDK can be found on admob.com .
')
The code in the project using the framework is written in C ++. However, the AdMob SDK is a Java language library. How to use this library in our project? In fact, everything is much easier than it might seem at first glance. And all this thanks to the capabilities of the Android SDK. The fact is that the View object in which the graphics implemented in C ++ is displayed is also a Java object, and here we are free to build the configuration we need for various View.
The first thing that comes to mind is the stack from View, let's say the banner above and below the game window. This can be done using the LinearLayout object in which to place the AdView object and Cocos2dxGLSurfaceView. All this will work, the only problem will arise at the moment when you want to be able to remove the banner, for example, after paying for the purchase inside the application. The problem is that the OpenGL view in Cocos2d-x does not support resizing the viewport.
Another solution is to use RelativeLayout and display a banner on top of the OpenGL view of the game. In this case, the display area of the game will take all the available space on the screen and will not change, and the area with the banner will be superimposed on top. Drop fears, it will not cause image distortion or flicker.
If you are familiar with the development under Android, then you know that usually the parameters of the display area are described in a special XML file. In programs on Cocos2d-x 1.0 it was. However, you will not find this file in the latest version of Cocos2d-x. For some reason unknown to me, the description of the display areas was transferred to the Java code. It does not cause any difficulties, you just need to know where these files are located (cocos2dx-2.0.4 / cocos2dx / platform / android / java / src / org / cocos2dx / lib). The code turns out a little more, but we have the ability to dynamically create the necessary display configuration. Unfortunately, without modifying the library files, it will not be possible to connect the viewport we need - the members of the class we need are declared private. In my project, I made a radical decision to completely copy this code into my project, instead of referring to the framework files. Since now all the code was now in the repository of my project, it gave me a free hand and I made all the necessary code modifications right in the Cocos2dxActivity class.
Integration
So let's get started. First of all, copy the test project folder, for example HelloCpp in HelloAdMob in the same folder. Next, copy the AdMob SDK files HelloAdMob / proj.android / AdMob. Now we will create the HelloAdMob / proj.android / cocos_java folder and copy the files from cocos2dx-2.0.4 / cocos2dx / platform / android / java / src including the subdirectories into it.
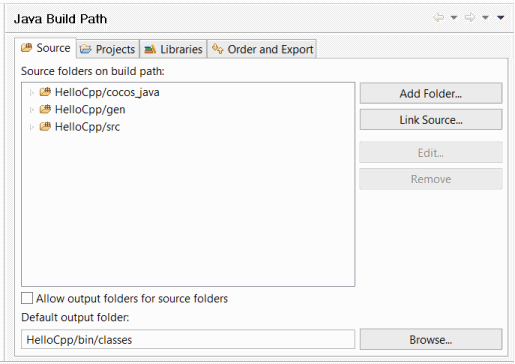
Next, open the project in Eclipse, or in another environment of your choice (notepad? ;-). Project properties should look like the screenshots below.
You will need to add the cocos_java folder to the project,
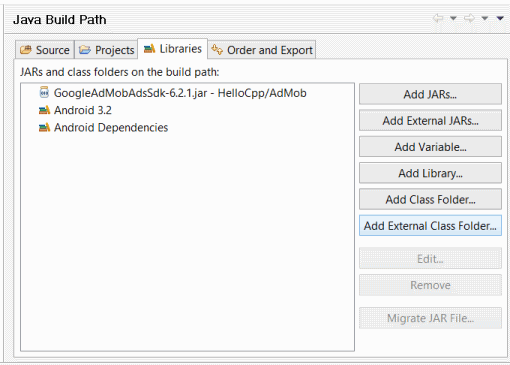
as well as the AdMob library.
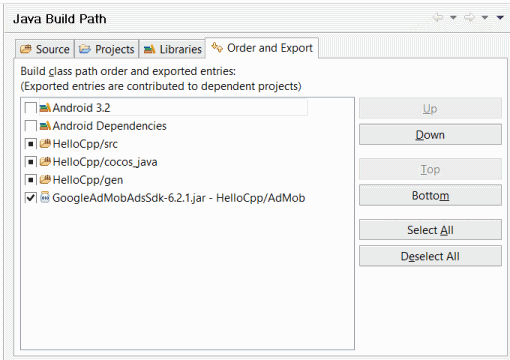
and mark the AdMob library for export.
You also need to change the version of the Android SDK, since AdMob requires version 3.2 or higher. Do not worry, support for versions from Android 2.2 will remain. Modify the project.properties file by installing the appropriate version
# Project target. target=android-13 Next, open the AndroidManifest.xml file as text, correct the line of the target SDK
<uses-sdk android:minSdkVersion="8" android:targetSdkVersion="13" /> the minimum version is left old. Below we will add the necessary permissions so that AdMob can download the banner from the network.
<uses-permission android:name="android.permission.INTERNET"/> <uses-permission android:name="android.permission.ACCESS_NETWORK_STATE"/> You also need to declare AdMob in the manifest file. I did this after announcing the activity class of the game.
<activity android:name="com.google.ads.AdActivity" android:configChanges="keyboard|keyboardHidden|orientation|screenLayout|uiMode|screenSize|smallestScreenSize"/> Now we modify the Cocos2dxActivity.java file - add AdMob import sinks:
import com.google.ads.AdRequest; import com.google.ads.AdSize; import com.google.ads.AdView; add a field for the ad unit to the class
private AdView adView; now after the lines
// ...add to FrameLayout framelayout.addView(edittext); insert the following code:
// adView = new AdView(this, AdSize.BANNER, "_id"); // , , cocos2d-x ViewGroup.LayoutParams ad_layout_params = new ViewGroup.LayoutParams( ViewGroup.LayoutParams.FILL_PARENT, 50); adView.setLayoutParams(ad_layout_params); // AdRequest adRequest = new AdRequest(); // adRequest.addTestDevice("id__"); // adView.loadAd(adRequest); Publisher ID you get after registering on admob.com and adding information about your program. The device ID will be displayed in the logcat console, it needs to be copied and pasted into the code, because of random clicks on your own banner, you can be banned (sorry for the pun) in the admob system, and if you logged in with a Google account, you can this account is also blocked, with all the ensuing consequences.
Next, you need to add the created viewport to the class hierarchy. This should be done after adding the OpenGL region, otherwise your banner will be blocked by it. After the line
gLSurfaceView.setCocos2dxEditText(edittext); add our code:
// AdView . , framelayout.addView(adView); Everything, it is possible to start assembly. Do not forget to build the native library using the Android NDK, after which you can build the project in Eclipse (or in your favorite environment) and enjoy the result.
Source: https://habr.com/ru/post/161891/
All Articles