AVR microcontrollers and Ada language
In this article I want to share a link to the AVR-Ada project ( sourceforge.net/projects/avr-ada ) by Rolf Ebert and give an example of using the Hell language in an amateur project on a microcontroller. The article may be useful to those who, like me, are not at all friendly with the language of "C". As an example, let's take a banal device - a thermometer on a DS18B20 sensor and an ATtiny13 microcontroller with LED indication.

')
To develop the firmware you will need to download the following:
1.1. WinAVR-20100110 ( sourceforge.net/projects/winavr/files/WinAVR/20100110 ) - SDK for the development of firmware in Assembler and C. Includes "Programmers Notepad" with Ada syntax highlighting.
1.2. AVR-Ada-1.1.0 ( sourceforge.net/projects/avr-ada/files/avr-ada/bin_windows ) - GNAT compiler and Ada libraries for WinAVR. Includes sample programs.
1.3. Program programmer. In my case, this is AvrOSPII, supplied with the programmer.
In the download section of AVR-Ada there are versions 1.1 and 1.2. For ease of installation, I recommend using an older version, since the new one requires several additional libraries (dll) that are not available in the installer. If you want to install version 1.2, then the missing parts can be found in MinGW ( sourceforge.net/projects/mingw/files ).
AVR-Ada should be installed over WinAVR in the same directory. Compilation is done using the “make” utility, so the directories “C: \ WinAVR-20100110 \ utils \ bin” and “C: \ WinAVR-20100110 \ bin” should be included in the PATH environment variable.
The following devices are required:
2.1. The programmer — in my case — the Inex PX-400 is driven by an assortment of “village” stores.
2.2. Power supply for thermometer and programmer - any 5 V mobile phone charger will do.
2.3. Actually a thermometer.
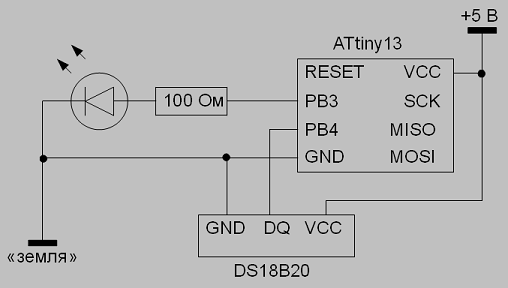
The device consists of an ATtiny13 microcontroller ( www.atmel.com/devices/attiny13.aspx ), a DS18B20 temperature sensor, a current-limiting resistor of at least 100 Ohms and a LED. The sensor is connected via a 1-wire bus to the PB4 pin of the microcontroller. Please note that the sensor can not be connected to the terminals used to connect the programmer (RESET, SCK, MOSI, MISO), since the intervention of the sensor in the exchange of data can lead to unpredictable consequences. Description of the 1-wire bus requires a 4.7 kOhm pull-up resistor, or less for parasitic power mode. It is also recommended to reduce this value when the tire is long. In our case, the length of the bus is minimal and parasitic power is not required, therefore, a pull-up resistor of 20-50 kΩ is enough that is built into the microcontroller. The LED connects to the PB3 pin. It is also possible to connect the LEDs to the terminals SCK, MOSI, MISO, but you will need to fulfill a number of additional requirements.
To turn on the LED, it is necessary to switch the corresponding output of the microcontroller to the "output" mode and give it a high level. For data exchange with a thermal sensor, a ready-made library is used, which will independently configure the output. To work correctly, time extracts need to set the clock frequency of the microcontroller to 8 MHz (“fuse bit” CKDIV8 = 1). By default, the ATtiny13 is tuned to 1 MHz. Installation is performed in accordance with the instructions on the programmer.
As the title of the article will be programmed in the language of Hell. The language is easy to learn, source codes are easy to read. The textbook in Russian can be read here ada-ru.org/V-0.4w/index.html
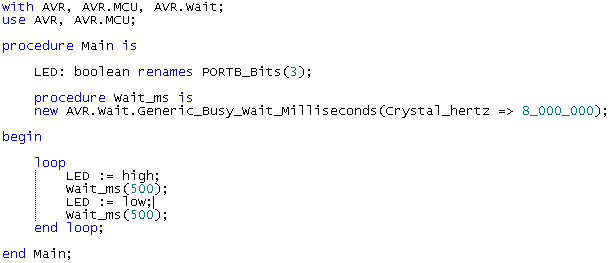
Let's start with a flashing LED. The entire project will consist of the source text (the “Main.adb” file), the project file (build.gpr) and the “make” utility configuration (Makefile). About the last two it is written in the part dedicated compilation. The file “Main.adb” will look like this:
Main.adb
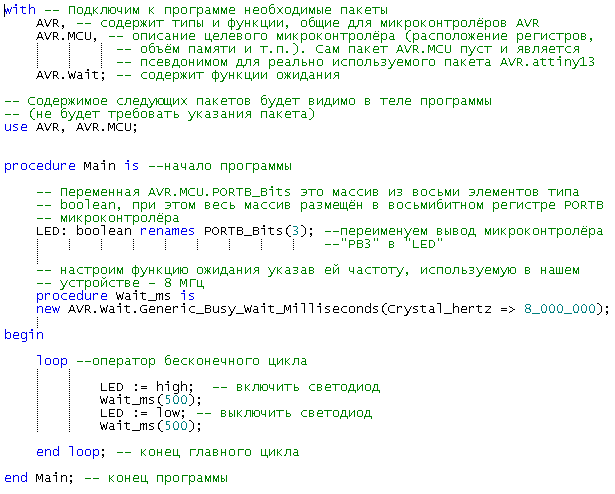
The same code with comments:
Main.adb
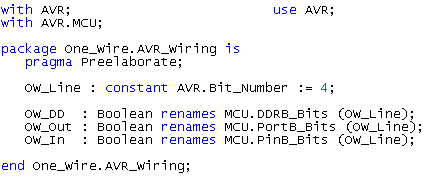
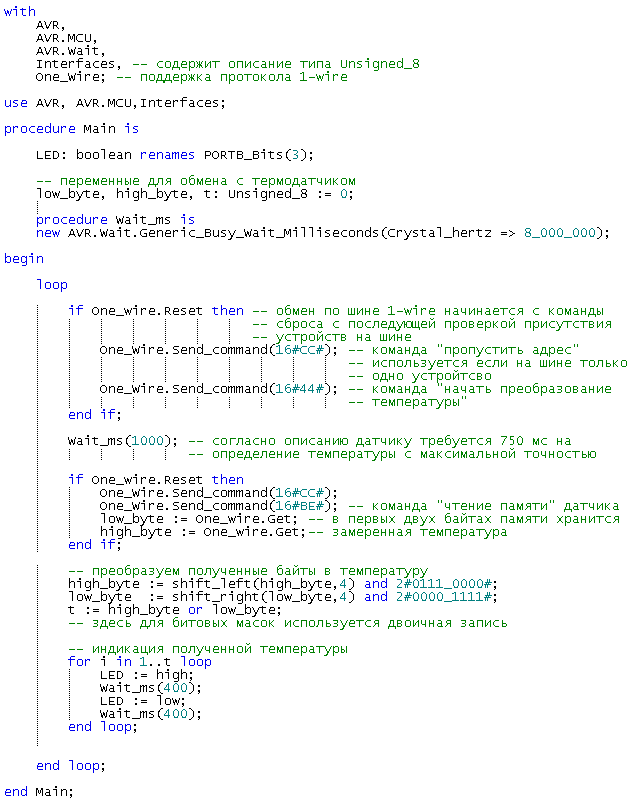
Let us expand the example by reading the temperature from the sensor memory To the above files you need to add the One_Wire library (files one_wire.ads, one_wire.adb, one_wire-init_comm.adb, one_wire-avr_wiring.ads), which can be found in the folder “C: \ WinAVR-20100110 \ lib \ gnat \ onewire”. Special attention should be paid to the file “one_wire-avr_wiring.ads”. It is necessary to specify the output of the microcontroller used to connect the bus 1-wire. For the given scheme it will look like this:
one_wire-avr_wiring.ads
Extended sample code:
Main.adb
As mentioned earlier, the compilation is carried out using the “make” utility, which is located in the “C: \ WinAVR-20100110 \ utils \ bin” directory. To compile, you need to copy the folder with the project “Makefile” from the folder “C: \ WinAVR-20100110 \ share \ doc \ avr-ada \ apps \ examples” and specify the necessary parameters in it:
Makefile
The GNAT compiler (The GNU Ada Compiler) allows you to set various options through a project file with the extension "* .gpr". Examples of projects can also be found in the folder “C: \ WinAVR-20100110 \ share \ doc \ avr-ada \ apps \ examples”. In our case, it will look like this:
build.gpr
Now you can go to the folder with the project and try to compile:
In order not to climb into the console, “Programmers Notepad” has the “Tools> [WinAVR] Make all” command.
Most likely, compilation from the first time will not be performed. This is due to the very strict syntax of Ada and the compiler's meticulousness. We'll have to fix a lot of syntax errors that are not considered errors in other languages.
If the compilation is still successful, then the main.hex file will appear in the root folder, which you need to flash into the microcontroller in accordance with the instructions on the programmer.
A small glass cup can be used as the body of the device obtained (no, this is not a stack for vodka consumption, it is a candlestick).
A handful of matte white beads works well as a diffuser. It creates the impression of a smooth growth and attenuation of the fire with a smooth brightness control.
A blue LED has been added to indicate negative temperatures in my thermometer.
In addition to the simplest unary indication system shown in the example, there are also options for unary-decimal, binary, ternary and unary with zero offset indications.
Unfortunately, Habrahabr does not support Ada syntax highlighting (well, or I am a “novice user”), so I had to insert the code in the form of pictures. Archive with code in text form here .
')
Part 1. Software components
To develop the firmware you will need to download the following:
1.1. WinAVR-20100110 ( sourceforge.net/projects/winavr/files/WinAVR/20100110 ) - SDK for the development of firmware in Assembler and C. Includes "Programmers Notepad" with Ada syntax highlighting.
1.2. AVR-Ada-1.1.0 ( sourceforge.net/projects/avr-ada/files/avr-ada/bin_windows ) - GNAT compiler and Ada libraries for WinAVR. Includes sample programs.
1.3. Program programmer. In my case, this is AvrOSPII, supplied with the programmer.
In the download section of AVR-Ada there are versions 1.1 and 1.2. For ease of installation, I recommend using an older version, since the new one requires several additional libraries (dll) that are not available in the installer. If you want to install version 1.2, then the missing parts can be found in MinGW ( sourceforge.net/projects/mingw/files ).
AVR-Ada should be installed over WinAVR in the same directory. Compilation is done using the “make” utility, so the directories “C: \ WinAVR-20100110 \ utils \ bin” and “C: \ WinAVR-20100110 \ bin” should be included in the PATH environment variable.
Part 2. Hardware components
The following devices are required:
2.1. The programmer — in my case — the Inex PX-400 is driven by an assortment of “village” stores.
2.2. Power supply for thermometer and programmer - any 5 V mobile phone charger will do.
2.3. Actually a thermometer.
The device consists of an ATtiny13 microcontroller ( www.atmel.com/devices/attiny13.aspx ), a DS18B20 temperature sensor, a current-limiting resistor of at least 100 Ohms and a LED. The sensor is connected via a 1-wire bus to the PB4 pin of the microcontroller. Please note that the sensor can not be connected to the terminals used to connect the programmer (RESET, SCK, MOSI, MISO), since the intervention of the sensor in the exchange of data can lead to unpredictable consequences. Description of the 1-wire bus requires a 4.7 kOhm pull-up resistor, or less for parasitic power mode. It is also recommended to reduce this value when the tire is long. In our case, the length of the bus is minimal and parasitic power is not required, therefore, a pull-up resistor of 20-50 kΩ is enough that is built into the microcontroller. The LED connects to the PB3 pin. It is also possible to connect the LEDs to the terminals SCK, MOSI, MISO, but you will need to fulfill a number of additional requirements.
To turn on the LED, it is necessary to switch the corresponding output of the microcontroller to the "output" mode and give it a high level. For data exchange with a thermal sensor, a ready-made library is used, which will independently configure the output. To work correctly, time extracts need to set the clock frequency of the microcontroller to 8 MHz (“fuse bit” CKDIV8 = 1). By default, the ATtiny13 is tuned to 1 MHz. Installation is performed in accordance with the instructions on the programmer.
Part 3. Programming
As the title of the article will be programmed in the language of Hell. The language is easy to learn, source codes are easy to read. The textbook in Russian can be read here ada-ru.org/V-0.4w/index.html
Let's start with a flashing LED. The entire project will consist of the source text (the “Main.adb” file), the project file (build.gpr) and the “make” utility configuration (Makefile). About the last two it is written in the part dedicated compilation. The file “Main.adb” will look like this:
Main.adb
The same code with comments:
Main.adb
Let us expand the example by reading the temperature from the sensor memory To the above files you need to add the One_Wire library (files one_wire.ads, one_wire.adb, one_wire-init_comm.adb, one_wire-avr_wiring.ads), which can be found in the folder “C: \ WinAVR-20100110 \ lib \ gnat \ onewire”. Special attention should be paid to the file “one_wire-avr_wiring.ads”. It is necessary to specify the output of the microcontroller used to connect the bus 1-wire. For the given scheme it will look like this:
one_wire-avr_wiring.ads
Extended sample code:
Main.adb
Part 4. Compilation
As mentioned earlier, the compilation is carried out using the “make” utility, which is located in the “C: \ WinAVR-20100110 \ utils \ bin” directory. To compile, you need to copy the folder with the project “Makefile” from the folder “C: \ WinAVR-20100110 \ share \ doc \ avr-ada \ apps \ examples” and specify the necessary parameters in it:
Makefile
# MCU := attiny13 # GNAT ( ) GPR := build.gpr # ADA_TARGETS := main # ... The GNAT compiler (The GNU Ada Compiler) allows you to set various options through a project file with the extension "* .gpr". Examples of projects can also be found in the folder “C: \ WinAVR-20100110 \ share \ doc \ avr-ada \ apps \ examples”. In our case, it will look like this:
build.gpr
project Build extends "avr_app" is -- "" "avr_app", -- AVR-Ada for Object_Dir use "obj"; -- obj, -- for Exec_Dir use "."; -- for Source_Dirs use ("."); -- end Build; Now you can go to the folder with the project and try to compile:
>cd " " >make In order not to climb into the console, “Programmers Notepad” has the “Tools> [WinAVR] Make all” command.
Most likely, compilation from the first time will not be performed. This is due to the very strict syntax of Ada and the compiler's meticulousness. We'll have to fix a lot of syntax errors that are not considered errors in other languages.
If the compilation is still successful, then the main.hex file will appear in the root folder, which you need to flash into the microcontroller in accordance with the instructions on the programmer.
Part 5. Decorative
A small glass cup can be used as the body of the device obtained (no, this is not a stack for vodka consumption, it is a candlestick).
A handful of matte white beads works well as a diffuser. It creates the impression of a smooth growth and attenuation of the fire with a smooth brightness control.
A blue LED has been added to indicate negative temperatures in my thermometer.
In addition to the simplest unary indication system shown in the example, there are also options for unary-decimal, binary, ternary and unary with zero offset indications.
application
Unfortunately, Habrahabr does not support Ada syntax highlighting (well, or I am a “novice user”), so I had to insert the code in the form of pictures. Archive with code in text form here .
Source: https://habr.com/ru/post/161257/
All Articles