Digitizing 35mm film
Good day, probably each of us has a lot of old film. So recently I decided to take it and digitize it, and at the same time share with you what I got from this. So, in this article I want to show and tell you how you can assemble a home photo-lab from practically with available means, in particular, it will be considered how to digitize: color, black and white positive and negative film. The goal is to digitize over 1000 frames. The quality requirement is very high. At the end of the article I will touch on the digitization of the slides.
If you are still interested, welcome under cat.
To begin with, you need to collect all the necessary, below I will give a list of the necessary, but not mandatory, why I’ll tell you so further.
What is required:
- digital reflex camera (DSLR)
- flash (powerful light source)
- 50mm-80mm lens
- macro rings
- photo enlarger
- softbox
- soft to DSLR
- usb-mini usb cable
')
May need:
- transition ring M42
- sync cable for flash
- slide adapter
- scotch tape
- torch
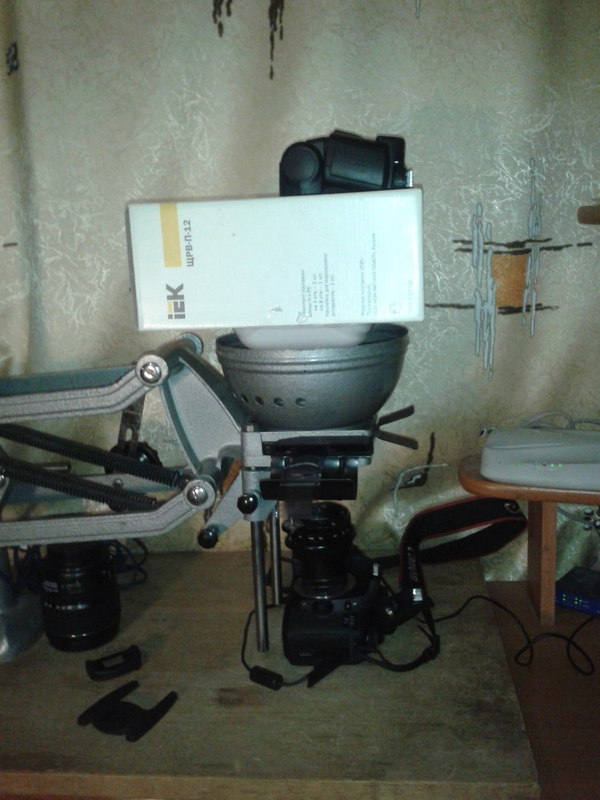
Let's start preparing the workplace, collect a photographic enlarger, the most convenient way is to put it next to the PC.
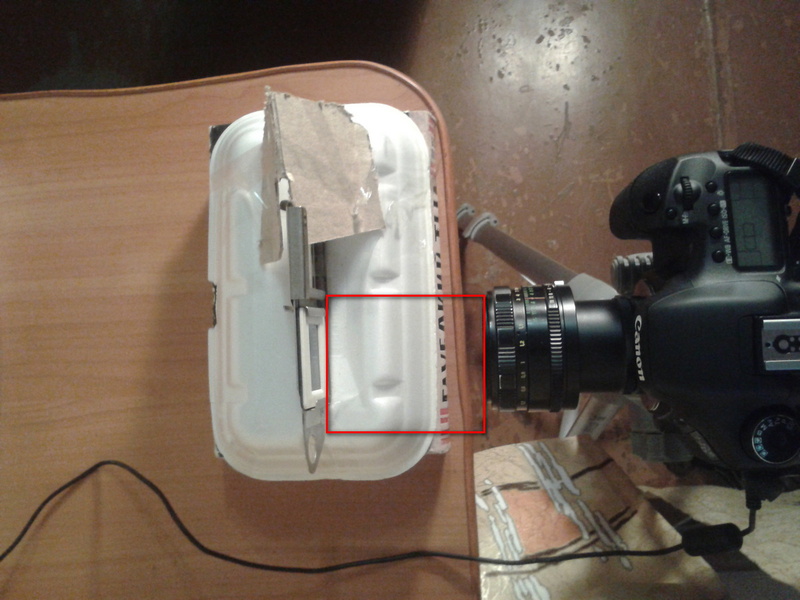
Collected photographic enlarger.

Red circled something that must be removed because interfere with the installation of the camera.
Let's go to the lens, here each will be individually, I can only say that you can use almost any lens (both regular and third-party), preferably with a fixed focal length from 50mm to 80mm (not zoom), it is better to try different, because the lens can To distort colors, I used the old Soviet “Zenitar 1.7 / 50” through the M42 adapter ring and two macro rings that had long been gathering dust in a box next to this lens. Macro-rings are selected empirically, more on that later.

Go to the assembly of the softbox, it will be used as a background. In my case, it was homemade, I took the first box I got, cut two holes in it, one for the flash, another for setting the background, inside the box I placed two sheets of white paper for better reflection.
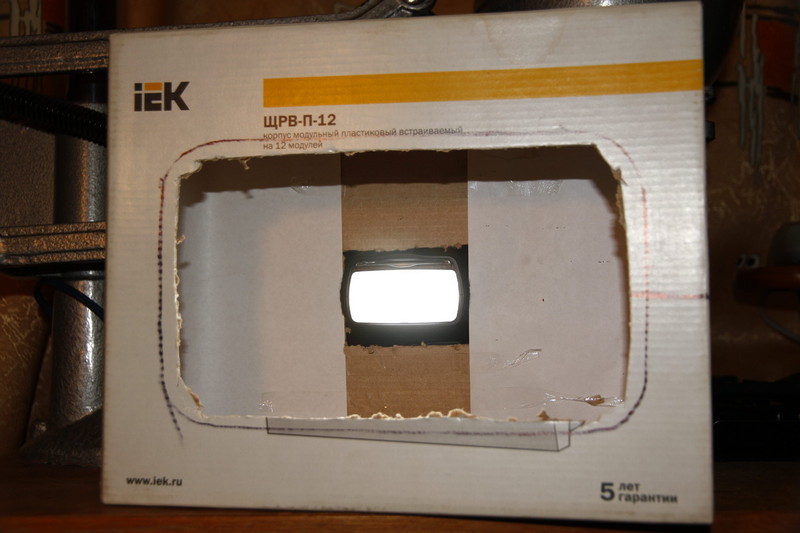
No matter how trite it may sound, I used a cookie tray as a background, fixed it to tape, it looks like this.
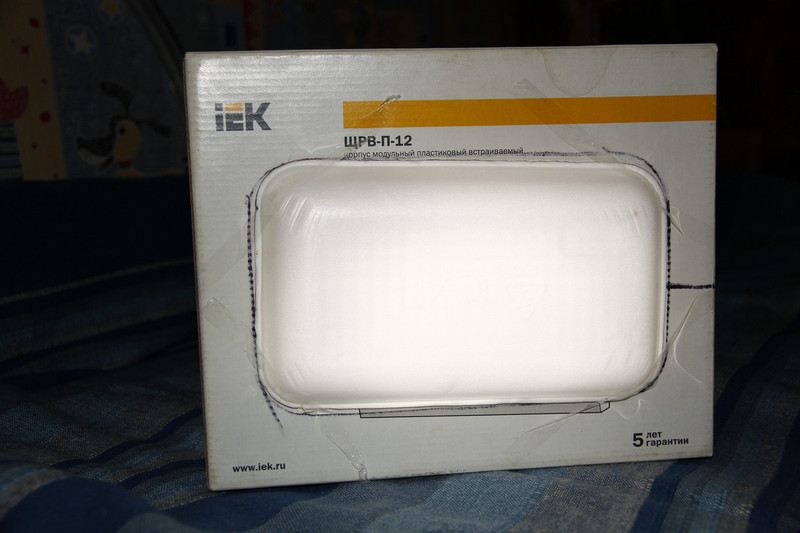
Gives a very soft, even and diffused light, what you need. With plain white paper instead of a background, you will not get such light, at worst, the villi will be visible.

A flash was used as a light source, I believe that this is the best choice, since flash has several advantages:
- you can adjust the power
- powerful light makes it possible to shoot at short exposures and at a closed aperture
But this does not mean that it is impossible to use other sources, it seems to me diode panels also show not a bad result.
Well, in small steps, we move from preparation for customization. So, now a very crucial moment, you need to pick up macro rings and adjust the focus, everything depends on this stage. I also want to note that any camera with interchangeable optics is suitable, be it CANON or SONY, this is almost no effect on the quality of the picture, it is very good if it has a Live View mode. The only difference in cameras will be if you use cropping or full-frame — although it all gets better with macro rings, in my case the canon eos 7d is a sprinkling camera and I use two macro rings, one big, the other small. Just remember that the more rings the stronger the increase.
For the collection of rings, take out the slide adapter from the photo enlarger and fix the film in it, choose the sharpest frame, then make the backlight for the slide adapter, well, it's all very simple for me personally, I used my phone, opened a white screen on it and set a timeout display to a maximum, it turns out a kind of pre-view in the process of digitizing, and so he used it.


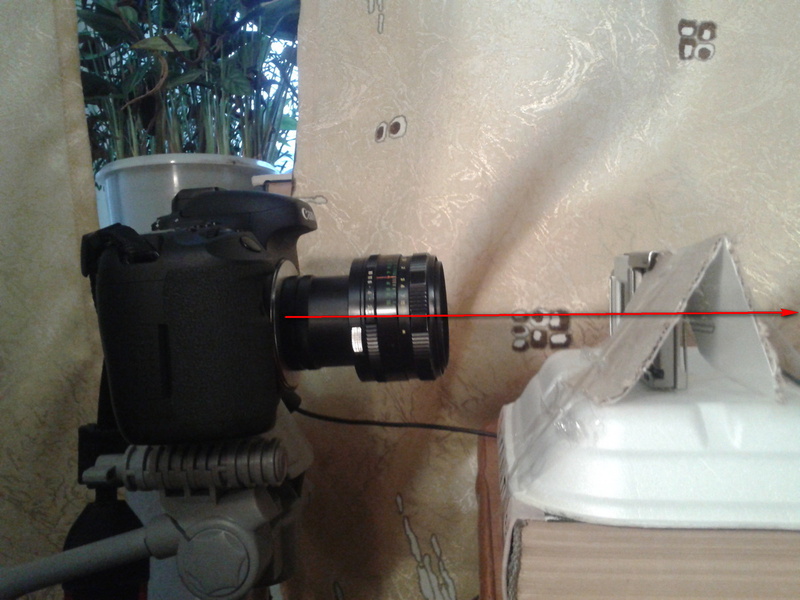
We stand vertically above the table and focus on sharpness, see that the frame is not cut off, if it is cut off, you need to either reduce the number of rings, or put a shorter ring and vice versa. Personally, I neglected this rule and allowed myself to trim the frame a little, it turned out that about 2-3mm were cut off from the width and height, i.e. In fact, I didn’t retake a frame of 36x24mm, but 34x22, I don’t find it critical. although it would be possible to take the entire frame, and later cut in the editor. Determined with the rings, the floor of the case is done, we remove the eyecup from the camera, translate it into manual mode (we put the disk in “M” for the canon), disable auto focus on the lens, connect it to the computer and put it vertically under the enlarger, insert the slide adapter with the film.
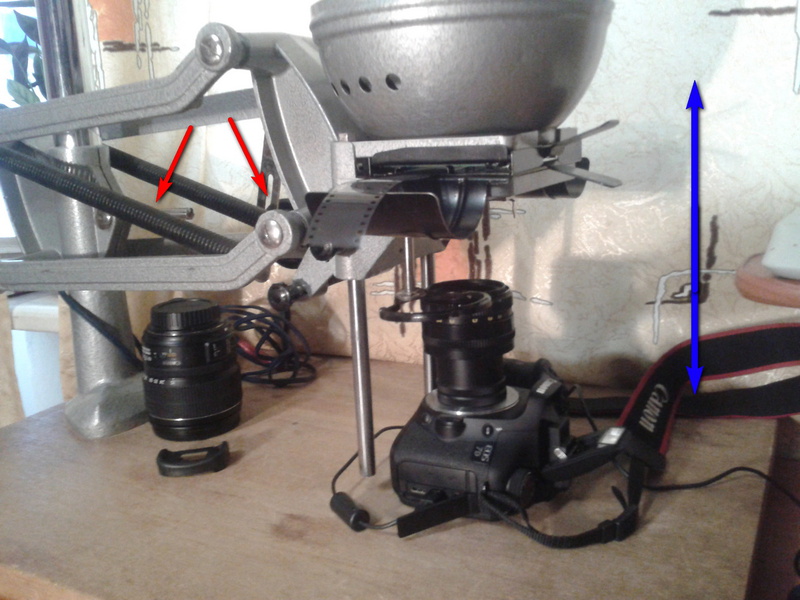
We start the remote control of the camera and as best we can catch the focus by moving the enlarger up or down. For a more accurate focus, I opened the aperture at maximum (f1.7) and additionally illuminated with a flashlight.
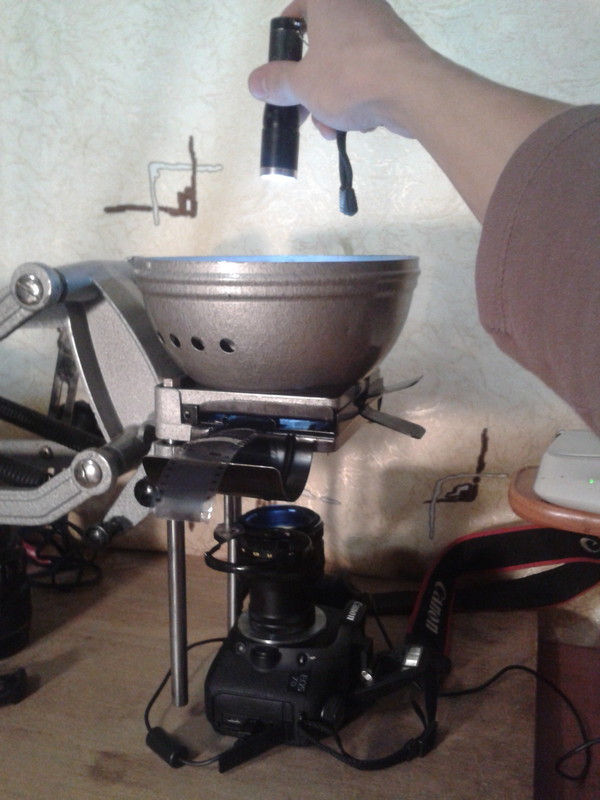
Catching the sharpness, I tightened all the nuts on the photo enlarger, went to a more fine-tuning focus, made a digital zoom in Live View and already caught the perfect focus with the focus ring on the lens, then closed the apertureto the maximum (f16) in order to pull out the maximum sharpness and have stock errors.
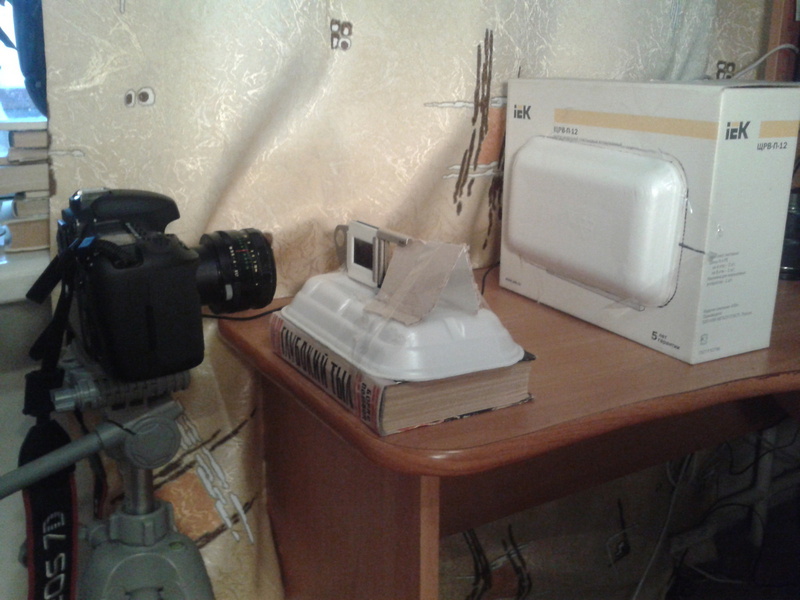
We install the softbox and connect the flash to the camera, I have the built-in flash as the master flash, you can also connect via a sync cable. Assembly looks like this:
Now I turn to setting up the camera, the whole shooting will be done completely in manual mode, just turn the flash into manual mode. We put ISO100, if there is an opportunity to put less, then this is good, the shutter speed of 1 / 250s is the shortest shutter speed for working with the flash, for some it can be 1 / 125s, we check the aperture again,I have written f1.4, a lie in fact f16 , I chose RAW format for shooting those who know what it will understand, those who do not know, shoot in JPEG, I will talk about white balance (BB) separately for each type of film, while I set the Kelvin temperature, in the settings we make that picture immediately saved to the computer, well, like everything left to press the shutter button.

I used the FastStone Image Viewer program a little to get away from the topic to view the finished photo, it is quite convenient, fast and free, it works especially well with RAW, but you can also use other software, taste and color ... By default, it has hot keys for inversion colors (Ctrl + I) and image rotation, left (L), right (R.), flip horizontally (Alt + R) and vertical (V). All this is very convenient and greatly speeds up the process of digitization.
Let's go back to digitization, start with negatives (color and B / W).
For B / W negatives in the settings of the camera set the user mode image-monochrome. The color temperature here does not play any role, we don’t touch it. We can shoot.
For color, you can put a portrait, landscape or leave natural colors. Color temperature (BB) can be changed. In general, for most photos, 5500K will do, but it happens that after inversion you see that the image is too warm, you want to add cold, then you will need to raise the temperature, for example, to 6200-6500 or higher and vice versa (removing it in RAW can be done later in lightroom or photoshop).
The most important rule for successful digitization is to calculate the flash power and correctly select the BB.
Negative film:
1. The more light when shooting, the darker it will be in the end and vice versa.
It turns out that if you took a picture, inverted it and make sure that it is clearly overexposed, then you need to add flash power.
2. The higher the temperature, the lower it will be on the finished image and vice versa.
Honestly often confused.
With a positive film, everything is simpler, here the more light the brighter and the higher the color temperature the warmer.
A couple of examples:
B / W negative.

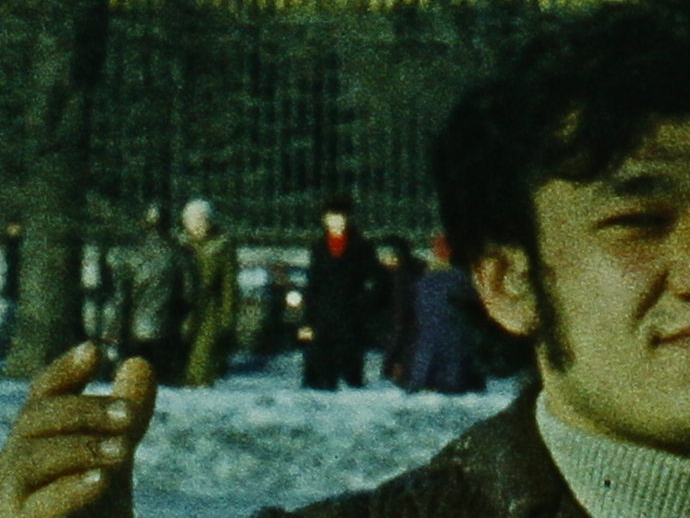
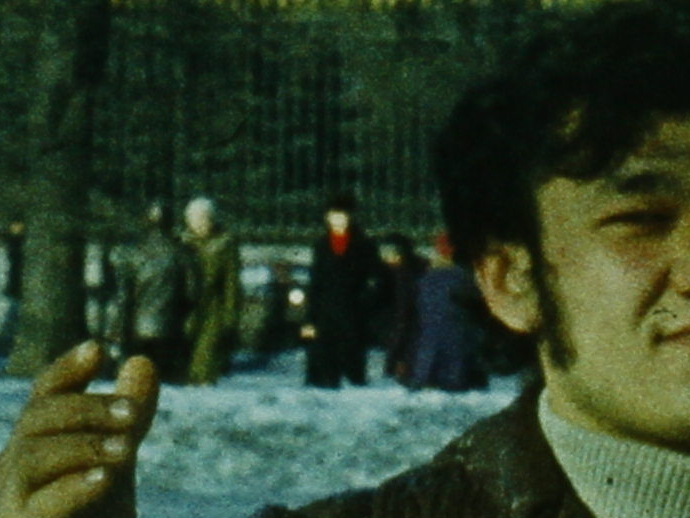
Moscow. 1974 Color negative.

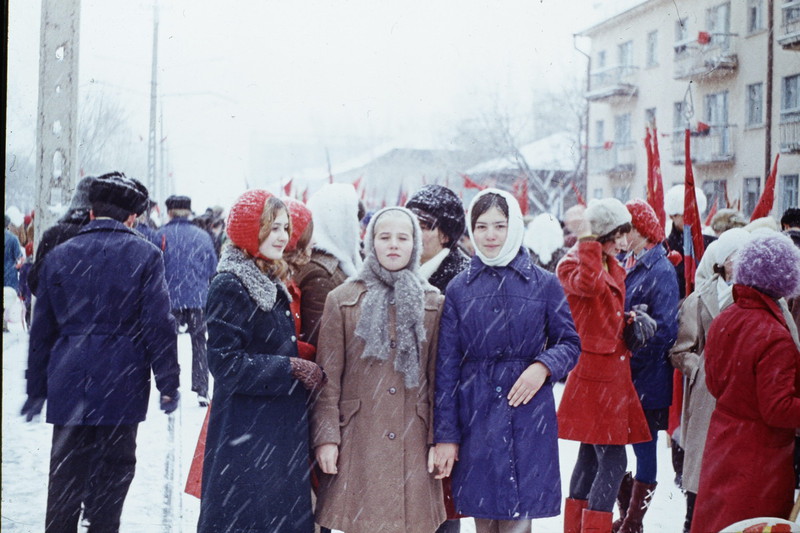
Moscow. Color positive.

To summarize, I am personally pleased with the result, not inferior to scanners, if only in the resolution, but this is a matter of technology, as my pictures are enlarged to 100%, the grain of the film is visible, I think it’s better not anymore. In general, for the most part, the quality of photos depends on the film. Perhaps from this topic it seems that this is all difficult and time consuming, but in fact, knowing the above, I do the preparation for shooting in 10 minutes and the shooting process itself is quite debugged, eventually getting used to my hands, in about 3 days (5 per day -7 hours) I shot 1500 frames. I do not touch on the topic of post processing.
As promised I will say a few words about digitizing slides. In general, the same rules apply to slides as I described above, the only thing is that you don’t need a photo enlarger.

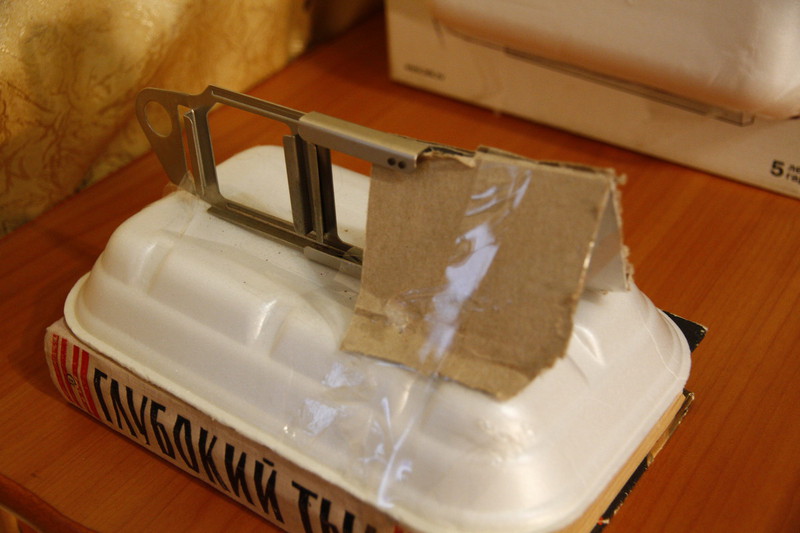
The most difficult thing about digitizing slides is the slide adapter and where to get it. Personally, I took it from a Soviet projector and taped it to an already familiar tray from cookies (just lying around idle) and a little more tape left, so that all this miracle could be tied to a book in order to equalize with the softbox.
We put a softbox, a camera on a tripod, here the main thing is to observe flatness.
(photos are conditional, I have not exactly)
As a result, it should turn out like this:
The distance from the softbox to the slide is 20-30cm, if during the shooting there are white highlights on the film and you are sure that this is not a defect of the film, try moving the softbox further or turning the slide.
Everything else is the same as with a photographic enlarger.
PS
All the necessary software to your camera, you can download from the official site.
Through these links you can see examples of photos in real size 18MP:
Example # 1
Example # 2
Example # 3
Example # 4
UPD: I want to add a little about the diaphragm. I always thought that the more closed the sharper, thanks to everyone who pointed out this mistake , you just opened my eyes to the world. But it turned out to be not so simple, I shot one frame at f5, f7, f9, f11 and f16, it turned out really sharper than all at f7, but there is also a drop in sharpness and optical distortion at the corners of the frame. I will say right away the film is flat and pressed by the glass, plus everything, I turned it over and tried different shots. So in my opinion the best option turned out to be f9. Below I show what happened in a 100% increase.
f7
f9

f16
Thanks for attention. I will be glad to objective criticism, as well as ready to answer questions of interest.
If you are still interested, welcome under cat.
To begin with, you need to collect all the necessary, below I will give a list of the necessary, but not mandatory, why I’ll tell you so further.
What is required:
- digital reflex camera (DSLR)
- flash (powerful light source)
- 50mm-80mm lens
- macro rings
- photo enlarger
- softbox
- soft to DSLR
- usb-mini usb cable
')
May need:
- transition ring M42
- sync cable for flash
- slide adapter
- scotch tape
- torch
Let's start preparing the workplace, collect a photographic enlarger, the most convenient way is to put it next to the PC.
Collected photographic enlarger.
Red circled something that must be removed because interfere with the installation of the camera.
Let's go to the lens, here each will be individually, I can only say that you can use almost any lens (both regular and third-party), preferably with a fixed focal length from 50mm to 80mm (not zoom), it is better to try different, because the lens can To distort colors, I used the old Soviet “Zenitar 1.7 / 50” through the M42 adapter ring and two macro rings that had long been gathering dust in a box next to this lens. Macro-rings are selected empirically, more on that later.
Go to the assembly of the softbox, it will be used as a background. In my case, it was homemade, I took the first box I got, cut two holes in it, one for the flash, another for setting the background, inside the box I placed two sheets of white paper for better reflection.
No matter how trite it may sound, I used a cookie tray as a background, fixed it to tape, it looks like this.
Gives a very soft, even and diffused light, what you need. With plain white paper instead of a background, you will not get such light, at worst, the villi will be visible.
A flash was used as a light source, I believe that this is the best choice, since flash has several advantages:
- you can adjust the power
- powerful light makes it possible to shoot at short exposures and at a closed aperture
But this does not mean that it is impossible to use other sources, it seems to me diode panels also show not a bad result.
Well, in small steps, we move from preparation for customization. So, now a very crucial moment, you need to pick up macro rings and adjust the focus, everything depends on this stage. I also want to note that any camera with interchangeable optics is suitable, be it CANON or SONY, this is almost no effect on the quality of the picture, it is very good if it has a Live View mode. The only difference in cameras will be if you use cropping or full-frame — although it all gets better with macro rings, in my case the canon eos 7d is a sprinkling camera and I use two macro rings, one big, the other small. Just remember that the more rings the stronger the increase.
For the collection of rings, take out the slide adapter from the photo enlarger and fix the film in it, choose the sharpest frame, then make the backlight for the slide adapter, well, it's all very simple for me personally, I used my phone, opened a white screen on it and set a timeout display to a maximum, it turns out a kind of pre-view in the process of digitizing, and so he used it.
We stand vertically above the table and focus on sharpness, see that the frame is not cut off, if it is cut off, you need to either reduce the number of rings, or put a shorter ring and vice versa. Personally, I neglected this rule and allowed myself to trim the frame a little, it turned out that about 2-3mm were cut off from the width and height, i.e. In fact, I didn’t retake a frame of 36x24mm, but 34x22, I don’t find it critical. although it would be possible to take the entire frame, and later cut in the editor. Determined with the rings, the floor of the case is done, we remove the eyecup from the camera, translate it into manual mode (we put the disk in “M” for the canon), disable auto focus on the lens, connect it to the computer and put it vertically under the enlarger, insert the slide adapter with the film.
We start the remote control of the camera and as best we can catch the focus by moving the enlarger up or down. For a more accurate focus, I opened the aperture at maximum (f1.7) and additionally illuminated with a flashlight.
Catching the sharpness, I tightened all the nuts on the photo enlarger, went to a more fine-tuning focus, made a digital zoom in Live View and already caught the perfect focus with the focus ring on the lens, then closed the aperture
We install the softbox and connect the flash to the camera, I have the built-in flash as the master flash, you can also connect via a sync cable. Assembly looks like this:
Now I turn to setting up the camera, the whole shooting will be done completely in manual mode, just turn the flash into manual mode. We put ISO100, if there is an opportunity to put less, then this is good, the shutter speed of 1 / 250s is the shortest shutter speed for working with the flash, for some it can be 1 / 125s, we check the aperture again,
I used the FastStone Image Viewer program a little to get away from the topic to view the finished photo, it is quite convenient, fast and free, it works especially well with RAW, but you can also use other software, taste and color ... By default, it has hot keys for inversion colors (Ctrl + I) and image rotation, left (L), right (R.), flip horizontally (Alt + R) and vertical (V). All this is very convenient and greatly speeds up the process of digitization.
Let's go back to digitization, start with negatives (color and B / W).
For B / W negatives in the settings of the camera set the user mode image-monochrome. The color temperature here does not play any role, we don’t touch it. We can shoot.
For color, you can put a portrait, landscape or leave natural colors. Color temperature (BB) can be changed. In general, for most photos, 5500K will do, but it happens that after inversion you see that the image is too warm, you want to add cold, then you will need to raise the temperature, for example, to 6200-6500 or higher and vice versa (removing it in RAW can be done later in lightroom or photoshop).
The most important rule for successful digitization is to calculate the flash power and correctly select the BB.
Negative film:
1. The more light when shooting, the darker it will be in the end and vice versa.
It turns out that if you took a picture, inverted it and make sure that it is clearly overexposed, then you need to add flash power.
2. The higher the temperature, the lower it will be on the finished image and vice versa.
Honestly often confused.
With a positive film, everything is simpler, here the more light the brighter and the higher the color temperature the warmer.
A couple of examples:
B / W negative.
Moscow. 1974 Color negative.
Moscow. Color positive.
To summarize, I am personally pleased with the result, not inferior to scanners, if only in the resolution, but this is a matter of technology, as my pictures are enlarged to 100%, the grain of the film is visible, I think it’s better not anymore. In general, for the most part, the quality of photos depends on the film. Perhaps from this topic it seems that this is all difficult and time consuming, but in fact, knowing the above, I do the preparation for shooting in 10 minutes and the shooting process itself is quite debugged, eventually getting used to my hands, in about 3 days (5 per day -7 hours) I shot 1500 frames. I do not touch on the topic of post processing.
As promised I will say a few words about digitizing slides. In general, the same rules apply to slides as I described above, the only thing is that you don’t need a photo enlarger.
The most difficult thing about digitizing slides is the slide adapter and where to get it. Personally, I took it from a Soviet projector and taped it to an already familiar tray from cookies (just lying around idle) and a little more tape left, so that all this miracle could be tied to a book in order to equalize with the softbox.
We put a softbox, a camera on a tripod, here the main thing is to observe flatness.
(photos are conditional, I have not exactly)
As a result, it should turn out like this:
The distance from the softbox to the slide is 20-30cm, if during the shooting there are white highlights on the film and you are sure that this is not a defect of the film, try moving the softbox further or turning the slide.
Everything else is the same as with a photographic enlarger.
PS
All the necessary software to your camera, you can download from the official site.
Through these links you can see examples of photos in real size 18MP:
Example # 1
Example # 2
Example # 3
Example # 4
UPD: I want to add a little about the diaphragm. I always thought that the more closed the sharper, thanks to everyone who pointed out this mistake , you just opened my eyes to the world. But it turned out to be not so simple, I shot one frame at f5, f7, f9, f11 and f16, it turned out really sharper than all at f7, but there is also a drop in sharpness and optical distortion at the corners of the frame. I will say right away the film is flat and pressed by the glass, plus everything, I turned it over and tried different shots. So in my opinion the best option turned out to be f9. Below I show what happened in a 100% increase.
f7
f9
f16
Thanks for attention. I will be glad to objective criticism, as well as ready to answer questions of interest.
Source: https://habr.com/ru/post/160689/
All Articles