Asterisk server backup implementation
One of the main criteria when choosing a new PBX is reliability, resiliency and system redundancy. Small and medium-sized companies usually have a simple backup with the ability to recover within 24 hours, while for large companies it is very critical and there can be no talk of a simple telephone connection. The company usually spends a lot of resources and money. With the advent of the R800 and R850 from DIGIUM, asterisk becomes a truly reliable system with full PSTN redundancy of E1 / T1 / BRI and FXO lines. Under the cut the details of the installation and configuration of two servers Asterisk and R850.
For this project we need iron:
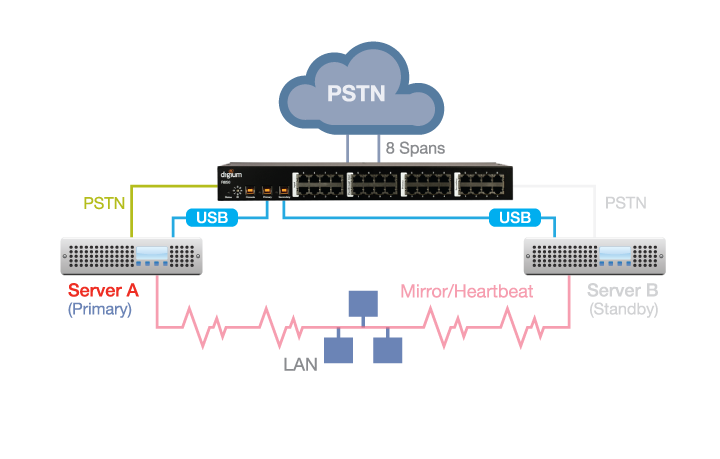
The scheme of our system will be like this

As can be seen in the diagram, the R850 piece of iron will receive streams from the communication provider and give them to 2 Asterisk servers. Depending on the state of the server, the R850 will switch streams between servers; for this, it is also connected by USB ports.
')

Connection R850:
The R850 is powered by a USB port, and as soon as you connect it to the server, it should turn on. Checking the system for new USB devices
root @ ubuntu: ~ # lsusb
Bus 007 Device 003: ID 10c4: ea60 Cygnal Integrated Products, Inc. CP210x Composite Device
All that is written below must be done on both servers!
Installing software for r-series:
Before installing, you must disable the R850 from the USB port.
Next, reconnect the R850 to the server and check
Must get such an answer
For full testing of the R850, you can run ./rtest.sh tests / dev / rseries0 The piece of iron will switch threads for a couple of seconds and click.
DRBD is a block device that provides synchronization (RAID1) between the local block device and the remote one. In our case, I will use 2 flash drives.
Cooking flash drives for DRBD
1) Delete (carefully I have a flash drive / dev / sdb you may have another disk)
2) Create a partition on 1GB. (can be more)
further n, p, 1, 1, + 1024M
3) Installing Pacemaker, Corosync, and DRBD
4) Install configs
if you get a message
then copy it with your hands.
1) Edit /etc/drbd.d/asterisk.res, change my data, e-mail, IP disk and hostname, I left astnode1 and astnode2 and it turned out like this:
2) Change the host depending on the server (etc / hostname)
hostname astnode1 - on the first machine and
hostname astnode2 - on the second
3) Create a new block device
if everything is set right then you will get
Now you can run DRDB
The following steps need only be done on the main server astnode1
Create a partition on DRBD
Check on the first server astnode1
If the test file is there, then everything goes according to plan, disable drbd
Now we check on the second server astnode2
Here we should also see the test file, further:
At this stage, our system is ready to install Asterisk, Dahdi and LibPRI.
On the main server astnode1 we create the necessary files and links:
Installation on the first server astnode1
1) Install the necessary packages to build DAHDI and Asterisk
2) Download Asterisk, DAHDI and LibPRI
3) Unpack
4) We collect
After successful installation
Go to the installation on the second server astnode2
here the script will answer that there are already such folders, as it should be.
The installation on the second server is almost identical to the first one, we do everything except make samples for asterisk.
We rule memberaddr in accordance with our IP addresses of servers and bindnetaddr
here is my config:
Then we change in / etc / default / corosync START = no to START = yes
We start
It is necessary to configure it only on the first server astnode1
In rseries-1.0.0 there is an example of setting it up and we’ll edit it.
I changed in it only the SP gateway address GatewayStatus and ocf: heartbeat: IPaddr2 SP address of my SIP phone.
Config:
use config for pacemaker
On the second server, nothing needs to be done.
To configure, use the Console port on the R850 and the cable from slave-astnode2 for example
A menu for setting should appear here: for E1, I configured it like this:
You can also use rctl from the rseries package to control the R850, it will allow you to check and update the firmware and test the device.
First, check that the R850 is switched to the first astnode astnode1
alarms = OK everything works fine; if not, then I advise you just to restart astnode1 and then astnode2.
Run killall asterisk
we get a log
crmd re-launched Asterisk and it works further, but since there are times when the asterisk no longer rises. Let's try to imitate such a test:
Look logs:
Asterisk rises on the second server, the R850 clicks and switches threads.
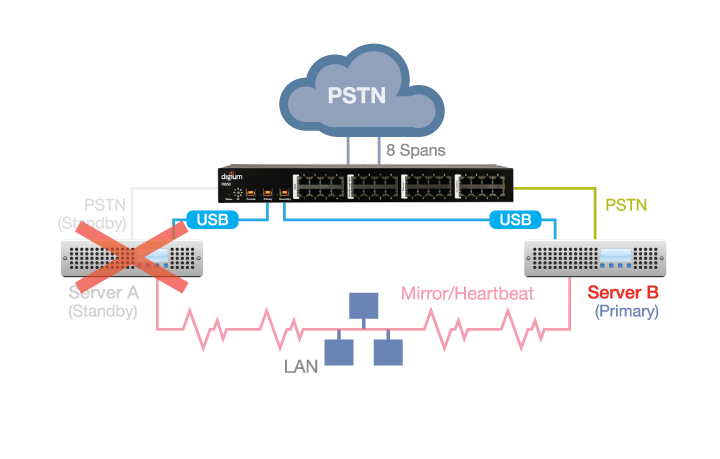
Before the test, I returned astnode1 to a working state, but the threads remained on the second server. Let's check how the system works if the power is turned off on the second server.
logs:
I think everything is clear, the astnode2 server crashed and the streams and asterisk rose to astnode. Also tested disconnecting the USB cable and disconnecting the server from the local network. The R850 always worked.
Thanks to DIGIUM and the new product R850, Asterisk has risen to a new level of reliability and application. Now asteriskers can sleep peacefully.
For this project we need iron:
- Server, Ubuntu 10.04 - 2 pcs (for the current version of rseries, Digium recommends using exactly ubuntu 10.04 or Centos 5.6)
- Digium R850 - 1 pc.
- Digium TE420 boards - 2 pcs.
- USB flash drive (at least 1 GB) -2 pcs.
The scheme of our system will be like this
As can be seen in the diagram, the R850 piece of iron will receive streams from the communication provider and give them to 2 Asterisk servers. Depending on the state of the server, the R850 will switch streams between servers; for this, it is also connected by USB ports.
')
Connection R850:
- We connect Primary E1 to Master Server
- We connect the Secondary E1 to the Slave Server board
- Primary USB to Master Server port
- Secondary USB to Slave Server Port
- USB Console (optional)
The R850 is powered by a USB port, and as soon as you connect it to the server, it should turn on. Checking the system for new USB devices
root @ ubuntu: ~ # lsusb
Bus 007 Device 003: ID 10c4: ea60 Cygnal Integrated Products, Inc. CP210x Composite Device
All that is written below must be done on both servers!
Preparing servers for working with R850
Installing software for r-series:
Before installing, you must disable the R850 from the USB port.
cd /usr/src wget http://downloads.digium.com/pub/telephony/rseries/rseries-current.tar.gz tar zxvf rseries-current.tar.gz cd rseries-XXX make && make install Next, reconnect the R850 to the server and check
./rtest.sh info /dev/rseries0 Must get such an answer
R-Series hardware is detected! Firmware version: 5 Serial number: DM96137330014 Product number: R850 Ports: 8 ID Switch: 0 Watchdog Timeout (get): 5 Control mode: 1 Port 1: 0, primary, T1/E1 Port 2: 0, primary, T1/E1 Port 3: 0, primary, T1/E1 Port 4: 0, primary, T1/E1 Port 5: 0, primary, T1/E1 Port 6: 0, primary, T1/E1 Port 7: 0, primary, T1/E1 Port 8: 0, primary, T1/E1 For full testing of the R850, you can run ./rtest.sh tests / dev / rseries0 The piece of iron will switch threads for a couple of seconds and click.
Setting up a clustering system based on Pacemaker, Corosync, and DRBD
DRBD is a block device that provides synchronization (RAID1) between the local block device and the remote one. In our case, I will use 2 flash drives.
Cooking flash drives for DRBD
1) Delete (carefully I have a flash drive / dev / sdb you may have another disk)
dd if=/dev/zero of=/dev/sdb bs=1M 2) Create a partition on 1GB. (can be more)
fdisk /dev/sdb further n, p, 1, 1, + 1024M
3) Installing Pacemaker, Corosync, and DRBD
apt-get install drbd8-utils apt-get install corosync pacemaker 4) Install configs
cd /usr/src/rseries-XXX/ make samples if you get a message
Not installing /etc/corosync/corosync.conf (already exists) then copy it with your hands.
cp configs/corosync/corosync.conf /etc/corosync/corosync.conf Getting Started
1) Edit /etc/drbd.d/asterisk.res, change my data, e-mail, IP disk and hostname, I left astnode1 and astnode2 and it turned out like this:
resource asterisk { handlers { split-brain "/usr/lib/drbd/notify-split-brain.sh adm@pbxware.ru"; } net { after-sb-0pri discard-younger-primary; after-sb-1pri discard-secondary; after-sb-2pri disconnect; } on astnode1 { device /dev/drbd0; disk /dev/sdb1; address 192.168.1.253:7789; meta-disk internal; } on astnode2 { device /dev/drbd0; disk /dev/sdb1; address 192.168.1.252:7789; meta-disk internal; } } 2) Change the host depending on the server (etc / hostname)
hostname astnode1 - on the first machine and
hostname astnode2 - on the second
3) Create a new block device
drbdadm create-md asterisk if everything is set right then you will get
…. New drbd meta data block successfully created. Now you can run DRDB
/etc/init.d/drbd start * Starting DRBD resources [ d(asterisk) n(asterisk) ] [ OK ] The following steps need only be done on the main server astnode1
Create a partition on DRBD
drbdadm disconnect asterisk drbdadm -- --clear-bitmap new-current-uuid asterisk drbdadm -- --overwrite-data-of-peer primary asterisk mkfs.ext3 -m0 /dev/drbd0 drbdadm secondary asterisk drbdadm detach asterisk drbdadm up asterisk Check on the first server astnode1
drbdadm primary asterisk mkdir /mnt/asterisk mount -t ext3 /dev/drbd0 /mnt/asterisk cd /mnt/asterisk touch test ls If the test file is there, then everything goes according to plan, disable drbd
cd umount /mnt/asterisk drbdadm secondary asterisk Now we check on the second server astnode2
drbdadm primary asterisk mkdir /mnt/asterisk mount -t ext3 /dev/drbd0 /mnt/asterisk cd /mnt/asterisk ls Here we should also see the test file, further:
cd umount /mnt/asterisk drbdadm secondary asterisk At this stage, our system is ready to install Asterisk, Dahdi and LibPRI.
On the main server astnode1 we create the necessary files and links:
cd /usr/src/rseries-1.0.0/ drbdadm primary asterisk mount -t ext3 /dev/drbd0 /mnt/asterisk ./createlinks.sh Install Asterisk, DAHDI and LibPRI
Installation on the first server astnode1
1) Install the necessary packages to build DAHDI and Asterisk
aptitude install mc htop iftop linux-headers-`uname -r` build-essential subversion libncurses5-dev libssl-dev libxml2-dev vim-nox libsqlite3-dev sqlite3 libnewt-dev 2) Download Asterisk, DAHDI and LibPRI
wget http://downloads.asterisk.org/pub/telephony/dahdi-linux-complete/dahdi-linux-complete-2.6.1+2.6.1.tar.gz wget http://downloads.asterisk.org/pub/telephony/certified-asterisk/certified-asterisk-1.8.11-current.tar.gz wget http://downloads.asterisk.org/pub/telephony/libpri/releases/libpri-1.4.10.tar.gz 3) Unpack
tar -zxvf libpri-1.4.10.tar.gz tar -zxvf certified-asterisk-1.8.11-current.tar.gz tar -zxvf dahdi-linux-complete-2.6.1+2.6.1.tar.gz 4) We collect
cd libpri-1.4.10 make && make install cd ../dahdi-linux-complete-2.6.1+2.6.1/ make && make install && make config cd ../certified-asterisk-1.8.11-cert8/ ./configure && make && make install && make samples After successful installation
umount /mnt/asterisk/ drbdadm secondary asterisk Go to the installation on the second server astnode2
cd /usr/src/rseries-1.0.0/ drbdadm primary asterisk mount -t ext3 /dev/drbd0 /mnt/asterisk ./createlinks.sh here the script will answer that there are already such folders, as it should be.
The installation on the second server is almost identical to the first one, we do everything except make samples for asterisk.
Installation on the second server astnode2
1) Install the necessary packages to build DAHDI and Asterisk
2) Download Asterisk, DAHDI and LibPRI
3) Unpack
4) We collect
After successful installation
aptitude install mc htop iftop linux-headers-`uname -r` build-essential subversion libncurses5-dev libssl-dev libxml2-dev vim-nox libsqlite3-dev sqlite3 libnewt-dev 2) Download Asterisk, DAHDI and LibPRI
wget http://downloads.asterisk.org/pub/telephony/dahdi-linux-complete/dahdi-linux-complete-2.6.1+2.6.1.tar.gz wget http://downloads.asterisk.org/pub/telephony/certified-asterisk/certified-asterisk-1.8.11-current.tar.gz wget http://downloads.asterisk.org/pub/telephony/libpri/releases/libpri-1.4.10.tar.gz 3) Unpack
tar -zxvf libpri-1.4.10.tar.gz tar -zxvf certified-asterisk-1.8.11-current.tar.gz tar -zxvf dahdi-linux-complete-2.6.1+2.6.1.tar.gz 4) We collect
cd libpri-1.4.10 make && make install cd ../dahdi-linux-complete-2.6.1+2.6.1/ make && make install && make config cd ../certified-asterisk-1.8.11-cert8/ ./configure && make && make install After successful installation
umount /mnt/asterisk/ drbdadm secondary asterisk Getting down to setting up Corosync on both servers.
vim /etc/corosync/corosync.conf We rule memberaddr in accordance with our IP addresses of servers and bindnetaddr
here is my config:
totem { version: 2 token: 3000 token_retransmits_before_loss_const: 10 join: 60 consensus: 5000 vsftype: none max_messages: 20 clear_node_high_bit: yes secauth: off threads: 0 rrp_mode: none interface { ringnumber: 0 bindnetaddr: 192.168.1.0 broadcast: yes mcastport: 5405 member { memberaddr: 192.168.1.253 } member { memberaddr: 192.168.1.252 } } } aisexec { user: root group: root } logging { fileline: off to_stderr: yes to_logfile: no to_syslog: yes syslog_facility: daemon debug: off timestamp: on logger_subsys { subsys: AMF debug: off tags: enter|leave|trace1|trace2|trace3|trace4|trace6 } } amf { mode: disabled } Then we change in / etc / default / corosync START = no to START = yes
We start
/etc/init.d/corosync start * Starting corosync daemon corosync [ OK ] Pacemaker setup
It is necessary to configure it only on the first server astnode1
In rseries-1.0.0 there is an example of setting it up and we’ll edit it.
vim /usr/src/rseries-1.0.0/configs/pacemaker/pacemaker.cfg I changed in it only the SP gateway address GatewayStatus and ocf: heartbeat: IPaddr2 SP address of my SIP phone.
Config:
node astnode1 node astnode2 primitive Asterisk ocf:Digium:asterisk \ op monitor interval="5" primitive Asterisk_drbd ocf:linbit:drbd \ params drbd_resource="asterisk" \ op monitor start-delay="10" interval="5" primitive Asterisk_fs ocf:heartbeat:Filesystem \ params device="/dev/drbd/by-res/asterisk" directory="/mnt/asterisk/" fstype="ext3" primitive ClusterIP ocf:heartbeat:IPaddr2 \ params ip="192.168.1.109" cidr_netmask="32" \ op monitor interval="5" primitive GatewayStatus ocf:pacemaker:ping \ params host_list="192.168.1.1" multiplier="100" \ op monitor interval="5" timeout="10" primitive rseries0 ocf:Digium:rseries \ params tty="/dev/rseries0" \ op monitor interval="10" role="Master" \ op monitor interval="60" role="Slave" ms Asterisk_ms Asterisk_drbd \ meta master-max="1" master-node-max="1" clone-max="2" clone-node-max="1" notify="true" ms rseries0_ms rseries0 \ meta master-max="1" master-node-max="1" clone-max="2" clone-node-max="1" target-role="Master" clone GatewayStatusClone GatewayStatus location Asterisk-with-ping Asterisk \ rule $id="Asterisk-with-ping-rule" -inf: not_defined pingd or pingd lte 0 colocation Everything-with-Asterisk inf: ( rseries0_ms:Master Asterisk_ms:Master ) ( ClusterIP Asterisk_fs ) Asterisk order Asterisk-after-Everything inf: ( rseries0_ms:promote Asterisk_ms:promote ) ( ClusterIP Asterisk_fs ) Asterisk:start property $id="cib-bootstrap-options" \ cluster-infrastructure="openais" \ expected-quorum-votes="2" \ stonith-enabled="false" \ no-quorum-policy="ignore" rsc_defaults $id="rsc-options" \ resource-stickiness="99" use config for pacemaker
cd /usr/src/rseries-1.0.0/ crm configure load update configs/pacemaker/pacemaker.cfg On the second server, nothing needs to be done.
R850 Setup
To configure, use the Console port on the R850 and the cable from slave-astnode2 for example
minicom -s +-----------------------------------------------------------------------+ | A - Serial Device : /dev/ttyUSB0 | | B - Lockfile Location : /var/lock | | C - Callin Program : | | D - Callout Program : | | E - Bps/Par/Bits : 115200 8N1 | | F - Hardware Flow Control : No | | G - Software Flow Control : No | | | | Change which setting? | +-----------------------------------------------------------------------+ A menu for setting should appear here: for E1, I configured it like this:
Digium R850 Firmware Version: 5 Serial Number: DM96137330014 Port |Mode Passthrough State All | --- --- --- 1 | T1/E1 disabled Input to Primary 2 | T1/E1 disabled Input to Primary 3 | T1/E1 disabled Input to Primary 4 | T1/E1 disabled Input to Primary 5 | T1/E1 disabled Input to Primary 6 | T1/E1 disabled Input to Primary 7 | T1/E1 disabled Input to Primary 8 | T1/E1 disabled Input to Primary Arrow keys or a (left), d (right), w (up) or s (down) to navigate thru menu r to refresh, <enter> to select, c to commit changes o to toggle operational state, xxx to exit menu. You can also use rctl from the rseries package to control the R850, it will allow you to check and update the firmware and test the device.
System testing
First, check that the R850 is switched to the first astnode astnode1
root@astnode1:~# dahdi_scan [1] active=yes alarms=OK description=T2XXP (PCI) Card 0 Span 1 name=TE2/0/1 manufacturer=Digium devicetype=Wildcard TE220 (5th Gen) location=Board ID Switch 0 basechan=1 totchans=31 irq=0 type=digital-E1 syncsrc=1 lbo=0 db (CSU)/0-133 feet (DSX-1) coding_opts=AMI,HDB3 framing_opts=CCS,CRC4 coding=HDB3 framing=CCS/CRC4 [2] active=yes alarms=OK description=T2XXP (PCI) Card 0 Span 2 name=TE2/0/2 manufacturer=Digium devicetype=Wildcard TE220 (5th Gen) location=Board ID Switch 0 basechan=32 totchans=31 irq=0 type=digital-E1 syncsrc=1 lbo=0 db (CSU)/0-133 feet (DSX-1) coding_opts=AMI,HDB3 framing_opts=CCS,CRC4 coding=HDB3 framing=CCS/CRC4 alarms = OK everything works fine; if not, then I advise you just to restart astnode1 and then astnode2.
Falling Asterisk on astnode1
Run killall asterisk
we get a log
crmd: [810]: info: process_lrm_event: LRM operation Asterisk_monitor_5000 (call=21, rc=7, cib-update=56, confirmed=false) not running …. Nov 9 13:07:19 astnode1 crmd: [810]: info: te_rsc_command: Initiating action 25: start Asterisk_start_0 on astnode1 (local) Nov 9 13:07:19 astnode1 crmd: [810]: info: do_lrm_rsc_op: Performing key=25:7:0:90c9675a-3c31-4e86-9f90-68c13142b377 op=Asterisk_start_0 ) Nov 9 13:07:19 astnode1 lrmd: [807]: info: rsc:Asterisk:23: start crmd re-launched Asterisk and it works further, but since there are times when the asterisk no longer rises. Let's try to imitate such a test:
mv /usr/sbin/asterisk /usr/sbin/asterisk-back killall asterisk Look logs:
Nov 9 13:10:36 astnode1 pengine: [809]: info: get_failcount: Asterisk has failed 1000000 times on astnode1 Nov 9 13:10:36 astnode1 pengine: [809]: WARN: common_apply_stickiness: Forcing Asterisk away from astnode1 after 1000000 failures (max=1000000) Nov 9 13:10:36 astnode1 pengine: [809]: notice: LogActions: Start Asterisk#011(astnode2) Asterisk rises on the second server, the R850 clicks and switches threads.
Problems with server power.
Before the test, I returned astnode1 to a working state, but the threads remained on the second server. Let's check how the system works if the power is turned off on the second server.
logs:
Nov 9 13:20:10 astnode1 crmd: [810]: info: ais_status_callback: status: astnode2 is now lost (was member) Nov 9 13:20:21 astnode1 kernel: [ 937.276823] wct4xxp 0000:06:08.0: Clearing yellow alarm span 1 Nov 9 13:20:21 astnode1 kernel: [ 937.448860] wct4xxp 0000:06:08.0: Clearing yellow alarm span 2 I think everything is clear, the astnode2 server crashed and the streams and asterisk rose to astnode. Also tested disconnecting the USB cable and disconnecting the server from the local network. The R850 always worked.
Thanks to DIGIUM and the new product R850, Asterisk has risen to a new level of reliability and application. Now asteriskers can sleep peacefully.
Source: https://habr.com/ru/post/160521/
All Articles