Precision bitmap rotation at an arbitrary angle
Rotation of a raster image at angles that are multiples of 90 ° relative to the geometric center of the image is a trivial task and is solved without loss of quality by simply transforming the coordinates of each pixel.
To rotate the bitmap at an arbitrary angle, fast but not optimal algorithms have been developed that provide an approximation that is acceptable for practical purposes with a loss of quality (for example, this one ).
 For quite a long time, out of purely sports interest, I was interested in the task of maximally accurate bitmap rotation at an arbitrary angle. Unfortunately, I could not find a ready-made algorithm anywhere, so I had to do it myself. Even if in the end I “invented the bicycle”, the result, I think, was interesting enough to be shared.
Below we consider the algorithm of precision rotation of a raster image at an arbitrary angle relative to an arbitrary center with minimal losses.
')
I express my gratitude to Kharchenko Vladislav Vladimirovich for the assistance provided.
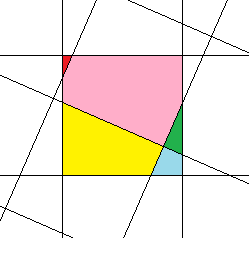
It can be seen from the above picture that after rotating a raster image, the color of each pixel of the final image is determined by adding the colors of several “fragments” of several pixels of the original image, proportional to the areas of the corresponding “fragments”. Therefore, in general, the solution to our problem will be to find the areas of all the "fragments" for each pixel of the original image and collect the color of each pixel of the final image from the colors of the corresponding "fragments" .
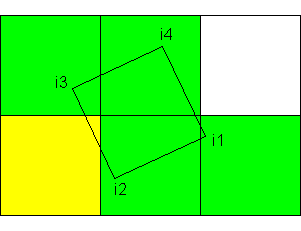
As the pixel model of the original image, we will use a square with a side = 1, with the following angle designations:
 i1 is the rightmost corner;
i2 is the lowest corner;
i3 is the leftmost corner;
i4 is the topmost corner.
The model of the final image will be a grid of parallel horizontal and vertical lines with the distance between the lines = 1.
The coordinates of the center of rotation of the raster image, in this representation, can be expressed by a pair of arbitrary real numbers. That is, the center of rotation in our problem may lie not at the geometric center of the pixel and not at the point of intersection of the grid lines, but at an arbitrary point of Cartesian coordinates.
Since, when rotating a raster image, the square of each pixel is rotated by the same angle (relative to the center of this pixel) we will solve the problem for one pixel, and then apply the solution obtained for each pixel of the original image.
The bitmap rotation can be divided into two parts:
1. Rotate the square of each pixel of the original image relative to the center of this square at a given angle.
2. The offset of the center of the square of the pixel in accordance with the angle of rotation of the image relative to the center of rotation of the image so that the square takes up its final position on the grid of the final image.
At the same time, the grid of the final image cuts the square of each pixel of the original image into “fragments” in the amount of 4, 5 or 6 pieces.
To systematize the variety of the resulting options, I had to compile a taxonomy of all possible intersections of the square of a pixel of the original image with the grid of the final image. There were only 23 essentially different options:

The conventions here are as follows:
- the numbers in the cells indicate the number of corners of the square of a pixel that fell into the given grid cell of the final image after the image was rotated;
- the green color indicates the cells into which the pixel sections fell and are guaranteed to be left there by a “fragment”;
- yellow color indicates cells, which, depending on the conditions, may fall (or may not fall) "fragments" of a square of a pixel, formed not by the corners of a square, but by the sides of a square.
For clarity, I will give one of the possible variations of option number 3:
As you can see, the upper right cell does not contain a “fragment” of a pixel, although under other conditions it could contain a turn.
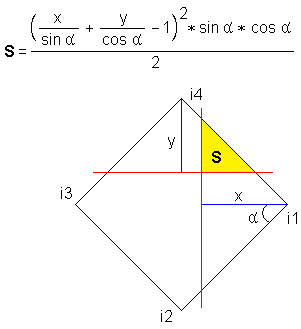
In order not to load the reader with detailed geometric calculations, I will say at once that in all these 23 variants, the pixel of the original image is dissected into “fragments”, the area of which is easily calculated by combining 4 formulas. Below are these formulas with illustrations. Red color indicates grid lines of the final image, which cut through the square of a pixel. The yellow area is shaded area, the area of which is calculated by the formula.
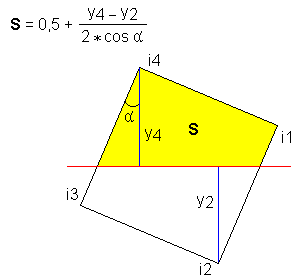 This formula is not used to calculate the final area of the “fragment”, but it is convenient to use it to quickly calculate auxiliary intermediate areas, since we know that the area of the entire pixel is 1.
The input variables in all formulas use heights dropped from the corners of a square onto the grid of the final image, for the simple reason that calculating these heights is reduced to instantaneous selection of the fractional part of the numerical value of the coordinate of the corresponding angle of a square pixel.

This formula is used only in options 1 and 2.
 A frequently used formula is very good that it is quickly calculated. Since the rotation angle is the same for each pixel - all trigonometric functions can be calculated once, before processing all pixels, and then use these values in the loop as constants.
 This formula is calculated in two steps. First, the expression in brackets is evaluated. If it takes a positive value, then the area is calculated. If the value is negative, then the “fragment” formed by the corner of the grid and the side of the square is not cut off from the pixel, and it makes no sense to perform further calculations.
In view of the foregoing, in general, the algorithm will look like this:
1. Load the original image into the computer memory.
2. Calculate the size of the final image in pixels.
3. Create an intermediate two-dimensional array, each element of which contains 3 components of the RGB color in the format of a floating-point number. The size of the array is equal to the size of the final image.
4. Sequentially iterate through all the pixels of the original image; rotate each of them at a given angle and place it on the grid of the final image, calculating 4 coordinates of the corners of a square pixel; we classify a pixel according to 23 variants and count the areas of "fragments"; we add to the corresponding elements of the intermediate array the colors of the obtained “fragments” in proportion to the area of these “fragments”.
5. After processing all the pixels of the original image, we round off the RGB values in the intermediate array to an integer value for each element and create a final image in BMP format based on these integer values.
Based on the above algorithm, a program for Windows was written. Source codes on Object Pascal and the compiled executable file can be downloaded here .
Program interface
By clicking on the "Open ..." button, a dialog box for selecting a BMP file opens. Only bitmaps with 24-bit palette are supported. The open image is displayed in the window. The window header displays the full file path and image size.
In the "Angle" field, you can set the rotation angle in degrees - any positive number.
As a decimal separator when entering fractional numbers, both a period and a comma can be used.
Radio buttons "CW" and "CCW" set the direction of rotation: "clockwise" and "counterclockwise", respectively.
In the “Background color” block you can set the background color with which the boundary pixels of the image will be mixed. The default background color is black.
In the "Center X" and "Center Y" fields, the coordinates of the center of rotation are specified. It should be borne in mind that the origin is in the upper left corner of the image and Y increases down. By default, the center of rotation is set to the geometric center of the loaded image.
By clicking on the “Rotate” button or by pressing the Enter key, the image is rotated at a given angle relative to the specified center of rotation and displayed in a window. Rotation of the image at angles that are multiples of 90 ° is implemented in a simplified scheme, by simply converting the coordinates of the pixels in the original image, while the values of “Center X” and “Center Y” are ignored.
The running time of the algorithm in seconds is displayed under the “Rotate” button.
Via the “Save ...” button, the rotated image can be saved to a BMP file.
If the final image does not fit in the window - it fits to the window borders with the StretchBlt API function - therefore, you can only assess the real quality of large images from a saved BMP file.
To rotate the image to a different angle, you do not need to load it again - the image from the selected file is rotated, but not the one currently displayed in the window.
An image with dimensions of 1024 x 768 on a machine with a quad core processor of 2.67 GHz is rotated by this program at an arbitrary angle, on average, approximately in 0.5 seconds. An image with dimensions of 4000 x 4000 - in about 10 seconds. The running time of the algorithm for different angles may differ due to the fact that the image at different angles is split into different numbers of “fragments”, the total time spent on calculating the areas of which is total, respectively, different times.
The intermediate array containing the pixel color information of the final image in the floating point number format is implemented on the extended type (10 bytes), therefore processing of large images (approximately more than 5000 x 5000 pixels) can cause a memory overflow error. It is possible to improve the situation by applying a less accurate data type and saving the integer part of the number immediately to the final bitmap, leaving only the fractional part in the auxiliary array.
We will conduct a comparative analysis of the work of the precision algorithm and the image rotation algorithm implemented in Photoshop.
For the first test, I took a very simple image — a horizontal black line with a thickness of 1 pixel and a length of 10 pixels, offset from the center of the white square with dimensions of 100 x 100 pixels:
After that, I rotated this image relative to the point with coordinates (0, 0) 3 ° clockwise. The point (0, 0) was chosen because, judging by my experiments, Photoshop rotates the image relative to this particular point. Here is the comparative result (increased 24 times):

Precision algorithm
Photoshop 7.0.1
Photoshop CS6 (64 Bit)
The Photoshop algorithm gives a more contrast image, the precision algorithm somewhat "blurs" the image. But in general, with a visual assessment, the result is almost the same. Along the way, we note that the rotation algorithm implemented in Photoshop has not undergone significant changes over 10 years.
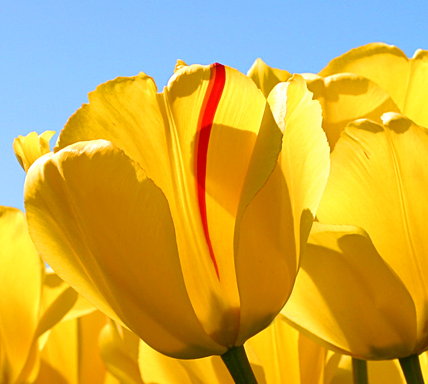
For the second test, I chose a tulip from the standard Win7 distribution:
After turning this image 5 ° clockwise relative to the geometric center, I summarized the color of all the pixels in the context of the RGB channels. Here is the result for the precision algorithm and the Photoshop algorithm:
The numbers in parentheses indicate the absolute deviation of this indicator from the original.
The color of the image after the precision rotation and before rounding almost did not change - which was to be expected.
The largest deviation, in this particular case, we find on channel G for the Photoshop algorithm. In percentage terms, this deviation is only 0.06%, so "by eye" it is not noticeable, but for reasons of perfectionism, the result of Photoshop is worse than that of a precision algorithm.
It is important to note that rounding off the color of each pixel in the precision algorithm to the integer value required for the BMP format irreversibly destroys some of the color information.
For a visual comparison of two algorithms, I will give an enlarged fragment of the image,

rotated 5 ° clockwise, respectively, with Photoshop:

and precision algorithm:
Comparative analysis shows that Photoshop better preserves the contrasting elements of the image, but it also creates “halos” of distorted color. The precision algorithm does not distort the color but at the same time “blurs” the image somewhat.
1. Precision and at the same time relatively quick rotation of the bitmap at an arbitrary angle is possible. It remains a mystery to me why the professional graphic editors do not have an option that allows the user to rotate the image extremely precisely in a little more time.
2. Despite the extreme accuracy of the considered algorithm, the inverse image transformation, i.e. rotation to the opposite angle without loss of quality is impossible, because rounding off the exact color value (in the format of a floating point number) irreversibly destroys some of the color information.
3. From the point of view of visual perception of contrasting details, the best result is given by the suboptimal Photoshop algorithm. Precision same algorithm makes sense to apply in cases where it is important to keep the maximum information about the color of the image.
UPD: For practical use, I wrote a program that implements a simplified algorithm, in which for each pixel of the final image all the necessary pieces of pixels of the original image are calculated sequentially and the color rounds off immediately. Only after that the next pixel of the final image is calculated. In this case, the program accesses several pixels of the original image. Calculation time, therefore, has increased, on average, by 1.7 times, but the memory in this version of the algorithm is spent only on the storage of bitmaps, which allows you to work with images of large sizes. Download the program and source code here .
To rotate the bitmap at an arbitrary angle, fast but not optimal algorithms have been developed that provide an approximation that is acceptable for practical purposes with a loss of quality (for example, this one ).
For quite a long time, out of purely sports interest, I was interested in the task of maximally accurate bitmap rotation at an arbitrary angle. Unfortunately, I could not find a ready-made algorithm anywhere, so I had to do it myself. Even if in the end I “invented the bicycle”, the result, I think, was interesting enough to be shared.Below we consider the algorithm of precision rotation of a raster image at an arbitrary angle relative to an arbitrary center with minimal losses.
')
I express my gratitude to Kharchenko Vladislav Vladimirovich for the assistance provided.
Algorithm
It can be seen from the above picture that after rotating a raster image, the color of each pixel of the final image is determined by adding the colors of several “fragments” of several pixels of the original image, proportional to the areas of the corresponding “fragments”. Therefore, in general, the solution to our problem will be to find the areas of all the "fragments" for each pixel of the original image and collect the color of each pixel of the final image from the colors of the corresponding "fragments" .
As the pixel model of the original image, we will use a square with a side = 1, with the following angle designations:
i1 is the rightmost corner;i2 is the lowest corner;
i3 is the leftmost corner;
i4 is the topmost corner.
The model of the final image will be a grid of parallel horizontal and vertical lines with the distance between the lines = 1.
The coordinates of the center of rotation of the raster image, in this representation, can be expressed by a pair of arbitrary real numbers. That is, the center of rotation in our problem may lie not at the geometric center of the pixel and not at the point of intersection of the grid lines, but at an arbitrary point of Cartesian coordinates.
Since, when rotating a raster image, the square of each pixel is rotated by the same angle (relative to the center of this pixel) we will solve the problem for one pixel, and then apply the solution obtained for each pixel of the original image.
The bitmap rotation can be divided into two parts:
1. Rotate the square of each pixel of the original image relative to the center of this square at a given angle.
2. The offset of the center of the square of the pixel in accordance with the angle of rotation of the image relative to the center of rotation of the image so that the square takes up its final position on the grid of the final image.
At the same time, the grid of the final image cuts the square of each pixel of the original image into “fragments” in the amount of 4, 5 or 6 pieces.
To systematize the variety of the resulting options, I had to compile a taxonomy of all possible intersections of the square of a pixel of the original image with the grid of the final image. There were only 23 essentially different options:
The conventions here are as follows:
- the numbers in the cells indicate the number of corners of the square of a pixel that fell into the given grid cell of the final image after the image was rotated;
- the green color indicates the cells into which the pixel sections fell and are guaranteed to be left there by a “fragment”;
- yellow color indicates cells, which, depending on the conditions, may fall (or may not fall) "fragments" of a square of a pixel, formed not by the corners of a square, but by the sides of a square.
For clarity, I will give one of the possible variations of option number 3:
As you can see, the upper right cell does not contain a “fragment” of a pixel, although under other conditions it could contain a turn.
In order not to load the reader with detailed geometric calculations, I will say at once that in all these 23 variants, the pixel of the original image is dissected into “fragments”, the area of which is easily calculated by combining 4 formulas. Below are these formulas with illustrations. Red color indicates grid lines of the final image, which cut through the square of a pixel. The yellow area is shaded area, the area of which is calculated by the formula.
Formula 1
This formula is not used to calculate the final area of the “fragment”, but it is convenient to use it to quickly calculate auxiliary intermediate areas, since we know that the area of the entire pixel is 1.The input variables in all formulas use heights dropped from the corners of a square onto the grid of the final image, for the simple reason that calculating these heights is reduced to instantaneous selection of the fractional part of the numerical value of the coordinate of the corresponding angle of a square pixel.
Formula 2
This formula is used only in options 1 and 2.
Formula 3
A frequently used formula is very good that it is quickly calculated. Since the rotation angle is the same for each pixel - all trigonometric functions can be calculated once, before processing all pixels, and then use these values in the loop as constants.Formula 4
This formula is calculated in two steps. First, the expression in brackets is evaluated. If it takes a positive value, then the area is calculated. If the value is negative, then the “fragment” formed by the corner of the grid and the side of the square is not cut off from the pixel, and it makes no sense to perform further calculations.In view of the foregoing, in general, the algorithm will look like this:
1. Load the original image into the computer memory.
2. Calculate the size of the final image in pixels.
3. Create an intermediate two-dimensional array, each element of which contains 3 components of the RGB color in the format of a floating-point number. The size of the array is equal to the size of the final image.
4. Sequentially iterate through all the pixels of the original image; rotate each of them at a given angle and place it on the grid of the final image, calculating 4 coordinates of the corners of a square pixel; we classify a pixel according to 23 variants and count the areas of "fragments"; we add to the corresponding elements of the intermediate array the colors of the obtained “fragments” in proportion to the area of these “fragments”.
5. After processing all the pixels of the original image, we round off the RGB values in the intermediate array to an integer value for each element and create a final image in BMP format based on these integer values.
Program
Based on the above algorithm, a program for Windows was written. Source codes on Object Pascal and the compiled executable file can be downloaded here .
Program interface
By clicking on the "Open ..." button, a dialog box for selecting a BMP file opens. Only bitmaps with 24-bit palette are supported. The open image is displayed in the window. The window header displays the full file path and image size.
In the "Angle" field, you can set the rotation angle in degrees - any positive number.
As a decimal separator when entering fractional numbers, both a period and a comma can be used.
Radio buttons "CW" and "CCW" set the direction of rotation: "clockwise" and "counterclockwise", respectively.
In the “Background color” block you can set the background color with which the boundary pixels of the image will be mixed. The default background color is black.
In the "Center X" and "Center Y" fields, the coordinates of the center of rotation are specified. It should be borne in mind that the origin is in the upper left corner of the image and Y increases down. By default, the center of rotation is set to the geometric center of the loaded image.
By clicking on the “Rotate” button or by pressing the Enter key, the image is rotated at a given angle relative to the specified center of rotation and displayed in a window. Rotation of the image at angles that are multiples of 90 ° is implemented in a simplified scheme, by simply converting the coordinates of the pixels in the original image, while the values of “Center X” and “Center Y” are ignored.
The running time of the algorithm in seconds is displayed under the “Rotate” button.
Via the “Save ...” button, the rotated image can be saved to a BMP file.
If the final image does not fit in the window - it fits to the window borders with the StretchBlt API function - therefore, you can only assess the real quality of large images from a saved BMP file.
To rotate the image to a different angle, you do not need to load it again - the image from the selected file is rotated, but not the one currently displayed in the window.
An image with dimensions of 1024 x 768 on a machine with a quad core processor of 2.67 GHz is rotated by this program at an arbitrary angle, on average, approximately in 0.5 seconds. An image with dimensions of 4000 x 4000 - in about 10 seconds. The running time of the algorithm for different angles may differ due to the fact that the image at different angles is split into different numbers of “fragments”, the total time spent on calculating the areas of which is total, respectively, different times.
The intermediate array containing the pixel color information of the final image in the floating point number format is implemented on the extended type (10 bytes), therefore processing of large images (approximately more than 5000 x 5000 pixels) can cause a memory overflow error. It is possible to improve the situation by applying a less accurate data type and saving the integer part of the number immediately to the final bitmap, leaving only the fractional part in the auxiliary array.
results
We will conduct a comparative analysis of the work of the precision algorithm and the image rotation algorithm implemented in Photoshop.
Test 1
For the first test, I took a very simple image — a horizontal black line with a thickness of 1 pixel and a length of 10 pixels, offset from the center of the white square with dimensions of 100 x 100 pixels:
After that, I rotated this image relative to the point with coordinates (0, 0) 3 ° clockwise. The point (0, 0) was chosen because, judging by my experiments, Photoshop rotates the image relative to this particular point. Here is the comparative result (increased 24 times):
Precision algorithm
Photoshop 7.0.1
Photoshop CS6 (64 Bit)
The Photoshop algorithm gives a more contrast image, the precision algorithm somewhat "blurs" the image. But in general, with a visual assessment, the result is almost the same. Along the way, we note that the rotation algorithm implemented in Photoshop has not undergone significant changes over 10 years.
Test 2
For the second test, I chose a tulip from the standard Win7 distribution:
After turning this image 5 ° clockwise relative to the geometric center, I summarized the color of all the pixels in the context of the RGB channels. Here is the result for the precision algorithm and the Photoshop algorithm:
Original | Precision turn | Precision turn | Photoshop CS6 |
| R = 33381406 G = 27933900 B = 11239213 | R = 33381406,0000004 (~ 0) G = 27933899.9999997 (~ 0) B = 11239212.9999999 (~ 0) | R = 33382786 (1380) G = 27933920 (20) B = 11238086 (-1127) | R = 33387726 (6320) G = 27950823 (16923) B = 11245937 (6724) |
The color of the image after the precision rotation and before rounding almost did not change - which was to be expected.
The largest deviation, in this particular case, we find on channel G for the Photoshop algorithm. In percentage terms, this deviation is only 0.06%, so "by eye" it is not noticeable, but for reasons of perfectionism, the result of Photoshop is worse than that of a precision algorithm.
It is important to note that rounding off the color of each pixel in the precision algorithm to the integer value required for the BMP format irreversibly destroys some of the color information.
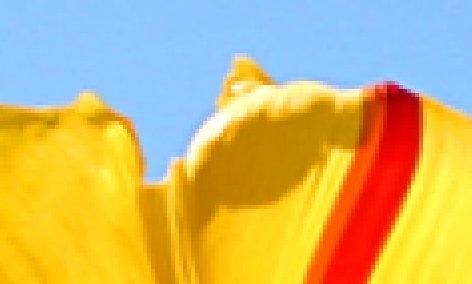
For a visual comparison of two algorithms, I will give an enlarged fragment of the image,
rotated 5 ° clockwise, respectively, with Photoshop:
and precision algorithm:
Comparative analysis shows that Photoshop better preserves the contrasting elements of the image, but it also creates “halos” of distorted color. The precision algorithm does not distort the color but at the same time “blurs” the image somewhat.
findings
1. Precision and at the same time relatively quick rotation of the bitmap at an arbitrary angle is possible. It remains a mystery to me why the professional graphic editors do not have an option that allows the user to rotate the image extremely precisely in a little more time.
2. Despite the extreme accuracy of the considered algorithm, the inverse image transformation, i.e. rotation to the opposite angle without loss of quality is impossible, because rounding off the exact color value (in the format of a floating point number) irreversibly destroys some of the color information.
3. From the point of view of visual perception of contrasting details, the best result is given by the suboptimal Photoshop algorithm. Precision same algorithm makes sense to apply in cases where it is important to keep the maximum information about the color of the image.
UPD: For practical use, I wrote a program that implements a simplified algorithm, in which for each pixel of the final image all the necessary pieces of pixels of the original image are calculated sequentially and the color rounds off immediately. Only after that the next pixel of the final image is calculated. In this case, the program accesses several pixels of the original image. Calculation time, therefore, has increased, on average, by 1.7 times, but the memory in this version of the algorithm is spent only on the storage of bitmaps, which allows you to work with images of large sizes. Download the program and source code here .
Source: https://habr.com/ru/post/160401/
All Articles