Philip Torchinsky of Semonix: installing SmartOS and using Node.js on it
On November 29, at the Yandex office in St. Petersburg, I will conduct a scientific seminar "DTrace - verification work for your code." At YaC 2012, those who listened to my report, “The Cloud Computing Infrastructure Based on the Illumos Core” - and many others - know that in Semonix I am working on cloud technologies that are closely related to SmartOS. At the seminar, I will tell you how to use DTrace technology to conduct in-depth performance analysis and study in detail the operation of the application. A search on Habra finds only one article about SmartOS , and that more people who are already familiar with it came to the seminar, I decided to write in advance about installing SmartOS and using Node.js on it.
To begin, tell you why you need SmartOS. In short, its purpose is to be the host system for virtual machines. It is often used as a basis for public and private clouds, such as Joyent and MITAC cloud services. Joyent uses LinkedIn: all of its mobile backend is done on Node.js, which is running in the Joyent cloud. We wrote about it in detail in the blog of Semonix in articles about SmartOS and the clouds based on illumos , and I told in the report on YaC 2012, which I already mentioned.
Typical cases of using SmartOS are systems for data centers, systems for developing and operating a loaded web application, a platform for creating a private or public cloud. When working on this article, I actively used an article by Stu Radnidge , who did about the same way of installing SmartOS as I did, but using VMware instead of VirtualBox.
Suppose you were one of those who are interested in trying SmartOS. How is it easier to do? I went along the simplest path that would prevent Windows or Linux from running in a virtual machine, but it would allow using SmartOS + Node.js in a ready way. I will run SmartOS in VirtualBox. It is clear that KVM in VirtualBox does not work under VirtualBox, and the rest should earn with a bang.
')
SmartOS can be the host system for guests running Windows, Linux and SmartOS itself. In this article, I consider only the version with guest systems running SmartOS. They implement lightweight virtualization (the same as Solaris zones and something similar to cells in FreeBSD), and therefore, their work does not require KVM, which is supported only on physical computers. The entire configuration is shown in the figure below. SmartOS (host) is a system that is a guest relative to Windows on my laptop, and a host is relative to SmartOS systems running in zones within this SmartOS.


SmartOS will be installed in a virtual machine with two network interfaces. What for? Very simple: I want from my host system (in this case, Windows) to connect with normal ssh to SmartOS so that you can open several windows - at least one for each guest system inside my SmartOS.
Why not use the graphical mode in the console and run the necessary number of xterm or gnome-terminal there? The fact is that the graphics (“X” - X) in SmartOS is not installed. There is a project to transfer X11 support to SmartOS, but so far it has not been completed, and Jonathan Perkin, who is leading this project on a voluntary basis, told me that the deadline for working on it is unknown. Therefore, if I want to open five windows with ssh to my SmartOS, I will need TCP access from my host system to SmartOS in VirtualBox.
In addition, VirtualBox Guest Additions cannot be installed in the SmartOS guest machine, allowing you to cut-and-paste between the guest system and the host system in which I write an article (and want to copy texts from the terminal into it). Theoretically, I think you can install Guest Additions (in fact, you need to install kernel modules), but for Solaris-like systems, Guest Additions comes in the form of a package in .pkg format, which is not supported in SmartOS. I decided that there would be more trouble with unpacking the package and manually screwing the module to the kernel than with ssh access from the host system.
Why do we need a second interface? So that SmartOS can go online via NAT for packets. This restriction on the conditions of the task is imposed by VirtualBox - it is possible to make a virtual machine with NAT / DHCP accessible from the host system in it otherwise it is only possible via the bridged network, and this is not always convenient. It is beyond the scope of this article to discuss cases when it is not very convenient (or not supported on certain host systems or versions of VirtualBox), but believe me, it happens. The simplest options are: you’ve run out of DHCP addresses on the network where you have a physical computer connected to, or you don’t want to watch every time what address is given to the system before ssh cling to it.
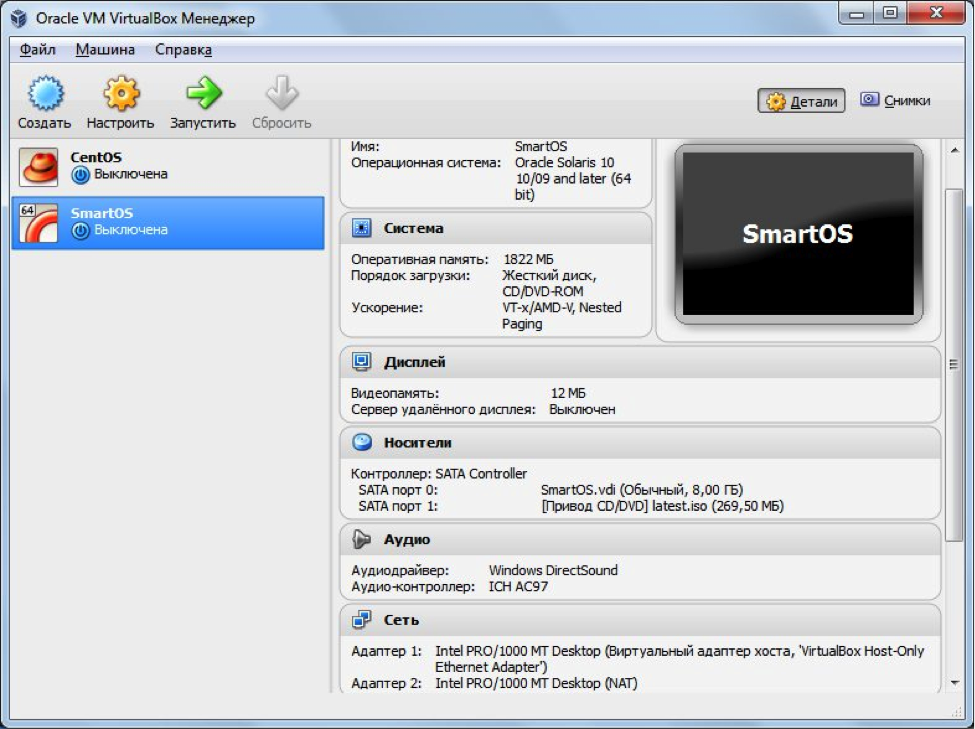
Configuring a virtual machine so that it has 2 network adapters is elementary: on the Network tab, you just need to specify that not only the first adapter is active in the host adapter mode, but the second one is in the NAT mode (see the figure below). Please note that for SmartOS it makes sense to choose a type of Solaris 10 10/09 or later (64 bit) virtual machine. It is possible that the Solaris 11 variant will work better. I have no problems and delays earned and so.
You need to connect the latest.iso file to the virtual machine CD-ROM - SmartOS will be loaded from it.

After booting for the first time, the system will ask a few questions about the settings (in particular, the root password), format the disk, create a ZFS pool on the disk, and write the settings to the disk. After the reboot, you should see something like the one below.


Log in as root using the password you set earlier. Already, you can connect to SmartOS using ssh, for this you only need to know what the server address is:
The system configuration in SmartOS is stored in the / usbkey / config file. The / usbkey file system is mounted from disk, unlike / etc, which is always loaded from a LiveCD or LiveUSB and mounted on a RAM disk. Therefore, changes made to the files from / etc will be lost upon reboot, and saved in / usbkey.
The / usbkey / config file is created when you first start SmartOS on your computer, and by default it describes only the first interface in the system. In order to see the second one, it is necessary to slightly modify the file. To modify it, we will need to know the MAC addresses of the interfaces. To do this, you can use the command
Now modify the / usbkey / config file so that it looks like this:
First you need to download a virtual machine image. To do this, you need to update the list of images:
And now let's see what ready-made images are in the repository:
Now we have a list of images available for installation. Here is only a part of the list - it is much longer. At the time of this writing, 96 images were available in the repository. We are interested in the base64 image - the minimum system that includes node.js. Currently the latest version of this image is 1.8.1 (includes node 0.8.9), and its UUID is 60a3b1fa-0674-11e2-abf5-cb82934a8e24.
Download the virtual machine image:
Now we will make a description of the virtual machine that we will create based on the image we just downloaded and run it inside the SmartOS host.
The description is done in the form of a JSON file (the process details are described in the documentation on smartos.org, I’ll just put a working example here - let us have it in /zones/template.json). The file should lie in the file system, which is located on the disk and saved between reboots, most conveniently in / zones.
Pay attention to dataset_uuid - this is the same UUID that belongs to the image just received from the repository. In the zone there will also be two network interfaces - “internal” and “external”. This setting is used in data centers in real life: the internal network in which the data center administrators are working is connected to the internal interface, the Internet from where the clients come from is connected to the external one.
Now we are creating a new SmartOS virtual machine (for brevity, we will further call it a “zone”):
If everything turned out fine, you can see the running new zone, giving the command
Now you can connect to the new zone either from the SmartOS console or via ssh:
Note: The UUID of a zone is different from the UUID of a zone image, because you can create many zones from the same image. Up to 8191 virtual machines can be running simultaneously on a single SmartOS host system.
To connect to the zone via ssh, you should clarify what address it was given to, you first need to join it through zlogin, and then find out the address:
Now you can install any packages we need in the zone. To do this, you need to update information about available packages using pkgin update , get their list of pkgin list or search for the required using pkgin search . To install the package, use pkgin install .
Suppose you were not familiar with Node.js before. Then for starters, you can make a very simple web application that produces a banal Hello, World! You can start mastering Node.js with a well-known guide . Following it, we create our Hello, World.
To do this, connect to the zone
and create, for example, the server.js file with the following contents in the / home / node directory:
Now run node /home/node/server.js and access our zone from a regular browser. In my case, this required setting up routing between the zone and the Windows host system:
In the area: route add 192.168.56.1 192.168.56.101
On Windows: route add 192.168.56.102 192.168.56.101
The address 192.168.56.1 is the VirtualBox interface in Windows, 192.168.56.101 is the SmartOS host system, 192.168.56.102 is the zone in it.
The DTrace provider for a node is called (surprise!) Node. Since this is a provider of the USDT type, its sensors should be specified either in the form of node * ::: <sensor name> , or with an indication of a specific PID of the node process, for example, node3297 ::: <sensor name> .
A live example of using DTrace to monitor the operation of your server under Node.js is logging calls to it. To find out which requests are received by servers from different zones (a typical case for a hosting provider), run a short script:
To see from which addresses requests come, you can slightly modify the script:
The following sensors are available for a node in DTrace:
gc-start
gc-done
http-client-request
http-client-response
http-server-request
http-server-response
net-server-connection
net-socket-read
net-socket-write
net-stream-end
If you find that some sensors are unavailable, this is a sure sign that you do not have the /usr/lib/dtrace/node.d file. Then you need to create the directory / var / lib / dtrace /, download the file there (it is located at https://raw.github.com/joyent/node/master/src/node.d ) and run dtrace with the –L / key var / lib / dtrace / (it means “include in the search path of the DTrace libraries the directory specified after the L key).
A detailed description of sensors with code examples (in English) is available on the page dtrace.org/blogs/rm/2011/03/01/dtrace-probes-for-node-v0-4-x/#httpd (however, it is about the outdated version of Node.js).
The special beauty of SmartOS settings is that once installed, they do not need to be repeated after the update is released. You can download the latest latest.iso, replace it with the previous one and boot from the new one. All settings, virtual machines and files inside them will be picked up automatically, as no one changes anything in them - only the loaded image is changed, and the settings exist separately from it.
Those who are interested to hear my story about DTrace will be waiting for November 29 at 7:00 pm in the Petersburg office of Yandex. The seminar is completely free, but the number of seats is limited, so you need to register . For those who do not get on it, the organizers will provide online broadcasting . And for those who are going to say that you need to bring laptops with SmartOS installed under VirtualBox, because an important part of the seminar will be solving practical problems.
The meeting will be useful to anyone interested in analyzing the performance of applications on UNIX-like systems, especially software developers for Solaris, software developers for Node.js, system administrators, and others responsible for performance (if they work with FreeBSD, Solaris, QNX, OpenIndiana, SmartOS and others that support DTrace).
To begin, tell you why you need SmartOS. In short, its purpose is to be the host system for virtual machines. It is often used as a basis for public and private clouds, such as Joyent and MITAC cloud services. Joyent uses LinkedIn: all of its mobile backend is done on Node.js, which is running in the Joyent cloud. We wrote about it in detail in the blog of Semonix in articles about SmartOS and the clouds based on illumos , and I told in the report on YaC 2012, which I already mentioned.
Typical cases of using SmartOS are systems for data centers, systems for developing and operating a loaded web application, a platform for creating a private or public cloud. When working on this article, I actively used an article by Stu Radnidge , who did about the same way of installing SmartOS as I did, but using VMware instead of VirtualBox.
Planning a test installation
Suppose you were one of those who are interested in trying SmartOS. How is it easier to do? I went along the simplest path that would prevent Windows or Linux from running in a virtual machine, but it would allow using SmartOS + Node.js in a ready way. I will run SmartOS in VirtualBox. It is clear that KVM in VirtualBox does not work under VirtualBox, and the rest should earn with a bang.
')
SmartOS can be the host system for guests running Windows, Linux and SmartOS itself. In this article, I consider only the version with guest systems running SmartOS. They implement lightweight virtualization (the same as Solaris zones and something similar to cells in FreeBSD), and therefore, their work does not require KVM, which is supported only on physical computers. The entire configuration is shown in the figure below. SmartOS (host) is a system that is a guest relative to Windows on my laptop, and a host is relative to SmartOS systems running in zones within this SmartOS.

SmartOS will be installed in a virtual machine with two network interfaces. What for? Very simple: I want from my host system (in this case, Windows) to connect with normal ssh to SmartOS so that you can open several windows - at least one for each guest system inside my SmartOS.
Why not use the graphical mode in the console and run the necessary number of xterm or gnome-terminal there? The fact is that the graphics (“X” - X) in SmartOS is not installed. There is a project to transfer X11 support to SmartOS, but so far it has not been completed, and Jonathan Perkin, who is leading this project on a voluntary basis, told me that the deadline for working on it is unknown. Therefore, if I want to open five windows with ssh to my SmartOS, I will need TCP access from my host system to SmartOS in VirtualBox.
In addition, VirtualBox Guest Additions cannot be installed in the SmartOS guest machine, allowing you to cut-and-paste between the guest system and the host system in which I write an article (and want to copy texts from the terminal into it). Theoretically, I think you can install Guest Additions (in fact, you need to install kernel modules), but for Solaris-like systems, Guest Additions comes in the form of a package in .pkg format, which is not supported in SmartOS. I decided that there would be more trouble with unpacking the package and manually screwing the module to the kernel than with ssh access from the host system.
Why do we need a second interface? So that SmartOS can go online via NAT for packets. This restriction on the conditions of the task is imposed by VirtualBox - it is possible to make a virtual machine with NAT / DHCP accessible from the host system in it otherwise it is only possible via the bridged network, and this is not always convenient. It is beyond the scope of this article to discuss cases when it is not very convenient (or not supported on certain host systems or versions of VirtualBox), but believe me, it happens. The simplest options are: you’ve run out of DHCP addresses on the network where you have a physical computer connected to, or you don’t want to watch every time what address is given to the system before ssh cling to it.
How to make two network interfaces in VirtualBox
Configuring a virtual machine so that it has 2 network adapters is elementary: on the Network tab, you just need to specify that not only the first adapter is active in the host adapter mode, but the second one is in the NAT mode (see the figure below). Please note that for SmartOS it makes sense to choose a type of Solaris 10 10/09 or later (64 bit) virtual machine. It is possible that the Solaris 11 variant will work better. I have no problems and delays earned and so.
What else needs to be configured?
You need to connect the latest.iso file to the virtual machine CD-ROM - SmartOS will be loaded from it.

After booting for the first time, the system will ask a few questions about the settings (in particular, the root password), format the disk, create a ZFS pool on the disk, and write the settings to the disk. After the reboot, you should see something like the one below.

Log in as root using the password you set earlier. Already, you can connect to SmartOS using ssh, for this you only need to know what the server address is:
ipadm show-addr How to make two network interfaces in SmartOS
The system configuration in SmartOS is stored in the / usbkey / config file. The / usbkey file system is mounted from disk, unlike / etc, which is always loaded from a LiveCD or LiveUSB and mounted on a RAM disk. Therefore, changes made to the files from / etc will be lost upon reboot, and saved in / usbkey.
The / usbkey / config file is created when you first start SmartOS on your computer, and by default it describes only the first interface in the system. In order to see the second one, it is necessary to slightly modify the file. To modify it, we will need to know the MAC addresses of the interfaces. To do this, you can use the command
dladm show-phys -m LINK SLOT ADDRESS INUSE CLIENT e1000g0 primary 8:0:27:f7:e9:a3 yes e1000g0 e1000g1 primary 8:0:27:d0:35:3b no -- Now modify the / usbkey / config file so that it looks like this:
# # This file was auto-generated and must be source-able by bash. # # admin_nic is the nic admin_ip will be connected to for headnode zones. admin_nic=8:0:27:f7:e9:a3 admin_ip=dhcp admin_netmask= admin_network=... admin_gateway=dhcp external_nic=8:0:27:d0:35:3b external_ip=dhcp external_netmask=255.255.255.0 external_gateway=dhcp dns_resolvers=8.8.8.8,8.8.4.4 dns_domain= ntp_hosts=pool.ntp.org compute_node_ntp_hosts=dhcp Creating a Virtual Machine Inside SmartOS
First you need to download a virtual machine image. To do this, you need to update the list of images:
imgadm update And now let's see what ready-made images are in the repository:
imgadm avail UUID OS PUBLISHED URN 78ab4d60-2610-11e2-b3f7-b3bd2c369427 linux 2012-11-04 sdc:jpc:ubuntu-12.04:2.1.2 6a67c702-2083-11e2-b4fa-03f9d1d64ef0 linux 2012-10-28 sdc:jpc:ubuntu-12.04:2.1.1 b00acc20-14ab-11e2-85ae-4f03a066e93e smartos 2012-10-12 sdc:sdc:mongodb:1.4.0 1fc068b0-13b0-11e2-9f4e-2f3f6a96d9bc smartos 2012-10-11 sdc:sdc:nodejs:1.4.0 8700b668-0da4-11e2-bde4-17221283a2f4 linux 2012-10-03 sdc:jpc:centos-6:1.3.0 55330ab4-066f-11e2-bd0f-434f2462fada smartos 2012-09-25 sdc:sdc:base:1.8.1 60a3b1fa-0674-11e2-abf5-cb82934a8e24 smartos 2012-09-25 sdc:sdc:base64:1.8.1 ... Now we have a list of images available for installation. Here is only a part of the list - it is much longer. At the time of this writing, 96 images were available in the repository. We are interested in the base64 image - the minimum system that includes node.js. Currently the latest version of this image is 1.8.1 (includes node 0.8.9), and its UUID is 60a3b1fa-0674-11e2-abf5-cb82934a8e24.
Download the virtual machine image:
imgadm import 60a3b1fa-0674-11e2-abf5-cb82934a8e24 Now we will make a description of the virtual machine that we will create based on the image we just downloaded and run it inside the SmartOS host.
The description is done in the form of a JSON file (the process details are described in the documentation on smartos.org, I’ll just put a working example here - let us have it in /zones/template.json). The file should lie in the file system, which is located on the disk and saved between reboots, most conveniently in / zones.
Pay attention to dataset_uuid - this is the same UUID that belongs to the image just received from the repository. In the zone there will also be two network interfaces - “internal” and “external”. This setting is used in data centers in real life: the internal network in which the data center administrators are working is connected to the internal interface, the Internet from where the clients come from is connected to the external one.
{ "brand": "joyent", "dataset_uuid": "60a3b1fa-0674-11e2-abf5-cb82934a8e24", "max_physical_memory": 1024, "nics": [ { "nic_tag": "admin", "ip": "dhcp", "gateway": "dhcp" }, { "nic_tag": "external", "ip": "dhcp", "gateway": "10.0.3.2" } ] } Now we are creating a new SmartOS virtual machine (for brevity, we will further call it a “zone”):
vmadm create -f /zones/ template.json If everything turned out fine, you can see the running new zone, giving the command
vmadm list UUID TYPE RAM STATE ALIAS 570cccb2-0511-400b-9143-7616b2ca8a3d OS 1024 running - Now you can connect to the new zone either from the SmartOS console or via ssh:
zlogin 570cccb2-0511-400b-9143-7616b2ca8a3d Note: The UUID of a zone is different from the UUID of a zone image, because you can create many zones from the same image. Up to 8191 virtual machines can be running simultaneously on a single SmartOS host system.
To connect to the zone via ssh, you should clarify what address it was given to, you first need to join it through zlogin, and then find out the address:
zlogin 570cccb2-0511-400b-9143-7616b2ca8a3d ipadm show-addr Package management
Now you can install any packages we need in the zone. To do this, you need to update information about available packages using pkgin update , get their list of pkgin list or search for the required using pkgin search . To install the package, use pkgin install .
How to run Node.js
Suppose you were not familiar with Node.js before. Then for starters, you can make a very simple web application that produces a banal Hello, World! You can start mastering Node.js with a well-known guide . Following it, we create our Hello, World.
To do this, connect to the zone
zlogin 570cccb2-0511-400b-9143-7616b2ca8a3d and create, for example, the server.js file with the following contents in the / home / node directory:
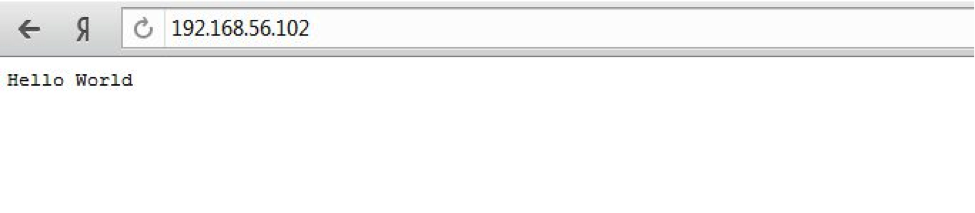
var http = require("http"); http.createServer(function(request, response) { response.writeHead(200, {"Content-Type": "text/plain"}); response.write("Hello World"); response.end(); }).listen(80); Now run node /home/node/server.js and access our zone from a regular browser. In my case, this required setting up routing between the zone and the Windows host system:
In the area: route add 192.168.56.1 192.168.56.101
On Windows: route add 192.168.56.102 192.168.56.101
The address 192.168.56.1 is the VirtualBox interface in Windows, 192.168.56.101 is the SmartOS host system, 192.168.56.102 is the zone in it.
How to use DTrace with Node.js?
The DTrace provider for a node is called (surprise!) Node. Since this is a provider of the USDT type, its sensors should be specified either in the form of node * ::: <sensor name> , or with an indication of a specific PID of the node process, for example, node3297 ::: <sensor name> .
A live example of using DTrace to monitor the operation of your server under Node.js is logging calls to it. To find out which requests are received by servers from different zones (a typical case for a hosting provider), run a short script:
# dtrace -L /var/lib/dtrace -n 'node*:::http-server-request{printf("%s: %s of %s\n",zonename, args[0]->method, args[0]->url)}' -q 570cccb2-0511-400b-9143-7616b2ca8a3d: GET of / 570cccb2-0511-400b-9143-7616b2ca8a3d: GET of /favicon.ico 570cccb2-0511-400b-9143-7616b2ca8a3d: GET of / 570cccb2-0511-400b-9143-7616b2ca8a3d: GET of /favicon.ico 570cccb2-0511-400b-9143-7616b2ca8a3d: GET of / 570cccb2-0511-400b-9143-7616b2ca8a3d: GET of /favicon.ico To see from which addresses requests come, you can slightly modify the script:
# dtrace -L /var/lib/dtrace -n 'node*:::http-server-request{printf("%s: %s of %s\n",args[1]->remoteAddress, args[0]->method, args[0]->url)}' -q 192.168.56.1: GET of / 192.168.56.1: GET of / 192.168.56.1: GET of /favicon.ico 192.168.56.1: GET of / 192.168.56.1: GET of /favicon.ico 192.168.56.1: GET of / 192.168.56.1: GET of / The following sensors are available for a node in DTrace:
gc-start
gc-done
http-client-request
http-client-response
http-server-request
http-server-response
net-server-connection
net-socket-read
net-socket-write
net-stream-end
If you find that some sensors are unavailable, this is a sure sign that you do not have the /usr/lib/dtrace/node.d file. Then you need to create the directory / var / lib / dtrace /, download the file there (it is located at https://raw.github.com/joyent/node/master/src/node.d ) and run dtrace with the –L / key var / lib / dtrace / (it means “include in the search path of the DTrace libraries the directory specified after the L key).
A detailed description of sensors with code examples (in English) is available on the page dtrace.org/blogs/rm/2011/03/01/dtrace-probes-for-node-v0-4-x/#httpd (however, it is about the outdated version of Node.js).
Conclusion
The special beauty of SmartOS settings is that once installed, they do not need to be repeated after the update is released. You can download the latest latest.iso, replace it with the previous one and boot from the new one. All settings, virtual machines and files inside them will be picked up automatically, as no one changes anything in them - only the loaded image is changed, and the settings exist separately from it.
Those who are interested to hear my story about DTrace will be waiting for November 29 at 7:00 pm in the Petersburg office of Yandex. The seminar is completely free, but the number of seats is limited, so you need to register . For those who do not get on it, the organizers will provide online broadcasting . And for those who are going to say that you need to bring laptops with SmartOS installed under VirtualBox, because an important part of the seminar will be solving practical problems.
The meeting will be useful to anyone interested in analyzing the performance of applications on UNIX-like systems, especially software developers for Solaris, software developers for Node.js, system administrators, and others responsible for performance (if they work with FreeBSD, Solaris, QNX, OpenIndiana, SmartOS and others that support DTrace).
Source: https://habr.com/ru/post/159661/
All Articles