Configure Nginx + LAMP server at home. Part 1: Configuring the frontend - backend

Hello. I recently asked a question about creating a series of articles. Here is the first article.
In this series of articles, you will learn how to correctly configure the LAMP server, ala “hosting is more powerful”.
We will use the following stack: nginx - apache-mpm-itk - mod_php - mysql - linux / debian.
I will cover the following topics:
- Frontend setup - backend
- Calculation of server capabilities, setting up mysql and backend
- The story about the experience based on intel s3420gp
I can confidently say that the LAMP server setting is not limited to 6-10 commands for installing and uncommenting certain lines in the configuration files.
Example: by default, nginx does not allow the request body to be uploaded to the server greater than 1M. If you do not configure this parameter, error 414 (Request-URI Too Large) will occur when you try to add a small series of photos.
Apache has exactly the opposite: its request body is unlimited by default. This makes it possible to make mischief.
')
In this article we will get acquainted with all the settings thoroughly. In the article you can find configuration files prepared by me. Being a pedant, my configuration files are always grouped by type, for example: “performance”, “content generation”, “error pages”, “compression”, “other settings”, “general settings”. It seems to me that the readability of these files becomes much better if they are grouped.
We will learn about what simple attacks are and how to defend against them. At once I will say that with the base configuration frontend in the face of nginx - backend apache is still vulnerable.
I'm pretty sure that I can't fit everything into one article. Welcome under cat.
- Preface:
It so happened that recently we started to drop the server. For some reason, he fell from the evening to night, and in the daytime he worked for himself. Not to say that it was a huge load. During the crashes, I discovered an incomprehensibly huge jump in the allocation of RAM to apache, more than 700 megs per process, although PHP had a maximum of 256M. The server went into swapping, and then fell. The server initially had 8G RAM, then set 16G.
Before these crashes, the server worked for a whole year and did not know any problems. He had a terrible configuration made on his knees, because from the hosting we were already driven. Here is its configuration, all from the Debin repositories:
Apache2.2.16_mpm_itk + php5.3.0 hung on the Internet behind the frontend and backend at the same time, without protection from possible attacks in general. I managed to carry out all the attacks mentioned in Habré =).
Mysql5.1 was configured in the basic configuration with not optimal use of RAM and all that.
From that moment on, everything had to be studied very well. By the way, after everything is set up properly, the number of unnecessary verbiage in the virtual host configs has decreased dramatically!
Start setting
- Repositories are different:
The first problem that arose is the software update. As is known, debian repositories have rather outdated software. They are said to be well tested, but they are really old! By the way, I myself was surprised when I found this selection of software.
Now I take the repositories of LAMP from here www.dotdeb.org
Here's how to set up www.dotdeb.org/instructions
For those who are very dry for the first time (after all, he himself was like this once and there was no one to help except Google):
- Install debian immediately put a checkbox to set the SSH server (nothing more !!!), then we find out the server IP for the VGA monitor no longer sit down, you can pass the server to the data center.
- We connect via SSH, I advise putty under win.
- nano /etc/apt/sources.list is inserted there according to the instructions from dotdeb. (note: inserting text into the console from the windows buffer is done with the right mouse button)
- we carry out other things according to the instruction
- we carry out the big block of commands which I wrote below
- we work through MC as white people
- then everything depends on you! =)
Note, here is my hardware configuration: Intel s3420gp, xeon x3450, 16GB ECC RDIMM, 3 * 1Tb 3.5 "SATA" WD BE "(2x-raid1 (25G / 20G swap, 100G / var, ~ 800G / home) + 1single (1Tb / mnt / unsafe)). Note to newbies: I’ve gotten creepy at one time that I put the Black Edition discs - I had to put the Raid Edition.
So. Now we have just divided the disks, put the operating system from the minidisk debian (190Mb) and made the settings of the repositories. Now we continue. During the execution of operations you will have questions from dpkg, you need to answer them.
apt-get update apt-get upgrade apt-get install nginx apache2 apache2-mpm-itk php5 php5-apc php-pear php5-dev php5-gd mysql-server mysql-client php5-mysql postfix mc -y apt-get install libapache2-mod-rpaf -y echo all done! nginx - frontend, apache2-mpm-itk - backend, mod_php5.3 - language, mysql5.5 - database, postfix - sending mail from PHP.
- We make the system architecture:
It is always known that without a visual image it is more difficult to set up a system than if it were. At first I couldn’t imagine it myself and drew it only after reading more than half of the main documentation on two servers and a little about Apaches with mysql. Now I drew it for readers immediately, so that they would be clearer and more convenient to learn the configuration. I think that according to this picture it will be enough just to analyze the narrow parts of the system in the future, which will positively affect the support of the system and, possibly, its scaling. (Picture clickable)
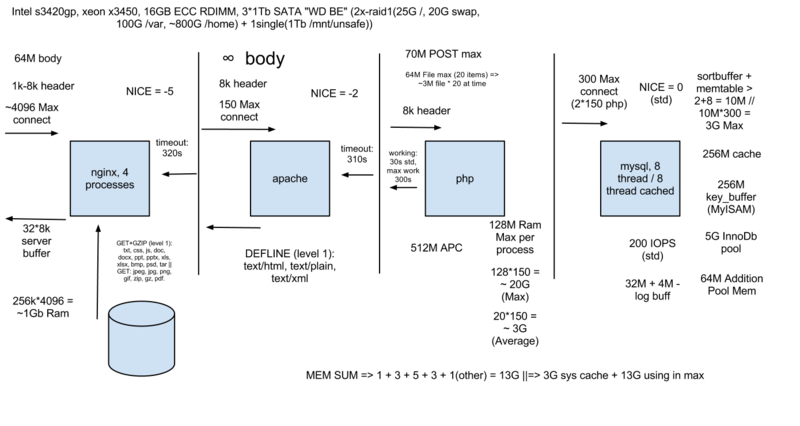
All parts of the picture I will explain in the next article. In this article we will reveal the frontend settings - backend. Apache protection
Frontend: nginx configuration
We will configure nginx in proxy mode. There are several reasons for this:
- Protecting apache server against attacks
- Compress and render static content on a lightweight server
- Saving server brains
- Ease of implementation
- Apache mod_php works ( not much || worse ) than PHP FastCGI, while mod_php is clearer and more standard
- Configs in the studio!
Here are my configuration files that I use for the proxy server
yadi.sk/d/w0SNSFIM0nyk1
What you got from the repositories should be ruthlessly replaced with these files, and also add the extensions .docx, .pptx, .xlsx to the mime opposite the respective mime types. Let's take a little look at the device configs:
/nginx.conf - - . . /proxy_params - , nginx proxy. : , killapache.pl, , , . /conf.d - . error-docs - , ngx_http_core_module - , ngx_http_gzip_module - . I deliberately do not explain the values of the settings, as for that is Russian documentation . However, I want to point out some of them and why I chose such parameters. Readers want to think about what settings are needed for their purposes, especially since I no longer need to search for them, I grouped them all.
- I increased client_max_body_size to 64M so that I could upload various multimedia to the server - trite photos.
- client_body_buffer_size - I increased the standard buffer to 32k because by default it is clearly not enough. Often it is necessary to process “big data (10-20k)” at the input. In general, this parameter should be determined from the code that will be executed on the server. If you like Twitter, then you don’t need to spend more than 1k (however, you still need to set 8k to drop on the 64x memory page of the system). If you are a Habrahabr, I would put 8k (less than the default), because comments are often written there beyond 1k, but on average less than 8k (I can make mistakes on the vskidku). What happens if this parameter overflows read the documentation.
- large_client_header_buffers - I reduced it, thereby aligning it with what the rest of the system can accept - apache + php.
- worker_processes - workflows delivered by the number of cores / 2.
- worker_priority - put it above all, so that the rest of the backend would not slow down the return of the generated content.
- server_tokens off; - do not shine with what you have =), you can get into trouble.
- proxy_read_timeout - I increased to 300 + 20 seconds. This is a little bit more than the apache timeout, which occurs after 300 + 10 seconds. This is done so that the timeout would occur “from the depths” of the backend, and for some unknown reason, the front end would not terminate. By default, this parameter is 60 seconds, which sometimes is not enough for heavy calculations. I note that php in this configuration can run for up to 300 seconds, before the start of timeout.
- Please pay attention to the proxy_set_header directives in the proxy_params file: they are used to set the headers for the proxied server. In particular, the proxied server does not see which IP address addressed it, because it considers that the local 127: 0: 0: 1 is accessing it.
- I will proxy to the local port 127.0.0.1:88, honestly trying to find sockets or crutches based on them, but it did not work out = (
Backend: apache setup
Now we are going to configure apache. Here is another bundle of grouped configuration files: yadi.sk/d/ZqsisoDl0nzrl
In the Apache files, I signed each parameter by copying it from the documentation, which would be more convenient to configure. Again, I send you to the documentation to customize for your needs and tell you about the key things:
- ports.conf file: listen on ports 88 and 443.
- additionally install libapache2-mod-rpaf (already done above). It serves to decrypt the headers that the proxy server transmits to us. Yes, the very headers that we set with the proxy_set_header directive.
- DeflateCompressionLevel 1 (file /mods-enabled/deflate.conf) in defline I set the compression ratio = 1, I decided not to press too much. In any case, if you have extra hands on the server, then why not 9 ?.
- I activated the mod_headers module and in the conf.d / security file I killed some security headers for the hosts hanging on port 443. Details in configs. I do not know why I left this port not proxied, but this is a fact. Just the hands did not reach something, or I was afraid, and then my hands did not reach. In any case, ordinary mortals are forbidden to contact him. By the way, with the Apaches version> = 2.2.21, this problem was solved by a special configuration at the kernel level.
- ServerTokens Prod, ServerSignature Off - again, we do not shine delicious places.
- In the secutiry file in the directory section, I described as many different settings as possible that there would be less verbiage in the virtual host files.
- TimeOut 310 - already wrote why 310 seconds.
- RLimitMEM is an interesting thing, I advise you to read. Allows you to limit the memory consumed by the Apache as a whole. Other R * parameters are also interesting.
- DefaultType application / octet-stream - if we do not know what we are giving, then let it be binary.
- AddDefaultCharset Off - it is better not to turn it on if you are not sure that you have everything in one encoding
With that on what it is necessary to pay attention I finished. Now let's move on to the mpm-itk module selected for hosting tasks.
The fact is that this module is convenient because with each new access to the server a new process is created and it switches to a specific user, let's say on www-ru-example. That is, this user is “locked” in his directory and no scripts can get anywhere, given that you have correctly configured the operating system. I note that many of the default debian configuration files are open for everyone to read !!! ..
The history of this MPM is interesting. The fact is that it was made on the basis of mpm prefork, which means that all settings for prefork also affect itk. Accordingly, in my configuration file you can trace it.
Please pay attention to MaxClients 150, these are the same maximum 150 users that can be when accessing the backend. I also ask you to pay attention to MaxRequestsPerChild. By default it is zero. It is advised to install it at least limited - this reduces the possibility of memory leaks.
Another important thing about mpm-itk is its nice value. I set this value to -2. I did just that, because as soon as the database gave the result, PHP should immediately form it and give it to the end. Please note the nice-value hierarchy.
nginx = -5, apache = -2, mysql = 0. This is done in order to quickly generate content and give it to the user. The operating system should force out non-priority processes for later.
I would like to say a few words about the basic protection of Apaches.
There are several types of attacks that any sysadmin should know: killapache.pl, slow post, slow lori. All of these attacks are very simple on the open Apache. From killapache.pl saves mod_headers or nginx, where you can close the problem by prohibiting certain headers. They say that killapache.pl is the problem of the protocol itself. Slow post, slow lori are identical attacks, one is done by transmitting a large POST, with a very slow channel, the other is done by transmitting the generated content to the client by a very slow channel. These attacks are not terrible for the strong muscular and wiry nginx server with which we covered ourselves. For Apache, this is mortally similar, for example, the PHP sandbox is cleaned after the server has given all the data, now imagine how much memory can be consumed.
In the end I want to say that in the configuration files I just sent the files. Do not forget to create sims in particular for mods-enabled directories from mods-available, sites- *, etc.
Thanks for reading, I hope you liked my selection of configs. I will try to highlight many other things in other topics. For example, setting up a backend (php - mysql) and calculating server capabilities. If the first and second articles are interesting, then I can roll out 2 more articles: “user accounting system”, “experience regarding the choice of entry-level hardware”, “various things about working on the server”. In the final, I can develop a set of utilities for quick server setup for the articles I specified.
Source: https://habr.com/ru/post/159203/
All Articles