Black and white laser and LED printing
I will continue the topic of informative articles and today we will tell you about the specifics of black and white laser (and LED!) Printing.
The technology is based on the principle of dry electrostatic transfer, and the full official name of the technology is electrographic printing. The essence of this principle is as follows: the light source shines on the pre-charged surface of the photosensitive shaft (photodrum, photo-photo). At those places where the light has hit, the charge changes and toner is then attracted to these places. Then this toner is overtightened by electrostatics on the paper on which it enters the oven, where it is fixed, under the action of high temperature and pressure. Prints made in this way are not afraid of moisture, resistant to abrasion and fading. The quality of this image is very high.
')
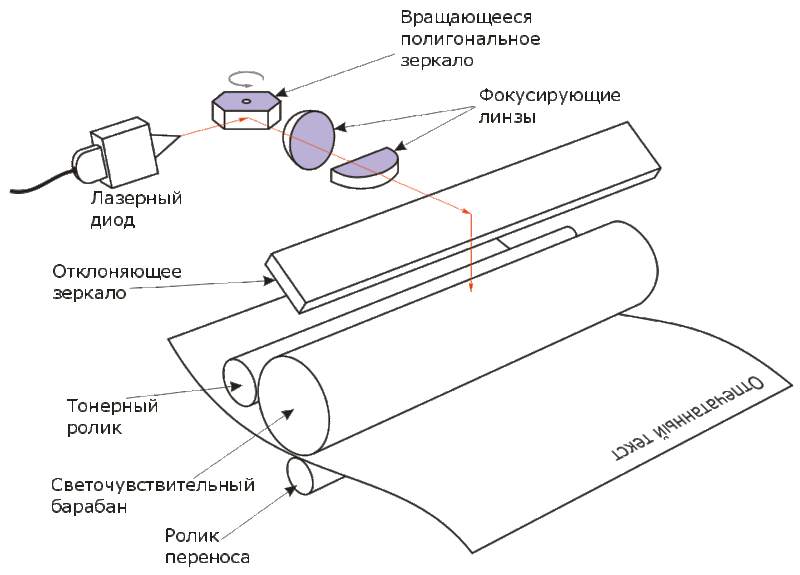
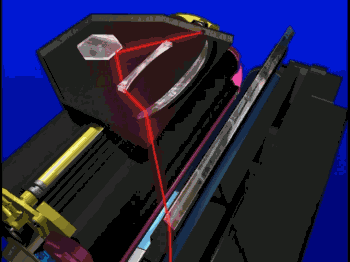
The light sources used in devices with dry electrostatic transfer technology are different. In the very first devices it was the light of a lamp reflected from the original: it was in this way that analog copies were still being made. However, later a technology appeared in which the laser beam became the light source. It is clear that the printers, in which this principle of illumination of the photosensitive shaft began to be used, began to be called laser printers. The laser beam, reflected from a rapidly rotating multi-faceted mirror (prism), running across the line behind the line along the entire length of the photosensitive shaft, thereby drawing on it consistently, as it rotates, an electrostatic image. On the lighted areas then the toner is attracted. Rotating further, the photosensitive drum comes in contact with the paper and due to the transfer voltage applied to the paper.
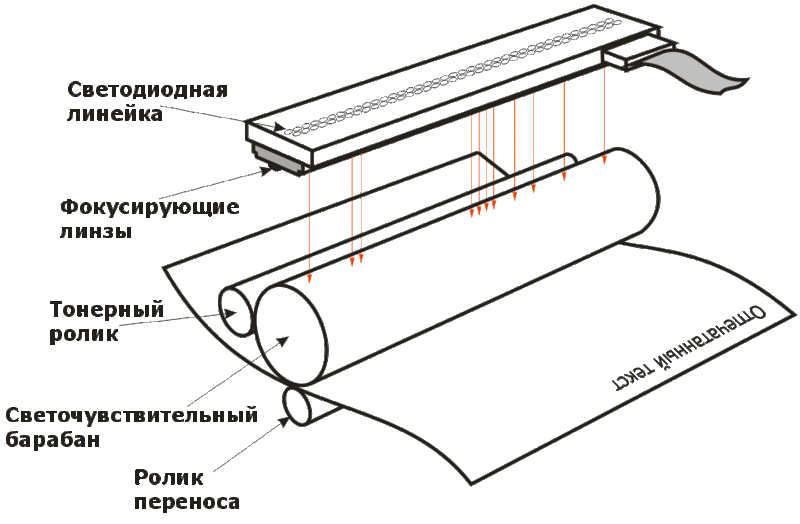
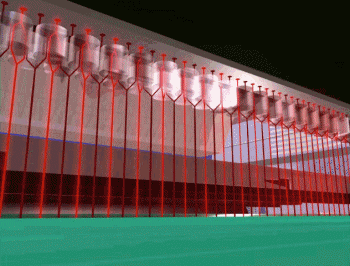
through the transfer roller, the toner is transferred onto the paper, remaining magnetized to it until the paper with toner on it enters the fusing unit (stove), where the toner is fused into the paper, thereby creating a finished print. An alternative light source that illuminates the drum unit in a modern printer is the LED strip. It consists of many (from 2.5 to 10 thousand pieces, depending on the resolution of the line) LEDs arranged in a row (thus forming the LED line) along the entire length of the photosensitive shaft. Illumination of a single line in the LED printer occurs simultaneously: at the command of the controller, those LEDs under which the image point should appear on the photosensitive shaft, flash, the others do not. Rows of dots during rotation of the photodrum also form an electrostatic image on it, which then manifests itself in toner and is transferred to the paper, where it is fixed - exactly as described above for laser printing.
The print quality obtained by printers using these two technologies is almost identical and the prints themselves have the same consumer properties. In future posts, I will talk about the huge advantages of LED technology.
Consider the printing process in more detail (for example, Oka LED printers)
1. Paper feed
This is where the printing process begins. Paper is fed from the printer tray using the feed roll. It is pressed against the stack of paper and, rotating, begins to move the top of the stack towards the printer mechanism. The top sheet is separated from the rest of the pack with the help of the so-called. brake pad, also called the separator, which stops the movement of all other sheets, feeding only one to the printer. Moving further, the sheet falls under the registration roller, where its leading edge is aligned. This is done due to a small delay in the rotation of this clip, when the paper fed continuously from the tray is somewhat “hunched” in front of it, until it rotates. When it starts spinning, it captures the front edge entirely and the paper is sold into the printer smoothly.
2. Charging Fotoval
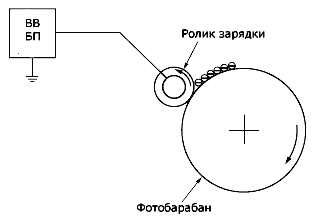
Simultaneously with the feeding of paper, the charging of the photosensitive shaft (photodrum) begins. Charging is performed using the Charge Roller, which is supplied with a constant negative potential from the High Voltage Power Supply (VVBP). The surface of the photosensitive shaft receives a constant negative charge along the entire length of the shaft. It should be noted that it was the process of charging the fotovala that was traditionally accompanied by the active release of ozone. This happened because instead of the charging roller, the coronator was previously used - a thin thread through which a high voltage current passed, creating a corona discharge (hence the name “coronator” or “corotron”), creating a charge on the photodrum. In parallel with the charge of the photodrum, the coronator thread ionized the air, causing the oxygen molecules to split, forming ozone in large quantities. Useful in small doses, in large doses it is detrimental to health, leading to dizziness and fatigue. Today, in almost all printers, the coronator is replaced by a charging roller, during operation of which no ozone is formed.
3. Highlights
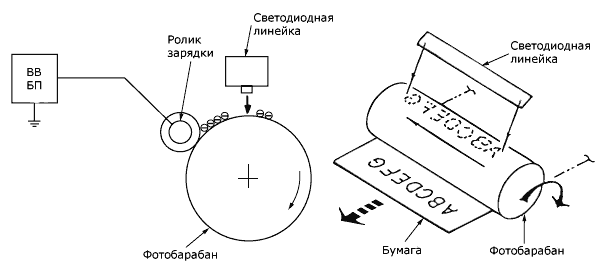
The LED ruler (or in the case of laser printers — a laser beam scanning along the length of the fototal) illuminates the negatively charged surface of the photodrum. The places that should be illuminated on the drum unit are determined by the imaging controller. In those places where the light beam falls, the negative charge is removed, becoming zero. Thereby an electrostatic image of the future print is created on the surface of the photodrum.
4. Development
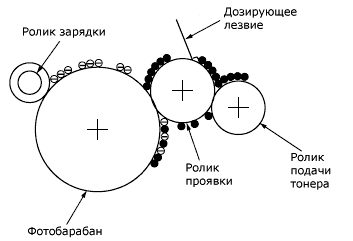
A negatively charged toner feed roller gives the toner a negative charge and feeds it to the development roller. The dosing blade distributes it on this roller with a thin even layer. After that, the toner comes into contact with the photodrum and is attracted to it in those places where the negative charge was removed by exposure. Thereby the electrostatic (invisible) image is transformed into the visible (manifested). The toner attracted to the drum unit moves further on until it comes in contact with the paper.
5. Transfer
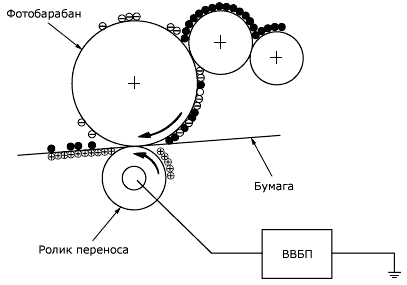
At the point of contact of the photodrum with the paper, under the paper is another video clip called the transfer roller. A positive charge is supplied to it, which it reports to the paper with which it contacts. Toner particles, having come into contact with positively charged paper, are pulled over it and held onto the surface by electrostatics. If at this moment you look at the paper, a completely finished image will be formed on it, which, however, can be easily destroyed by swiping it with your finger: the image consists of toner powder attracted to the paper, nothing other than electrostatics is kept on paper. To obtain the final print image must be fixed.
6. Fastening
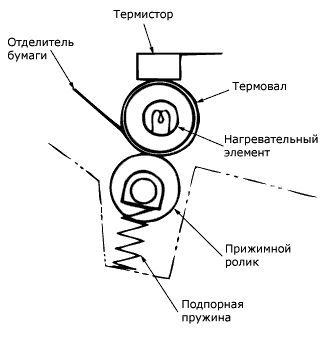
The image is fixed by heating and pressure. This process takes place in the stove (fuser). It consists of two shafts - the upper shaft, inside of which there is a heating element (usually a halogen lamp), called a thermal shaft and a lower shaft (pressure roller), which presses the paper to the upper one due to a retaining spring. Thermal sensor (thermistor) monitors temperature. When the paper is heated, the toner attracted to it melts and squeezes in liquid form into the paper texture. Coming out of the stove, the toner quickly hardens, which creates a permanent image that is resistant to external influences. So that the paper on which the toner is applied does not stick to the thermowal, the paper separators are made on it. It should be noted that thermals - not the only implementation of the heater. An alternative is a stove that uses thermofilm: a special flexible material with heating elements in its structure. The advantage of thermo film ovens is that they very quickly (almost immediately after turning on the printer) reach the operating temperature, while the oven with thermal fuses takes time to warm up before starting work. On the other hand, the film is more susceptible to damage if a solid object gets inside the oven.
7. Cleaning
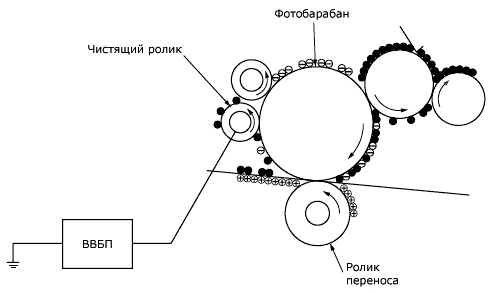
In the process of transferring, not all of the toner that was supposed to get on the paper actually gets on it. Part of the toner remains on the surface of the drum. To clean it in Oka LED printers, there is a special cleaning cycle. It runs after every 10 sheets or is forced to start manually by the user. During this cycle, the voltage is applied to a special cleaning roller (located below the charge roller). The toner is pulled over this roller and then returned to the drum unit. On its surface, it reaches the development roller, to which a positive potential is supplied to the cleaning cycle, which causes the toner to transfer to it and return to the hopper with fresh toner. This way the recycling system works, allowing you to reuse toner that did not get on the paper. I must say that this is not the most common scheme. A large number of printers do not use recycling. Instead of a cleaning roller in the cartridges of such printers, there is a cleaning blade (Cleaning Blade) that mechanically “cuts off” the remaining toner from the surface of the drum and sends them to a special collection hopper - the cavity inside the cartridge, which is insulated from the cavity where the fresh toner is located. Each of these approaches has pros and cons. The advantage of cartridges with a hopper is the fact that the toner involved in printing is always clean, free from debris that can get into it from paper. The advantage of recycling cartridges is a noticeable (up to 30%) toner savings. When using quality paper, there are no big problems with garbage, but if you save on paper, the presence of recycling will quickly lead to print quality deterioration due to toner contamination and shaft wear inside the cartridge.
Sergey Lebedev, OKI Marketing Director
The technology is based on the principle of dry electrostatic transfer, and the full official name of the technology is electrographic printing. The essence of this principle is as follows: the light source shines on the pre-charged surface of the photosensitive shaft (photodrum, photo-photo). At those places where the light has hit, the charge changes and toner is then attracted to these places. Then this toner is overtightened by electrostatics on the paper on which it enters the oven, where it is fixed, under the action of high temperature and pressure. Prints made in this way are not afraid of moisture, resistant to abrasion and fading. The quality of this image is very high.
')
The light sources used in devices with dry electrostatic transfer technology are different. In the very first devices it was the light of a lamp reflected from the original: it was in this way that analog copies were still being made. However, later a technology appeared in which the laser beam became the light source. It is clear that the printers, in which this principle of illumination of the photosensitive shaft began to be used, began to be called laser printers. The laser beam, reflected from a rapidly rotating multi-faceted mirror (prism), running across the line behind the line along the entire length of the photosensitive shaft, thereby drawing on it consistently, as it rotates, an electrostatic image. On the lighted areas then the toner is attracted. Rotating further, the photosensitive drum comes in contact with the paper and due to the transfer voltage applied to the paper.
through the transfer roller, the toner is transferred onto the paper, remaining magnetized to it until the paper with toner on it enters the fusing unit (stove), where the toner is fused into the paper, thereby creating a finished print. An alternative light source that illuminates the drum unit in a modern printer is the LED strip. It consists of many (from 2.5 to 10 thousand pieces, depending on the resolution of the line) LEDs arranged in a row (thus forming the LED line) along the entire length of the photosensitive shaft. Illumination of a single line in the LED printer occurs simultaneously: at the command of the controller, those LEDs under which the image point should appear on the photosensitive shaft, flash, the others do not. Rows of dots during rotation of the photodrum also form an electrostatic image on it, which then manifests itself in toner and is transferred to the paper, where it is fixed - exactly as described above for laser printing.
The print quality obtained by printers using these two technologies is almost identical and the prints themselves have the same consumer properties. In future posts, I will talk about the huge advantages of LED technology.
Consider the printing process in more detail (for example, Oka LED printers)
1. Paper feed
This is where the printing process begins. Paper is fed from the printer tray using the feed roll. It is pressed against the stack of paper and, rotating, begins to move the top of the stack towards the printer mechanism. The top sheet is separated from the rest of the pack with the help of the so-called. brake pad, also called the separator, which stops the movement of all other sheets, feeding only one to the printer. Moving further, the sheet falls under the registration roller, where its leading edge is aligned. This is done due to a small delay in the rotation of this clip, when the paper fed continuously from the tray is somewhat “hunched” in front of it, until it rotates. When it starts spinning, it captures the front edge entirely and the paper is sold into the printer smoothly.
2. Charging Fotoval
Simultaneously with the feeding of paper, the charging of the photosensitive shaft (photodrum) begins. Charging is performed using the Charge Roller, which is supplied with a constant negative potential from the High Voltage Power Supply (VVBP). The surface of the photosensitive shaft receives a constant negative charge along the entire length of the shaft. It should be noted that it was the process of charging the fotovala that was traditionally accompanied by the active release of ozone. This happened because instead of the charging roller, the coronator was previously used - a thin thread through which a high voltage current passed, creating a corona discharge (hence the name “coronator” or “corotron”), creating a charge on the photodrum. In parallel with the charge of the photodrum, the coronator thread ionized the air, causing the oxygen molecules to split, forming ozone in large quantities. Useful in small doses, in large doses it is detrimental to health, leading to dizziness and fatigue. Today, in almost all printers, the coronator is replaced by a charging roller, during operation of which no ozone is formed.
3. Highlights
The LED ruler (or in the case of laser printers — a laser beam scanning along the length of the fototal) illuminates the negatively charged surface of the photodrum. The places that should be illuminated on the drum unit are determined by the imaging controller. In those places where the light beam falls, the negative charge is removed, becoming zero. Thereby an electrostatic image of the future print is created on the surface of the photodrum.
4. Development
A negatively charged toner feed roller gives the toner a negative charge and feeds it to the development roller. The dosing blade distributes it on this roller with a thin even layer. After that, the toner comes into contact with the photodrum and is attracted to it in those places where the negative charge was removed by exposure. Thereby the electrostatic (invisible) image is transformed into the visible (manifested). The toner attracted to the drum unit moves further on until it comes in contact with the paper.
5. Transfer
At the point of contact of the photodrum with the paper, under the paper is another video clip called the transfer roller. A positive charge is supplied to it, which it reports to the paper with which it contacts. Toner particles, having come into contact with positively charged paper, are pulled over it and held onto the surface by electrostatics. If at this moment you look at the paper, a completely finished image will be formed on it, which, however, can be easily destroyed by swiping it with your finger: the image consists of toner powder attracted to the paper, nothing other than electrostatics is kept on paper. To obtain the final print image must be fixed.
6. Fastening
The image is fixed by heating and pressure. This process takes place in the stove (fuser). It consists of two shafts - the upper shaft, inside of which there is a heating element (usually a halogen lamp), called a thermal shaft and a lower shaft (pressure roller), which presses the paper to the upper one due to a retaining spring. Thermal sensor (thermistor) monitors temperature. When the paper is heated, the toner attracted to it melts and squeezes in liquid form into the paper texture. Coming out of the stove, the toner quickly hardens, which creates a permanent image that is resistant to external influences. So that the paper on which the toner is applied does not stick to the thermowal, the paper separators are made on it. It should be noted that thermals - not the only implementation of the heater. An alternative is a stove that uses thermofilm: a special flexible material with heating elements in its structure. The advantage of thermo film ovens is that they very quickly (almost immediately after turning on the printer) reach the operating temperature, while the oven with thermal fuses takes time to warm up before starting work. On the other hand, the film is more susceptible to damage if a solid object gets inside the oven.
7. Cleaning
In the process of transferring, not all of the toner that was supposed to get on the paper actually gets on it. Part of the toner remains on the surface of the drum. To clean it in Oka LED printers, there is a special cleaning cycle. It runs after every 10 sheets or is forced to start manually by the user. During this cycle, the voltage is applied to a special cleaning roller (located below the charge roller). The toner is pulled over this roller and then returned to the drum unit. On its surface, it reaches the development roller, to which a positive potential is supplied to the cleaning cycle, which causes the toner to transfer to it and return to the hopper with fresh toner. This way the recycling system works, allowing you to reuse toner that did not get on the paper. I must say that this is not the most common scheme. A large number of printers do not use recycling. Instead of a cleaning roller in the cartridges of such printers, there is a cleaning blade (Cleaning Blade) that mechanically “cuts off” the remaining toner from the surface of the drum and sends them to a special collection hopper - the cavity inside the cartridge, which is insulated from the cavity where the fresh toner is located. Each of these approaches has pros and cons. The advantage of cartridges with a hopper is the fact that the toner involved in printing is always clean, free from debris that can get into it from paper. The advantage of recycling cartridges is a noticeable (up to 30%) toner savings. When using quality paper, there are no big problems with garbage, but if you save on paper, the presence of recycling will quickly lead to print quality deterioration due to toner contamination and shaft wear inside the cartridge.
Sergey Lebedev, OKI Marketing Director
Source: https://habr.com/ru/post/158801/
All Articles