Web development on node.js and express. Chapter 2 - Testing the Application
Less than six months later I finally got to writing the second chapter of the textbook. I also reworked the first chapter a little, taking into account the wishes of the habragers, so you can review it again - Web development on node.js and express. We study node.js in practice
In this chapter we will begin to develop our application, which we will use as an example throughout the tutorial, and begin with the simplest, namely the static pages. We will also learn about testing applications on node.js and the tools that are used for this.
')
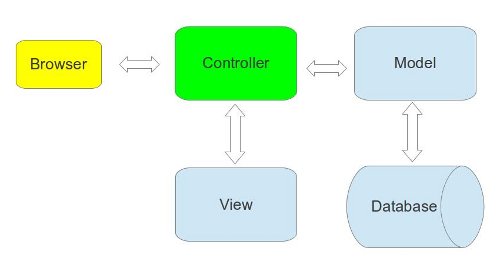
Before embarking on the actual development of the application, it is useful to talk about what constitutes the typical architecture of a web application at the highest level of abstraction. The most popular architectural pattern for today is the model-view-controller (MVC), the general meaning of the pattern is to separate the business logic of the application (it is tied to the models) and the view. In addition, the models implement an interface to the database. The controller plays a mediating role between the model and the view. In the case of a web application, it looks like this: the user's browser sends a request to the server, the controller processes the request, receives the necessary data from the model and sends it to the view. View receives data from the controller and turns it into a beautiful HTML page that the controller eventually sends to the user.
It's time to start developing our demo application. In the first chapter, we have already deployed a test application, but used the express generator and did not write a single line of code. Now we will write our application ourselves and start with “Hello, World”.
What is npm? It's simple, this is a node package manager (although the authors dispute this). In general, the npm package is the directory containing the program and the package.json file describing this program, including in this file you can specify from which other packages our program depends, read the description of package.json .
In order to use all the charms that npm can give us, we will create a file in the root directory of our project:
package.json:
Now you can run
As a result, npm will create a node_modules directory in which it will place all the modules on which our project depends.
The main file is server.js:
server.js:
Immediately determine the terminology and analyze this code. Our application will be an
In order to admire the result of our work, there are two ways:
or
The second method is available because we added the appropriate line to the configuration file package.json in the “scripts” section.
Now at http: // localhost: 3000 / you can get the line 'Hello, World!'.
It's time to upload something to GitHub. Create a new repository on GitHub with the name node-demo-app and execute the following set of commands in the project directory, first create the README.md file (good tone rule)
Create a .gitignore file in order not to commit extra files in git, namely the node_modules directory:
Maybe someone read the Mikeal Rogers article and would like to argue against adding node_modules to .gitignore. For those who are too lazy to read, in the projects on node.js this approach is recommended:
But! We use Heroku as the hosting and the deployment method is not selected, and there the node.js projects are deployed using npm, so we will not trash the repository.
Create a repository, commit and upload everything on GitHub:
Express does not yet dictate a strict structure for the application files, so we will invent our own. I suggest this option:
No one forces you to stick to just this kind of file layout, but it seems convenient to me, so just remember this picture and as we move through the tutorial we will create the necessary files and directories.
What is TDD and why you need to write tests have probably already been heard, and if not, you can read about it here . In this tutorial, we’ll use an approach called BDD (behavior-driven development) to test the application. In tests, we will describe the intended behavior of the application. The tests themselves will be divided into two categories: integration tests - they will simulate user behavior and test the entire system, and unit tests - to test individual application modules.
As frameworks for writing tests, we will use the mocha libraries (read like mocha, coffee mocha :)), should.js , and supertest . Mocha is used to organize test case descriptions, should.js provides the syntax for performing various checks, and supertest is an add-on for a simple http client that allows you to check the results of http requests. To connect libraries we will make the necessary changes in package.json
We placed the dependencies in the “devDependencies” section, since there is no need to drag these libraries to the production server. To install the libraries run
In order to understand how this works, we will try to create our first test and run it through our framework.
In test.js we put such a test
and run it
It is quite natural that such a test will pass, so replace it with something that does not work.
run
and we see that the tests did not pass, we will have to repair the code, add the variable declaration
run
and see that the code is working.
The basic principle of TDD is to write tests before writing the code, so we can make sure that the tests really test something, and not just run the code and do tests in the style of true.should.be. true That is, the development process is as follows:
And so many times.
To simplify the test run, add a task test runner to the Makefile
Makefile Content:
Traditionally, make was used to build a project, but it is convenient to use it and, in general, to automate routine tasks. Read about using the Makefile here . I draw attention to the fact that the indents after the title of task should be made tabs, not spaces.
Now you can run the test suite with the command:
Let's try to test http requests. In order to make testing more convenient, we will conduct a small code refactoring and move the express application from the server.js file to a separate app / main.js module, and also create an app.js file that will export this module. Now it may not seem appropriate, but this way of organizing the code will come in handy when we check the code coverage with tests.
app / main.js:
app.js:
server.js is replaced by
In order to understand how the node.js modules work, as well as what
In order to verify the correctness of the http request, we will write the following code in test.js
In this test, we verify that the server responds with the “Hello, Express!” Line. Since the server responds with “Hello, World!” Instead, the test will drop. An important point that you need to pay attention to, requests to the http server occur asynchronously, so we will need to assign a callback to complete the test. Mocha provides this feature using the done function, which can optionally be passed to a function with a test case. In order for the test to pass, you need to replace the “Hello, World!” Line with “Hello, Express!” In the app / main.js file and run
In principle, this paragraph can be skipped, since it does not affect the process of writing a test application, but a report on the coverage of code with tests will be a nice addition to our test suite.
To find out how completely our code is covered with tests, we need another tool, it is called jscoverage . It should be compiled. So if you have not yet installed the compiler, you should put it:
Then install jscoverage:
Return to the project directory:
We will need to make some changes to the Makefile and app.js in order to be able to generate coverage reports.
Makefile:
app.js:
We added the test-cov task to the Makefile so that now to generate the report coverage.js, it suffices to run
We generate the report:
A coverage.html file should appear, which can be opened in a browser.
It remains to add app-cov and coverage.html to .gitignore:
We have dealt with the tests, so we remove the test test.
And we commit
The source code of the demo application can be obtained here: github.com/DavidKlassen/node-demo-app
On the approach of the third chapter, in it we will write a full-fledged controller for the pages of the site and deal with the standardization of express.
Chapter 2. Demo application and first tests
In this chapter we will begin to develop our application, which we will use as an example throughout the tutorial, and begin with the simplest, namely the static pages. We will also learn about testing applications on node.js and the tools that are used for this.
2.1 Model-View-Controller (MVC)
')
Before embarking on the actual development of the application, it is useful to talk about what constitutes the typical architecture of a web application at the highest level of abstraction. The most popular architectural pattern for today is the model-view-controller (MVC), the general meaning of the pattern is to separate the business logic of the application (it is tied to the models) and the view. In addition, the models implement an interface to the database. The controller plays a mediating role between the model and the view. In the case of a web application, it looks like this: the user's browser sends a request to the server, the controller processes the request, receives the necessary data from the model and sends it to the view. View receives data from the controller and turns it into a beautiful HTML page that the controller eventually sends to the user.
2.2 Demo application
It's time to start developing our demo application. In the first chapter, we have already deployed a test application, but used the express generator and did not write a single line of code. Now we will write our application ourselves and start with “Hello, World”.
$ cd ~/projects/node-tutorial $ mkdir node-demo-app $ cd node-demo-app 2.2.1 npm packages
What is npm? It's simple, this is a node package manager (although the authors dispute this). In general, the npm package is the directory containing the program and the package.json file describing this program, including in this file you can specify from which other packages our program depends, read the description of package.json .
In order to use all the charms that npm can give us, we will create a file in the root directory of our project:
$ touch package.json package.json:
{ "name": "node-demo-app" , "version": "0.0.1" , "scripts": { "start": "node server.js" } , "dependencies": { "express": "3.0.x" } } Now you can run
$ npm install As a result, npm will create a node_modules directory in which it will place all the modules on which our project depends.
2.2.2 Hello, World!
The main file is server.js:
$ touch server.js server.js:
var express = require('express') , app = express() , port = process.env.PORT || 3000 app.get('/', function (req, res) { res.send('Hello, World!') }) app.listen(port, function () { console.log('Listening on port ', port) }) Immediately determine the terminology and analyze this code. Our application will be an
app object, the function call app.get mounts the action (action), which in this case performs an anonymous function, to the route (route) '/'. In fact, this means that every time an http GET / request is received, the application will execute the specified action. The variable port in this example is initialized by the environment variable PORT if it exists, and if there is no such variable, it takes the value 3000. app.listen starts the http server on the specified port and starts listening to incoming requests.In order to admire the result of our work, there are two ways:
$ node server.js or
$ npm start The second method is available because we added the appropriate line to the configuration file package.json in the “scripts” section.
Now at http: // localhost: 3000 / you can get the line 'Hello, World!'.
It's time to upload something to GitHub. Create a new repository on GitHub with the name node-demo-app and execute the following set of commands in the project directory, first create the README.md file (good tone rule)
$ echo '# Node.js demo app' > README.md Create a .gitignore file in order not to commit extra files in git, namely the node_modules directory:
$ echo 'node_modules' > .gitignore Maybe someone read the Mikeal Rogers article and would like to argue against adding node_modules to .gitignore. For those who are too lazy to read, in the projects on node.js this approach is recommended:
- For projects that we deploy , such as web applications, node_modules are placed in the repository.
- For libraries and other reusable code, node_modules are not added to the repository.
- For deployment to production npm is not used.
But! We use Heroku as the hosting and the deployment method is not selected, and there the node.js projects are deployed using npm, so we will not trash the repository.
Create a repository, commit and upload everything on GitHub:
$ git init $ git add . $ git commit -m 'Hello, World' $ git remote add origin git@github.com:<username>/node-demo-app.git $ git push -u origin master 2.2.3 Application structure
Express does not yet dictate a strict structure for the application files, so we will invent our own. I suggest this option:
/node-demo-app |- /app | |- /controllers - | |- /models - | |- /views - html | |- config.js - | |- main.js - |- /public - - , , .. |- /tests - |- app.js - |- server.js - http No one forces you to stick to just this kind of file layout, but it seems convenient to me, so just remember this picture and as we move through the tutorial we will create the necessary files and directories.
2.3 Testing the application
What is TDD and why you need to write tests have probably already been heard, and if not, you can read about it here . In this tutorial, we’ll use an approach called BDD (behavior-driven development) to test the application. In tests, we will describe the intended behavior of the application. The tests themselves will be divided into two categories: integration tests - they will simulate user behavior and test the entire system, and unit tests - to test individual application modules.
2.3.1 Automatic tests
As frameworks for writing tests, we will use the mocha libraries (read like mocha, coffee mocha :)), should.js , and supertest . Mocha is used to organize test case descriptions, should.js provides the syntax for performing various checks, and supertest is an add-on for a simple http client that allows you to check the results of http requests. To connect libraries we will make the necessary changes in package.json
{ "name": "node-demo-app" , "version": "0.0.1" , "scripts": { "start": "node server.js" } , "dependencies": { "express": "3.0.x" } , "devDependencies": { "mocha": "1.7.0" , "should": "1.2.1" , "supertest": "0.4.0" } } We placed the dependencies in the “devDependencies” section, since there is no need to drag these libraries to the production server. To install the libraries run
$ npm install In order to understand how this works, we will try to create our first test and run it through our framework.
$ mkdir tests $ touch tests/test.js In test.js we put such a test
describe('Truth', function () { it('should be true', function () { true.should.be.true }) it('should not be false', function () { true.should.not.be.false }) }) and run it
$ ./node_modules/.bin/mocha --require should --reporter spec tests/test.js It is quite natural that such a test will pass, so replace it with something that does not work.
describe('foo variable', function () { it('should equal bar', function () { foo.should.equal('bar') }) }) run
$ ./node_modules/.bin/mocha --require should --reporter spec tests and we see that the tests did not pass, we will have to repair the code, add the variable declaration
var foo = 'bar' describe('foo variable', function () { it('should equal bar', function () { foo.should.equal('bar') }) }) run
$ ./node_modules/.bin/mocha --require should --reporter spec tests/test.js and see that the code is working.
The basic principle of TDD is to write tests before writing the code, so we can make sure that the tests really test something, and not just run the code and do tests in the style of true.should.be. true That is, the development process is as follows:
- We write a test
- Perform a test and make sure that it falls.
- Write the code
- We carry out the test and make sure that it passes, if not, we return to step 3
And so many times.
To simplify the test run, add a task test runner to the Makefile
$ touch Makefile Makefile Content:
REPORTER=spec TESTS=$(shell find ./tests -type f -name "*.js") test: @NODE_ENV=test ./node_modules/.bin/mocha \ --require should \ --reporter $(REPORTER) \ $(TESTS) .PHONY: test Traditionally, make was used to build a project, but it is convenient to use it and, in general, to automate routine tasks. Read about using the Makefile here . I draw attention to the fact that the indents after the title of task should be made tabs, not spaces.
Now you can run the test suite with the command:
$ make test Let's try to test http requests. In order to make testing more convenient, we will conduct a small code refactoring and move the express application from the server.js file to a separate app / main.js module, and also create an app.js file that will export this module. Now it may not seem appropriate, but this way of organizing the code will come in handy when we check the code coverage with tests.
$ mkdir app $ touch app/main.js app / main.js:
var express = require('express') , app = express() app.get('/', function (req, res) { res.send('Hello, World!') }) module.exports = app $ touch app.js app.js:
module.exports = require(__dirname + '/app/main') server.js is replaced by
var app = require(__dirname + '/app') , port = process.env.PORT || 3000 app.listen(port, function () { console.log('Listening on port ', port) }) In order to understand how the node.js modules work, as well as what
require and module.exports read the documentation.In order to verify the correctness of the http request, we will write the following code in test.js
var request = require('supertest') , app = require(__dirname + '/../app') describe('GET /', function () { it('should contain text "Hello, Express!"', function (done) { request(app) .get('/') .expect(/Hello, Express!/, done) }) }) In this test, we verify that the server responds with the “Hello, Express!” Line. Since the server responds with “Hello, World!” Instead, the test will drop. An important point that you need to pay attention to, requests to the http server occur asynchronously, so we will need to assign a callback to complete the test. Mocha provides this feature using the done function, which can optionally be passed to a function with a test case. In order for the test to pass, you need to replace the “Hello, World!” Line with “Hello, Express!” In the app / main.js file and run
make test .2.3.2 Code Coverage Tests
In principle, this paragraph can be skipped, since it does not affect the process of writing a test application, but a report on the coverage of code with tests will be a nice addition to our test suite.
To find out how completely our code is covered with tests, we need another tool, it is called jscoverage . It should be compiled. So if you have not yet installed the compiler, you should put it:
$ sudo apt-get install g++ Then install jscoverage:
$ cd /tmp $ git clone git://github.com/visionmedia/node-jscoverage.git $ cd node-jscoverage $ ./configure && make $ sudo make install Return to the project directory:
$ cd ~/projects/node-tutorial/node-demo-app/ We will need to make some changes to the Makefile and app.js in order to be able to generate coverage reports.
Makefile:
REPORTER=spec TESTS=$(shell find ./tests -type f -name "*.js") test: @NODE_ENV=test ./node_modules/.bin/mocha \ --require should \ --reporter $(REPORTER) \ $(TESTS) test-cov: app-cov @APP_COV=1 $(MAKE) --quiet test REPORTER=html-cov > coverage.html app-cov: @jscoverage app app-cov .PHONY: test app.js:
module.exports = process.env.APP_COV ? require(__dirname + '/app-cov/main') : require(__dirname + '/app/main') We added the test-cov task to the Makefile so that now to generate the report coverage.js, it suffices to run
make test-cov . The changes in app.js are due to the fact that the report is generated using an instrumented copy of the application that jscoverage generates. That is, we check the APP_COV environment APP_COV and if it is installed, load the application from the / app-cov directory, and if not, we take the regular version from / app.We generate the report:
$ make test-cov A coverage.html file should appear, which can be opened in a browser.
It remains to add app-cov and coverage.html to .gitignore:
$ echo 'app-cov' >> .gitignore $ echo 'coverage.html' >> .gitignore We have dealt with the tests, so we remove the test test.
$ rm tests/test.js And we commit
$ git add . $ git ci -m "Added testing framework" $ git push The source code of the demo application can be obtained here: github.com/DavidKlassen/node-demo-app
On the approach of the third chapter, in it we will write a full-fledged controller for the pages of the site and deal with the standardization of express.
Source: https://habr.com/ru/post/158185/
All Articles