Project RetroGSM, or how to surprise your grandmother
First look at the teaser:
(if suddenly Vimeo refuses to work, link)
“First was the idea,” as the forgotten file says in a text editor. Indeed, the idea was. It was studied, thought over, and then - r-time - and something similar was found already implemented on one American site. However, this did not prevent its implementation, but in some ways even simplified it.

The unspoken laws of the Pin-Up genre required that the "main" should be demonstrated only by hint, and not directly.
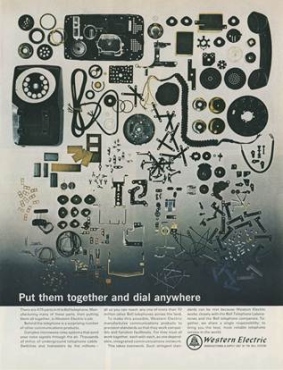
Western Electric advertises its telephones. “Put it together and call it anywhere.”
It all started a long time ago, when half-naked girls in stockings just started to appear in advertising, and the word reliability was often mentioned in telephone advertising. These devices, with their only function, changed the culture, becoming quite romantic witnesses of the era.
So, to remind her, I decided to make a phone. It would seem that in this such? And, most importantly, why do this, another bike? However, we will leave these questions for later.
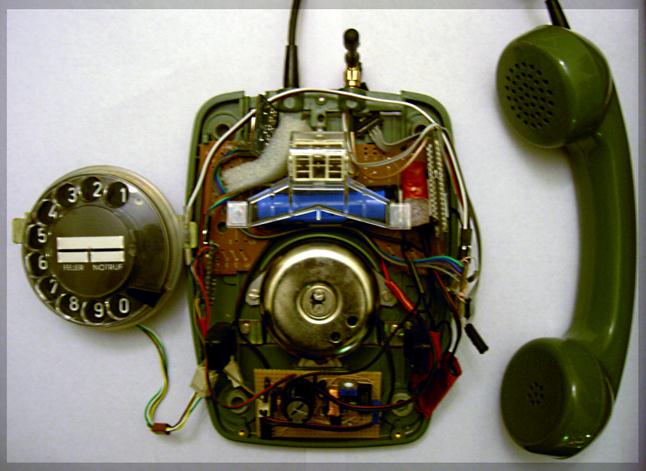
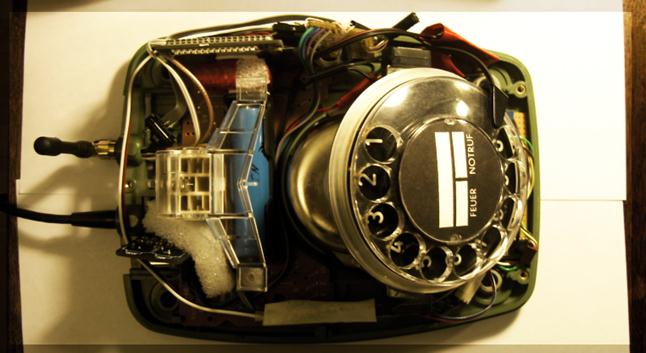
Many people who decide to make a device face the problem of the case, and often a good deal remains to lie on the table in the form of a layout, gradually dissolving into new developments, becoming a donor of parts. Or gathering dust in the closet, being little adapted for use. To prevent this, a strategic decision was made — to start with a hull selection. And since we make the phone, then the body must be appropriate. However, ordering casting on three-dimensional models is ideologically correct, but expensive in 2012, so we'll manage with a donor. As a donor, we got a telephone with a dial plate made in Poland by FeTap-611. It just so happened that he was in good condition, suitable for modification.
')
The details of the circuit were taken out of it, but the board was left on which the switch was soldered under the tube, as well as the native mechanical bell (Fig.4). The photo already shows a small fee, about it a little later.
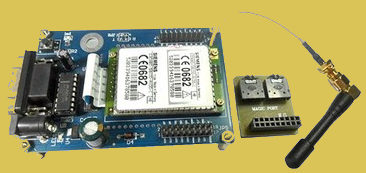
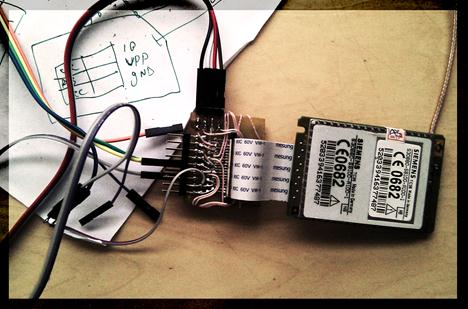
In fact, the scheme of the device is simple, but the question arose behind its heart - the module of cellular communication. The option of using the fillings of the old Siemens phone was considered, since they are controlled by simple AT-commands, but later, by the will of fate, who left me to study in Finland for six months, I got the opportunity to order goods from Ebay and wait only two weeks while having fun from joining the mail. What I just did not order ... But the main thing I received in the first place was the prototyping fee and the Siemens TC35i GSM module. In fig. 5 shows a general view of the board. It comes bundled with an antenna and a board for connecting an audio headset.
The MAX232 chip is soldered on the board for matching levels with a COM port. After trying on all this inside the phone, it became clear that I just would not get off with jumpers to the controller. I had to unplug the module, evaporate the connector of the cable, since it was not found on sale during the next trip to the Motherland. It was something with a burning textolite from an overheated soldering iron tip, but everything ended well. The second board lost all the sockets and connectors, and was soldered directly to the twisted cord of the handset. By the way, an electret microphone was installed in the phone, and there was no need to invent anything to get the desired signal level for the gsm module. The speaker also earned immediately and as it should.
To connect the connector of the cable and the controller, an attempt was first made to solder the wires directly to the contacts with a step of 0.5 mm. However, this design was not reliable. In the end, I decided to make an additional fee, the so-called breakout. After etching and soldering the main connector, I still could not figure out in advance what I would need, and that I would have to transfer the SIM card connector to the cable, and this led to some chaos from MGTF. In Figure 6 you can see how it all looked at the crucial moment of verification after assembly. The SIM card is still on the back of the breakout card.
AT ... OK!
Remember, I left a regular mechanical bell? The time has come and let it go! But how to make a 3.6 volt lithium battery with variables 25 ÷ 30 V? Thanks to SparkFun, who did it before me, and put everything in open access. A DC-DC converter was assembled on an MC34063 microcircuit with a typical switching circuit, and through long experiments with coils, resistors and capacitors, I got 30 VDC output. However, further it is necessary to make an alternating current out of this! The driver of the engine, H-bridge, L298B comes to the rescue. It is supplied with two power supplies - for the control circuit U c , and the switched voltage U comm . Two inputs, in the presence of permissive logical units, commute two outputs to + U comm or to ground. At the same time, U comm can be down to ... it is necessary to look in the specification for a specific revision.

As a frequency generator, an old good LA7 chip is used, which generates a burst of pulses with a frequency of 20-30 Hz with a duration of about 1 second with a break of about 1.5 seconds. Who wants the top five, can calculate the duty ratio. Frequency parameters are set by tuning resistors. In order that all this does not eat up the battery during idle time, the entire bell unit is connected to a signal from the controller via the field effect transistor. The whole circuit consumes about 0.4 A during a call. The capacitor is needed to smooth out the voltage drop during a call on. It is recommended to choose the frequency of the call to achieve the resonance frequency of the call itself, and then it will ring louder. The prototype board was used, since there was no iron, ferric chloride, drilling machine and textolite at hand, for obvious reasons I will not show the other side, however, the layout with copper patches connected in three holes is very convenient, although it was not done without MGTF. To think about tracing were printed sheets depicting mockup.
A small "disclaimer for srach in the comments" for those who earn money for the assembler and C. I appreciate my time, and in this case I chose the platform, God forgive me, Arduino as the controlling controller. She allowed to quickly issue a working device, and special speed here and was not required.
The redundancy of the main board was solved by ordering the Arduino-mini module, which is the most compact, carried by the Atmega328 microcontroller and has nothing superfluous. After testing the pieces of the sketch responsible for reading the controls (lifting the tube, dialing the number, communicating with the gsm module), all of this was assembled into a single sketch. In principle, there was nothing difficult here, a program method was used to suppress contact bounce. The internal pull-up resistors of the controller are enough for confident operation.
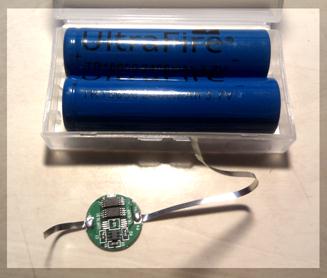
It is the most difficult stage, as it turned out. The task was to make it all mobile, respectively, on the battery. To simplify your life, a li-ion rechargeable battery without protection was ordered, as well as a holder for it (size 18650) and a protection board that disconnects the consumer when the battery voltage drops to 3 V. Despite the comments on the forum of the famous Chinese online store, were quite bearable. Later on the self-made stand I measured the capacity of the batteries, and it turned out to be no less than 90% of the promised. Maybe I'm just lucky.
There are two difficulties:
- when an incoming call, a sharply increased current cut down the protection, perhaps this is its feature, but rather a bug, and as a result, the module lost contact with the network.
- the controller ate together with the module an inadmissible 60 ÷ 100 mA. According to calculations, in this situation the battery will not last long.
The first problem was solved by including a call scheme to bypass the protection. This is not very good, but I am very tired of messing around with the choice of battery overload protection controllers. In theory, if the controller is de-energized, then it will not start the call, that is, it will not open the field effect transistor. It did not work out to simulate this situation, but soon, probably, in a week, I still wait for the battery to discharge ...
The second problem was solved by carefully reading the documentation for the gsm-module. Using the AT + CFUN = 0 command, the module is put into a sleep state. Consumption is reduced from 10 mA to 3 mA (typical values). However, he is in touch with the base station, and can wake up from an incoming call, or a built-in alarm clock. To wake up the modem, you need to put the RTS line on the ground.
The power consumption of the controller was decided by a thoughtful reading of the datasheet and an example found on the network. The controller is put into a sleep state if within 10 seconds no manipulations are made with it and the handset is placed on the device. He wakes up on a falling front on pins having an interrupt vector, one “watches” the tube lifting, the second one follows the RING line of the gsm module.
As a result, the total consumption decreased to 0.5 ÷ 1 mA in idle mode, according to my avometer. Talk time rarely rises to 100 mA, I think it is because of good network coverage.
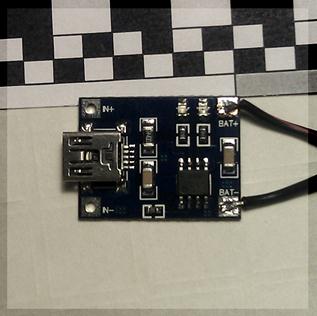
The battery is charged from the purchased module of the charger on the controller TP4056, its scheme is simple, several resistors, at the input 5 ÷ 7 V, two operation indication LEDs. To connect the power supply in the technological opening of the telephone apparatus, a male connector is arranged, which is conveniently closed with a lid.
What do we still lack? Of course, alarms that the module has successfully connected to the network and is ready to call. To do this, we connect one of the pins going to the speaker with the controller through a resistor and send a “beep” to the standard for the ATC frequency corresponding to the “ATC answer” signal at the moment of lifting the handset after passing the module registration check in the GSM network.
Also added some special features to reinitialize the modem or disconnect it from the network, if necessary. All this is done by dialing a three-digit service number. In response, the controller beeps into a special tube. sequence. If the number was dialed more than 7, then the first "8" is replaced by "+" to correctly dial the number.
It is time to collect everything in the case. The battery holder, the bell board, the module were fixed on a strong double-sided tape on foamed polyethylene. Keeps well, but washing off his glue is not the most pleasant thing.
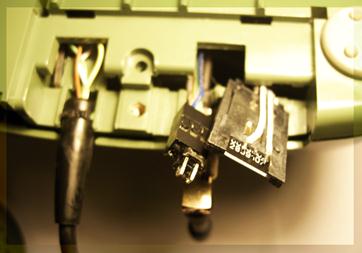
It was possible to assemble everything without an auxiliary board with dialer connectors, etc., but the wires turned out decently. Part of their number has increased due to the need to output the serial port of the controller and the module to the technological niche at the bottom of the device for diagnosing the device and updating the firmware, which also houses the SIM card connector. Bluetooth? No, thanks, that's enough for us.
Indecently rolled up with red, not blue tape - protection and battery charging boards. No, they are not heated enough to take this into account.
Solemn assembly and screwing up the last screw, and ... here, the main tool for entertainment and "trolling" passers-by and cafeteria visitors. Only the antenna gives it out, but what kind of people make their eyes when they hear a dial tone!

Finalize the service numbers of the device. Add the ability to manage the phone book, although the ability to call the numbers from the book on the SIM-card is already there. As well as the ability to dial the last number dialed. If suddenly someone ever wants to do something similar - make a printed circuit board. I beg you.
I want to say thanks:
to all those who did not send me ahead of time to the mental hospital;
Comrade Pasha, who made the first call from the next room of our apartment on Teknologiapuistonkatu; partners in the shooting of the video, “Brynze” for the once delicious pasties.
And, finally, the photo awards for those who read to the end.

(if suddenly Vimeo refuses to work, link)
“First was the idea,” as the forgotten file says in a text editor. Indeed, the idea was. It was studied, thought over, and then - r-time - and something similar was found already implemented on one American site. However, this did not prevent its implementation, but in some ways even simplified it.
The unspoken laws of the Pin-Up genre required that the "main" should be demonstrated only by hint, and not directly.
Western Electric advertises its telephones. “Put it together and call it anywhere.”
It all started a long time ago, when half-naked girls in stockings just started to appear in advertising, and the word reliability was often mentioned in telephone advertising. These devices, with their only function, changed the culture, becoming quite romantic witnesses of the era.
So, to remind her, I decided to make a phone. It would seem that in this such? And, most importantly, why do this, another bike? However, we will leave these questions for later.
Making a rich inner world, or - body
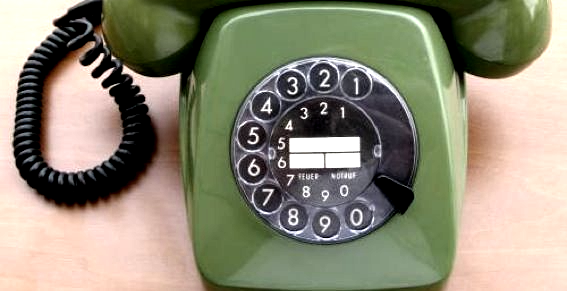
Many people who decide to make a device face the problem of the case, and often a good deal remains to lie on the table in the form of a layout, gradually dissolving into new developments, becoming a donor of parts. Or gathering dust in the closet, being little adapted for use. To prevent this, a strategic decision was made — to start with a hull selection. And since we make the phone, then the body must be appropriate. However, ordering casting on three-dimensional models is ideologically correct, but expensive in 2012, so we'll manage with a donor. As a donor, we got a telephone with a dial plate made in Poland by FeTap-611. It just so happened that he was in good condition, suitable for modification.
')
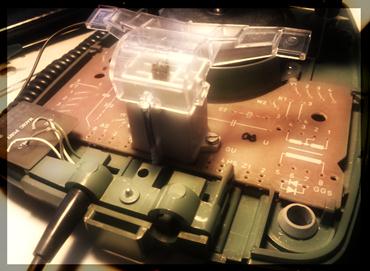
The details of the circuit were taken out of it, but the board was left on which the switch was soldered under the tube, as well as the native mechanical bell (Fig.4). The photo already shows a small fee, about it a little later.
Heart module
In fact, the scheme of the device is simple, but the question arose behind its heart - the module of cellular communication. The option of using the fillings of the old Siemens phone was considered, since they are controlled by simple AT-commands, but later, by the will of fate, who left me to study in Finland for six months, I got the opportunity to order goods from Ebay and wait only two weeks while having fun from joining the mail. What I just did not order ... But the main thing I received in the first place was the prototyping fee and the Siemens TC35i GSM module. In fig. 5 shows a general view of the board. It comes bundled with an antenna and a board for connecting an audio headset.
The MAX232 chip is soldered on the board for matching levels with a COM port. After trying on all this inside the phone, it became clear that I just would not get off with jumpers to the controller. I had to unplug the module, evaporate the connector of the cable, since it was not found on sale during the next trip to the Motherland. It was something with a burning textolite from an overheated soldering iron tip, but everything ended well. The second board lost all the sockets and connectors, and was soldered directly to the twisted cord of the handset. By the way, an electret microphone was installed in the phone, and there was no need to invent anything to get the desired signal level for the gsm module. The speaker also earned immediately and as it should.
To connect the connector of the cable and the controller, an attempt was first made to solder the wires directly to the contacts with a step of 0.5 mm. However, this design was not reliable. In the end, I decided to make an additional fee, the so-called breakout. After etching and soldering the main connector, I still could not figure out in advance what I would need, and that I would have to transfer the SIM card connector to the cable, and this led to some chaos from MGTF. In Figure 6 you can see how it all looked at the crucial moment of verification after assembly. The SIM card is still on the back of the breakout card.
AT ... OK!
Call
Remember, I left a regular mechanical bell? The time has come and let it go! But how to make a 3.6 volt lithium battery with variables 25 ÷ 30 V? Thanks to SparkFun, who did it before me, and put everything in open access. A DC-DC converter was assembled on an MC34063 microcircuit with a typical switching circuit, and through long experiments with coils, resistors and capacitors, I got 30 VDC output. However, further it is necessary to make an alternating current out of this! The driver of the engine, H-bridge, L298B comes to the rescue. It is supplied with two power supplies - for the control circuit U c , and the switched voltage U comm . Two inputs, in the presence of permissive logical units, commute two outputs to + U comm or to ground. At the same time, U comm can be down to ... it is necessary to look in the specification for a specific revision.
As a frequency generator, an old good LA7 chip is used, which generates a burst of pulses with a frequency of 20-30 Hz with a duration of about 1 second with a break of about 1.5 seconds. Who wants the top five, can calculate the duty ratio. Frequency parameters are set by tuning resistors. In order that all this does not eat up the battery during idle time, the entire bell unit is connected to a signal from the controller via the field effect transistor. The whole circuit consumes about 0.4 A during a call. The capacitor is needed to smooth out the voltage drop during a call on. It is recommended to choose the frequency of the call to achieve the resonance frequency of the call itself, and then it will ring louder. The prototype board was used, since there was no iron, ferric chloride, drilling machine and textolite at hand, for obvious reasons I will not show the other side, however, the layout with copper patches connected in three holes is very convenient, although it was not done without MGTF. To think about tracing were printed sheets depicting mockup.
Controller
A small "disclaimer for srach in the comments" for those who earn money for the assembler and C. I appreciate my time, and in this case I chose the platform, God forgive me, Arduino as the controlling controller. She allowed to quickly issue a working device, and special speed here and was not required.
The redundancy of the main board was solved by ordering the Arduino-mini module, which is the most compact, carried by the Atmega328 microcontroller and has nothing superfluous. After testing the pieces of the sketch responsible for reading the controls (lifting the tube, dialing the number, communicating with the gsm module), all of this was assembled into a single sketch. In principle, there was nothing difficult here, a program method was used to suppress contact bounce. The internal pull-up resistors of the controller are enough for confident operation.
Nutrition
It is the most difficult stage, as it turned out. The task was to make it all mobile, respectively, on the battery. To simplify your life, a li-ion rechargeable battery without protection was ordered, as well as a holder for it (size 18650) and a protection board that disconnects the consumer when the battery voltage drops to 3 V. Despite the comments on the forum of the famous Chinese online store, were quite bearable. Later on the self-made stand I measured the capacity of the batteries, and it turned out to be no less than 90% of the promised. Maybe I'm just lucky.
There are two difficulties:
- when an incoming call, a sharply increased current cut down the protection, perhaps this is its feature, but rather a bug, and as a result, the module lost contact with the network.
- the controller ate together with the module an inadmissible 60 ÷ 100 mA. According to calculations, in this situation the battery will not last long.
The first problem was solved by including a call scheme to bypass the protection. This is not very good, but I am very tired of messing around with the choice of battery overload protection controllers. In theory, if the controller is de-energized, then it will not start the call, that is, it will not open the field effect transistor. It did not work out to simulate this situation, but soon, probably, in a week, I still wait for the battery to discharge ...
The second problem was solved by carefully reading the documentation for the gsm-module. Using the AT + CFUN = 0 command, the module is put into a sleep state. Consumption is reduced from 10 mA to 3 mA (typical values). However, he is in touch with the base station, and can wake up from an incoming call, or a built-in alarm clock. To wake up the modem, you need to put the RTS line on the ground.
The power consumption of the controller was decided by a thoughtful reading of the datasheet and an example found on the network. The controller is put into a sleep state if within 10 seconds no manipulations are made with it and the handset is placed on the device. He wakes up on a falling front on pins having an interrupt vector, one “watches” the tube lifting, the second one follows the RING line of the gsm module.
As a result, the total consumption decreased to 0.5 ÷ 1 mA in idle mode, according to my avometer. Talk time rarely rises to 100 mA, I think it is because of good network coverage.
The battery is charged from the purchased module of the charger on the controller TP4056, its scheme is simple, several resistors, at the input 5 ÷ 7 V, two operation indication LEDs. To connect the power supply in the technological opening of the telephone apparatus, a male connector is arranged, which is conveniently closed with a lid.
Cloudberries for dessert
What do we still lack? Of course, alarms that the module has successfully connected to the network and is ready to call. To do this, we connect one of the pins going to the speaker with the controller through a resistor and send a “beep” to the standard for the ATC frequency corresponding to the “ATC answer” signal at the moment of lifting the handset after passing the module registration check in the GSM network.
Also added some special features to reinitialize the modem or disconnect it from the network, if necessary. All this is done by dialing a three-digit service number. In response, the controller beeps into a special tube. sequence. If the number was dialed more than 7, then the first "8" is replaced by "+" to correctly dial the number.
Assembly
It is time to collect everything in the case. The battery holder, the bell board, the module were fixed on a strong double-sided tape on foamed polyethylene. Keeps well, but washing off his glue is not the most pleasant thing.
It was possible to assemble everything without an auxiliary board with dialer connectors, etc., but the wires turned out decently. Part of their number has increased due to the need to output the serial port of the controller and the module to the technological niche at the bottom of the device for diagnosing the device and updating the firmware, which also houses the SIM card connector. Bluetooth? No, thanks, that's enough for us.
Indecently rolled up with red, not blue tape - protection and battery charging boards. No, they are not heated enough to take this into account.
Solemn assembly and screwing up the last screw, and ... here, the main tool for entertainment and "trolling" passers-by and cafeteria visitors. Only the antenna gives it out, but what kind of people make their eyes when they hear a dial tone!
Project Characteristics
expand
The cost of parts was about 3000 rubles.
It was unknown how long it took, but you can make it a month on weekends, if you do not meet a special rake and buy everything in advance.
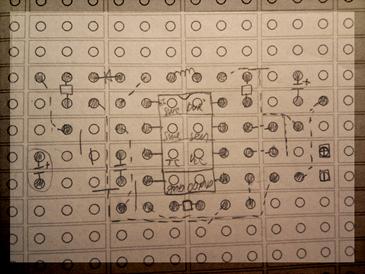
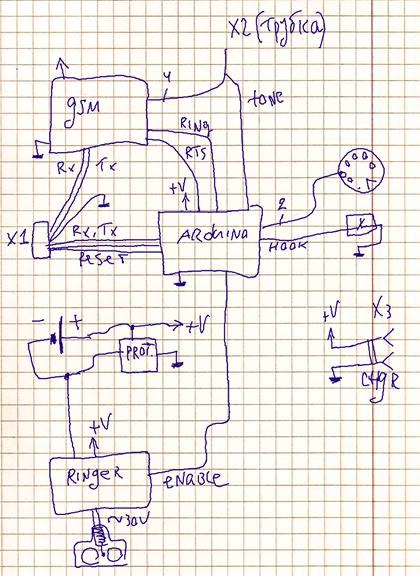
Block diagram of the device stuffing:
It was unknown how long it took, but you can make it a month on weekends, if you do not meet a special rake and buy everything in advance.
Block diagram of the device stuffing:
Plans
Finalize the service numbers of the device. Add the ability to manage the phone book, although the ability to call the numbers from the book on the SIM-card is already there. As well as the ability to dial the last number dialed. If suddenly someone ever wants to do something similar - make a printed circuit board. I beg you.
Afterword
I want to say thanks:
to all those who did not send me ahead of time to the mental hospital;
Comrade Pasha, who made the first call from the next room of our apartment on Teknologiapuistonkatu; partners in the shooting of the video, “Brynze” for the once delicious pasties.
And, finally, the photo awards for those who read to the end.
Source: https://habr.com/ru/post/158109/
All Articles