Creating animation using Python 2.7
This article will introduce you to the basics of creating animation using Python and Pyglet. Pyglet is designed to work with 3D graphics, but in this article we will use it to create very simple 2D animations. In particular, we will get acquainted with the basic techniques of using Pyglet (developing code to create and play animation) and create animation using a sequence of images.
So let's get started ...
An animation is a sequence of frames that are quickly displayed one after another. This creates an optical illusion of movement of objects.
')
Pyglet provides an API for working with multimedia data in applications written using Python. This is an OpenGL library that runs on multiple platforms. It is mainly used to develop gaming and other graphically rich applications. Pyglet can be downloaded from the link: http://www.pyglet.org/download.html . We put Pyglet version 1.1.4 or later, if there is one. There should be no difficulty installing Pyglet.
Download and install the distribution Pyglet 1.1.4.msi or later.
Python 2.7 must be installed.
The Pyglet website provides a binary file for Mac OS X. Download and install Pyglet-1.1.4.dmg or later.
In Linux, install Pyglet 1.1.4 or later, suitable assembly of your system.
If there is none, the library can be installed in another way:
Before moving on, you need to make sure that Pyglet is installed correctly. To check this, just run Python from the command line and enter the following command:
If the import is successful, everything is ready to go!
We will briefly discuss some of the most important Pyglet modules and packages that we will use. Please note that this is just a tiny part of the Pyglet Framework. Please read the Pyglet documentation to learn more about all its features, as this is beyond the scope of this article.
The pyglet.window.Window module provides a user interface. It is used to create an OpenGL context window. The Window class represents API methods for handling various events, such as those associated with the mouse and keyboard. Window can be displayed in normal or in full screen mode. Here is a simple example of creating a window instance. You can define the size by specifying the width and height as arguments in the constructor.
The background color for an image can be customized using OpenGL by calling glClearColor, as follows:
This code sets the background color to white. The first three arguments are red, green, and blue. The latter value is the alpha channel. The following code will create a gray background color.
The following image shows a screenshot of the created window with a gray background color:

The pyglet.image module allows you to display an image on the screen. The following code snippet shows how to insert and display a picture at a specified position within the Pyglet window.
The next section will discuss some of the important operations supported by the pyglet.image module.
A sprite is a user-defined configuration of image elements.
Sprite is another important module. It is used to display an image or frame of animation in the Pyglet window described earlier. The sprite allows us to position the image anywhere in the Pyglet window. Sprite can be rotated and scaled. You can create multiple sprites of the same image, place them in different places or in the same window with different orientations.
The Animation module is part of the pyglet.image package. As the name suggests, pyglet.image.Animation is used to create animations from one or more image frames. There are various ways to create animations. For example, it can be created from a sequence of images or by using AnimationFrame objects. Sprite animations can be created and displayed in the Pyglet window.
Creates a separate frame of the animation from the image. An animation can be created from a sequence of such AnimationFrame objects. Example:
This module is used to schedule functions that will be called at a specified time. For example, the following code calls the moveObjects method ten times per second:
In the Image subsection, we learned how to load images using image.blit. However, using blit is a less efficient way to display an image. There is a better method for displaying an image in a created instance of Sprite. Multiple Sprite objects can be created to display the same image. For example, it is necessary that one image be displayed in different places within a window. Separate copies of Sprite should be presented to each of these images. The following simple example simply loads the image and displays an instance of Sprite, displaying this image on the screen.
The code in line 3 loads the image by calling pyglet.image.load.
A sprite corresponding to this image is created in line 4.
Line 6 sets the white background for the window.
On_draw represents an API method that is called when the window needs to be reloaded.
The following image shows an example of loading an image into a Pyglet window.

This window shows a still image.
The window module in Pyglet implements some API methods that allow the user to control the animation playback. API methods such as on_mouse_press and on_key_press are used to capture mouse and keyboard events during animation playback. These methods can be used to perform certain tasks.
Pyglet supports playback of audio and video content. The following code loads a media file and plays it while the animation is displayed.
The second optional argument, provided in line 3, fully decodes the media file into memory at boot time. This can be important if the media file has to be played several times during the animation playback. The API play () method starts streaming playback of a media file.
The Pyglet framework provides a number of modules needed to develop an animation. Let's now look at methods for creating 2D animations using Pyglet.
If you already have an animation file, for example, in GIF format, it can be loaded and displayed directly in a Pyglet. API for this is used pyglet.image.load_animation.
The sample code below will help you understand how Pyglet is used to view animations.
Note: The animation file must be placed in the same directory as our application.
This example displays the animation in a Pyglet window. You can use any animation file, just change in line 4 path.
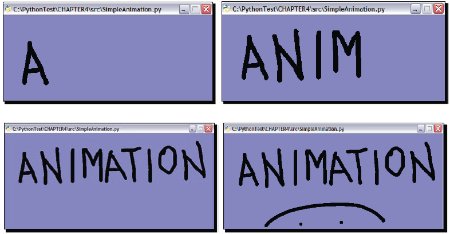
The following image shows some frames from an animation file at different time intervals.
Animation.from_image_sequence is an API method that allows you to create an animation using multiple consecutive images. Each of the images is sequentially displayed as an animation frame, one after the other. The time to display a frame of an animation is specified as an argument when creating an animation for an object, or it can be set after creating an instance of the animation.
Let's create several pictures, the sequential display of which will be the animation, and display them on the screen. Each of the image files will be displayed as an animation frame for a specified amount of time. For example, I will use images of a pendulum floor clock. Animation is the oscillation of the pendulum clock. This animation consists of three frames of images, in two of them the pendulum is located in opposite sides. Here is what these images look like:

Let's revive the pendulum in our watches:
Note: Animation files must be placed in a separate folder in the directory with our application.
After starting our example, you will see a window in which the pendulum clock will be displayed. The animation cycle will continue until the window is closed.
So, we have just created a semblance of what almost every Soviet schoolboy was engaged in as a child, drawing a cartoon on the pages of a notebook! We created a simple utility that takes a sequence of images as input and creates animation using Pyglet. To accomplish this task, we used Animation.from_image_sequence.
In this article, we learned how to create 2D animation in Python using Pyglet.
In particular, we:
Source: www.packtpub.com/article/python-multimedia-fun-with-animations-using-pyglet
Translation: Seganapa
So let's get started ...
An animation is a sequence of frames that are quickly displayed one after another. This creates an optical illusion of movement of objects.
')
PYGLET INSTALLATION
Pyglet provides an API for working with multimedia data in applications written using Python. This is an OpenGL library that runs on multiple platforms. It is mainly used to develop gaming and other graphically rich applications. Pyglet can be downloaded from the link: http://www.pyglet.org/download.html . We put Pyglet version 1.1.4 or later, if there is one. There should be no difficulty installing Pyglet.
Windows platform
Download and install the distribution Pyglet 1.1.4.msi or later.
Python 2.7 must be installed.
Other platforms
The Pyglet website provides a binary file for Mac OS X. Download and install Pyglet-1.1.4.dmg or later.
In Linux, install Pyglet 1.1.4 or later, suitable assembly of your system.
If there is none, the library can be installed in another way:
- Download and unzip the archive Pyglet-1.1.4.tar.gz or later.
- Make sure that the python is configured to work on the command line. Otherwise, set the correct path to the Python executable in the PYTHONPATH environment variable.
- At the command prompt, go to the unpacked archive, and then run the following command:
python setup.py install - Next, follow the instructions described in the readme / install files in the folder with the library.
Installation check
Before moving on, you need to make sure that Pyglet is installed correctly. To check this, just run Python from the command line and enter the following command:
import pyglet If the import is successful, everything is ready to go!
GETTING TO KNOW PYGLET
IMPORTANT COMPONENTS
We will briefly discuss some of the most important Pyglet modules and packages that we will use. Please note that this is just a tiny part of the Pyglet Framework. Please read the Pyglet documentation to learn more about all its features, as this is beyond the scope of this article.
Window
The pyglet.window.Window module provides a user interface. It is used to create an OpenGL context window. The Window class represents API methods for handling various events, such as those associated with the mouse and keyboard. Window can be displayed in normal or in full screen mode. Here is a simple example of creating a window instance. You can define the size by specifying the width and height as arguments in the constructor.
win = pyglet.window.Window() The background color for an image can be customized using OpenGL by calling glClearColor, as follows:
pyglet.gl.glClearColor(1, 1, 1, 1) This code sets the background color to white. The first three arguments are red, green, and blue. The latter value is the alpha channel. The following code will create a gray background color.
pyglet.gl.glClearColor(0.5, 0.5, 0.5, 1) The following image shows a screenshot of the created window with a gray background color:
Image
The pyglet.image module allows you to display an image on the screen. The following code snippet shows how to insert and display a picture at a specified position within the Pyglet window.
img = pyglet.image.load('my_image.bmp') x, y, z = 0, 0, 0 img.blit(x, y, z) The next section will discuss some of the important operations supported by the pyglet.image module.
Sprite (Sprite)
A sprite is a user-defined configuration of image elements.
Sprite is another important module. It is used to display an image or frame of animation in the Pyglet window described earlier. The sprite allows us to position the image anywhere in the Pyglet window. Sprite can be rotated and scaled. You can create multiple sprites of the same image, place them in different places or in the same window with different orientations.
Animation (animation)
The Animation module is part of the pyglet.image package. As the name suggests, pyglet.image.Animation is used to create animations from one or more image frames. There are various ways to create animations. For example, it can be created from a sequence of images or by using AnimationFrame objects. Sprite animations can be created and displayed in the Pyglet window.
AnimationFrame
Creates a separate frame of the animation from the image. An animation can be created from a sequence of such AnimationFrame objects. Example:
animation = pyglet.image.Animation(anim_frames) anim_frames - , AnimationFrame. Clock (time)
This module is used to schedule functions that will be called at a specified time. For example, the following code calls the moveObjects method ten times per second:
pyglet.clock.schedule_interval(moveObjects, 1.0/10) IMAGE OUTPUT
In the Image subsection, we learned how to load images using image.blit. However, using blit is a less efficient way to display an image. There is a better method for displaying an image in a created instance of Sprite. Multiple Sprite objects can be created to display the same image. For example, it is necessary that one image be displayed in different places within a window. Separate copies of Sprite should be presented to each of these images. The following simple example simply loads the image and displays an instance of Sprite, displaying this image on the screen.
1 import pyglet 2 3 car_img= pyglet.image.load('images/car.png') 4 carSprite = pyglet.sprite.Sprite(car_img) 5 window = pyglet.window.Window() 6 pyglet.gl.glClearColor(1, 1, 1, 1) 7 8 @window.event 9 def on_draw(): 10 window.clear() 11 carSprite.draw() 12 13 pyglet.app.run() The code in line 3 loads the image by calling pyglet.image.load.
A sprite corresponding to this image is created in line 4.
Line 6 sets the white background for the window.
On_draw represents an API method that is called when the window needs to be reloaded.
The following image shows an example of loading an image into a Pyglet window.
import os original_path = "C:/images/car.png" new_path = os.path.normpath(original_path) This window shows a still image.
CONTROL OF MOUSE AND KEYBOARD
The window module in Pyglet implements some API methods that allow the user to control the animation playback. API methods such as on_mouse_press and on_key_press are used to capture mouse and keyboard events during animation playback. These methods can be used to perform certain tasks.
ADDING SOUND EFFECTS
Pyglet supports playback of audio and video content. The following code loads a media file and plays it while the animation is displayed.
1 background_sound = pyglet.media.load( 2 'C:/AudioFiles/background.mp3', 3 streaming=False) 4 background_sound.play() The second optional argument, provided in line 3, fully decodes the media file into memory at boot time. This can be important if the media file has to be played several times during the animation playback. The API play () method starts streaming playback of a media file.
PYGLET ANIMATION
The Pyglet framework provides a number of modules needed to develop an animation. Let's now look at methods for creating 2D animations using Pyglet.
REPRODUCTION OF EXISTING ANIMATION
If you already have an animation file, for example, in GIF format, it can be loaded and displayed directly in a Pyglet. API for this is used pyglet.image.load_animation.
DISPLAYING EXISTING ANIMATION
The sample code below will help you understand how Pyglet is used to view animations.
1 import pyglet 2 3 animation = pyglet.image.load_animation( 4 "images/SimpleAnimation.gif") 5 6 # . 7 animSprite = pyglet.sprite.Sprite(animation) 8 9 # Pyglet 10 w = animSprite.width 11 h = animSprite.height 12 win = pyglet.window.Window(width=w, height=h) 13 14 # r,gb, 15 r, g, b, alpha = 0.5, 0.5, 0.8, 0.5 16 17 # OpenGL . 18 pyglet.gl.glClearColor(r, g, b, alpha) 19 20 # 21 # pyglet.Window 22 @win.event 23 def on_draw(): 24 win.clear() 25 animSprite.draw() 26 27 pyglet.app.run() - In line 3 of the API, the image.load_animation method creates an instance of the image.Animation class using the specified animation file.
- In line 7, a sprite object is created for this animation.
- The Pyglet window created in line 12 will be used to display the animation.
- animSprite sets the height and width of the window.
- The background color for the window is set using OpenGL calling glClearColor.
- Next, we need to connect the animation file to our sprite in the Pyglet window.
- Pyglet.window defines an on_draw API method that is called when an event occurs.
- To display the animation on the screen, in line 25 call draw ().
- The code in line 27 starts this application.
Note: The animation file must be placed in the same directory as our application.
This example displays the animation in a Pyglet window. You can use any animation file, just change in line 4 path.
The following image shows some frames from an animation file at different time intervals.
ANIMATION BY MEANS OF SEQUENCE OF IMAGES
Animation.from_image_sequence is an API method that allows you to create an animation using multiple consecutive images. Each of the images is sequentially displayed as an animation frame, one after the other. The time to display a frame of an animation is specified as an argument when creating an animation for an object, or it can be set after creating an instance of the animation.
Let's create several pictures, the sequential display of which will be the animation, and display them on the screen. Each of the image files will be displayed as an animation frame for a specified amount of time. For example, I will use images of a pendulum floor clock. Animation is the oscillation of the pendulum clock. This animation consists of three frames of images, in two of them the pendulum is located in opposite sides. Here is what these images look like:
Let's revive the pendulum in our watches:
1 import pyglet 2 3 image_frames = ('images/clock1.png', 4 'images/clock2.png', 5 'images/clock3.png') 6 7 # - 8 images = map(lambda img: pyglet.image.load(img), 9 image_frames) 10 11 # 0,33 12 # 13 # , 14 # , 1 15 16 animation = pyglet.image.Animation.from_image_sequence( 17 images, 0.33) 18 # 19 animSprite = pyglet.sprite.Sprite(animation) 20 21 # Pyglet 22 w = animSprite.width 23 h = animSprite.height 24 win = pyglet.window.Window(width=w, height=h) 25 26 # 27 pyglet.gl.glClearColor(1, 1, 1, 1) 28 29 @win.event 30 def on_draw(): 31 win.clear() 32 animSprite.draw() 33 34 pyglet.app.run() - The image_frames tuple contains image paths.
- Calling the map function in line 8 creates pyglet.image objects corresponding to each of the image paths and saves them to the list.
- In line 16, an animation is created using the API method Animation.from_image_sequence. This method takes a list of image objects as the first argument. The second additional argument is the time each frame is displayed in seconds. Set it to 0.33 seconds so that the total time of the full animation cycle is 1 second. Thus, one full swing of the pendulum, in our animation will take one second.
Note: Animation files must be placed in a separate folder in the directory with our application.
After starting our example, you will see a window in which the pendulum clock will be displayed. The animation cycle will continue until the window is closed.
So, we have just created a semblance of what almost every Soviet schoolboy was engaged in as a child, drawing a cartoon on the pages of a notebook! We created a simple utility that takes a sequence of images as input and creates animation using Pyglet. To accomplish this task, we used Animation.from_image_sequence.
FINALLY
In this article, we learned how to create 2D animation in Python using Pyglet.
In particular, we:
- We looked at some of the main components of Pyglet, which form the basis for creating animation. We discussed modules such as Window, Image, Animation, Sprite, AnimationFrame, ImageGrid, etc.
- Wrote code to create animation using a sequence of images.
Source: www.packtpub.com/article/python-multimedia-fun-with-animations-using-pyglet
Translation: Seganapa
Source: https://habr.com/ru/post/158023/
All Articles