PBX in 5 minutes

Not so long ago, an acquaintance asked for help in coping with the usual task: telephoneing their small company. Giving your mobile to all customers is no longer possible, e-mail is not enough, so they got the idea to install a PBX.
In 5 minutes, without getting up from the soft chairs, we installed and configured a virtual PBX. I would like to tell you about this on the example of installing a free PBX Zadarma.
At the beginning of the paragraph is a simple theory. Who knows - do not read.
Why do you need and how does PBX work?
In most offices where you call, you will most likely be greeted by an automatic greeting. Then the operator will pick up the phone and transfer the call to the necessary employee. It’s not a fact that an employee is in the office at this time, he may be in Novosibirsk and Prague, but you will be connected with him quickly and imperceptibly. It is not necessary to have a girl operator, and indeed an office.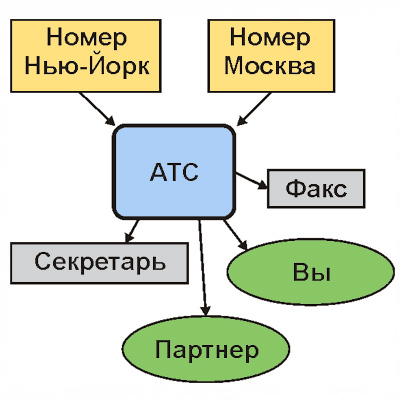
Do you want to organize your work as well? Nothing complicated, on the right is a diagram describing the work of ATS.
Scary system scale? I think you should not be afraid! Everything on the scheme, except for you, can be virtual, but it is quite possible to work. We connected and configured PBX in 5 minutes.
Starting PBX can be done in just 4 steps:
- Register and refill account
- Choose and buy a number
- Enable PBX and complete the setup wizard.
- Download and configure the client program to your computer / phone
Let's start the PBX installation:
1) Registration and account replenishment: 5 minutes
For simplicity and speed we will not delve into the comparison of services, just register on the site . The tariff is suitable for starters "Standard", it is per second, with free minutes, and it can always be changed to another.After registration, go to your personal account. We check the connection with a test call, and replenish the account. I replenished my account with a credit card through the RBK service ($ 10 of the first deposit was enough for 2 numbers and calls for the first time), everything worked out in a few seconds.
')
2) Choosing and buying rooms - 4 minutes
At first it is worth asking the price, for this we will go to the full list of numbers (“Settings / Direct Number” or on the main site). My friend needs a traditional number in Moscow (code 499), plus a number in New York. I registered the number in the USA instantly (a hurricane is not a hindrance to us), for Moscow I downloaded a scan of my passport and chose a number. The order is ready, the number in Moscow will be connected during the day, after checking the documents.3) Turning on and setting up the PBX - 5 minutes
Turn on the PBX in your account using the button at the bottom right.After switching on, we get to the “Setup Wizard”, we will describe it in points:
- Creating internal PBX numbers . How many internal numbers do we need? In our case, three was enough (later you can always add up to 50 numbers).
- Set the external line for the PBX . Since we only need one external SIP (1 SIP = 5 lines), skip this item.
- Outgoing calls . Section for convenience. If you are accustomed to calling within a city using short numbers and dialing 8 before a long-distance number, select your city in the list. If your city is not listed, select the closest one and change the area code to yours. And for those who dial in international format, you don’t need to choose anything at all. Click "next"!
- Create voice menu / greeting . The function is not mandatory, but we decided to use all the advantages of PBX: we make a voice menu! I want to set the menu, but there is no audio file with a greeting. It does not matter - choose "Read from text." I wrote for example: “Welcome to Igor and partner. Click 1 to contact Igor, 2 to contact partner, 3-fax. ” Entered the text, clicked "Read" and that's it - the text is well-read and the greeting is included!
- Create voice menu items . In the welcome text, I suggested 3 options for action,
 which means I need 3 menu options (the menu item is created automatically in case you don’t press anything). I create 3 menus, for example I called them: “Button 1-I, button 2-partner, button 3-fax” .PS: In the Zadarma virtual PBX, menu options are called “scripts”.
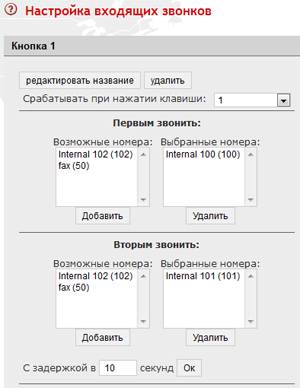
 - Set up incoming calls . The menu items we created, named, it remains to describe their work.
I will have the internal number 100, and the partner has 101. Then for the “Button 1” scenario I put my number in the “First Call” section - 100. If I don't pick up the phone, let the partner call, enter it in the “Second Call” section . We also do for the “Button 2” menu: we put a partner in “First to call” - 101, and if they don’t pick up the phone, then I’m 100, but I don’t like to receive his calls, therefore we increase the delay to 30 seconds. The “Do not click” menu will be set up in the same way as the “Button 1” menu.
Congratulations, you have configured PBX! Click "Finish" and connect phones to the PBX.
4) Download and setup programs on computer and phone - 3 minutes
For example, we will receive calls on the Android phone, and the partner - on a laptop under Windows. For ourselves, we install the Zadarma program (on the program page , enter your number and get the link). Since we connect to the PBX, then cancel the standard wizard settings, click "add an account", and enter the data of your internal number. On Android 4.x, you can do without the program and use the built-in SIP client.For Windows, PhonerLite is usually advised, it can be downloaded in the program section of your personal account, instructions on how to configure it are available there.
Different programs are recommended for working with iOS, for example media5 phone. Minus its free version in the presence of only G711 codec, which is inconvenient when calling via 3G. There are other programs and they can be easily found on the app-store by specifying a search for the word SIP.
"Bows" (additional functions) - 5 minutes
Connect numbers in Moscow and New York? delivering a voice greeting is great, and in most cases it’s all over. But the virtual PBX Zadarma allows you to get a much larger number of "beautiful" and convenient features.- CallerID setting (caller ID) . By purchasing a new “beautiful” Moscow number, you naturally want it to be displayed to those you call. Since they were the first to buy a number in the USA, its CallerID was set by default, but it is easy to change In the “SIP Settings” section, you can set the parameters of the external SIP line, including the CallerID, sent for outgoing calls. You can use CallerID and external numbers if you confirm it in your profile.
- Conditional call forwarding . My favorite feature. I often travel, but I do not want to miss calls. 3G Internet does not always use in mind imperfect coverage. In the settings of the internal number, I tick the “Forwarding” checkbox, select “No answer, unavailable” and enter my cell phone number. In the Android settings, the SIP client has set up work only via WiFi. Now, as soon as I go out into the street, the calls come to the mobile, and when I return home or to work, they come via SIP. The main thing - not a single missed call. For demanding users, forwarding to voicemail or skype is available.
- Receive calls by caller number . It is quite difficult to teach my partner's mother-in-law to press "2" when calling our number, but I don't want to communicate with her every time and transfer the call. There is a simple way out: I open the “Partner” script in the settings for incoming calls, tick the box “Trigger on calls from numbers” and enter the number of his mother-in-law. Everything, now all her calls will go directly to the partner, without a voice menu.
- Automatic fax . In practice, few people need a fax now, but why not leave it? A beautiful addition, and free. Since we have already created a script for the fax (button 3), you only need to open this script and add the extension number “50” in the list. All faxes will be sent to the registration email.
- Opening hours . I want to take all calls, but only during working hours. The rest of the time we will send all to the answering machine. You can set the working hours in the settings of incoming calls PBX. We set the days, hours of work, and the text that will sound during off-hours (you can check and set your time zone in the profile settings). For the answering machine, you need to create a script “Answering machine” and set a free internal number 102 in it. In the settings of internal number 102, we set the redirection of all calls to voice mail.

- Record conversations . If you want to record conversations, turn on the “Record conversations” tick in the settings of the internal number. Records will be sent to the specified e-mail box.
- The melody of waiting . For music lovers, you can download and install any waiting melody during a call transfer. This can be done in the settings of incoming calls.
- Additional external line . The new virtual PBX is not in a vacuum, there may be an old number, calls to which must also be received. What to do in this case? It's simple, we connect it as an “additional external line”. If the old number came in with copper, you will have to put a SIP gateway with an FXO port, turn on the line line on the site in “gateway” mode and set the settings on the site from the gateway. And if the old number was already working on SIP, then everything is simple: just turn on the line in the "server" mode and set the number settings, the PBX will connect to the server itself and receive calls to this number.
PS : And finally, useful news from Zadarma : from November 6, 2012, prices for project services have been reduced: outgoing calls - 90%, phone numbers - 60%, Moscow landline number $ 4 .
Source: https://habr.com/ru/post/157861/
All Articles