Automatic publication of a new version of the library using TFS 2010 and NuGetter
Given
- One small, but very useful library. Includes general functionality - logging, working with Windows Azure, etc.
- A large number of projects (solutions), where this library is used.
- A distributed development team, part of which the library writes and maintains, and the other part only uses.
Problems you want to solve
- The need to copy source / binaries from a project to a project is inconvenient, for a long time, there is a high probability of an error when updating.
- The inability to use different versions for different projects - finding and building a specific version “from the past” is inconvenient, again there is a high probability of an error when updating.
- The need to keep track of the relevance of library dependencies - especially the Azure SDK, which is now regularly updated, not always all developers have the latest version, and updating the SDK is not always possible.
- Using an existing project on different machines is another “thin” place, generating a lot of unnecessary errors. To work correctly, a complete coincidence of paths for projects is needed, which is very difficult to achieve.
Solution and problems encountered
It immediately became clear that getting the package with the latest / specific version of the library when building a solution is the easiest way to do it through NuGet - working with the Azure SDK has a similar approach.
However, after deploying the repository, it turned out that it would not be possible to set up the publication in NuGet just like that - I had to write a separate project that would assemble the package for publication and fill it with the repository.
It also turned out that the version number in the
AssemblyInfo file is not very convenient - the numbering by default does not include the publication date, which makes it somewhat difficult to solve problems that appear after updating the library (it is not always easy to catch when this or that part of the functionality stops working) ).As a result, it was decided to transfer the publishing process to the TFS server by adding Build Definition (build) for the library. All these actions were performed in Team Explorer VS 2010, but I did not notice any particular differences when switching to VS 2012.
')
Search for the best
As an auxiliary project, NuGetter was selected (for automatic publication to the repository during the build on the server) with the addition of TFSVersioning (for editing the
AssemblyInfo file during the build on the server), the author had only one project and no integration problems should arise.Step by step description of personal experience of implementation
I would like to immediately note that everything written below is following the documentation from both projects, plus a description of some of the side effects I encountered.
I didn’t have to set up a build personally before, so all the steps will be described in sufficient detail and boring.
0. Preparing for configuration - upload to server.
Both projects contain libraries with specific Custom Actions for the build workflow on the server and xaml files with workflow templates that extend the default build capabilities. All this is required to upload to the server: project templates to be able to select them when creating a new build, and libraries - to be able to find them the next time this particular build is executed.
It is recommended to lay out workflow templates in the folder for storing default templates
$/(Solution Name)/BuildProcessTemplates .Libraries and the NuGet.exe file with its settings are recommended to be put in a separate folder (on our server it has a very original name
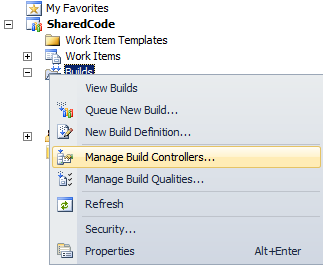
.nuget - but always at the top, which is convenient when setting up the build).In order for these libraries to be found in the build process, you need to configure the build controller (Build Controller) for this solution. This is done like this:
Team Explorer -> (Solution Name) -> Builds -> right click -> Manage Build Controllers ...
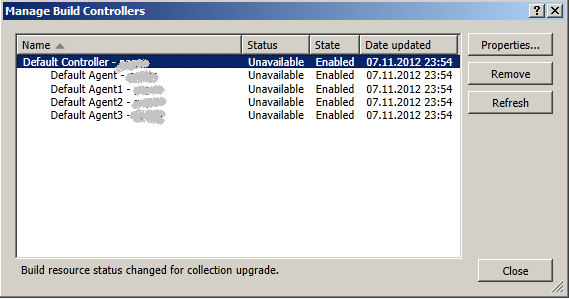
Controller selection:
Editing controller for (Solution Name):
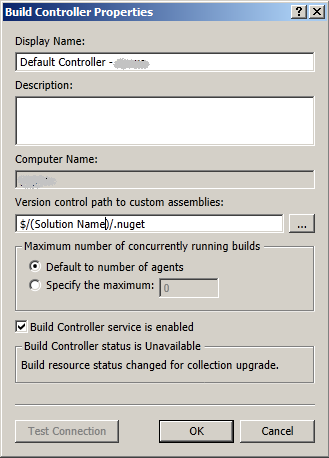
In the
Version control path to custom assemblies field, you must specify the path to your folder with shared libraries.Here I had the first small problem - I tried to edit the properties of not the controller, but one of its build agents . Be careful.
Just in case, check the connection to the folder (
Test Connection button).After checking the connection, save the changes.
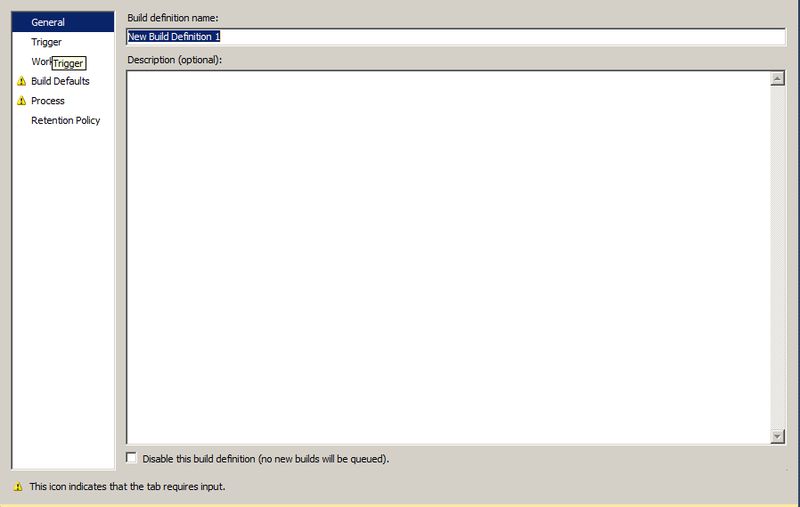
1. Adding a new build based on a template.
Now you need to add a new build on the template that was loaded in the previous step. This is done like this:
Team Explorer -> (Solution Name) -> Builds -> right click -> New Build Definition ...

Name and description of the build:
Schedule to run the build:
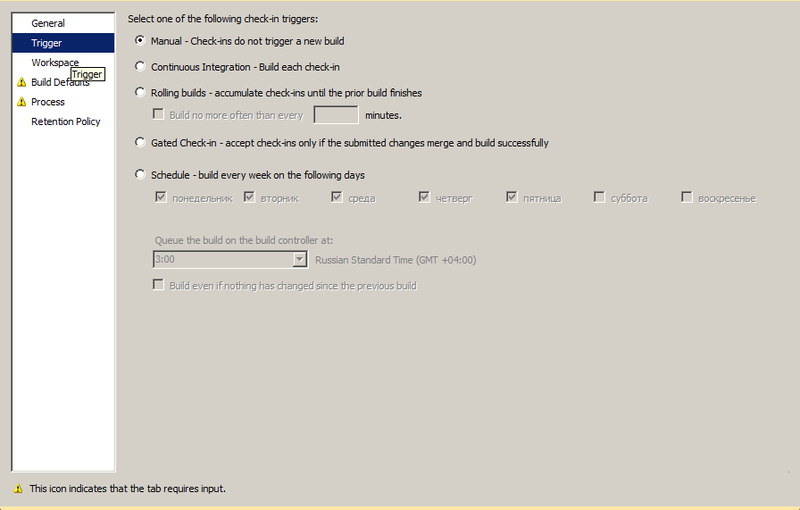
Options:
- Run only manually.
- After each check-in from the developers.
- Wait for the previous build to complete.
- Collecting check-in, with the ability to set the launch time "no more than N minutes."
- Only accept a check-in if there was a successful merge and the build on the server after that was successful.
- Scheduled.
Code to be compiled during the build:

Sometimes there are too many projects here - remove unnecessary ones. You can also specify which project to which folder should be copied during the build.
Defining default parameters for a build:
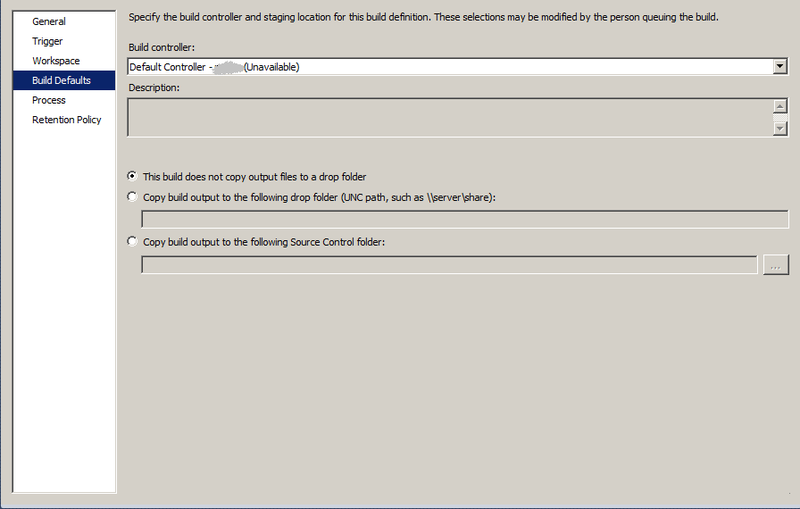
You must select:
- The controller that was configured in the previous paragraph.
- Where to put the code:
- Do not copy the result of the assembly anywhere.
- Copy build result to shared folder
A valid UNC address of the form\\server\sharerequired . - Copy the build result to the TFS server folder
The option is not always available, depending on the rights of the user creating the build .
Build settings:

The first three items are the settings that are always available for any build. Now only the first block is of interest to us - the choice of projects or solutions for assembly (
Projects to Build ).You should also pay attention to the
Build number format - this parameter is responsible for the folder name with the result of the build (for projects with a large nesting of folders it should not be very long).Build results save settings:
2. Select a template for the build.
On the
Process tab at the top of the drop-down list, select the desired template. If the required list is not visible in the drop-down list, it means that it will be used for the first time, and it must be “shown” to the server using the New... button (select or copy the file already downloaded to the TFS server). Template selection:
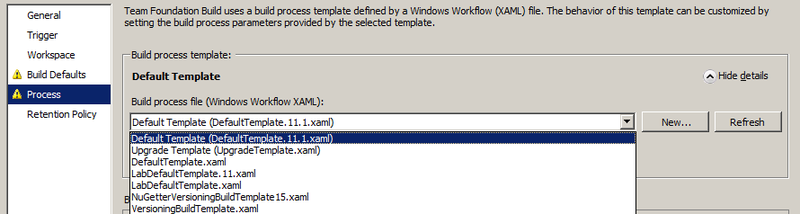
Options:
- [All the build templates installed on the TFS server].
VersioningBuildTemplate.xaml- the basic template for replacing versions in the AssemblyInfo.cs file.VersioningBuildTemplate15.xaml- a template to replace in the AssemblyInfo.cs file — additional editing options for library properties available in TFSVersioning 1.5.NuGetterStandardBuildTemplate.xamlis a basic template for publishing build results to NuGet.NuGetterVersioningBuildTemplate.xamlis a basic template for publishing NuGet build results and replacing versions in the AssemblyInfo.cs file.NuGetterVersioningBuildTemplate15.xaml- a template for publishing the build results to NuGet and replacing it in the AssemblyInfo.cs file with additional features from TFSVersioning 1.5.
3. Set up replacements in the AssemblyInfo.cs file.
If you selected a template with TFSVersioning, in the build settings will appear
item number 4:
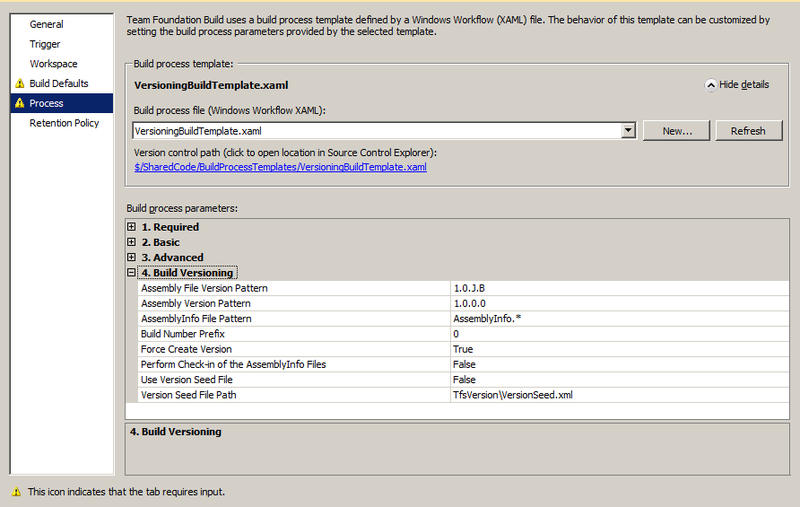
What and what for:
- The first two lines are responsible for the version number templates for
AssemblyFileVersionandAssemblyVersion. - Replacement rules for the version number template:
- The number encountered anywhere in the pattern remains unchanged.
Bis replaced with the build number within one day.YYYYreplaced by a 4-digit representation of the current year.YYreplaced with a 2-digit representation of the current year (the last two digits).MMorMare replaced with the number of the current month (when replacingMMzero is not put in front ).DDorDare replaced with the number of the current day in the month (when replacingDDzero is not put ahead ).Jis replaced with the date in the formatYYDDD, whereDDDis the day ordinal number since the beginning of the year.
The proposed default template -1.0.JB- provides a virtually unique version number for the library. Difficulties will begin in 100 years, provided that the major and minor versions of the project are preserved. Legacy code strikes back. - The third line is a mask for searching AssemblyInfo files in assembled projects. Normally, editing is not required.
- The fourth line is the number that will be added to the number
BIt can be used in case of setting up several builds for one project - we add 100 to one, 200 to another, everyone is happy. The maximum value for the sum of the build number and prefix is 65535 . The author of the projects also asks to contact him if you produce more than 999 builds per day, you are obviously busy with something interesting. - The fifth line indicates whether it is necessary to create the
AssemblyFileVersionandAssemblyVersionattributes in their absence. - The sixth line indicates whether to upload modified AssemblyInfo files to the data warehouse.
If you build more than one project, or you create a NuGet package as a result of the build, you can put templates for version numbers into a separate XML file , upload it to the server and enable its use on the seventh line, indicating the path to it in the eighth .
XML looks like this:
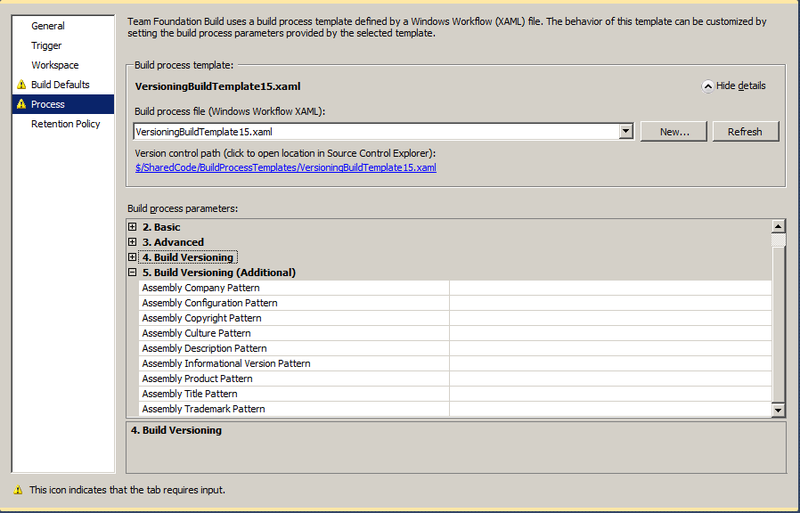
<?xml version="1.0" encoding="utf-8" ?> <VersionSeed> <Solution name="Default"> <AssemblyVersionPattern>1.8.jb</AssemblyVersionPattern> <AssemblyFileVersionPattern>1.8.jb</AssemblyFileVersionPattern> </Solution> <NuGetPackage id="ServiceLib"> <VersionPattern>1.8.jb</VersionPattern> </NuGetPackage> </VersionSeed> If you are using a build template for TFSVersioning 1.5, you will also be available
tab with additional features AutoCorrect in the AssemblyInfo file:
4. Setting up a publication in NuGet.
When using the template for NuGetter, three more tabs are available.
NuGetter (A) - Pre-Packaging:

The first tab is responsible for preparing the assembled project for packaging and publication. If necessary, you can add your PowerShell script to the server (for creating folders specified in the NuGet specification, for example).
Be careful: executable PowerShell scripts may not be allowed to be executed on the server. In this case, the build will not give an error , but simply try to run NuGet as if the script worked correctly.
The policy regarding the execution of PowerShell scripts can be checked and corrected through commands
Get-ExecutionPolicy Set-ExecutionPolicy NuGetter (B) - Package:

What and what for:
- The first line is any additional parameters for running the NuGet file.
- The second line is the name of the base folder for executing NuGet commands when packing and publishing.
- The third line is the path to the NuGet file on the server (the file must be in the repository or in folders defined in the PATH in Windows on the server ).
- The fourth line is the path to the file of the NuGet specification on the server (the file must be in the repository).
- The fifth line is the name of the folder in which the package will be created (if the build is successful).
- The sixth line - the address of the file with the version templates for the project - as mentioned above, you can put all version numbers for projects and packages in a separate XML file, and do not change them permanently in the build properties.
I didn’t manage to set up the workflow so that the NuGet file caused an update of itself before execution - I just had to upload a new version of NuGet.exe to the server. I think you need to create your own template based on the provided, where to add a Custom Action with another NuGet call. Although, perhaps, I reinvent the wheel, and everything is made much easier.
NuGetter (C) - Push and Publish:

What and what for:
- The first line is the API key, if it is defined for the NuGet repository, in which the package is published. The author expects the key GUID in the
aaaaaaaa-bbbb-cccc-dddd-eeeeeeeeeeeeentry, if the specified key does not pass the ReGex check, the string is considered a relative path to the file where the API key is specified . - The second line indicates whether you just need to create a package and copy it into the repository or require publication to a remote server. In fact, when the flag is on, it adds the
-coparameter to the NuGet startup parameters, which destroys the entire build, since in version 2.1 the parameter is not recognized. - The third line indicates whether to attempt to publish the package to the repository after it is created.
- The fourth line is the address of the NuGet repository for publication.
Possible values:- Remote repository URL.
- The UNC name of the folder on the local network.
- The local address of the folder on the server where the build is started.
To successfully publish to the NuGet repository, you must have write access to the packages folder for the user running the Application Pool. The memory on the server should also suffice, since the error when there is not enough disk space in the EventLog is very strange and completely uninformative.
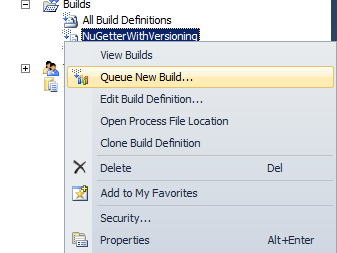
5. Run the build.
In addition to automatically starting the build according to the settings in point 1 , the build can be started by hand.
Team Explorer -> (Solution Name) -> Builds -> Build to run -> right click -> Queue New Build ...
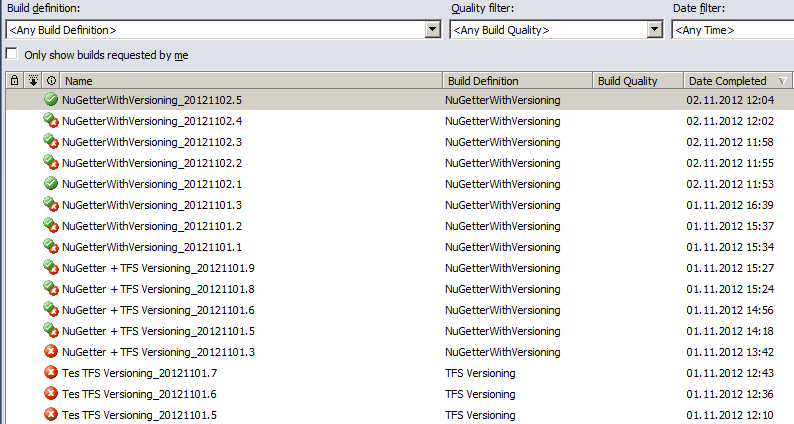
The table of running builds with the current status:
6. Total.
The task was solved, and much faster than this article was written. Moreover, after becoming familiar with the technique of creating TFS builds, it turned out that it was not so difficult to set up Continious Integration. It is important to remember that the build builds on the server , so the project settings, files and other changes should not be forgotten to upload to the repository.
If the build fails, TFS automatically creates a bug, with the urgency of Critical, and hangs it on the developer who has downloaded the code to the server last. After the “fix”, the bug is assigned to the
Network Service , so this particular user needs to be granted write permission.I hope the article will save someone time and nerves.
Thanks for attention.
Source: https://habr.com/ru/post/157155/
All Articles