Samba4, Radius and PPTP using MS-CHAP v2
... Wow, it happened. Everything turned out to be quite simple, although I had to spend a lot of time, mainly on searching for information on the Internet (useful, of course) - the cat wept ... And how it (this information) is scattered! Therefore, I decided to write this guide based on my own implementation experience. The main thing is that everything will be collected in one place (except, perhaps, the bind9 settings, but more on that later).
So, the task. There is a server with Ubuntu 12.04. It should be:
Getting started.
Carefully read the Samba4 / HOWTO . At the time of the start of the installation, the next version of Samba4-4.0.0rc2 was available. Now, as far as I know, 4.0.0rc3. I worked with RC2 and I will describe it.
We do everything according to the instructions of the HOWTO, but do not forget about a few nuances:
Next, do as described in the WiKi Samba4 HOWTO . The built samba4 will be located in the / usr / local / samba / directory. Once again, I’ll note that all samba4 binaries are located in the / usr / local / samba / bin / directory , services are in the / usr / local / samba / sbin / directory, so you need to access them now using absolute paths, or correct them the PATH variable, or - as I did, because I put samba4 on a machine without samba3 - make symbolic links of all the files from the / usr / local / samba / bin / directory to the / usr / bin / directory , and from the / usr / local / directory samba / sbin / - to the / usr / sbin / directory.
Now do the “provisioning” of samba4 as described in the HOWTO. Among other things, this procedure will create in the / usr / local / samba / etc / directory the main samba configuration file - smb.conf , which can be supplemented with the necessary options and "balls" and ... run samba! Here’s what my /usr/local/samba/etc/smb.conf looks like:
')
To run samba4 in the / etc / init / directory, create a samba4.conf file of approximately the following content:
Starting / stopping the service will be done as follows:
A separate song is worth setting dns, because on this server, bind9 was already spinning with its zones, and samba4, having its own built-in dns server, did not want to “make friends” with the already configured bind9, so ... let's, for now, restrict ourselves to HOWTO instructions, and if it is interesting, then I will describe a bunch of samba4- bind9.
All the rest is strictly according to the HOWTO mentioned above with a few remarks.
So, samba4 is installed and running. Now is the turn of AD user authentication in Linux
Go to the Samba4 / Winbind Wiki documentation and do EVERYTHING-EVERYTHING written there. Do not forget to restart the system after making changes to /etc/nsswitch.conf, because ... In general, you need to reboot. Be careful with the files in /etc/pam.d/, because if you make the mistake, your server will turn into a “black box”, because you cannot log into it either via ssh or from the console ... If you have done everything without errors - voila, you can now log in to the Linux server using Active Directory user accounts!
However, let me list the necessary actions once again and give all my (working!) Configuration files so that everything is in one place.
So.
Make the libnss_winbind.so library available :
Rule /etc/nsswitch.conf :
# /etc/nsswitch.conf
After this edit, reboot immediately!
Test winbind. Yes, do not be embarrassed that there is no such process in the system - the samba daemon now performs all functions.
Winbind availability:
Winbind returns a list of domain users:
getent passwd gives a list of ALL users — both Linux and domain:
The id command returns information about domain users:
Please note that the domain user Administrator created at the “procurement” stage of samba4 has uid = 0 with all the ensuing consequences!
First of all, we are making the pam_winbind.so library available :
Configure the following files in the /etc/pam.d/ directory:
/etc/pam.d/common-auth
/etc/pam.d/common-account :
/etc/pam.d/common-session :
Now you have the opportunity to login on a Linux-computer under a domain user!
The next step is to install and configure a freeradius server, configure pptpd to work in conjunction with freeradius using Active Directory data and MS-CHAP v2 and MPPE-128 protocols. And do not believe that to implement MS-CHAP v2, you need to use samba3 or, which is even better, smash samba4 and the radius server on different machines!
So, we’ll use WiKi Samba4 / HOWTO / Virtual_Private_Network again as a starting point. But not literally. Getting started.
Install freeradius:
Please note that in comparison with the mentioned article on WiKi, installation of the radiusclient1 package has been added here, which will be necessary for pptpd to work with radius plugins.
Configuring freeradius. I have this /etc/freeradius/radiusd.conf :
Next, in /etc/freeradius/clients.conf, we write:
Remove the possibility of working inner-tunnel, which requires EAP-TTLS and PEAP:
Now, the default directory remains in the / etc / freeradius / sites-enabled / directory, which we edit:
Go to the directory / etc / freeradius / modules / and edit the necessary modules.
File / etc / freeradius / modules / ldap (replacing all cn and dc with yours):
Edit / etc / freeradius / modules / mschap :
I once again draw your attention to the parameter ntlm_auth = "/ usr / local / samba / bin / ntlm_auth3 ..." Samba4 is "friendly" with samba3 and besides the ntlm_auth binary, which does not support MS-CHAP v2, there is a ntlm_auth3 binary, which all this means "!
And finally - pptpd. It is understood that you have already installed and configured pptpd itself (the /etc/pptpd.conf file is not necessary to edit!)
We rule / etc / ppp / pptpd-options :
The file /etc/radiusclien/radiusclient.conf (in my opinion, I did not touch it, except that I corrected authserver and acctserver):
File / etc / radiusclien / server :
A very important point - create the file /etc/radiusclient/dictionary.microsoft . I will not give his text, because You can get it entirely here )
And at the end of the file / etc / radiusclient / dictionary append a line
INCLUDE /etc/radiusclient/dictionary.microsoft to get the following:
It seems everything. Samba4 is already running, you need to restart the freeradius server and the pptpd daemon.
Oh yes. About how to enable / disable access to VPN to certain users. You did install the Windows Remote Administration Tools package? So, you will not see that picture of the ADUC snap-in that is shown on the WiKi pages under Windows 7 with the “Dial-in” tab. And you will see something similar:

And where is the “Dial-in” tab or its Russian analogue “Incoming Calls”? How can I manage user permissions? Nothing wrong. We are not afraid of difficulties? We remember (I think you didn’t forget!) That the domain controller is, among other things, an LDAP server, so we put any tools for managing such a server (for example, LdapAdmin ) and we steer them.
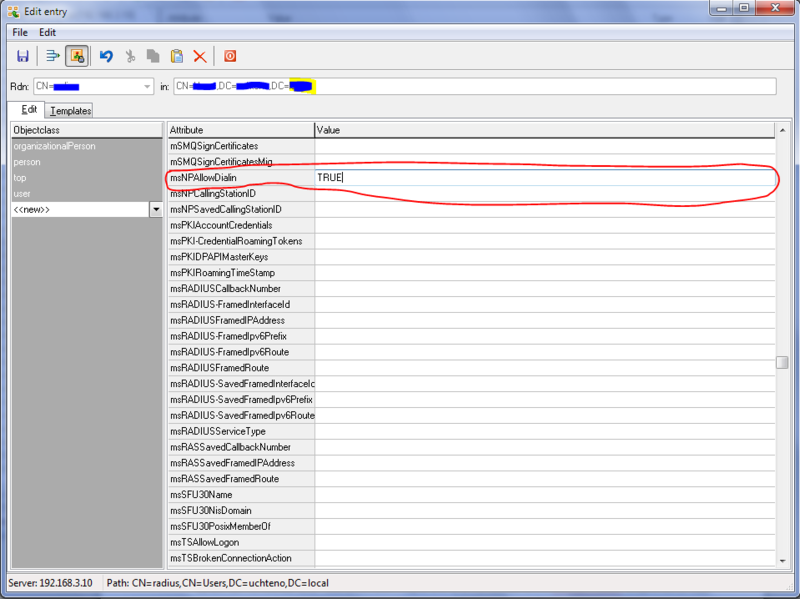
To begin with, we set up a connection with our samba4 server: register the server address, push the “Fetch DNs” button, select the top-level database, radio-box “GSS-API”, connect the user’s password as the administrator, the password. We see our entire directory, which is when deploying a domain. Select the desired user and go into edit mode. Find the msNPAllowDialin attribute and enter TRUE or FALSE (required - in capital letters!):
We save. This user is allowed (or denied) to log in via VPN.
In my opinion, all the tasks set at the beginning of the post are solved. The time spent on their solution (about two and a half weeks) was primarily spent on studying the documentation on the Internet, the experience of such decisions, comparing the information received with the realities that I saw with my own eyes on our server, compiling and recompiling samba4, and editing, editing and editing configs again ... But I was pleased with the result: the result was an almost complete replacement of Windows Server 2008 R2 with Active Directory, network policy and access service and remote desktop service (under wine, of course, but this isn’t ova did not write).
So, the task. There is a server with Ubuntu 12.04. It should be:
- PDC Windows domain with Active Directory.
- VPN server (let it be, for example, PPTP, but with mandatory support for MS-CHAP v2 and MPPE-128) with authorization on the Radius server (for definiteness - freeradius).
- Respectively - Freeradius-server.
- A terminal server on which AD users transparently log in.
Getting started.
We put Samba4
Carefully read the Samba4 / HOWTO . At the time of the start of the installation, the next version of Samba4-4.0.0rc2 was available. Now, as far as I know, 4.0.0rc3. I worked with RC2 and I will describe it.
We do everything according to the instructions of the HOWTO, but do not forget about a few nuances:
- We want to authenticate our AD users on a Linux computer? Then do not forget to install the libpam0g-dev package into the system (like this: sudo apt-get install libpam0g-dev ). Without these libraries, pam support in samba4 will not be implemented (in the built project there will be no directory / usr / local / samba / lib / security / with the very necessary library pam_winbind.so ).
- I would recommend (strongly!) Instead of ./configure to use ./configure.developer .
Next, do as described in the WiKi Samba4 HOWTO . The built samba4 will be located in the / usr / local / samba / directory. Once again, I’ll note that all samba4 binaries are located in the / usr / local / samba / bin / directory , services are in the / usr / local / samba / sbin / directory, so you need to access them now using absolute paths, or correct them the PATH variable, or - as I did, because I put samba4 on a machine without samba3 - make symbolic links of all the files from the / usr / local / samba / bin / directory to the / usr / bin / directory , and from the / usr / local / directory samba / sbin / - to the / usr / sbin / directory.
Now do the “provisioning” of samba4 as described in the HOWTO. Among other things, this procedure will create in the / usr / local / samba / etc / directory the main samba configuration file - smb.conf , which can be supplemented with the necessary options and "balls" and ... run samba! Here’s what my /usr/local/samba/etc/smb.conf looks like:
# Global parameters [global] dos charset = CP860 workgroup = <DOMAIN> # NetBIOS realm = <domain.-> # netbios name = <NetBIOS_Name> # NetBIOS server role = active directory domain controller dns forwarder = 127.0.0.1 # dns-. template shell = /bin/bash # , – … winbind use default domain = Yes winbind enum users = Yes winbind enum groups = Yes [netlogon] path = /usr/local/samba/var/locks/sysvol/uchteno.local/scripts read only = No [sysvol] path = /usr/local/samba/var/locks/sysvol read only = No #[profiles] # path = /var/lib/samba/profiles # read only = no # browseable = No # «», . ')
To run samba4 in the / etc / init / directory, create a samba4.conf file of approximately the following content:
description "SMB/CIFS File and Active Directory Server" author "Jelmer Vernooij <jelmer@ubuntu.com>" start on (local-filesystems and net-device-up) stop on runlevel [!2345] expect fork normal exit 0 pre-start script [ -r /etc/default/samba4 ] && . /etc/default/samba4 install -o root -g root -m 755 -d /var/run/samba install -o root -g root -m 755 -d /var/log/samba end script exec /usr/local/samba/sbin/samba –D Starting / stopping the service will be done as follows:
# service samba4 start # service samba4 stop # service samba4 restart A separate song is worth setting dns, because on this server, bind9 was already spinning with its zones, and samba4, having its own built-in dns server, did not want to “make friends” with the already configured bind9, so ... let's, for now, restrict ourselves to HOWTO instructions, and if it is interesting, then I will describe a bunch of samba4- bind9.
All the rest is strictly according to the HOWTO mentioned above with a few remarks.
- The Windows Remote Administration Tools package installed on Windows 7 has two unpleasant features (so far, I noticed two):
- first, in the ADUC snap-in for user properties, the “Dial-in” tab is completely absent (or how is it in Russian?), And it means that you will have to configure the remote access capability for users in other ways;
- secondly, group policy management is possible only under the Administrator account, despite the fact that a specially created user was included in all possible groups ... - Honestly, until I understood in detail the possibility of group policies under samba4 ...
So, samba4 is installed and running. Now is the turn of AD user authentication in Linux
Winbind setup
Go to the Samba4 / Winbind Wiki documentation and do EVERYTHING-EVERYTHING written there. Do not forget to restart the system after making changes to /etc/nsswitch.conf, because ... In general, you need to reboot. Be careful with the files in /etc/pam.d/, because if you make the mistake, your server will turn into a “black box”, because you cannot log into it either via ssh or from the console ... If you have done everything without errors - voila, you can now log in to the Linux server using Active Directory user accounts!
However, let me list the necessary actions once again and give all my (working!) Configuration files so that everything is in one place.
So.
Make the libnss_winbind.so library available :
# ln -s /usr/local/samba/lib/libnss_winbind.so.2 /lib/libnss_winbind.so # ln -s /lib/libnss_winbind.so /lib/libnss_winbind.so.2 Rule /etc/nsswitch.conf :
# /etc/nsswitch.conf
passwd: compat winbind group: compat winbind shadow: compat hosts: files dns networks: files protocols: db files services: db files ethers: db files rpc: db files netgroup: nis After this edit, reboot immediately!
Test winbind. Yes, do not be embarrassed that there is no such process in the system - the samba daemon now performs all functions.
Winbind availability:
$ /usr/local/samba/bin/wbinfo -p Ping to winbindd succeeded Winbind returns a list of domain users:
$ /usr/local/samba/bin/wbinfo -u ... <_>\Administrator ... getent passwd gives a list of ALL users — both Linux and domain:
$ getent passwd root:x:0:0… ... <_>\Administrator:x:0:100::/home/MATWS/Administrator:/bin/false ... The id command returns information about domain users:
$ id Administrator uid=0(root) gid=100(users) groupes=0(root),100(users),3000004(Group Policy Creator Owners),3000008(Domain Admins) Please note that the domain user Administrator created at the “procurement” stage of samba4 has uid = 0 with all the ensuing consequences!
Pam setup
First of all, we are making the pam_winbind.so library available :
# ln -s /usr/local/samba/lib/security/pam_winbind.so /lib/security Configure the following files in the /etc/pam.d/ directory:
/etc/pam.d/common-auth
# # /etc/pam.d/common-auth - authentication settings common to all services # # This file is included from other service-specific PAM config files, # and should contain a list of the authentication modules that define # the central authentication scheme for use on the system # (eg, /etc/shadow, LDAP, Kerberos, etc.). The default is to use the # traditional Unix authentication mechanisms. # # As of pam 1.0.1-6, this file is managed by pam-auth-update by default. # To take advantage of this, it is recommended that you configure any # local modules either before or after the default block, and use # pam-auth-update to manage selection of other modules. See # pam-auth-update(8) for details. # here are the per-package modules (the "Primary" block) auth sufficient pam_winbind.so auth [success=1 default=ignore] pam_unix.so nullok_secure use_first_pass # here's the fallback if no module succeeds auth requisite pam_deny.so # prime the stack with a positive return value if there isn't one already; # this avoids us returning an error just because nothing sets a success code # since the modules above will each just jump around auth required pam_permit.so # and here are more per-package modules (the "Additional" block) # end of pam-auth-update config /etc/pam.d/common-account :
# # /etc/pam.d/common-account - authorization settings common to all services # # This file is included from other service-specific PAM config files, # and should contain a list of the authorization modules that define # the central access policy for use on the system. The default is to # only deny service to users whose accounts are expired in /etc/shadow. # # As of pam 1.0.1-6, this file is managed by pam-auth-update by default. # To take advantage of this, it is recommended that you configure any # local modules either before or after the default block, and use # pam-auth-update to manage selection of other modules. See # pam-auth-update(8) for details. # # here are the per-package modules (the "Primary" block) account sufficient pam_winbind.so account [success=1 new_authtok_reqd=done default=ignore] pam_unix.so # here's the fallback if no module succeeds account requisite pam_deny.so # prime the stack with a positive return value if there isn't one already; # this avoids us returning an error just because nothing sets a success code # since the modules above will each just jump around account required pam_permit.so # and here are more per-package modules (the "Additional" block) # end of pam-auth-update config /etc/pam.d/common-session :
# # /etc/pam.d/common-session - session-related modules common to all services # # This file is included from other service-specific PAM config files, # and should contain a list of modules that define tasks to be performed # at the start and end of sessions of *any* kind (both interactive and # non-interactive). # # As of pam 1.0.1-6, this file is managed by pam-auth-update by default. # To take advantage of this, it is recommended that you configure any # local modules either before or after the default block, and use # pam-auth-update to manage selection of other modules. See # pam-auth-update(8) for details. # here are the per-package modules (the "Primary" block) session [default=1] pam_permit.so # here's the fallback if no module succeeds session requisite pam_deny.so # prime the stack with a positive return value if there isn't one already; # this avoids us returning an error just because nothing sets a success code # since the modules above will each just jump around session required pam_permit.so # The pam_umask module will set the umask according to the system default in # /etc/login.defs and user settings, solving the problem of different # umask settings with different shells, display managers, remote sessions etc. # See "man pam_umask". session required pam_mkhomedir.so session required pam_winbind.so session optional pam_umask.so # and here are more per-package modules (the "Additional" block) session required pam_unix.so session optional pam_ck_connector.so nox11 # end of pam-auth-update config Now you have the opportunity to login on a Linux-computer under a domain user!
Freeradius
The next step is to install and configure a freeradius server, configure pptpd to work in conjunction with freeradius using Active Directory data and MS-CHAP v2 and MPPE-128 protocols. And do not believe that to implement MS-CHAP v2, you need to use samba3 or, which is even better, smash samba4 and the radius server on different machines!
So, we’ll use WiKi Samba4 / HOWTO / Virtual_Private_Network again as a starting point. But not literally. Getting started.
Install freeradius:
sudo apt-get install freeradius freeradius-common freeradius-krb5 freeradius-ldap freeradius-utils radiusclient1 Please note that in comparison with the mentioned article on WiKi, installation of the radiusclient1 package has been added here, which will be necessary for pptpd to work with radius plugins.
Configuring freeradius. I have this /etc/freeradius/radiusd.conf :
prefix = /usr exec_prefix = /usr sysconfdir = /etc localstatedir = /var sbindir = ${exec_prefix}/sbin logdir = /var/log/freeradius raddbdir = /etc/freeradius radacctdir = ${logdir}/radacct confdir = ${raddbdir} run_dir = ${localstatedir}/run/freeradius db_dir = ${raddbdir} libdir = /usr/lib/freeradius pidfile = ${run_dir}/freeradius.pid max_request_time = 30 cleanup_delay = 5 max_requests = 1024 listen { type = auth ipaddr = <ip_address_> # port = 0 interface = eth0 } listen { type = auth ipaddr = 127.0.0.1 port = 0 interface = lo } listen { type = acct ipaddr = <ip_address_> port = 0 interface = eth0 } listen { type = acct ipaddr = 127.0.0.1 port = 0 interface = lo } # , , #listen { type = auth …} listen {type = acct …} hostname_lookups = no allow_core_dumps = no regular_expressions = yes extended_expressions = yes log { destination = files file = ${logdir}/radius.log syslog_facility = daemon stripped_names = no auth = no auth_badpass = no auth_goodpass = no } checkrad = ${sbindir}/checkrad security { max_attributes = 200 reject_delay = 1 status_server = yes } proxy_requests = no $INCLUDE clients.conf thread pool { start_servers = 5 max_servers = 32 min_spare_servers = 3 max_spare_servers = 10 max_requests_per_server = 0 } modules { $INCLUDE ${confdir}/modules/ } instantiate { exec expr expiration logintime } $INCLUDE policy.conf $INCLUDE sites-enabled/ Next, in /etc/freeradius/clients.conf, we write:
client localhost { ipaddr = 127.0.0.1 netmask = 32 secret = samba4 # «» shortname = localhost } Remove the possibility of working inner-tunnel, which requires EAP-TTLS and PEAP:
sudo rm -rf /etc/freeradius/sites-enabled/inner-tunnel Now, the default directory remains in the / etc / freeradius / sites-enabled / directory, which we edit:
authorize { preprocess auth_log chap mschap #suffix # , .. ldap expiration logintime pap } authenticate { Auth-Type PAP { pap } Auth-Type CHAP { chap } Auth-Type MS-CHAP { mschap } Auth-Type LDAP { ldap } } preacct { preprocess acct_unique suffix files } accounting { detail radutmp attr_filter.accounting_response } session { radutmp } post-auth { exec Post-Auth-Type REJECT { attr_filter.access_reject } } pre-proxy { } post-proxy { } Go to the directory / etc / freeradius / modules / and edit the necessary modules.
File / etc / freeradius / modules / ldap (replacing all cn and dc with yours):
ldap { server = "localhost" identity = "cn=VPN,cn=users,dc=example,dc=com" # ldap # password = <__> basedn = "dc=example,dc=com" filter = "(sAMAccountName=%{Stripped-User-Name:-%{User-Name}})" ldap_connections_number = 5 timeout = 4 timelimit = 3 net_timeout = 1 tls { start_tls = no } access_attr = "msNPAllowDialin" dictionary_mapping = ${confdir}/ldap.attrmap edir_account_policy_check = no # WiKi , # Active Directory ! chase-referrals = yes rebind = yes } Edit / etc / freeradius / modules / mschap :
mschap { use_mppe = yes ( mppe-128) require_encryption = yes require_strong = yes with_ntdomain_hack = no # - – !!! ntlm_auth = "/usr/local/samba/bin/ntlm_auth3 --request-nt-key \ --username=%{Stripped-User-Name:-%{User-Name:-None}} \ --challenge=%{mschap:Challenge:-00} \ --nt-response=%{mschap:NT-Response:-00}" } I once again draw your attention to the parameter ntlm_auth = "/ usr / local / samba / bin / ntlm_auth3 ..." Samba4 is "friendly" with samba3 and besides the ntlm_auth binary, which does not support MS-CHAP v2, there is a ntlm_auth3 binary, which all this means "!
PPTPD
And finally - pptpd. It is understood that you have already installed and configured pptpd itself (the /etc/pptpd.conf file is not necessary to edit!)
We rule / etc / ppp / pptpd-options :
############################################################################### # $Id: pptpd-options 4643 2006-11-06 18:42:43Z rene $ # # Sample Poptop PPP options file /etc/ppp/pptpd-options # Options used by PPP when a connection arrives from a client. # This file is pointed to by /etc/pptpd.conf option keyword. # Changes are effective on the next connection. See "man pppd". # # You are expected to change this file to suit your system. As # packaged, it requires PPP 2.4.2 and the kernel MPPE module. ############################################################################### # Authentication # Name of the local system for authentication purposes # (must match the second field in /etc/ppp/chap-secrets entries) name pptpd # Optional: domain name to use for authentication # # Strip the domain prefix from the username before authentication. # (applies if you use pppd with chapms-strip-domain patch) #chapms-strip-domain # Encryption # Debian: on systems with a kernel built with the package # kernel-patch-mppe >= 2.4.2 and using ppp >= 2.4.2, ... refuse-pap refuse-chap refuse-mschap # Require the peer to authenticate itself using MS-CHAPv2 [Microsoft # Challenge Handshake Authentication Protocol, Version 2] authentication. require-mschap-v2 # Require MPPE 128-bit encryption # (note that MPPE requires the use of MSCHAP-V2 during authentication) require-mppe-128 # Network and Routing # If pppd is acting as a server for Microsoft Windows clients, this # option allows pppd to supply one or two DNS (Domain Name Server) # addresses to the clients. The first instance of this option # specifies the primary DNS address; the second instance (if given) # specifies the secondary DNS address. # Attention! This information may not be taken into account by a Windows # client. See KB311218 in Microsoft's knowledge base for more information. ms-dns <ip_dns> # – 127.0.0.1 # If pppd is acting as a server for Microsoft Windows or "Samba" # clients, this option allows pppd to supply one or two WINS (Windows # Internet Name Services) server addresses to the clients. The first # instance of this option specifies the primary WINS address; the # second instance (if given) specifies the secondary WINS address. ms-wins <ip_wins> # – 127.0.0.1 # Add an entry to this system's ARP [Address Resolution Protocol] # table with the IP address of the peer and the Ethernet address of this # system. This will have the effect of making the peer appear to other # systems to be on the local ethernet. # (you do not need this if your PPTP server is responsible for routing # packets to the clients -- James Cameron) proxyarp # Debian: do not replace the default route nodefaultroute # Logging # Enable connection debugging facilities. # (see your syslog configuration for where pppd sends to) debug # Print out all the option values which have been set. # (often requested by mailing list to verify options) #dump # Miscellaneous # Create a UUCP-style lock file for the pseudo-tty to ensure exclusive # access. lock # Disable BSD-Compress compression nobsdcomp auth logfile /var/log/pptpd.log # radius plugin radius.so plugin radattr.so The file /etc/radiusclien/radiusclient.conf (in my opinion, I did not touch it, except that I corrected authserver and acctserver):
# General settings # specify which authentication comes first respectively which # authentication is used. possible values are: "radius" and "local". # if you specify "radius,local" then the RADIUS server is asked # first then the local one. if only one keyword is specified only # this server is asked. auth_order radius,local # maximum login tries a user has login_tries 4 # timeout for all login tries # if this time is exceeded the user is kicked out login_timeout 60 # name of the nologin file which when it exists disables logins. # it may be extended by the ttyname which will result in # a terminal specific lock (eg /etc/nologin.ttyS2 will disable # logins on /dev/ttyS2) nologin /etc/nologin # name of the issue file. it's only display when no username is passed # on the radlogin command line issue /etc/radiusclient/issue # RADIUS settings # RADIUS server to use for authentication requests. this config # item can appear more then one time. if multiple servers are # defined they are tried in a round robin fashion if one # server is not answering. # optionally you can specify a the port number on which is remote # RADIUS listens separated by a colon from the hostname. if # no port is specified /etc/services is consulted of the radius # service. if this fails also a compiled in default is used. authserver localhost # RADIUS server to use for accouting requests. All that I # said for authserver applies, too. # acctserver localhost # file holding shared secrets used for the communication # between the RADIUS client and server servers /etc/radiusclient/servers # dictionary of allowed attributes and values # just like in the normal RADIUS distributions dictionary /etc/radiusclient/dictionary # program to call for a RADIUS authenticated login login_radius /usr/sbin/login.radius # file which holds sequence number for communication with the # RADIUS server seqfile /var/run/radius.seq # file which specifies mapping between ttyname and NAS-Port attribute mapfile /etc/radiusclient/port-id-map # default authentication realm to append to all usernames if no # realm was explicitly specified by the user # the radiusd directly form Livingston doesnt use any realms, so leave # it blank then default_realm # time to wait for a reply from the RADIUS server radius_timeout 10 # resend request this many times before trying the next server radius_retries 3 # LOCAL settings # program to execute for local login # it must support the -f flag for preauthenticated login login_local /bin/login File / etc / radiusclien / server :
# Make sure that this file is mode 600 (readable only to owner)! # #Server Name or Client/Server pair Key #---------------- --------------- 127.0.0.1 samba4 # «», freeradius? A very important point - create the file /etc/radiusclient/dictionary.microsoft . I will not give his text, because You can get it entirely here )
And at the end of the file / etc / radiusclient / dictionary append a line
INCLUDE /etc/radiusclient/dictionary.microsoft to get the following:
# # Updated 97/06/13 to livingston-radius-2.01 miquels@cistron.nl # # This file contains dictionary translations for parsing # requests and generating responses. All transactions are # composed of Attribute/Value Pairs. The value of each attribute # is specified as one of 4 data types. Valid data types are: # # string - 0-253 octets # ipaddr - 4 octets in network byte order # integer - 32 bit value in big endian order (high byte first) # date - 32 bit value in big endian order - seconds since # 00:00:00 GMT, Jan. 1, 1970 # # Enumerated values are stored in the user file with dictionary # VALUE translations for easy administration. # # Example: # # ATTRIBUTE VALUE # --------------- ----- # Framed-Protocol = PPP # 7 = 1 (integer encoding) # # # Following are the proper new names. Use these. # # # !!!! !!!!! INCLUDE /etc/radiusclient/dictionary.microsoft It seems everything. Samba4 is already running, you need to restart the freeradius server and the pptpd daemon.
Solving the problem with the absence of the “Dial-in” tab in the ADUC snap-in
Oh yes. About how to enable / disable access to VPN to certain users. You did install the Windows Remote Administration Tools package? So, you will not see that picture of the ADUC snap-in that is shown on the WiKi pages under Windows 7 with the “Dial-in” tab. And you will see something similar:
And where is the “Dial-in” tab or its Russian analogue “Incoming Calls”? How can I manage user permissions? Nothing wrong. We are not afraid of difficulties? We remember (I think you didn’t forget!) That the domain controller is, among other things, an LDAP server, so we put any tools for managing such a server (for example, LdapAdmin ) and we steer them.
To begin with, we set up a connection with our samba4 server: register the server address, push the “Fetch DNs” button, select the top-level database, radio-box “GSS-API”, connect the user’s password as the administrator, the password. We see our entire directory, which is when deploying a domain. Select the desired user and go into edit mode. Find the msNPAllowDialin attribute and enter TRUE or FALSE (required - in capital letters!):
We save. This user is allowed (or denied) to log in via VPN.
Results
In my opinion, all the tasks set at the beginning of the post are solved. The time spent on their solution (about two and a half weeks) was primarily spent on studying the documentation on the Internet, the experience of such decisions, comparing the information received with the realities that I saw with my own eyes on our server, compiling and recompiling samba4, and editing, editing and editing configs again ... But I was pleased with the result: the result was an almost complete replacement of Windows Server 2008 R2 with Active Directory, network policy and access service and remote desktop service (under wine, of course, but this isn’t ova did not write).
Source: https://habr.com/ru/post/157019/
All Articles