Apple Push Notification Service Guide
 This article is a free translation of the Apple Push Notification Service guide on raywenderlich.com and some of my additions.
iOS apps cannot be in the background for a long time. In order to conserve battery power, applications running in the background are allowed to perform a limited set of actions.
But what if something interesting happens and you want to inform the users about it, even if your application is not running?
For example, a user received a response on Twitter, or his favorite team won the game, or his dinner is ready. Since the application is not running, it cannot verify and receive this data.
')
Fortunately, Apple has provided a solution to this problem. Instead of continuously checking events or performing any actions in the background, you can create the server side of the application that will perform these actions.
And when the event of interest arrives, the server side will be able to send a push notification to the application! Absolutely any push notification can perform the following three actions:
- Show short text message.
- Play a short beep.
- Set the number on the badge application icons.
You can combine these actions as you see fit; for example, play the sound and set the number on the badge, but do not show the message.
Short review
The scheme of the push-notification mechanism:
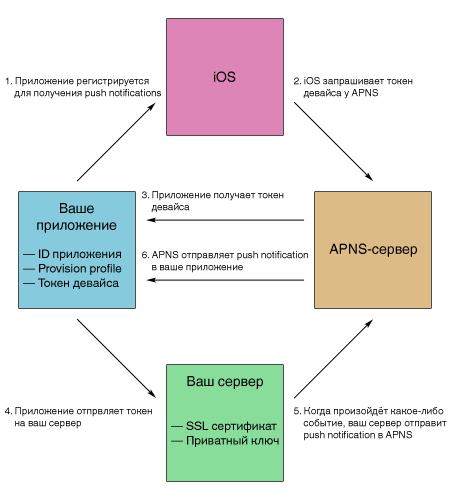
After installing the application, a pop-up message will appear confirming acceptance of push notifications.
- iOS requests the token of the device from the Apple Push Notification Service (APNS) server.
- The application gets a token device. We can assume that the token is the address for sending push notifications.
- The application sends a token device to your server.
- When an event occurs for your application, the server will send a push notification to APNS.
- APNS will send a push notification to the user's device.
When the user receives a push notification, a message will appear, and / or a beep will sound, and / or the badge will be updated on the application icon. The user can open the application from the notification. The application will receive the content of the push notification and be able to process it.
Should I still use push notifications if local notifications and multitasking have already appeared in iOS 4.0? Still would!
Local notifications are time-limited events. Only VOIP applications, navigation, and background audio playback have unlimited background execution capability. If you need to notify users of the application (as long as it is closed) about any external event, you still need to use push notifications.
This guide will describe in detail the work of the system of push-notifications and how to integrate it into your application.
What is needed for push notifications
To integrate push notifications into an application, you must:
iPhone, iPad or iPod touch. Push notifications do not work in the simulator, so you need a device for testing.
Registration in the iOS Developer Program. For each application in which the push notification mechanism will be integrated, you need to create a new App ID and provisioning profile, as well as an SSL certificate for the server. These actions are performed on the iOS Provisioning Portal.
If you want to completely follow the examples in this guide, you need to create a provisioning profile and an SSL certificate. I will explain in detail how to do this.
Server connected to the internet. Push notifications are always sent by the server. During the development process, you can use your own Mac as a server, but for release you need something like VPS (Virtual Private Server).
To work with push-notifications cheap virtual hosting is not enough. You need to run background execution on the server, install an SSL certificate, configure an outgoing TLS connection on certain ports. Most virtual hosting providers will not allow you to do this. Although if you contact the technical support service, then you will most likely be helped to solve all the problems. But still, I strongly recommend using VPS.
Anatomy of push notifications
Your server is responsible for creating messages for push notifications. Therefore, it is useful to know how these messages look.
A push notification is a short message consisting of a token device, a payload (payload) and some more information. The payload is the actual data that will be sent to the device.
Your server should convert the payload to a JSON dictionary. The payload for a simple push message is as follows:
{ "aps": { "alert": "Hello, world!", "sound": "default" } } A block bounded by curly braces contains a dictionary that consists of key-value pairs (as in NSDictionary).
A payload is a dictionary that consists of at least one key-value pair “aps”, the meaning of which is itself a dictionary. In the example above, "aps" contains two fields: "alert" and "sound". When a push notification arrives on the device, a pop-up message will appear with the text “Hello, world!” And a standard beep will be played.
In addition, in the "aps" you can add other fields to configure the notification. For example:
{ "aps": { "alert": { "action-loc-key": "Open", "body": "Hello, world!" }, "badge": 2 } } Now the value of the "alert" field is a dictionary. The “action-loc-key” contains alternative text for the “Run” button. The “badge” field contains a number that will be displayed on the badge of the application icon. Push notification will not be accompanied by a beep.
There are quite a few ways to generate a JSON payload. You can change the notification sound, add your own fields. More information can be found on the Apple Developers ’Local and Push Notification Programming Guide page.
Push notifications are pretty small; The size of the payload cannot exceed 256 bytes. This is about the same as it allows to contain SMS or tweet. The push server will not spend money on new line breaks and spaces, but will generate something like this:
{"aps":{"alert":"Hello, world!","sound":"default"}} Such a presentation is less readable, but provides enough space for more valuable information. APNS will reject push notifications whose sizes exceed 256 bytes.
Understanding Push Notifications
 They are not reliable! There are no guarantees that push notifications will be delivered even if APNS accepts them.
Once your server has generated a push notification, it sends it to APNS without a response. There is no way to know the delivery status of the notification to the end user after sending. Delivery time can vary from a few seconds to half an hour.
In addition, i-device users may not be able to receive push notifications all the time. For example, there is no Wi-Fi network with Internet access nearby, or the device can be turned off altogether.
APNS will attempt to deliver the last notification sent when the device is available for reception. But these attempts are limited in time. After a timeout, the push notification will be lost forever!
 They can be expensive! Adding push functionality to an application is fairly simple and inexpensive if you own the data. However, if you have many users, or you need to request data, the costs increase dramatically.
For example, you can easily notify users of changes in the RSS feed, because you control the feed and know when changes will be made - when the content on the site is updated - your server will instantly send a notification.
But what if your application is an RSS reader that allows users to enter the URLs of their feeds? In this case, you need to come up with a tracking mechanism for updating the added feeds.
In practice, this means that your server needs to constantly check tapes for changes. If you have many users, you may need to install additional servers to handle all the processes and maintain stable bandwidth. For applications such as an RSS reader, the implementation of the push functionality can be quite expensive and not valuable to you.
Okay, enough theory. It is time to learn the process of implementing all these push-things. But before embarking on the most "delicious" - programming! - you need to perform some boring settings on the iOS Provisioning Portal. Well, let's make them as fast as possible.
Provisioning Profiles and Certificates
 In order to connect push notifications to an application, you must sign it with a properly configured provisioning profile. In addition, your server needs to connect to the APNS using an SSL certificate.
The Provisioning profile and the SSL certificate are closely related to each other and are valid only for one App ID. This is a protection that ensures that only your server can send push notifications to users of your application.
As you know, for the development and release of applications use different provisioning profiles. There are two types of push certificates for the server:
- Development (Development). If the application is in debug mode and a provisioning profile is signed for development (Code Signing Identity - “iPhone Developer”).
- Release (Production). Applications created as Ad-Hoc or prepared for download on the App Store (Code Signing Identify - “iPhone Distribution”) should inform the server that they are using a certificate for release (Production certificate). If there are inconsistencies between them, then push notifications will not be able to come into your application.
This guide will only use a certificate for development.
Generate Certificate Signing Request (CSR)
Remember how you logged into the iOS Provisioning Portal and created a Development Certificate after joining the iOS Developer Program? The following steps will be similar. But still, I advise you to carry them out exactly as described below. Developers have most of the problems with push notifications related to certificates.
Digital certificates are based on encryption using a public-private key. You do not need to know anything about encryption when working with certificates, but you should be aware that the certificate is always paired with a private key.
A certificate is a common part of this key pair. The private key should be kept secret. Owning it only you and no one else should have access to it. I note that it is impossible to use a certificate without a private key.
Whenever you request a digital certificate, you must make a request for its signature (Certificate Signing Request [CSR]). When you create a CSR, the new key will be stored in the keychain. You then need to send the CSR to a certification authority (in this case, the iOS Developer Portal), which will generate an SSL certificate based on the information from the CSR.
Open the keychain utility (“Applications → Utilities (Other)”) and select the option “Request a certificate from a certification authority ...”.
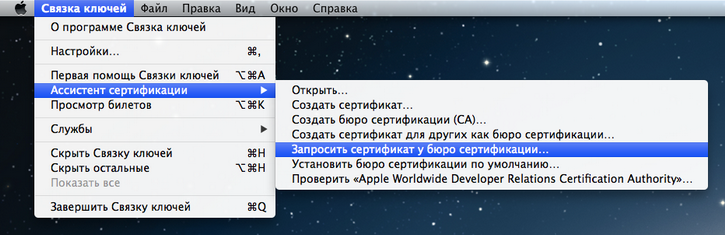
If you do not see this menu option or a message appears with the text “Request a certificate from a certificate authority with a key” (“Request a Certificate from a Certificate Authority with key”), then you need to download and install WWDR Intermediate Certificate . You also need to check that no private key is allocated.
Now before you should be a window of the certification assistant:
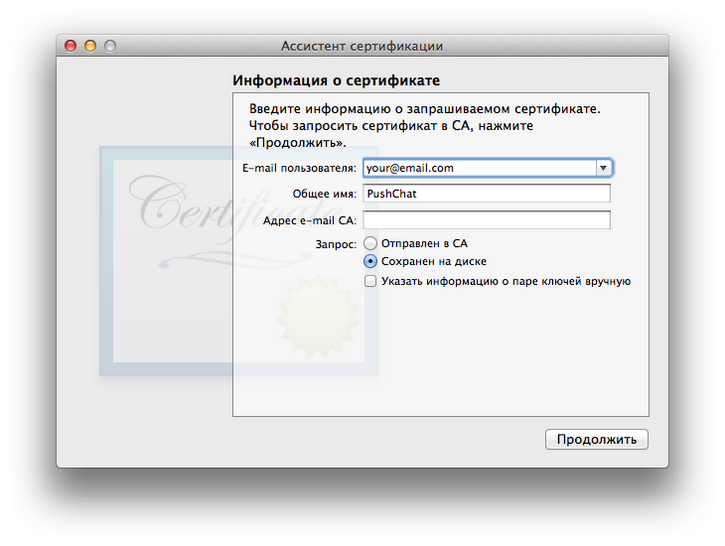
Enter e-mail here. Developers are advised to use the same email as the one you used to register with the iOS Developer Program, but this is not necessary.
As a common name, enter “PushChat”. You can enter anything, but choose something descriptive. Later this will make it easy to find a private key.
Select the "Saved to disk" radio button and click "Continue." Save the file as “PushChat.certSigningRequest”.
Create App ID and SSL Certificate
Login to the iOS Provisioning Portal .
First, create a new App ID. Each application that uses a push notification mechanism needs its own unique ID.
Click on the “App IDs” item on the sidebar and click on the “New App ID” button.
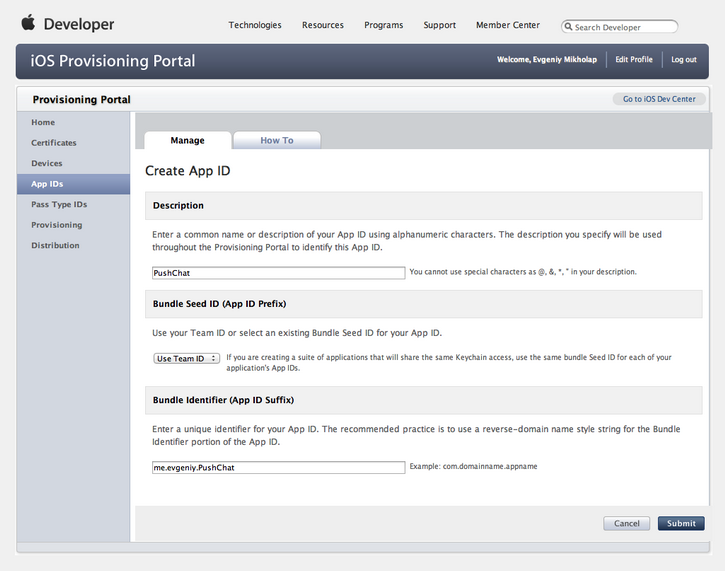
I filled the fields as follows:
Description: PushChat
Bundle Seed ID: default
Bundle Identifier: me.evgeniy.PushChat
It would be better if you specify your own Bundle Identifier - com.yoursite.PushChat - instead of mine. In an Xcode project, you need to set the same bundle ID.
A few more points: we will generate an SSL certificate that your push server will use to securely connect to APNS. This certificate is associated with the App ID. The server can send push notifications only to your application and to no other.
After the App ID has been created, it will appear in the list:
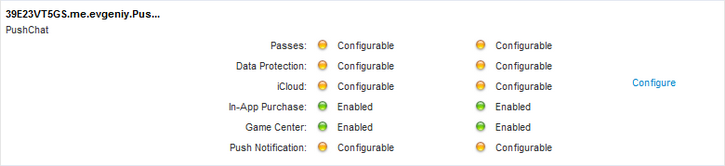
In the columns “Development” and “Production” opposite “Push Notification” there are two orange circles with the inscription “Configurable”. This means that the App ID can use push notifications, but they still need to be configured. Therefore, follow the link "Configure".
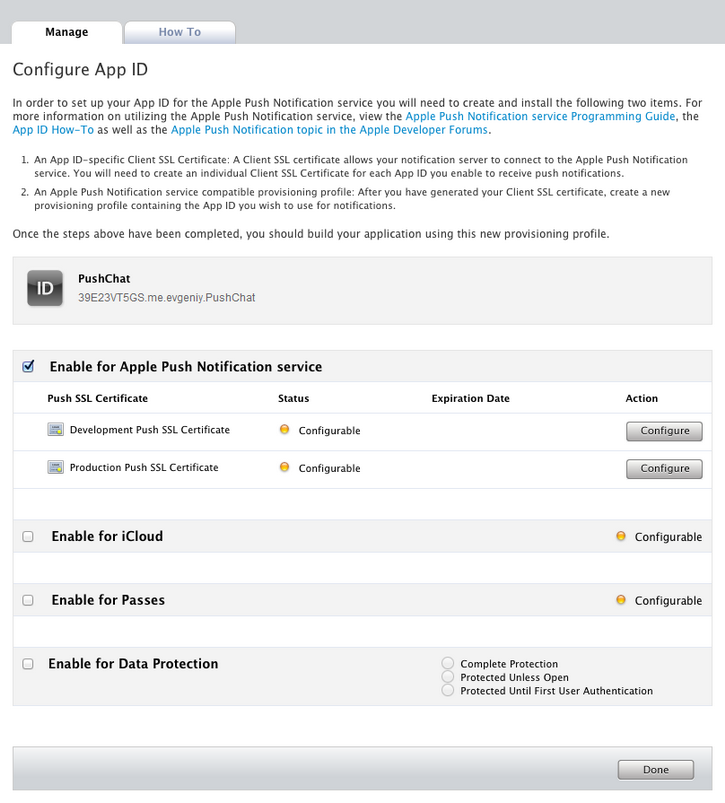
On the page that appears, check the box next to “Enable for Apple Push Notification service”. Then click the “Configure” button in the line with the Development Push SSL Certificate. The “Apple Push Notification service SSL Certificate Assistant” window opens:
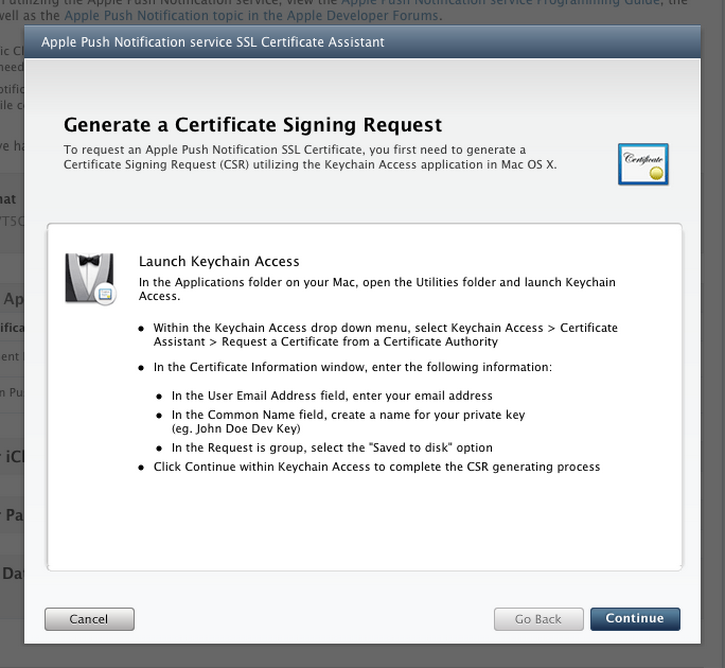
The first thing to do is generate a Certificate Signing Request. We have already done this, so click "Continue".

The next step is to upload the CSR to the Apple server. Select the CSR file you generated earlier and click “Generate”.
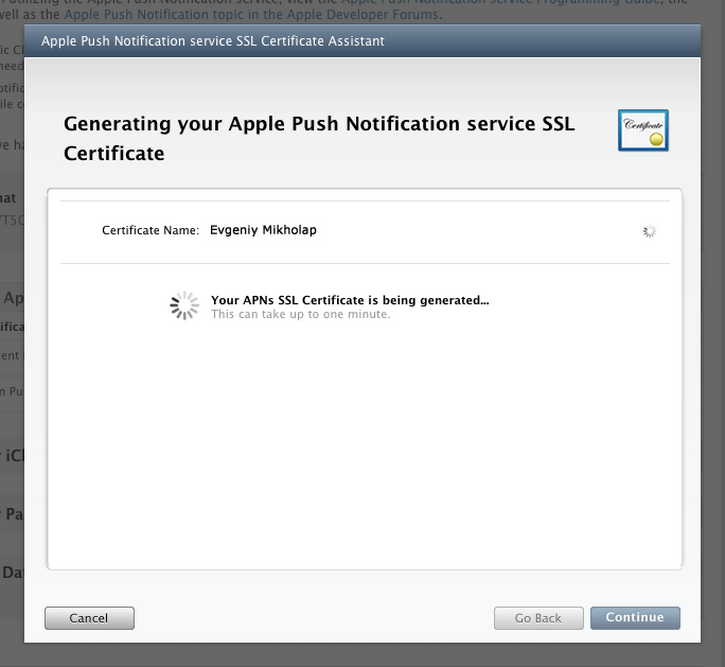
SSL certificate generation takes a few seconds. When ready, click “Continue”.
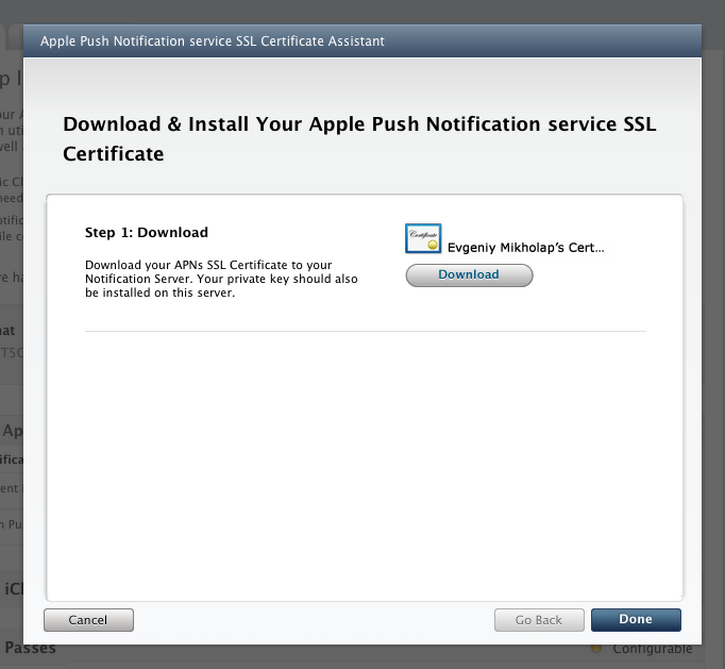
To download a certificate, click “Download” - it will be saved under the name “aps_development.cer”. After click "Done".

Now we have a valid certificate and a push notification mechanism is available for development. If necessary, you can reload the certificate.
When your application is ready for release, you need to repeat the entire process to generate a Production-certificate. All steps are similar.
Comment. A production certificate is valid for a year, but you can re-create it before the expiration date.
No need to add a certificate to a keychain. If you want to do this, then double-click on the previously downloaded aps_development.cer file (after that, the certificate will be associated with the private key).
Creating a Provisioning Profile
Go to the Provisioning Portal. Click on the “Provisioning” link and click on the “New Profile” button.

I filled the fields as follows:
- Profile Name: PushChat Development
- Certificates: select a certificate
- App ID: PushChat
- Devices: select your device (s)
This process is no different from generating any other provisioning profile. We create a new profile, because each application that supports the push notification mechanism needs its own profile, which is associated with a specific App ID.
Click “Submit” and the profile will be generated. The new profile will be set to “Pending” status. Reload the page and see that the status has changed to Active. Now you can download the provisioning profile (file called “PushChat.mobileprovision”).
Add the provisioning profile to Xcode by dragging the file to the IDE icon or by double clicking on the file.
If your application is ready for release, then you need to repeat the process described above to create an Ad Hoc or App Store distribution profile.
Simple application
Previous actions were not really exciting, but they are required to perform. I wanted to show in detail how to generate a certificate, because the developer does not do such things every day, and without them, push notifications will not work.
Now we will create a simple application that will receive push notifications.
Open Xcode and create a new project. In the assistant, select “Single View Application” and proceed to the next step.
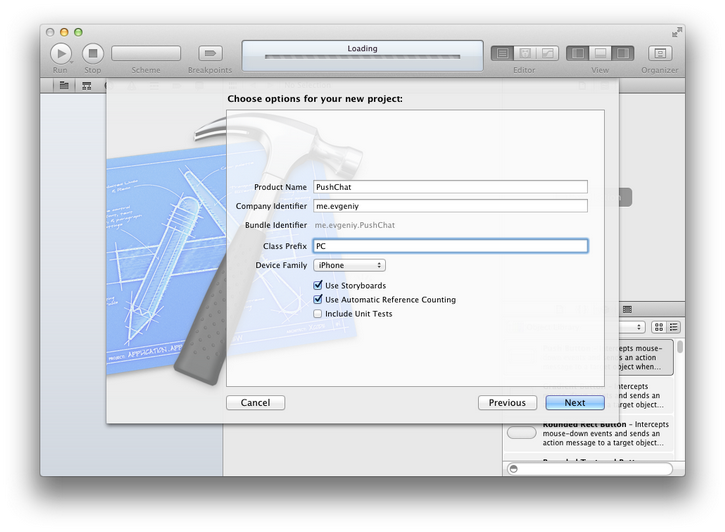
I filled the fields as follows:
- Product Name: PushChat
- Company Identifier: me.evgeniy
- Class Prefix: PC
- Device Family: iPhone
- Flags: “Use Storyboards” and “Use Automatic Referance Counting”
Together the Product Name and Company Identifier form the Bundle ID. In my case it is “me.evgeniy.PushChat”. You must enter the Product Name and Company Identifier corresponding to the App ID that was previously created on the Provisioning Portal (com.yourname.PushChat).
After creating the project, open PCAppDelegate.m. Change the didFinishLaunchingWithOptions method as follows:
- (BOOL)application:(UIApplication *)application didFinishLaunchingWithOptions:(NSDictionary *)launchOptions { // iOS 7 [[UIApplication sharedApplication] registerForRemoteNotificationTypes: (UIRemoteNotificationTypeBadge | UIRemoteNotificationTypeSound | UIRemoteNotificationTypeAlert)]; // iOS 8 // [[UIApplication sharedApplication] registerUserNotificationSettings:[UIUserNotificationSettings settingsForTypes:(UIUserNotificationTypeSound | UIUserNotificationTypeAlert | UIUserNotificationTypeBadge) categories:nil]]; // [[UIApplication sharedApplication] registerForRemoteNotifications]; return YES; } A call to registerForRemoteNotificationTypes tells iOS that this application wants to receive push notifications.
Build and run the application. To do this, you need to use the device, because the simulator does not support push notifications. Xcode will automatically select the new provisioning profile. If an error occurs during the launch of the application, make sure that the correct profile is selected in the Code Signing Identity.
When the application starts, a message will appear confirming the acceptance of push notifications.
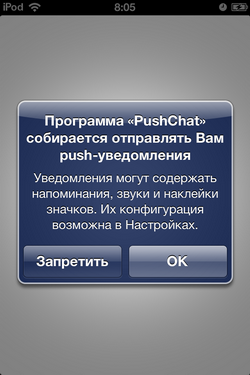
The application will ask for permission only once. If the user clicks "OK", push-notifications will come, if "Deny" - will not. Your decision can be changed in the settings.
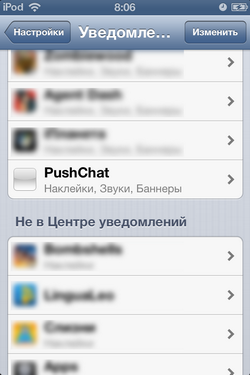
The name of your application will be added to the push notification settings. Here, the user can enable or disable push notifications for your application, as well as customize badges, sounds, and messages.
Your application can determine which types of push notifications are included:
UIRemoteNotificationType enabledTypes = [[UIApplication sharedApplication] enabledRemoteNotificationTypes]; There is one more thing you need to add to the app in order to be able to receive push notifications. Add the following code to PCAppDelegate.m:
- (void)application:(UIApplication *)application didRegisterForRemoteNotificationsWithDeviceToken:(NSData *)deviceToken { NSLog(@"My token is: %@", deviceToken); } - (void)application:(UIApplication *)application didFailToRegisterForRemoteNotificationsWithError:(NSError *)error { NSLog(@"Failed to get token, error: %@", error); } When your application registers to receive push notifications, it tries to get the token of the device. This is a 32-byte unique number that uniquely identifies your device. The token of the device can be compared with the address where push notifications will be sent.
After starting the application, the token of your device will be displayed on the Xcode console:
My token is: <740f4707 bebcf74f 9b7c25d4 8e335894 5f6aa01d a5ddb387 462c7eaf 61bb78ad>A token is an opaque binary data structure that is an object of type NSData. For our purposes, it is enough to know the 32-byte device token. The token can be represented as 64 hexadecimal characters. We will use exactly this format.
If you run the application on the simulator, the method didFailToRegisterForRemoteNotificationsWithError: will be called, which will display an error with the information that the simulator does not support push notifications.
We are done with the app. Now let's try push notifications in action!
Sending push notifications
As described earlier, to send push notifications, you must configure the server. But for testing we will use the application for Mac OS PushMeBaby, which can also be downloaded from the github service.
Then everything is simple - open PushMeBaby in Xcode, add the previously created SSL certificate (aps_development.cer) to the project, and then proceed to editing the ApplicationDelegate.m file. In the init method, we make the following changes:
Add the token of the device, which will be displayed in the Xcode console after launching the application created earlier:
self.deviceToken = @"564f77d3 c1d06866 77a907d5 31d0450a 9cb552ec 5e2373e5 f2cc2c20 ff013232"; Add the payload, which was mentioned earlier (we must screen quotes):
self.payload = "{\"aps\":{\"alert\":\"Hello, world!\",\"sound\":\"default\"}}"; And we set the name of the SSL certificate added to the project:
self.certificate = [[NSBundle mainBundle] pathForResource:@"aps_development" ofType:@"cer"]; 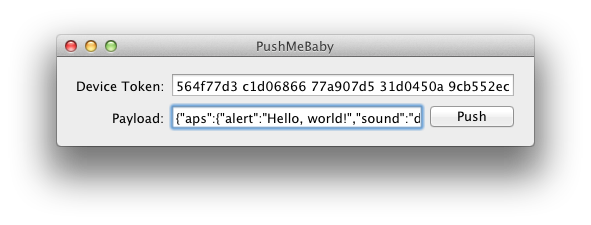
Now we start the application and press the Push button. Within a few seconds you should receive a push notification.
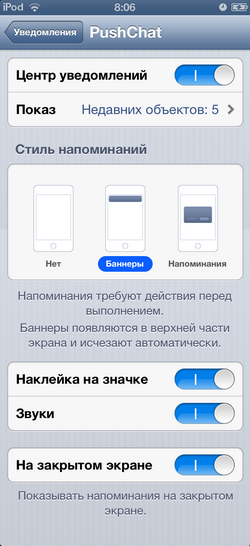
With the “Banner” style, the push notification looks like this:

With the style "Reminder" more familiar:
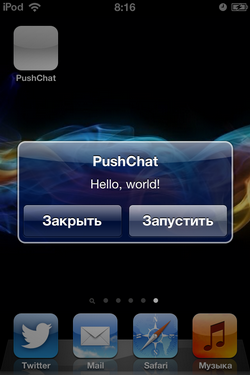
Comment. The notification will not appear if the application is running and active on the device. However, the payload will come to the application and can be processed using the didReceiveRemoteNotification method:
- (void) application:(UIApplication *)application didReceiveRemoteNotification:(NSDictionary *)userInfo { NSLog(@"Received notification: %@", userInfo); } That's all. All questions you are interested in can be asked in the comments; I will try to answer them.
Source: https://habr.com/ru/post/156811/
All Articles