Creating Clustered Storage Spaces in Windows Server 2012
Good day!
Today I would like to talk a little about a new feature in Windows Server 2012 - Storage Spaces or Data Spaces.
In essence, this is some kind of disk subsystem virtualization mechanism that abstracts us from the physical layer of the disk subsystem. However, a more interesting implementation of this mechanism is Clustered Storage Spaces. Let's take a closer look at how to configure this mechanism.

')
To begin with, let's deal with those necessary conditions of our “given” for the implementation of the customization process.
So:
1) To create a Storage Spaces in the failover cluster mode, you need at least 3 physical disks, the size of which is at least 4 GB for each disk.
2) All disks inside the Storage Pools must be Serial Attached SCSI (SAS) - independent of whether these disks are directly connected to the system, whether there is any layer between the OS and the disks in the form of RAID controllers and other disk subsystems or not.
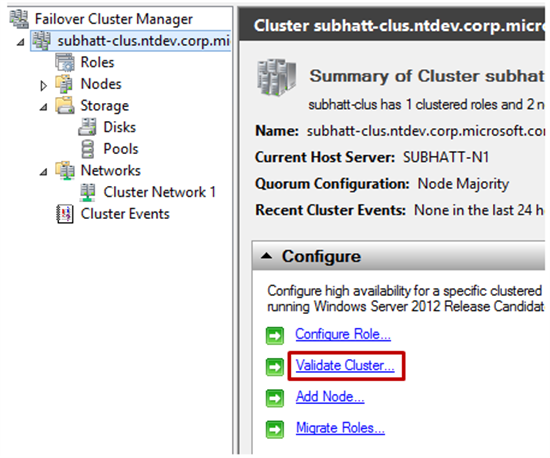
3) All physical disks that will be in a clustered pool must successfully pass the validation test in Failover Clustering. In order to do this, open Failover Cluster Manager - cluadmin.msc and select the Validate Cluster option.
4) A clustered data space should use a fixed type of resource provision (this is the type of vhd (x) disk that is used for Storage Spaces).
5) Simple (simple) and mirror (mirror) types of Storage Spaces are supported - the type with integrity control (parity) is not supported.
6) The disks that are used in the failover pool must be allocated . This means that they cannot be used in other pools, only in one and only one.
7) Storage spaces that are formatted in ReFS format cannot be added to a shared cluster volume (CSV) .
1) Add the File Services role and the File Services Role Administration Tools toolkit to all cluster nodes in Failover Cluster.
2) Open the Failover Cluster Manager management console (cluadmin.msc) .
3) On the left side of the panel, expand the Storage item, right-click on Pools and select the item to create a new New Storage Pool . Next you will see the New Storage Pool Wizard setup wizard.

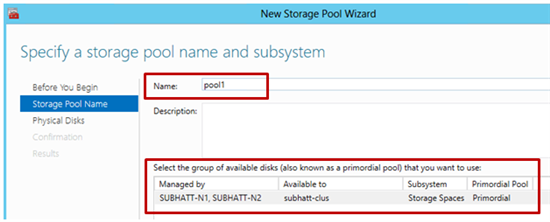
4) Set a name for the Storage Pool and select the disk subsystem available for the cluster and click Next .
5) Select the physical disks in the Physical Disks section for the new pool (remember the requirements !!!) and confirm the creation of the pool. The pool will be added to the cluster transferred to the active state (Online) .

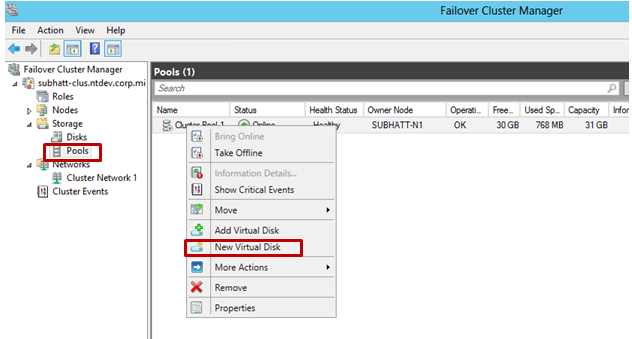
6) The next step is to create a virtual disk or data space that will be associated with our pool. In the Failover Cluster Manager, select the storage pool of interest that the virtual disk will provide. Right click and the item New Virtual Disk is our choice!
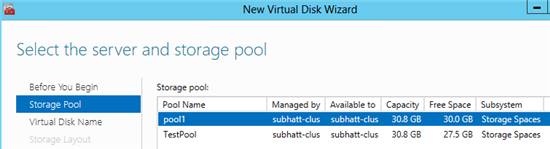
7) Next, the New Virtual Disk Wizard Virtual Hard Disk Wizard will start. Select the server and pool for the virtual disk and click Next . Note that in the server list will be specified the node that hosts the pool.
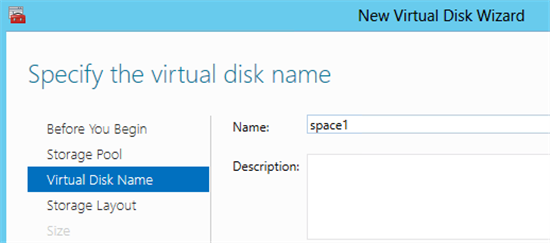
8) Specify the name of the virtual disk and its description. Click Next .
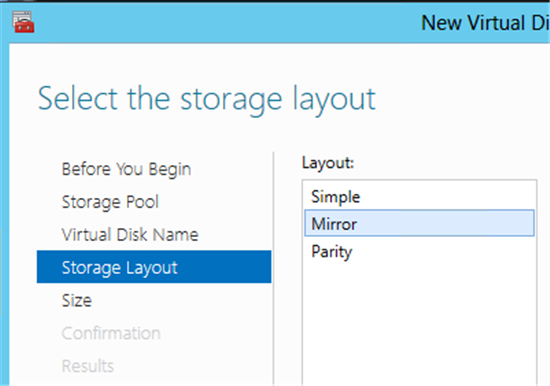
9) Select the type of disk subsystem - Simple (Simple) or Mirror (Mirror) . Remember that the Parity option is not supported for cluster implementation.
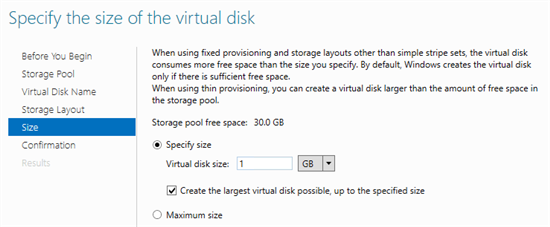
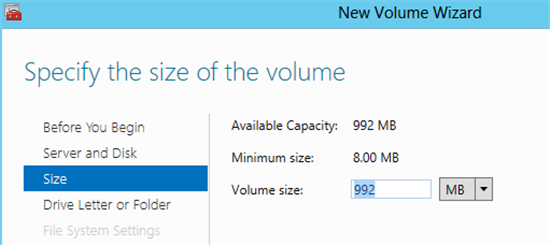
10) Specify the size of the virtual disk and click Next . After confirmation, the disc will be created. If you did not uncheck the check box, then the New Volume Wizard will start.
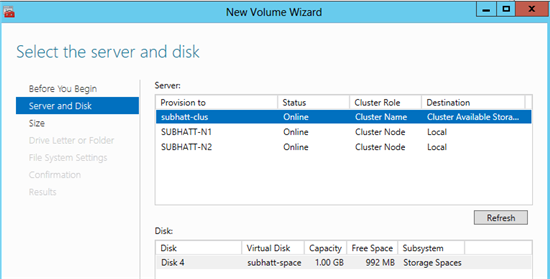
11) Set the correct “Server-Disk” for your configuration and click Next .
12) Specify the size of the volume and click Next .
13) You can also assign a letter to a new volume - then click Next .

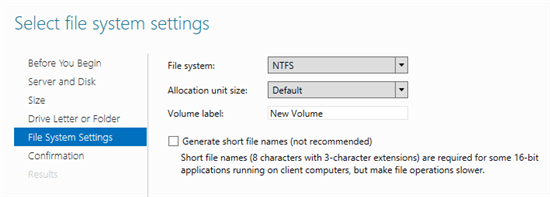
14) Select the file system type (we remember that only NTFS is suitable for our task) and click Next to confirm the settings. A new volume will be created on top of the virtual disk and given to the cluster ownership.
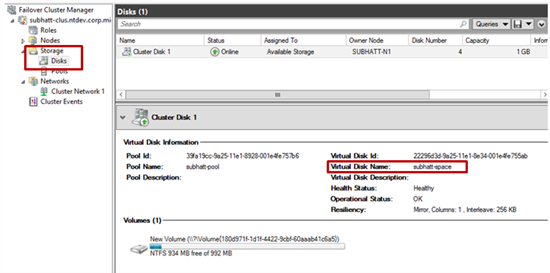
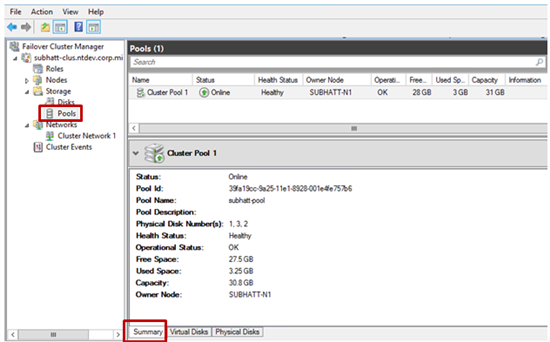
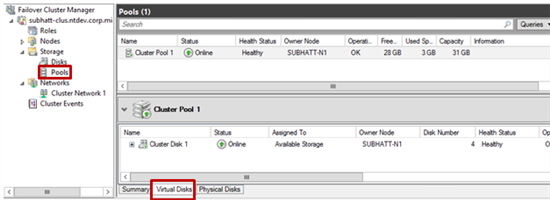
15) Well, our cluster space has been successfully created! Now it is possible to place clustered loads on top of it. To view the pool properties, log in to the Failover Cluster Manager .
And lastly.
All the same, but without GUI)))
1. Create a new space
a. Select physical disks and add to pool
$ phydisk = Get-PhysicalDisk –CanPool $ true | Where BusType -eq "SAS"
b. Getting the disk subsystem for the pool
$ stsubsys = Get-StorageSubsystem
c. Create a new pool
$ pool = New-StoragePool -FriendlyName TestPool -StorageSubsystemFriendlyName $ stsubsys.FriendlyName -PhysicalDisks $ phydisk -ProvisioningTypeDefault Fixed
d. Adding a disk for hot swapping (Hot Spare)
$ hotSpareDisk = Get-PhysicalDisk –CanPool $ true | Out-GridView -PassThru
Add-PhysicalDisk -StoragePoolFriendlyName TestPool -PhysicalDisks $ hotSpareDisk -Usage HotSpare
2. Creating data space on top of previously created pool
a. $ newSpace = New-VirtualDisk –StoragePoolFriendlyName TestPool –FriendlyName space1 -Size (1GB) -ResiliencySettingName Mirror
3. Initialization, markup and formatting of previously created data space
a. $ spaceDisk = $ newSpace | Get-disk
b. Initialize-Disk -Number $ spaceDisk.Number -PartitionStyle GPT
c. $ partition = New-Partition-DiskNumber $ spaceDisk.Number -DriveLetter $ driveletter -size $ spaceDisk.LargestFreeExtent
d. Format-Volume -Partition $ partition -FileSystem NTFS
4. Adding data space to the cluster
a. $ space = Get-VirtualDisk -FriendlyName space1
b. Add-ClusterDisk $ space
This seems to be all. It remains to add that if you want to learn more about the new features of Windows Server 2012, then we invite everyone to IT Camps, which will be held in Moscow. Schedule you will find here .
And do not forget about a very useful resource - Microsoft Virtual Academy
Merry IT adventures!
Respectfully,
George A. Gadzhiev
Information Infrastructure Expert
Microsoft Corporation
Today I would like to talk a little about a new feature in Windows Server 2012 - Storage Spaces or Data Spaces.
In essence, this is some kind of disk subsystem virtualization mechanism that abstracts us from the physical layer of the disk subsystem. However, a more interesting implementation of this mechanism is Clustered Storage Spaces. Let's take a closer look at how to configure this mechanism.
')
Preliminary Requirements
To begin with, let's deal with those necessary conditions of our “given” for the implementation of the customization process.
So:
1) To create a Storage Spaces in the failover cluster mode, you need at least 3 physical disks, the size of which is at least 4 GB for each disk.
2) All disks inside the Storage Pools must be Serial Attached SCSI (SAS) - independent of whether these disks are directly connected to the system, whether there is any layer between the OS and the disks in the form of RAID controllers and other disk subsystems or not.
3) All physical disks that will be in a clustered pool must successfully pass the validation test in Failover Clustering. In order to do this, open Failover Cluster Manager - cluadmin.msc and select the Validate Cluster option.
4) A clustered data space should use a fixed type of resource provision (this is the type of vhd (x) disk that is used for Storage Spaces).
5) Simple (simple) and mirror (mirror) types of Storage Spaces are supported - the type with integrity control (parity) is not supported.
6) The disks that are used in the failover pool must be allocated . This means that they cannot be used in other pools, only in one and only one.
7) Storage spaces that are formatted in ReFS format cannot be added to a shared cluster volume (CSV) .
How to set up - step by step instructions
1) Add the File Services role and the File Services Role Administration Tools toolkit to all cluster nodes in Failover Cluster.
2) Open the Failover Cluster Manager management console (cluadmin.msc) .
3) On the left side of the panel, expand the Storage item, right-click on Pools and select the item to create a new New Storage Pool . Next you will see the New Storage Pool Wizard setup wizard.
4) Set a name for the Storage Pool and select the disk subsystem available for the cluster and click Next .
5) Select the physical disks in the Physical Disks section for the new pool (remember the requirements !!!) and confirm the creation of the pool. The pool will be added to the cluster transferred to the active state (Online) .
6) The next step is to create a virtual disk or data space that will be associated with our pool. In the Failover Cluster Manager, select the storage pool of interest that the virtual disk will provide. Right click and the item New Virtual Disk is our choice!
7) Next, the New Virtual Disk Wizard Virtual Hard Disk Wizard will start. Select the server and pool for the virtual disk and click Next . Note that in the server list will be specified the node that hosts the pool.
8) Specify the name of the virtual disk and its description. Click Next .
9) Select the type of disk subsystem - Simple (Simple) or Mirror (Mirror) . Remember that the Parity option is not supported for cluster implementation.
10) Specify the size of the virtual disk and click Next . After confirmation, the disc will be created. If you did not uncheck the check box, then the New Volume Wizard will start.
11) Set the correct “Server-Disk” for your configuration and click Next .
12) Specify the size of the volume and click Next .
13) You can also assign a letter to a new volume - then click Next .
14) Select the file system type (we remember that only NTFS is suitable for our task) and click Next to confirm the settings. A new volume will be created on top of the virtual disk and given to the cluster ownership.
15) Well, our cluster space has been successfully created! Now it is possible to place clustered loads on top of it. To view the pool properties, log in to the Failover Cluster Manager .
PowerShell lovers
And lastly.
All the same, but without GUI)))
1. Create a new space
a. Select physical disks and add to pool
$ phydisk = Get-PhysicalDisk –CanPool $ true | Where BusType -eq "SAS"
b. Getting the disk subsystem for the pool
$ stsubsys = Get-StorageSubsystem
c. Create a new pool
$ pool = New-StoragePool -FriendlyName TestPool -StorageSubsystemFriendlyName $ stsubsys.FriendlyName -PhysicalDisks $ phydisk -ProvisioningTypeDefault Fixed
d. Adding a disk for hot swapping (Hot Spare)
$ hotSpareDisk = Get-PhysicalDisk –CanPool $ true | Out-GridView -PassThru
Add-PhysicalDisk -StoragePoolFriendlyName TestPool -PhysicalDisks $ hotSpareDisk -Usage HotSpare
2. Creating data space on top of previously created pool
a. $ newSpace = New-VirtualDisk –StoragePoolFriendlyName TestPool –FriendlyName space1 -Size (1GB) -ResiliencySettingName Mirror
3. Initialization, markup and formatting of previously created data space
a. $ spaceDisk = $ newSpace | Get-disk
b. Initialize-Disk -Number $ spaceDisk.Number -PartitionStyle GPT
c. $ partition = New-Partition-DiskNumber $ spaceDisk.Number -DriveLetter $ driveletter -size $ spaceDisk.LargestFreeExtent
d. Format-Volume -Partition $ partition -FileSystem NTFS
4. Adding data space to the cluster
a. $ space = Get-VirtualDisk -FriendlyName space1
b. Add-ClusterDisk $ space
This seems to be all. It remains to add that if you want to learn more about the new features of Windows Server 2012, then we invite everyone to IT Camps, which will be held in Moscow. Schedule you will find here .
And do not forget about a very useful resource - Microsoft Virtual Academy
Merry IT adventures!
Respectfully,
George A. Gadzhiev
Information Infrastructure Expert
Microsoft Corporation
Source: https://habr.com/ru/post/156777/
All Articles