EGPU assembly experience and its interaction with a laptop
Introduction
Good afternoon, dear habro-community. By profession, I am a person far from IT, however, almost everything that is somehow related to this area of the article is very interesting to me, since I’m still the geek in my heart.
As you probably have already noticed, this article is not the first one dedicated to the topic of eGPU . It is possible that in my article you will find little interesting, but, nevertheless, I want to share my experience, the results of which impressed me. I ask under the cut ( attention traffic! ) ...
')
One evening, after a hard day's work, playing with “friends” with my friends, an idea came to my mind, inspired by a long time ago read articles, that you can significantly improve the performance of the graphic component of a laptop. Having free time and means, it was decided to buy all the components and try out in practice what the eGPU system can give, despite the limited throughput capacity of the express port.
A little about the theory and components of eGPU
So, you want to take a chance and turn the operation “eGPU”, but do not know where to start? You have a lot of questions like: “Will it fit the eGPU laptop ?,“ Which graphics card should I choose? ”,“ Which power supply unit to purchase? ”, Etc. Then you can feel free to contact here (as direct communication with the owners) and to the materials of this site (as a reference, since the ideological inspirer of the eGPU movement is nando4 , after an unfair ban, and other important participants moved to techinferno ).
Briefly, the system on the eGPU is a kind of tandem from a laptop, a stationary power supply and a discrete video card, interconnected via the ExpressCard interface \ mPCIe slot and the key component - the adapter, due to which the conversion to PCI Express takes place. Making a small digression, it is worth noting that there is a version for the port of Thunderbolt in the DIY version - TH05 , and in the ready one - Echo Express SE Thunderbolt Expansion Chassis , however, today such a purchase would not be entirely reasonable, because Thunderbolt port does not activate PCI-E compression mode, which affects overall performance. However, on the horizon flashes the prospect of an even faster generation of the Thunderbolt port, which will ensure the performance of PCI-Express 3.0 . Returning to the main thread of the story, we have to admit that it remains to choose between versions based on ExpressCard and mPCIe, among which there are cheap ones - PE4L


and PE4H
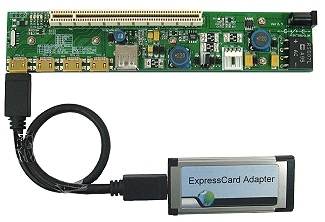
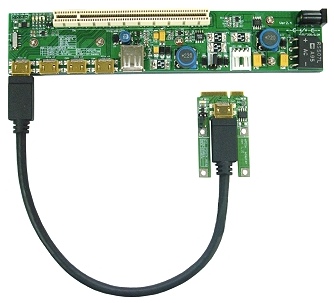
, and also not quite cheap, more aesthetic and less energy-intensive options - Magma ExpressBox

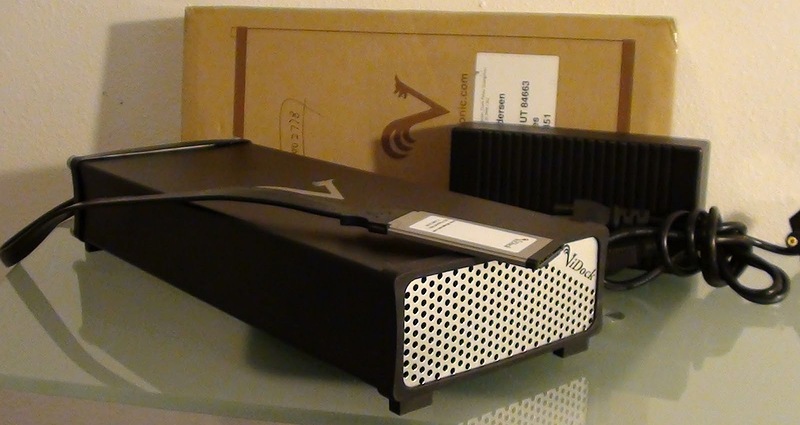
and ViDock .
As soon as we decided for ourselves which eGPU solution is better, the next step is to choose a video card. Taking into account that the video card will be used on a limited port, throughput, you need to make your choice on the cards of the middle and highest category of any of the GTX 460/470 , GTX 560/570 , GTX 660/670 series. Moreover, comparing the related categories of video cards, for example GTX 570 and GTX670, the difference in performance will not be very significant. You can analyze this issue in more detail using this table as a sample.
Let's say your choice fell on the nVIDIA GeForce 670 GTX line. The next step will be - the study of power consumption and amperage, which are necessary for the normal functioning of the video card. So, for the GeForce 670 GTX series, a power source is needed, which gives a 12 V power output with a minimum current of 30A. Failure to comply with these conditions may cause a quick failure of your video card.
In turn, based on the above-mentioned parameters of the video card, the power supply should be selected ( note below ). The recommended power supply for the GTX 670 series ranges from 500 to 600 watts. The best guide will be the choice of power supply with a margin of +50 watts of power. Thus, for GeForce 670 GTX operating at standard frequencies, this will be a power supply of 550-600 W, for cards with factory overclocking, preferably 650 W.
Fans of high resolutions will have to spend additional time on an external monitor. It is worth noting here that eGPU can be used with both an external monitor and a laptop display. And if with connecting an external monitor everything is as clear as day, then using a laptop display is not so simple, and for some laptop owners it is completely impossible in terms of implementation.
In total there are three widely used methods in practice :
1) Using technology nVIDIA Optimus . The main conditions are: naturally, the presence of the nVIDIA video card (starting with the latest cards on the Fermi architecture and the newer ones) and the integrated Intel video models 4500MHD / HD / HD3000 / HD4000 . When using this method, the nVIDIA driver clones an image from an external video card onto a laptop display, and this process has a negligible effect on the performance of the video subsystem. In other words - the speed of a video card connected directly to an external monitor will be slightly higher than using a laptop display.
2) Ultramon / Chung Gun method. This method is suitable for owners of ATI video cards and early models of nVIDIA cards. It is similar to the above, except that 3D programs can only be run in windowed mode.
3) The third method is based on the use of HDMI ExpressCard converter - HD80E HDMI Express Video Capture Card . The advantage of this option is that it is deprived of the speed limits of the two previous ones, however, to use it, you need a free mPCIe slot, to which the eGPU will be connected.
And of course the last component, without which the whole operation would be meaningless, is a laptop. As mentioned above, if you plan to use eGPU only with a laptop display, the best option would be a nVIDIA video card and a laptop with integrated video of 4500MHD / HD / HD3000 / HD4000 models. In order to get maximum performance, it is desirable that the processor of your laptop was based on the Sandy Bridge microarchitecture, or better still, Ivy Bridge. So, in the case of Sandy Bridge laptops, you get a second-generation ExpressCard interface with a bandwidth of 500 MB / s, which, coupled with the compression of the nVIDIA Optimus driver, gives very, very good performance.
Generalize For an eGPU based system, we will need :
- Straight arms and a bright head.
- A laptop.
- Adapter eGPU (choose depending on the laptop, needs, budget, etc.).
- Video card (similar to ...).
- BP (unforgettable about the power and strength of the current, as well as the recommendations of the manufacturers of specific cards regarding the energy inquiries of a particular model).
- External monitor (optional).
Buying and assembly process
So, you have decided on the components, ordered, received the cherished boxes, unpacked, decomposed, studied the manual. Getting to the assembly!
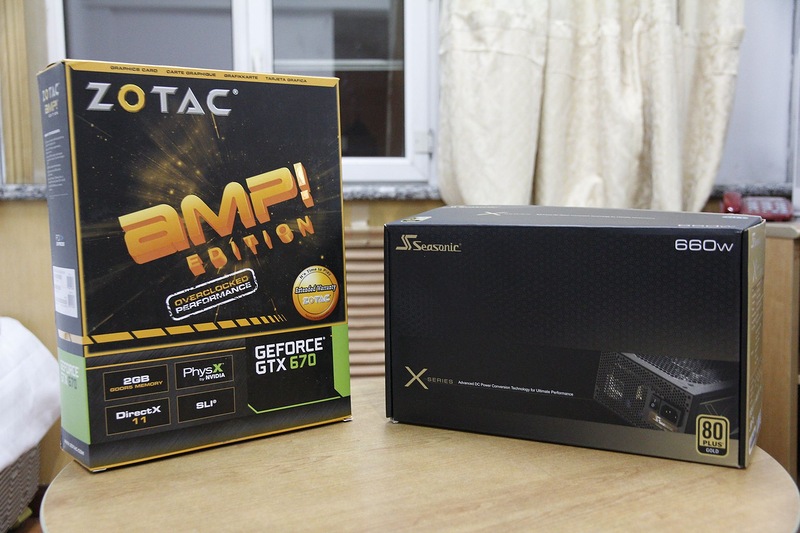
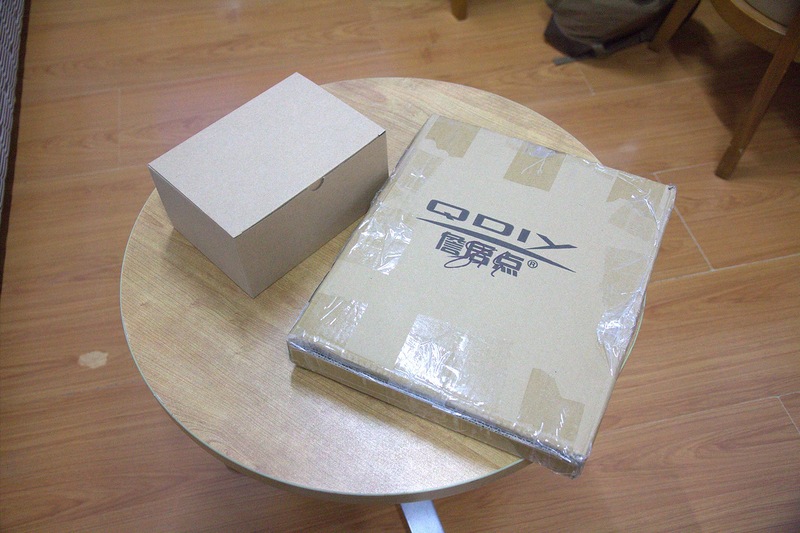
Immediately, I note that at the time of purchase, the goal was not to save money, so the video card is one of the best in its category and the BP did not disappoint. The reason for this was some fears - it won’t work, didn’t like, etc., etc., in which case, everything could be sold or returned (some sellers give seven days for tests) without significant losses. Everything was bought on TaoBao. But, looking ahead, I will say that everything works and most likely, I will not return anything, or I will not sell.
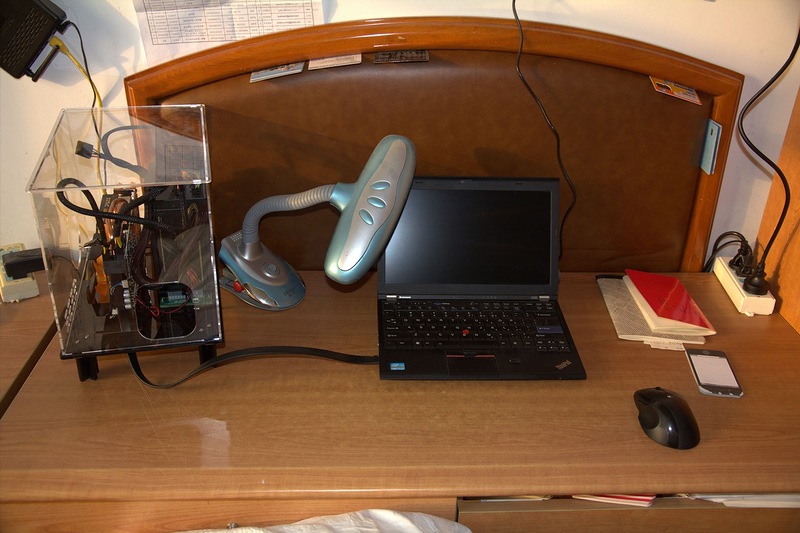
Everything was tested using the eGPU PE4L 2.1b adapter on a Lenovo X220 laptop, whose happy owner I am. The maximum configuration, to put it more precisely - i7-2640M \ 8GB \ HDD320GB .
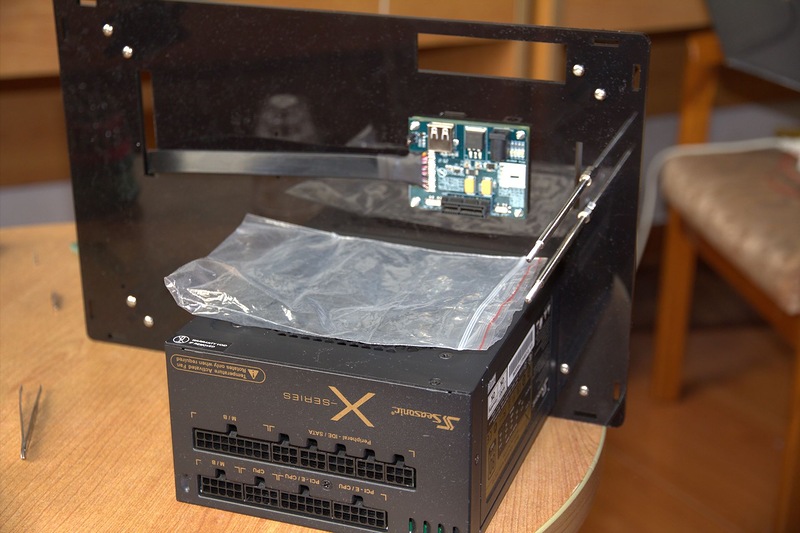
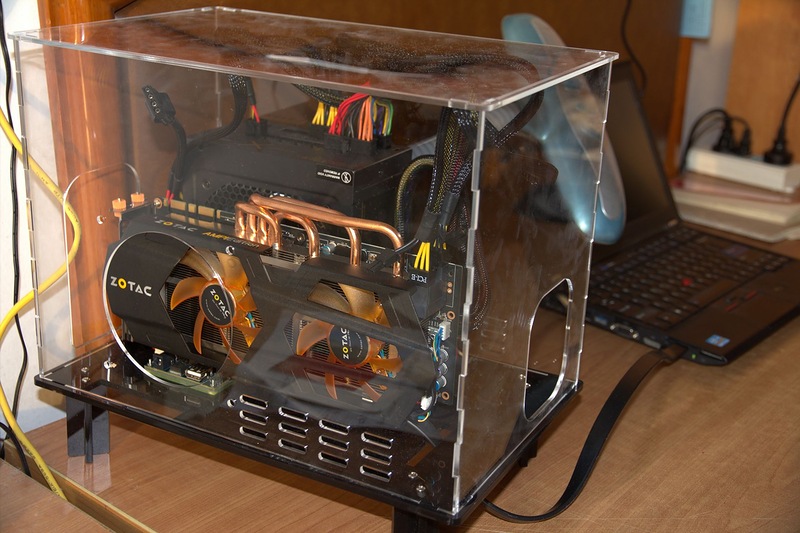
In addition to the main components, an acrylic case was purchased, from the same company that manufactures the PE4L and PE4H adapters. With him we begin.
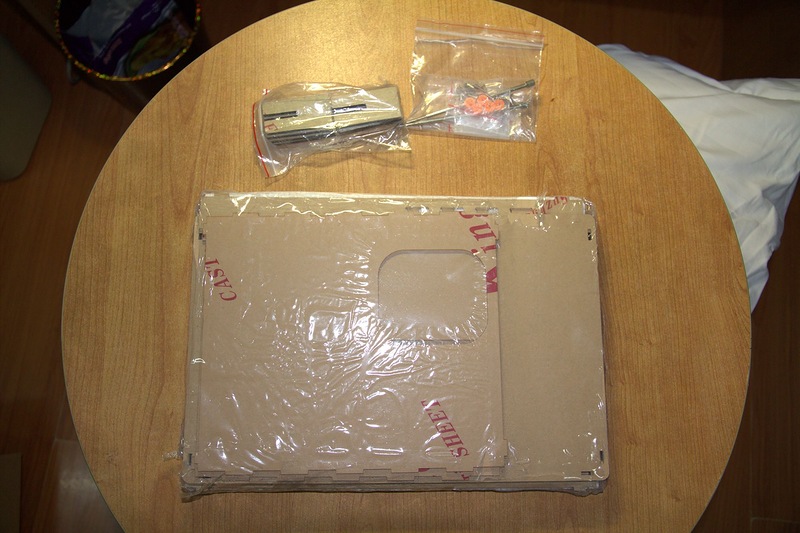
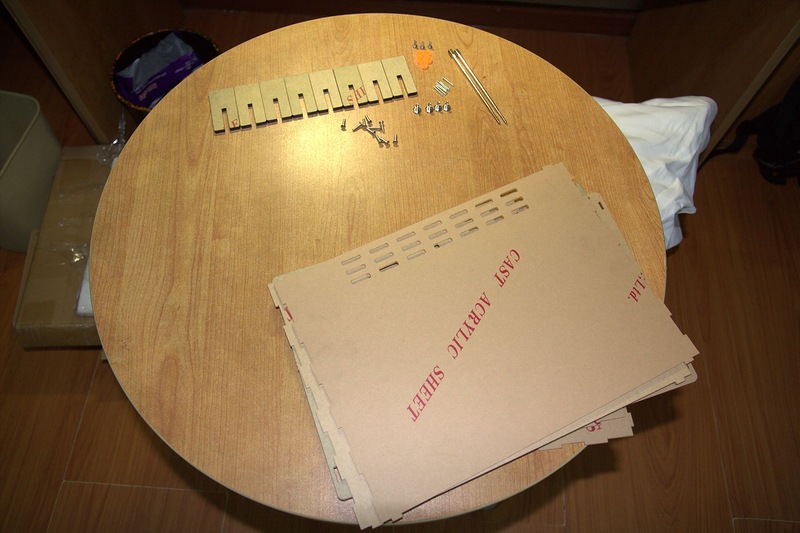
We unpack and get, carefully place the components. Each acrylic part of the case for protection against scratches is covered with thick paper, which can be torn off or left as it is, in any case - this will not affect the air flow or the efficiency of the finished system. I decided to tear off.
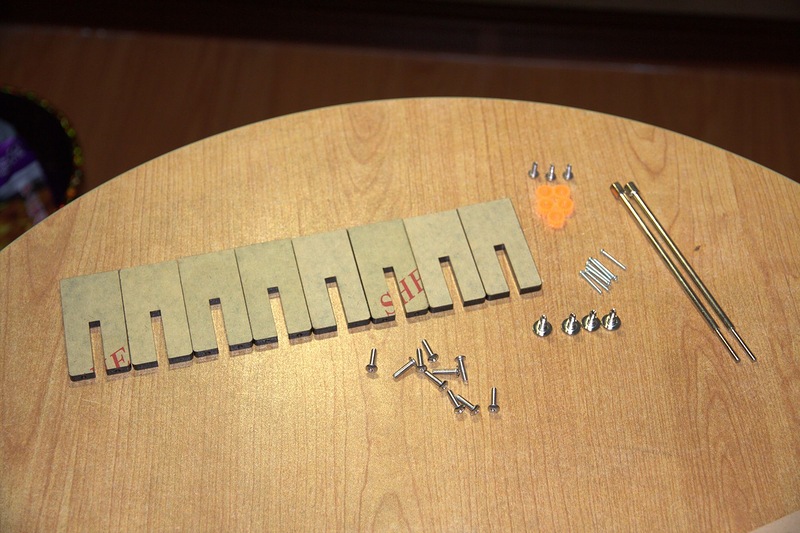
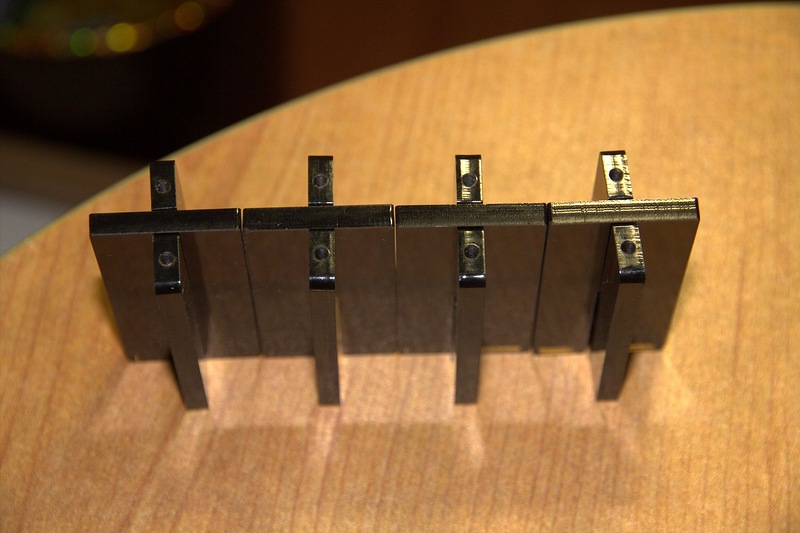
Assemble the legs and fasten to the bottom of the case. Here it is worth scolding the creators for not having drilled two holes in each of the ribs, so the finished design would be monolithic. After fastening to the bottom, the ribs without holes are a little loose. However, at the end of the assembly, the overall weight of the structure corrects the situation.
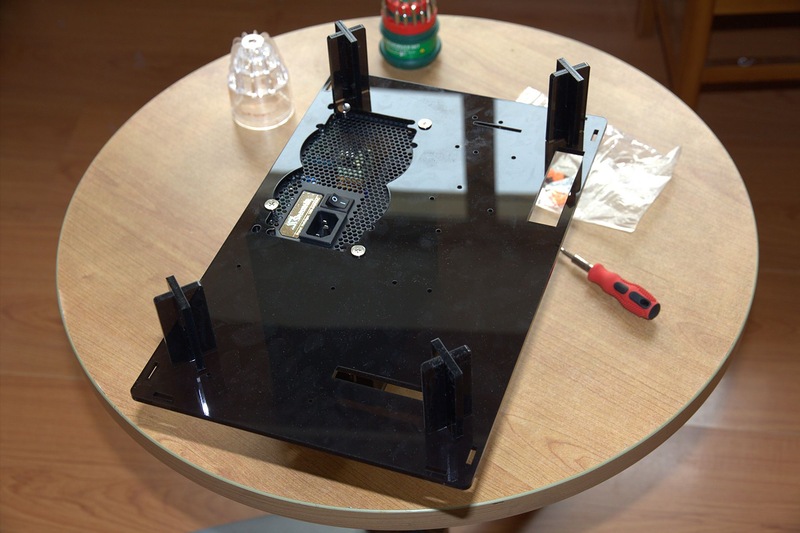
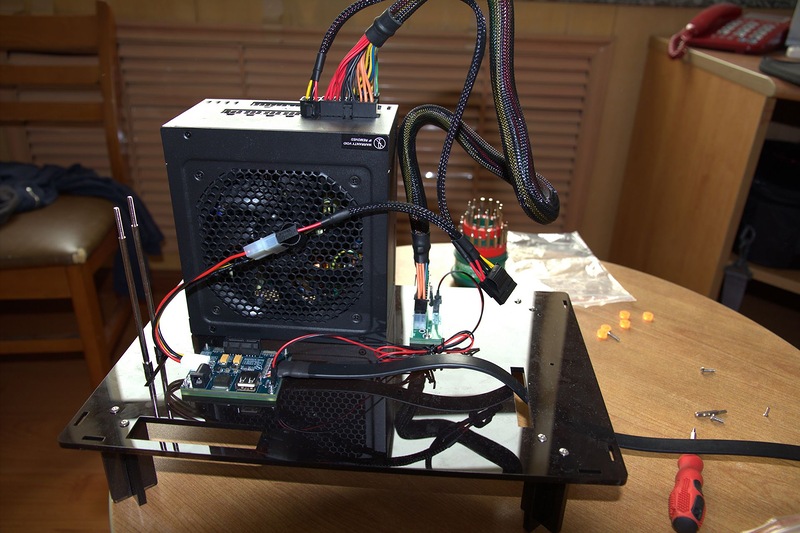
After the support is ready, go to the heaviest component - BP. In the acrylic bottom, holes are drilled for different variations of the PSU, so compatibility problems should not be. For my system, I used a 660 watt PSU from Seasonic, the X series. For more details on this PSU, read here . Everything is mounted on a fairly strong-looking bolts.
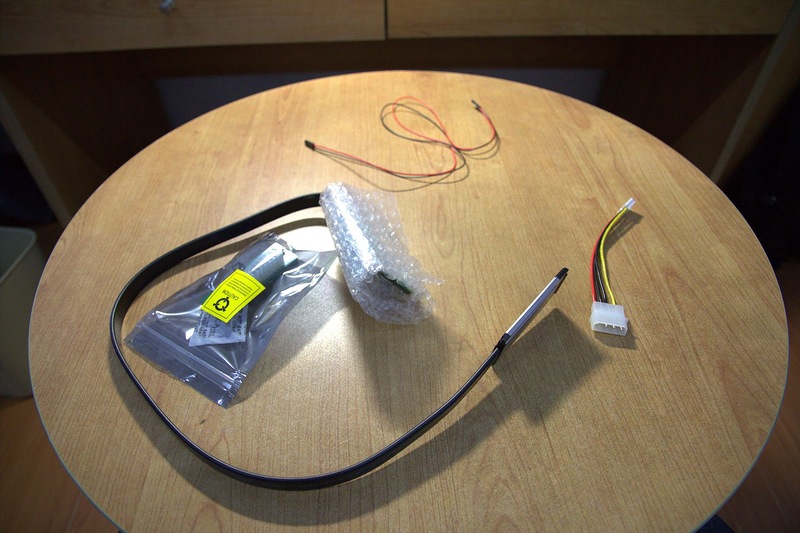
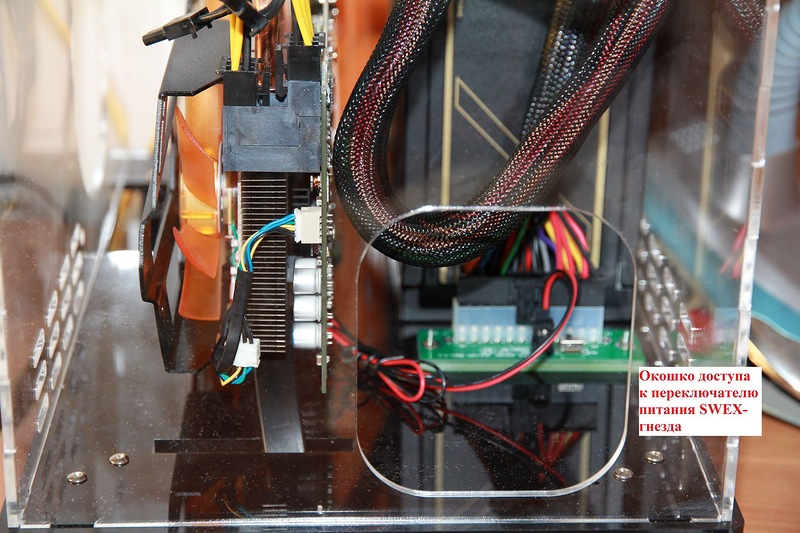
The turn came of the components of the eGPU adapter, including: SWEX-socket for the power supply, power cable, connecting cable for the adapter and the power switch and, directly, the PE4L adapter itself.
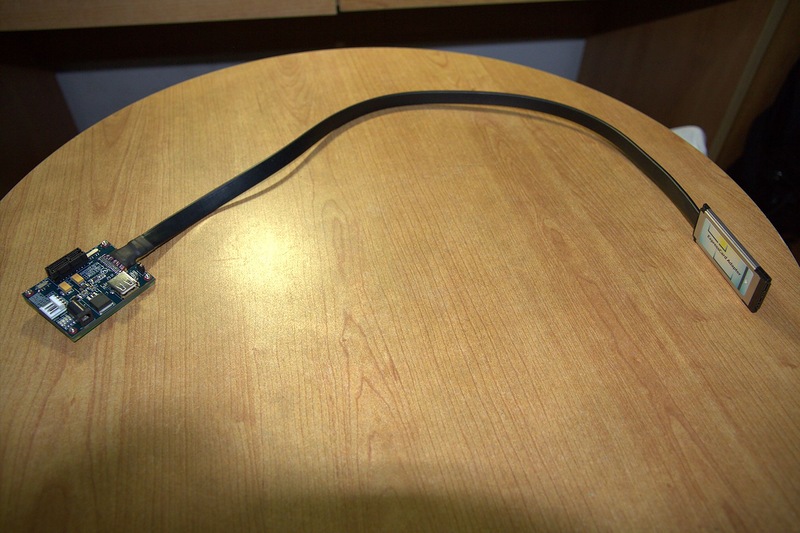

Remove the adapter from the wrapper. The adapter is made on a piece of dark blue textolite, to which green textolite is additionally bolted. Such a “sandwich” solution is not accidental, since in the process of continuous operation this element of the eGPU can become very hot. First you need to unscrew the default screws and nuts. Then, passing something onto the power grid of the power supply fan ( approx. Nuts and screws are small, easy to drop ), fasten the adapter to the bottom of the case. At the time of assembly, another drawback was noticed - two of the four holes had a little more cogs in diameter, so the cardboard insulation washers that came with the adapter were used as a solution.
Before proceeding to the next step, consider the device adapter in more detail.

On it are :
1. USB 2.0 port.
2. Power connector for connecting an external power supply unit.
3. Floppy power connector.
4. Switch for forced detection of PCI cards with speeds higher than the first (i.e. x2, x4, x8, x16).
5. PCI slot.
6. CLKRUN # switch (the description says that the switch is used to avoid detecting a PCI card by the BIOS for a specific period of time. If I'm wrong or the description is lying, please correct it. Anyway, everything is fine with me started on parameter 500ms).
7. Connector for connecting the wire connecting the eGPU adapter and the power switch of the SWEX socket.
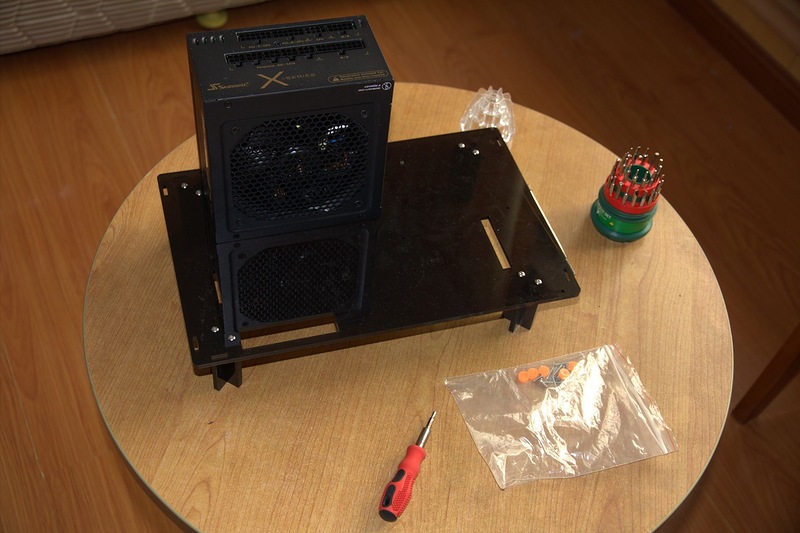
The next step is to install supports for the video card. Nothing complicated. In that case, if you plan to use the monitor and one of the supports will block the video output, then you can leave only one. In my case, nothing was removed, since it was originally planned to use only the display of the laptop.

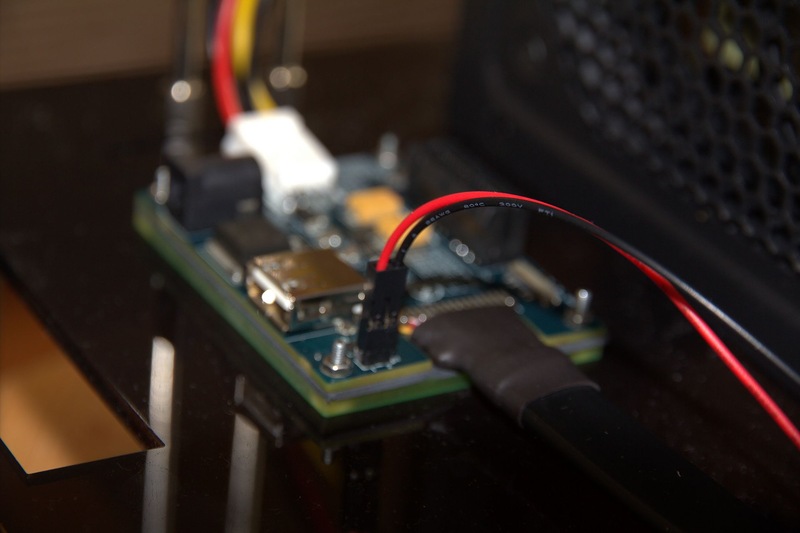
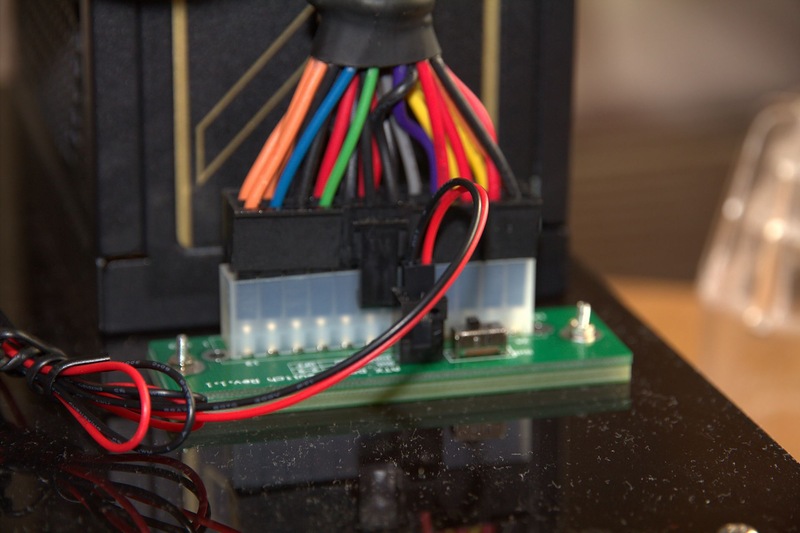
We proceed to connect the power supply unit to the SWEX socket, the eGPU adapter, and then connect the eGPU adapter to the power switch.
An important point is that when connecting the connecting cable for the eGPU adapter and the power switch, polarity must be observed.
Almost finished design looks like this. It remains to connect the last component - the video card. Oh! This delicious smell of fresh PCB!

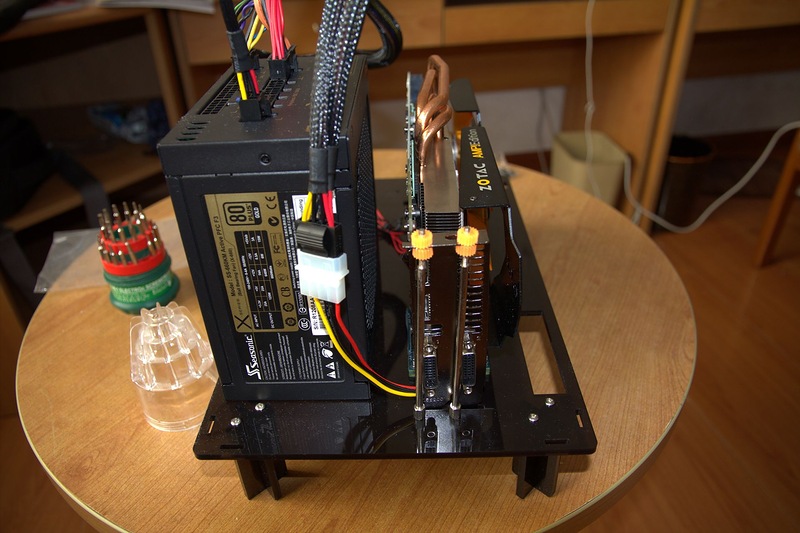
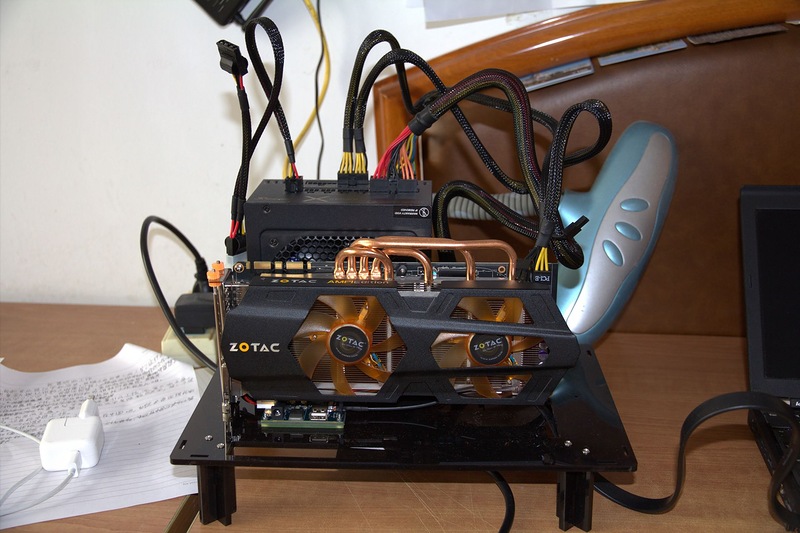
When inserting the card into the slot, you need to be careful with the wires and tighten the screws on the supports. Things to do are install the latest acrylic panels and start testing.
It is worth noting that the manufacturer of the case did not drill holes in the walls for their subsequent fixing with screws, but simply limited it to special projections that are inserted into the slots of the bottom. In my opinion, this is also a miscalculation. Even if we take into account the fact that this was done with the aim of not being able to carry the case, holding the side panels ( compared to the weight of the inside of the case, acrylic panels do not look so strong. For this reason, even if they were fixed with screws, there is a high risk of breakage and subsequent loss of the bottom ).
When I was closely looking at the already assembled system in the process of work, my neighbor successfully joked, saying: "Now you have personal IT porn on your table."
Install and run the system
So, we come to the final and most exciting moment for me - the launch of the system.
Previously, we need to download the latest drivers for the video card. Then we start the installation process, during which the program reports that no suitable video adapter has been detected. We translate a laptop into sleep mode. It should be noted that you only need to put in sleep mode during the installation of the drivers. In the future, you can insert the ExpressCard adapter into the appropriate slot after turning on the eGPU, right while the laptop is running. In turn, before disconnecting it is obligatory to use the function of "safe removal of devices".
Move the switch on the power supply unit (if any) and the SWEX socket to the ON position. The fact that everything is going as it should be indicated by the working fans of the video card, the PSU and the orange and green diodes on the eGPU adapter board. We connect the ExpressCard adapter to the socket, bring the laptop out of sleep mode. The installation program should determine the connection of the video card, click next and perform a clean installation. Reboot. We are ready for testing!
Testing
I want to emphasize that all tests were conducted using a laptop display, which makes its own adjustments to the results obtained. When using an external monitor, the results will be much better. In addition, the system was in no way optimized (registry add-ons, pre-defragmentation, disabling OS visual styles, etc.).
Test bench :
- Lenovo x220 i7-2640M \ 8GB \ HDD320GB
- Display IPS native resolution 1366x768
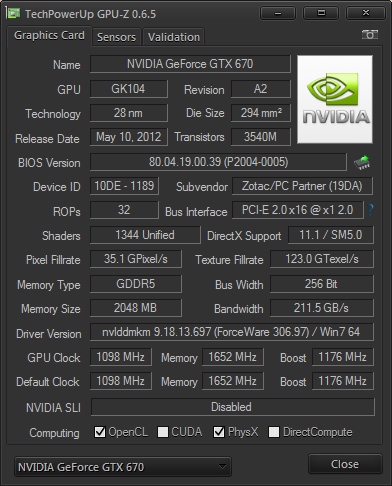
- ZOTAC GeForce GTX 670 AMP! Edition 2 GB (no overclocking)
Testing programs :
- 3DMark 11 Basic Edition
- Resident Evil 5 Benchmark Version
- Sleeping Dogs Benchmark Mode
- Battlefield 3 (FRAPS)
- Left4Dead2 (FRAPS)
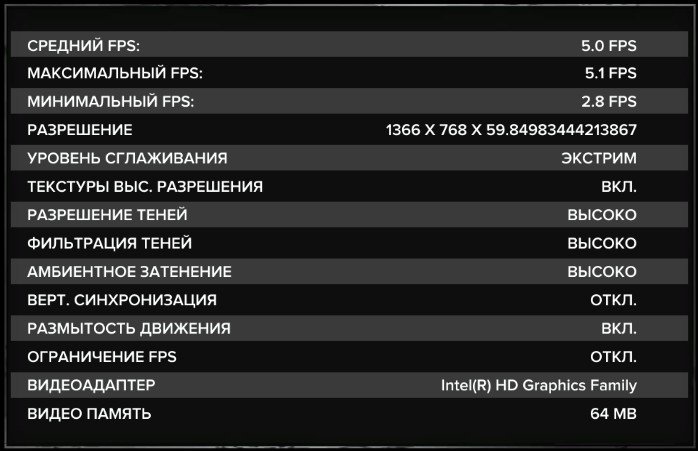
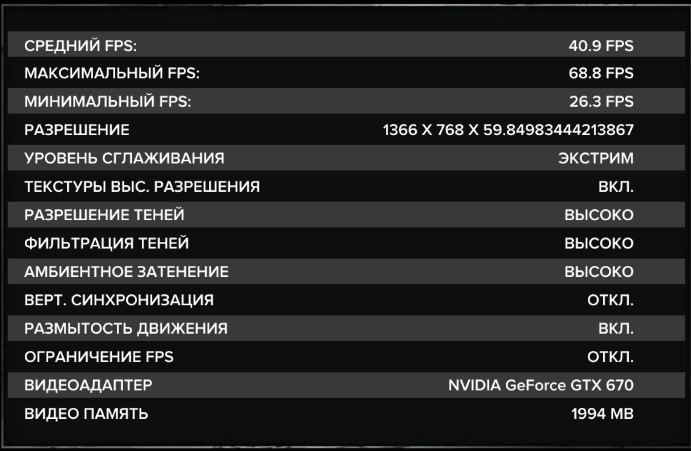
In order to have something to compare with, tests were conducted on integrated video from Intel (in my case it is Intel HD Graphics 3000 ). So, the results:

For obvious reasons, on the integrated video the last 3D Mark does not start, so the results are only for GTX 670. Basic version, all settings are default. Total turned 6034 points.

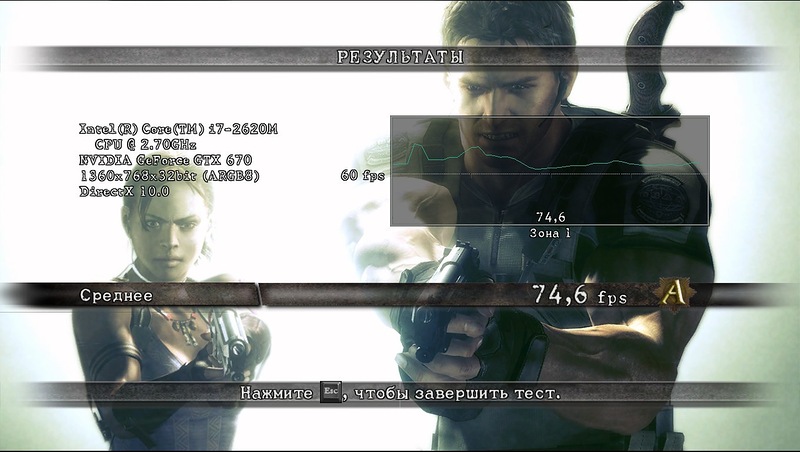
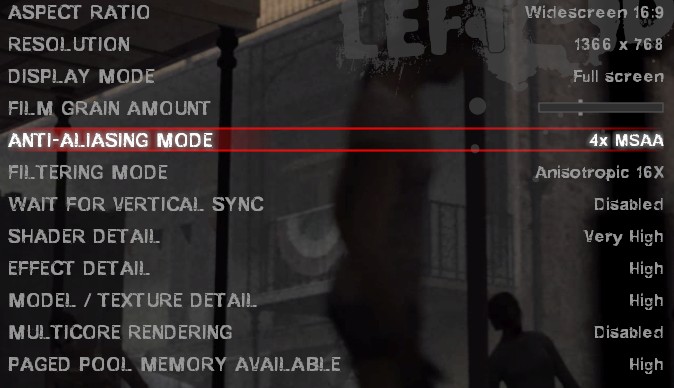
Next comes the “fixed test” RE5 . Image settings are set to maximum, anti-aliasing is x4 ( since integrated video only supports it, so for GTX 670 the values will be the same in all tests ), V-Sync is disabled ( similarly in all tests ), the resolution is 1366x768.
- Intel HD Graphics 3000 18.2 fps
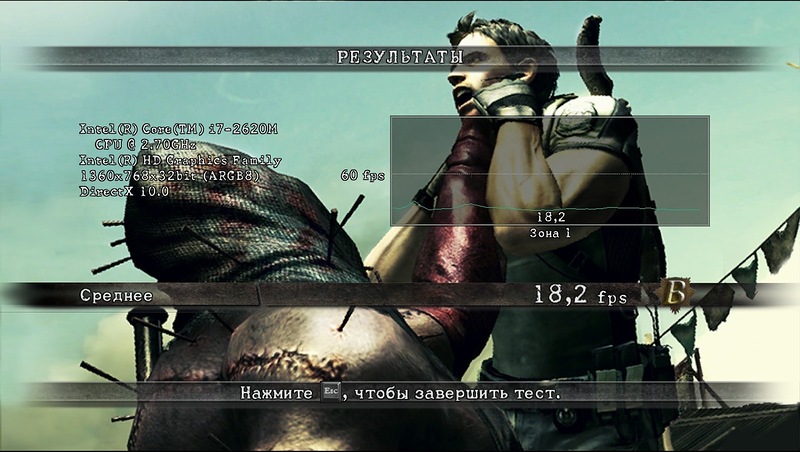
- ZOTAC GeForce GTX 670 AMP! 74.6 fps

Sleeping Dogs is the game of the year. With appropriate graphics settings, it is quite tolerable even on integrated video, but the situation changes dramatically if you set everything to the maximum. See the screenshots:
- Intel HD Graphics 3000
- ZOTAC GeForce GTX 670 AMP!

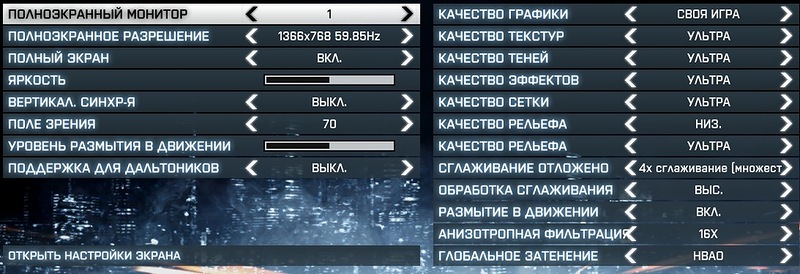
Came the turn of heavy artillery. Battlefield 3 - perhaps one of the most resource-intensive games today. It is a pity that the developers did not include a simple benchmark in the game, it would be very useful, I had to use FRAPS. For testing, the “Brothers in Arms” mission was chosen. The settings for both display adapters are as follows:
Results:
- Intel HD Graphics 3000 Min: 1fps - Max: 5fps
- ZOTAC GeForce GTX 670 AMP! Min: 30fps - Max: 93fps

Completes the chain of programs for the tests the game Left 4 Dead 2 - adrenaline action with pieces of flying flesh. With medium settings, the game, pretty quickly, works on embedded video, with the exception of some campaigns, such as Swamp Fever , where there are small lags. For the test, the initial mission of The Parish campaign was loaded, which is relatively resource intensive. The following settings were used:
The results, again, were obtained using FRAPS:
- Intel HD Graphics 3000 Min: 11fps - Max: 37fps
- ZOTAC GeForce GTX 670 AMP! Min: 48fps - Max: 101fps
Total
So, my small testing of the eGPU system has come to an end. Honestly, the impressions are the best. It is impossible to convey the indescribable delight that a simple laptop can turn into a workstation with one hand movement, and even using an external monitor can achieve even better results! And all this, without any errors, blue screens, etc. In addition, all costs for the purchase of components can be significantly reduced by buying used \ or cheaper analogues, early models of components, etc. And with materials, tools and direct hands, you can Make an eGPU adapter and a box to it yourself, the benefit of the manufacturer's website is the scheme. Moreover, if you constantly move and at the same time lack the capacity of the video subsystem, then you really should try eGPU, because it is much easier to move a laptop and a disassembled eGPU, rather than a full-fledged, stationary computer with all its keyboards, monitors, system units and other peripherals .
Pros :
- Cheapness (if such a goal is set)
- Mobility is higher than that of a stationary system (you can even put everything in a plastic case)
- Sufficient performance that allows you to run all modern games at high settings and resolutions (depending on the video card)
- Easy to assemble and connect
- The ability to use the laptop display.
- It is possible to use other PCI devices (for example, a sound card )
- It is possible to connect multiple monitors simultaneously
Minuses:
- The use of nVIDIA video cards is recommended - there is less trouble with them.
- FPS obtained when using the monitor, higher than when using a laptop display.
- Limited PCI interface. Opt. 1.1 - 250 MB / s, Opt 1.2 - 500 MB / s (for systems based on the microarchitecture Sandy Bridge and Ivy Bridge, using nVIDIA microarchitecture Fermi or Kepler video cards)
- Mandatory use of a stationary power supply for energy-intensive video cards (however, there are examples of using eGPU with a conventional external PSU from the first-generation Xbox, which provides 203 watts)
- Using eGPU is not possible with some notebook models.
In the load, I would like to recommend for familiarization a few videos showing the work of the eGPU system:
Battlefield 3
Crysis 2
TES: Skyrim
The withcer 2
Acknowledgments
First of all, I thank the participants of the Techinferno AP27 and nando4 forum for lightning-fast and intelligible answers to my questions, it would be very difficult for the eGPU community of users without you. Thank you guys!
Thanks to the forums Techinfreno and Notebookreview - this is a real fount of IT information about various gadgets and devices, here you can find and get answers to any questions you may have.
Thanks to all the creators of eGPU adapters.
Thanks also to you, dear habr-users for having found a little time to read my article.
Links
The article used materials from the following sites:
forum.notebookreview.com is a portal dedicated to different notebook models and everything related to them.
www.3dmark.com is a well-known benchmark company for many years.
console.hardocp.com is a portal dedicated to reviewing and discussing various components.
www.pcworld.com is a major portal dedicated to various aspects of the IT industry.
forum.techinferno.com is an excellent IT-related portal.
forum.techinferno.com/diy-e-gpu-projects/2109-diy-egpu-experiences-%5Bversion-2-0%5D.html is a thread dedicated to eGPU.
PS: That's all. The purpose of this post is to share experience. I hope at least someone was interested. Ready to answer any questions regarding the topic.
Upd:
Since the purchase was almost a month. I decided to supplement my review, namely regarding the intricacies of turning on and off eGPU.
- When you first connect, insert the adapter into the express port, turn on the laptop. At this stage, the system is configured and for eGPU allocated a range of free memory.
- After playing enough \ simulated, etc., and the work of the eGPU is not required, turn it off through the function "Safely remove the device" ( always! ).
- If, after working at the computer, the “hibernation” or “hibernation” function is used, then after restoring work (or when the eGPU is reconnected without switching to the above described modes \ restarting / shutting down), we directly connect the eGPU and, through the desktop, proceed to the graphic functions nVIDIA drivers. If there is a rotating three-dimensional nVIDIA icon, then everything is fine, if it is not there and a permanent driver crash occurs, then we retrieve the eGPU through the “safely remove the device” function and connect again, look at the icon (usually cases with a driver crash are rare).
- If, after operation, the computer shuts down without using the “hibernation” or “hibernation” functions, a necessary condition for the eGPU to work the next time it is started is to connect it to the laptop before turning on / during the “POST”.
- If, for unclear reasons, it is not possible to connect a previously operating eGPU, try restarting the laptop by connecting the eGPU to the laptop before passing through POST, in my case it always helps.
Despite the above subtleties, I emphasize once again that I am happy as an elephant and I don’t regret my purchase.
Source: https://habr.com/ru/post/156587/
All Articles