Photographing via WIA on .NET
 The task of the post is to refresh information about working with WIA in .NET, which lies in the open spaces of the network, because most of the examples are godlessly outdated (they do not work), share experiences with those interested, and ask advice from experienced people. I think that jointly discussing some points will be useful for colleagues involved in similar tasks. I will try to chew all the moments.
The motive was as follows: in the program where information about people is stored there are their photos, but photos get there in a complicated way. We take a paper original photo (people bring them along with documents), scan to a file, open it in a simple editor, frame it under 3x4cm, save it, open the person’s profile in the program and add a photo from the finished file to it.
Now there are several thousand people in the program and the task is to photograph them all beautifully, because they bring photos of simply terrible quality and with different percentages of filling the face. Things are easy: hang the screen, set the light, the chair, the tripod, the camera, USB ... and our program.
')
I had big plans to implement this feature:
- a man comes, combed his hair, sits down opposite the camera
- the cameraman directs the camera, straightens the hair, clothes ... well
- sit down at the program and presses the button “Make everything automatic”
- everything.
In the meantime, the program should:
- connect to camera via wia
- make the camera take a photo
- get a fresh shot from the camera
- rotate it according to the turn data
- find the face in the photo, defining the rectangle in which it is inscribed
- calculate the scaling percentage so that the face rectangle occupies 80% of the frame 3x4cm at a resolution of 300dpi
- scale the photo and apply it on a white background
- save photo to person profile
Much has been written about face recognition on the image, but I haven’t reached this stage yet, maybe I’ll tell you about them next time. Enough problems and the first three. About them will be discussed.
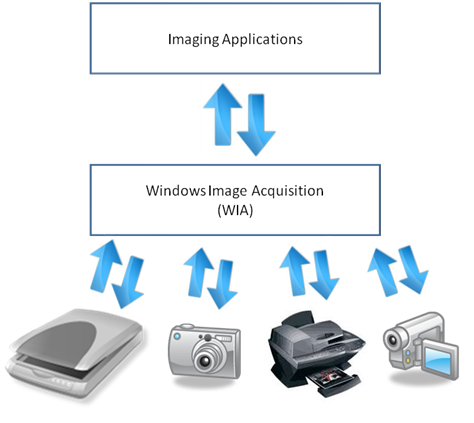
WIA
Windows Image Acquisition (WIA) is a simple way to work with most models of image processing devices (camera, scanner, video camera, and others). For successful work, it is necessary that the device, as a minimum, is displayed in the "Scanners and Cameras" Windows Control Panel. For this to happen, you need a suitable driver. Some devices work out of the box, while others need to install the WIA driver manually, as is the case with Canon EOS cameras .
The most useful MSDN article that really helps to go broke with WIA problems is an article with examples . I accidentally stumbled upon only one, must have.
Simplest code
For ease of understanding, I will give here the code on VB.NET 2008 and C # 2008, and sort them out. Immediately I will note that it omits all subjective methods, as well as error checking, to simplify the example as much as possible. Everyone should think over the application logic himself, since Everyone has different tasks, and it is very difficult to understand someone’s code, especially when you need only a few lines from it. Colleagues can reveal the code in the preferred language and refer to it in the course of the text. The steps are completely similar.
Here is the source code for Form1 with a single PictureBox1 element stretched across the entire form. And the most difficult part here is to add a reference to the WIA COM object in the project settings. Before starting, make sure that your device is turned on.
VB.NET code
Imports WIA Public Class Form1 Dim Device1 As WIA.Device Dim CommonDialog1 As New WIA.CommonDialogClass Dim DeviceManager1 As New WIA.DeviceManager Private Sub Form1_Load(ByVal sender As System.Object, ByVal e As System.EventArgs) Handles MyBase.Load ' 1. Device1 = CommonDialog1.ShowSelectDevice(WiaDeviceType.CameraDeviceType) ' 2. Device1.ExecuteCommand(WIA.CommandID.wiaCommandTakePicture) ' 4. Dim Device1a As WIA.Device = DeviceManager1.DeviceInfos(Device1.DeviceID).Connect ' 3. Dim newItem As WIA.Item = Device1a.Items(Device1a.Items.Count) ' 5. Dim newImage As WIA.ImageFile = CommonDialog1.ShowTransfer(newItem, WIA.FormatID.wiaFormatJPEG) ' 6. Dim newVector As WIA.Vector = newImage.FileData ' 7. , Dim bytBLOBData() As Byte = newVector.BinaryData ' 8. Dim stmBLOBData As New IO.MemoryStream(bytBLOBData) ' 9. PictureBox PictureBox1.Image = Image.FromStream(stmBLOBData) ' 10. Zoom ( ) PictureBox1.SizeMode = PictureBoxSizeMode.Zoom End Sub End Class Code C # 2008
using System; using System.Collections.Generic; using System.ComponentModel; using System.Data; using System.Drawing; using System.Linq; using System.Text; using System.Windows.Forms; using WIA; using System.IO; namespace WindowsFormsApplication1 { public partial class Form1 : Form { public Form1() { InitializeComponent(); } private void Form1_Load(object sender, EventArgs e) { WIA.DeviceManager DeviceManager1 = new DeviceManagerClass(); WIA.CommonDialogClass CommonDialog1 = new CommonDialogClass(); // 1. WIA.Device Device1 = CommonDialog1.ShowSelectDevice(WiaDeviceType.CameraDeviceType, true, false); // 2. Device1.ExecuteCommand(WIA.CommandID.wiaCommandTakePicture); // 3. WIA.Device Device1a = null; foreach (DeviceInfo dev_item in DeviceManager1.DeviceInfos) { // if (dev_item.DeviceID == Device1.DeviceID) { // , DeviceID Device1a = dev_item.Connect(); break; } } // 4. WIA.Item newItem = Device1a.Items[Device1a.Items.Count]; // 5. WIA.ImageFile newImage = (ImageFile)CommonDialog1.ShowTransfer(newItem, WIA.FormatID.wiaFormatJPEG, false); // 6. WIA.Vector newVector = newImage.FileData; // 7. , Byte[] bytBLOBData = (Byte[])newVector.get_BinaryData(); // 8. MemoryStream stmBLOBData = new MemoryStream(bytBLOBData); // 9. PictureBox pictureBox1.Image = Image.FromStream(stmBLOBData); // 10. Zoom ( ) pictureBox1.SizeMode = PictureBoxSizeMode.Zoom; } } } After the 7th step, you are free to do anything with the image: save to a file, save to a database, display on a form, convert, apply filters, etc. The main thing is that you have it.
I, to make sure that everything works, displayed it on the form.
It seems everything is simple
As you can see - the code is short and saturated with useful actions. But the rake and pitfalls - the eternal companions of programmers on different sides of Microsoft. They thought that everything was done simply and obviously, but we, as always, did not understand.
Step 1
' 1. Device1 = CommonDialog1.ShowSelectDevice(WiaDeviceType.CameraDeviceType) You must select a device. There are two ways: choose yourself or let the user choose. The goal of both methods is the same - to get the device ID - DeviceID. Then you can work with WIA, using this DeviceID everywhere as a link to the device you need.

In the example, a standard WIA window opens to select a device. There may be several.
If we do not need the user to decide what he wants to use, then we can filter the available devices using the WiaDeviceType parameter. In the example, I'm looking for a camera - CameraDeviceType. But beware, some card readers pretend to be cameras.
Here you can do this: go through the cycle on all devices and check if they support the wiaCommandTakePicture function (make a photo). Accordingly, if such has not been found, but there is at least one suitable, then the user will not get out of it - he will have to decide what to photograph. How to do this is well described in one example of an MSDN article (see above).
Stone No.
It may be that no device supports wiaCommandTakePicture. This is confusing, especially if you have a Canon and all of the programs are on their disk, including a program for Remote Shooting (remote shooting via USB). In it, he takes pictures, and through WIA does not want. Here you can either butt with Canon and beg for them with the SDK , which they give to very few people, and then write their module , or force the user to take a picture manually, and then do everything automatically. But overall, the game is worth the candle. Keep in mind that Canon has many divisions, and they distribute the SDKs, each in its own region. For Russia, everything is sad, but you can try to contact the European branch. Something like this, they responded to me by mail.
Step 2
' 2. Device1.ExecuteCommand(WIA.CommandID.wiaCommandTakePicture) Ok, let's say we were lucky and you can take pictures. Ur ... ah-uh ... What af * ck?
No settings. You can only take a photo. The camera (read the lens) leaves, clicks in full automatic mode (or whatever is on the switch) and goes back. Well, thanks for that.
Honestly, I didn’t go deep into the problems of pre-setting the camera remotely, but the attempts of the population were noticed with the help of Google. Perhaps someone could find a solution.
The camera takes a frame and saves it in its memory or card. Now you need to get it from there!
Step 3
' 3. Dim Device1a As WIA.Device = DeviceManager1.DeviceInfos(Device1.DeviceID).Connect Once again we connect to the camera, but in a different mode. In C #, this step is slightly longer. Here we connect to it as a container of files. Be carefull! The file structure is remembered at the time of connection! About this further ...
Step 4
' 4. Dim newItem As WIA.Item = Device1.Items(Device1.Items.Count) While writing the article, it seems I understood the cause of the problem with Stone No. two. Thanks Harb!
At this step, we remember the ID of the last file stored in the camera, because Device1.Items object stores information about all files and folders stored in the camera's memory. Yes, yes, and folders too - be careful. Through this object you can get any information, such as the file name. This is all in the MSDN examples (see above). Here we are helped by a simple object count. It is logical, but not always true, that our new photo is the last one. So check for errors here, too, need to insert.
Step 5
' 5. Dim newImage As WIA.ImageFile = CommonDialog1.ShowTransfer(newItem, WIA.FormatID.wiaFormatJPEG) And grab the file, the pointer to which is remembered.
Here, the process of uploading photos will be shown with a standard WIA interface with a progress bar.
One of the parameters of the function is the format of the file being transferred. I now need wiaFormatJPEG. This is so that the camera suddenly did not give me a TIFF. (joke)
Stone No. two
Or rather, a rake, here lies in the fact that the function that issues the last photo taken, remembers the file structure of the camera at the time of connection. That is why a new connection is used - you need to update the file structure after taking a picture.
Step 6
' 6. Dim newVector As WIA.Vector = newImage.FileData The only documented way to get a photo is to get it through a vector interface. As a result, there will be a lot of things in this object, but we are only interested in one thing - an array of BinaryData containing the image.
Steps 7,8,9
' 7. , Dim bytBLOBData() As Byte = newVector.BinaryData ' 8. Dim stmBLOBData As New IO.MemoryStream(bytBLOBData) ' 9. PictureBox PictureBox1.Image = Image.FromStream(stmBLOBData) This BinaryData requires a couple of transformations before it becomes a full-fledged picture. Bytes to stream, stream to image. And then you can do anything with the received object (according to the comments in the listing).
By the way: the indicated method converts images for storage in a DBMS (only the conversion goes in the opposite direction).
Step 10
PictureBox1.SizeMode = PictureBoxSizeMode.Zoom Everyone has his own way, well, for clarity, I assigned a picture to the Image property of the element PictureBox1. To look at yourself lukewarm.
Now it remains only to provide error handling, since WIA is very capricious and there will be many situations (most of them will be in development for the x64 system, because during debugging in case of an error, the code will not throw an exception, but simply will not be executed from the place of the error). The camera, for example, may fall asleep until it is used for a long time. Much needs to be foreseen.
This technology is very often used for work of a “pass office” with photographs.
Now about the issues for discussion:
- Does anyone have a sdk for canon? Can you share the necessary DLLs for non-commercial use?
- Recognize the rectangle in which the face is inscribed in the photo, you can literally 10 lines using OpenCV and its wrapper for .NET . What I will do in the near future.
Thanks for attention!
UPD: Added an example in C #. Removed the confusion with the steps.
Source: https://habr.com/ru/post/156495/
All Articles