Using the functionality of the MVC4 framework to authorize users and use the role-based model of access to the site
Greetings.
Today I would like to tell you in a very small lesson (the level is rather for very beginners) how you can quickly and easily set up user authentication , as well as authorization when they access some functionality on your site, using standard means of the MVC framework (4).
I am now writing a personal unpretentious website for recording and managing expenses, incomes, reminders about periodic payments (utilities, loans, school, etc.) + analytics (mainly charts), since Google and Docs have ceased to organize my wife’s functionality.
Accordingly, the question arose of how to close information , in this case, the family’s financial condition from prying eyes for authentication, as well as to distribute access roles (authorization) - what can a wife, child, anonymous users, and what can anadministrator head of a family.
UPD: described ways to create users, roles in a more correct way (no need to go directly into the database)
The code showing the menu should be translated into a more correct form, corresponding to the MVC ideology, since the current code is far from exemplary and written quickly, for demonstration, I am working on it.
')
Short introduction - The reasons that prompted me to write this article and some notes for beginners ">
The project was created in the framework of the study of C #, MVC4 - I'm new.
I spent a few evenings searching, messing with user providers and setting them up, until I realized that I didn’t need all this code at this stage. The result was the rewriting of an article on the principle I once had in my head - the less changes are made to any object, whether it is a configuration file, a document or code at the current level of my knowledge or ideas, the later it will be easier. Perhaps I missed some important nuances (I am a beginner), so I will be glad both to criticism and to the hints of the audience.
I believe that the user has already created at least one simple site on this framework, for example, using the basic instructions for creating a simple catalog of your films on the MVC4 framework (it took me about 20 minutes).
Or studying MVC for the second, very good and more complex instruction on creating an online store for selling music albums (it concerns MVC3, but, nevertheless, I recommend starting MVC with this instruction).
In the process of studying the second instruction, I ran into problems related to the fact that some things in MVC4 changed compared to MVC3, and I consider taking outdated controller code from the previous framework model and model to be a bad idea, so I decided to deal with this problem.
When you create a new MVC4 project by default at the top, to the right when you open the site there is a small menu of two items - “Registration” and “Log in”.

"Activate" and run on our website role-based access model with the distribution of functionality.
By default, everything that we need is already there and it works, thanks to the developers, but we will have to add something ourselves.
I have the usual Russian versions of Visual Studio 2012 Express, .Net 4.5, SQL 2012 and MVC4 (as well as TFS2012 Express. All this lives on Windows 2008R2), if you install the English localization of the name, menu items and other interface elements will be called differently, so I abstract to the maximum from the screenshots of the screen.
I prefer to separate these applications from authorization, so I created a separate users database,
I have several controllers responsible for working with financial information, so in the description of each controller (you can close or, on the contrary, open separate methods), you must insert the appropriate access setting:
Or insert such a line to enter the methods of several roles
Now I want to change the menu list slightly depending on the role of the user.
Now you need to clean, rebuild the application and you can run. If you know the link to one of the controllers that are closed for anonymous login, try to log in - get an authorization form and then go back to the page that initiated the authorization.
It looks like this:
Anonymous login

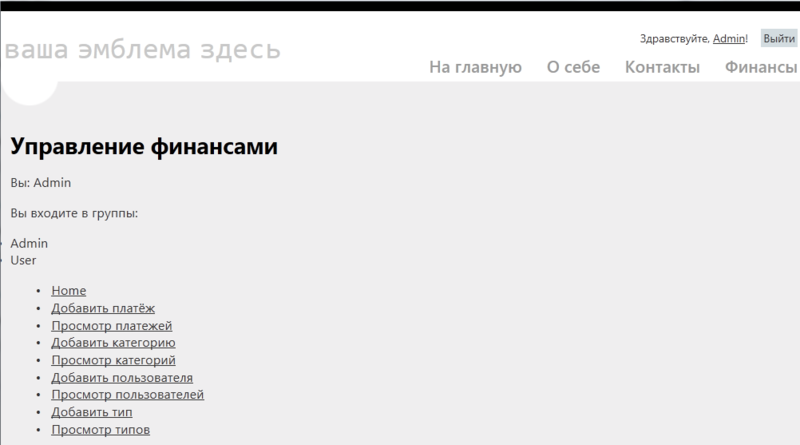
Login with administrative role
Login with user role

Today I would like to tell you in a very small lesson (the level is rather for very beginners) how you can quickly and easily set up user authentication , as well as authorization when they access some functionality on your site, using standard means of the MVC framework (4).
Introductory
I am now writing a personal unpretentious website for recording and managing expenses, incomes, reminders about periodic payments (utilities, loans, school, etc.) + analytics (mainly charts), since Google and Docs have ceased to organize my wife’s functionality.
Accordingly, the question arose of how to close information , in this case, the family’s financial condition from prying eyes for authentication, as well as to distribute access roles (authorization) - what can a wife, child, anonymous users, and what can an
UPD: described ways to create users, roles in a more correct way (no need to go directly into the database)
The code showing the menu should be translated into a more correct form, corresponding to the MVC ideology, since the current code is far from exemplary and written quickly, for demonstration, I am working on it.
')
Short introduction - The reasons that prompted me to write this article and some notes for beginners ">
The project was created in the framework of the study of C #, MVC4 - I'm new.
I spent a few evenings searching, messing with user providers and setting them up, until I realized that I didn’t need all this code at this stage. The result was the rewriting of an article on the principle I once had in my head - the less changes are made to any object, whether it is a configuration file, a document or code at the current level of my knowledge or ideas, the later it will be easier. Perhaps I missed some important nuances (I am a beginner), so I will be glad both to criticism and to the hints of the audience.
I believe that the user has already created at least one simple site on this framework, for example, using the basic instructions for creating a simple catalog of your films on the MVC4 framework (it took me about 20 minutes).
Or studying MVC for the second, very good and more complex instruction on creating an online store for selling music albums (it concerns MVC3, but, nevertheless, I recommend starting MVC with this instruction).
In the process of studying the second instruction, I ran into problems related to the fact that some things in MVC4 changed compared to MVC3, and I consider taking outdated controller code from the previous framework model and model to be a bad idea, so I decided to deal with this problem.
Prerequisite:
When you create a new MVC4 project by default at the top, to the right when you open the site there is a small menu of two items - “Registration” and “Log in”.
Technical task:
"Activate" and run on our website role-based access model with the distribution of functionality.
By default, everything that we need is already there and it works, thanks to the developers, but we will have to add something ourselves.
Workspace:
I have the usual Russian versions of Visual Studio 2012 Express, .Net 4.5, SQL 2012 and MVC4 (as well as TFS2012 Express. All this lives on Windows 2008R2), if you install the English localization of the name, menu items and other interface elements will be called differently, so I abstract to the maximum from the screenshots of the screen.
The solution of the problem
Storage preparation
I prefer to separate these applications from authorization, so I created a separate users database,
- In the App_Data directory, you need to create a new, empty database, let's call it “users” to identify its contents.
- In our web application, you need to describe the connection to our new database; to do this, open the web.config file, which is located in the root directory of our application, find (usually at the very beginning of the file) the item describing connections to data sources. (I took the config from an already working site, so you will only have the connection name DefaultConnection as the correct and matching item).
<connectionStrings> <add name="DefaultConnection" connectionString="Data Source=(LocalDb)\v11.0;Initial Catalog=aspnet-MyMoney-2132141343;Integrated Security=SSPI;AttachDBFilename=|DataDirectory|\users.mdf" providerName="System.Data.SqlClient" /> <add name="payDBContext" connectionString="Data Source=(LocalDb)\v11.0;Initial Catalog=aspnet-MyMoney-data;Integrated Security=SSPI;AttachDBFilename=|DataDirectory|\MyMoney.mdf" providerName="System.Data.SqlClient" /> </connectionStrings>
A little more detail:
In this list of connections, we have the default connection “DefaultConnection”, we will only use it to store user information, so we will not change this, all application data will be stored in another database, payDBContext.
In the DefaultConnection settings, we change:- The initial directory “Initial Catalog = aspnet-MyMoney-2132141343” is the name of the database at the moment of attachment of the database to the database server, therefore, if several databases work with this same name, there can be ambiguities
- the item “AttachDBFilename = | DataDirectory | \ users.mdf”, the name of the database file where users and roles will be stored. The name of the database we created in the App_Data directory is "users.mdf".
- Now you can start the site, log in and register, for example, two Admin and User users.
- After that, in the database browser, right in the studio, open the structure of our database
And we get something like
- To add roles, you can add code like this in accountmodel.cs:
public class UsersContext : DbContext { public UsersContext() : base("users") { } public DbSet<UserProfile> UserProfiles { get; set; } public DbSet<webpages_Roles> webpages_Roles { get; set; } // } // [Table("webpages_Roles")] public class webpages_Roles { [Key] [DatabaseGeneratedAttribute(DatabaseGeneratedOption.Identity)] public int RoleId { get; set; } [Display(Name = " ")] public string RoleName { get; set; } }
Then, after rebuilding the project, we can create a roles controller (don't forget to close it for users with an administrative role)
It is better to look at an example of adding users in the “Account” controller, Register methods and modifying it to add a user to one or several roles using Roles.AddUserToRole (), for example, by closing it for an administrative role, or adding your controller. which will add the user to the role.
I have several controllers responsible for working with financial information, so in the description of each controller (you can close or, on the contrary, open separate methods), you must insert the appropriate access setting:
[Authorize(Roles = "Admin")] namespace MyMoney.Controllers { [Authorize(Roles = "Admin")] public class catController : Controller { Or insert such a line to enter the methods of several roles
[Authorize(Roles = "Admin, User")] Now I want to change the menu list slightly depending on the role of the user.
- In the / Views / Shared directory, I create a partial view (it’s also Partial View) with the name "_Menu"the source code, by the way, who will tell you how to optimize it better, otherwise it
@{ var menus = new[] { new { LinkText=" ", ActionName="Index",ControllerName="Home",Roles="All" }, new { LinkText=" ", ActionName="About",ControllerName="Home",Roles="All" }, new { LinkText="", ActionName="Contact",ControllerName="Home",Roles="All" }, new { LinkText="", ActionName="Index",ControllerName="payments",Roles="Admin,User" }, }; } <ul id="menu"> @if (HttpContext.Current.User.Identity.IsAuthenticated) { String[] roles = Roles.GetRolesForUser(); var links = from item in menus where item.Roles.Split(new String[] { "," }, StringSplitOptions.RemoveEmptyEntries) .Any(x => roles.Contains(x) || x == "All") select item; foreach (var link in links) { @: <li> @Html.ActionLink(link.LinkText, link.ActionName,link.ControllerName)</li> } } else{ var links = from item in menus where item.Roles.Split(new String[]{","},StringSplitOptions.RemoveEmptyEntries) .Any(x=>new String[]{"All","Anonymous"}.Contains(x)) select item; foreach ( var link in links){ @: <li> @Html.ActionLink(link.LinkText, link.ActionName, link.ControllerName)</li> } } </ul> - Now you need to connect it to the markup /Views/Shared/_Layout.cshtml
We are looking for this code in the _Layout.cshtml file<section id="login"> @Html.Partial("_LoginPartial") </section> <nav> <ul id="navlist"> <li class="first"><a href="@Url.Content("~")" id="current">Home</a></li> <li><a href="@Url.Content("~/Store/")">Store</a></li> <li>@{Html.RenderAction("CartSummary", "ShoppingCart");}</li> <li><a href="@Url.Content("~/StoreManager/")">Admin</a></li> </ul> </nav>
and change the block<nav> ... </nav>
on<nav> @Html.Partial("~/Views/Shared/_Menu.cshtml") </nav> - I have one controller with a short name, using one view as a menu, here’s the view code.
Sketched a quick to show the work with roles.presentation code@{ var menus = new[] { new { LinkText="Home", ActionName="Index",ControllerName="Home",Roles="All" }, new { LinkText="About", ActionName="About",ControllerName="Home",Roles="Anonymous" }, new { LinkText="Contact", ActionName="Contact",ControllerName="Home",Roles="Anonymous" }, new { LinkText=" ", ActionName="Create",ControllerName="pay",Roles="Admin,User" }, new { LinkText=" ", ActionName="Index",ControllerName="pay",Roles="Admin,User" }, new { LinkText=" ", ActionName="Create",ControllerName="cat",Roles="Admin" }, new { LinkText=" ", ActionName="Index",ControllerName="cat",Roles="Admin,User" }, new { LinkText=" ", ActionName="Create",ControllerName="user",Roles="Admin" }, new { LinkText=" ", ActionName="Index",ControllerName="user",Roles="Admin" }, new { LinkText=" ", ActionName="Create",ControllerName="type",Roles="Admin" }, new { LinkText=" ", ActionName="Index",ControllerName="type",Roles="Admin" }, //new { LinkText="", ActionName="",ControllerName="",Roles="Administrator" }, }; } @{ ViewBag.Title = " "; } <h2> </h2> <p>: @User.Identity.Name</p> <p> :</p> <table> <tr> @{ foreach (string item in Roles.GetRolesForUser()) { <li>@item</li> } } </tr> </table> <ul id="list"> @if (HttpContext.Current.User.Identity.IsAuthenticated) { String[] roles = Roles.GetRolesForUser(); var links = from item in menus where item.Roles.Split(new String[] { "," }, StringSplitOptions.RemoveEmptyEntries) .Any(x => roles.Contains(x) || x == "All") select item; foreach (var link in links) { @: <li> @Html.ActionLink(link.LinkText, link.ActionName, link.ControllerName)</li> } } else { var links = from item in menus where item.Roles.Split(new String[] { "," }, StringSplitOptions.RemoveEmptyEntries) .Any(x => new String[] { "All", "Anonymous" }.Contains(x)) select item; foreach (var link in links) { @: <li> @Html.ActionLink(link.LinkText, link.ActionName, link.ControllerName)</li> } } </ul>
Now you need to clean, rebuild the application and you can run. If you know the link to one of the controllers that are closed for anonymous login, try to log in - get an authorization form and then go back to the page that initiated the authorization.
It looks like this:
Anonymous login
Login with administrative role
Login with user role
Remarks at last
What I am thinking about now is that it is necessary to link in my finance database the receipt of the data of the current authorized user, since Now, in Google Docs, you have to choose with your hands who was the initiator of the expense / income - and entering information twice is stupid. And ideally, get authorization from a Windows session if the browser is IE.
Yes, for some code snippets, I, as a beginner, have to hurt my hands, so I’m happy to accept corrections and improvements to this code.
Thank you for your attention, I hope I helped someone.
Yes, for some code snippets, I, as a beginner, have to hurt my hands, so I’m happy to accept corrections and improvements to this code.
Thank you for your attention, I hope I helped someone.
Source: https://habr.com/ru/post/156443/
All Articles