Create an Azure based game server
In the process of implementing one game for Windows RT, it was necessary to make multiplayer for 2 players. At the same time, support for a cross-platform game between WinRT and Windows Phone 7.5 was needed. The services providing such an opportunity were not detected, so I decided to write my own simple server that would just forward messages from one client to another in real time. Since I only have an Azure account, it was decided to do the implementation for it. At the same time, Azure provides easy scaling, excellent management console (new interface) and many services that facilitate development. Well, the main feature for me to develop under Azure: the possibility of developing in C # and Visual Studio 2012.
Under the cut description of the development and deployment of the server in the cloud.
So we will make a game server that provides the game for 2 people against each other. The server is built on WCF technology with duplex channel in Worker Role. The server provides the game in real time between different operating systems.
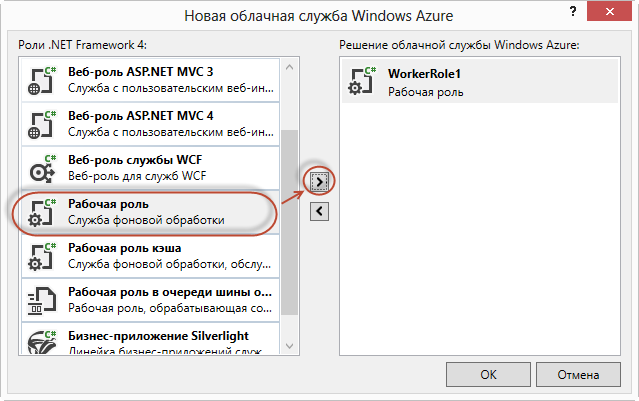
Create a new project in Visual studio 2012:

')
Choose a working role:
In the properties of the working role, create two endpoints:

One endpoint for the interface and one for the metadata. The endpoint for the metadata is needed in order to automatically generate client code.
The role will work in one copy. Generally recommended at least two copies. This is necessary to ensure minimum role resiliency and load balancing. If one role falls, the second will accept requests. But in the case of 2 roles, it is necessary to do synchronization between them. I will describe this process in the next article.
Now we will write the startup code for our WCF service in the WorkerRole.cs file.
In this method, we create two endpoints: the service itself and metadata to generate client code automatically. The service will try to start the specified number of times.
In the Run () method, we prescribe the launch of our service:
I will not give all the code, since volume for the article. (You can download the source code here ) I will give only the code sections describing the concept.
There are two managers: the user manager and the game manager, who store information about current user sessions and current game sessions, respectively. Data is stored in static dictionaries, where the key is a unique user / game ID. Also, managers implement thread-safe access to the dictionary.
Since the server is developed for games for mobile platforms, it is necessary to take into account that the connection with the server will constantly disappear and the session will break. To solve this problem, we will call the Register () server method on the client every 30 seconds.
Register method in server code:
It was originally planned to receive sessionId from OperationContext.Current, but since the connection is constantly broken, every client call after the break will create a new session. We need not to create a new session, but to update an existing one. To do this, a unique user ID is passed to the Register method, which is obtained at the client by the Guid.NewGuid (). ToString () function.
When the connection is broken, the game and player session are marked as inactive. This is necessary because it is not known whether the user will return to the game or not. When you call Register, we get the current game and mark it as active (i.e. it is assumed that there was a communication break and the player returned to the game).
Every 60 seconds a handler is called on the server to disable inactive sessions and games:
Thus, if the client has not updated his session within 60 seconds, it is considered that he will not return and his session and game will be deleted. In this case, notifications are sent to users connected to this game, that the game is no longer available.
The MakeTurn () method sends messages to all users of the current game:
Since a server crash due to an error is not acceptable, we enclose all the critical code in try / catch.
The message is a string, so we can develop any games without changing the server code.
The game ID is the user ID of the creator of the game. Therefore, if the game is deleted by the user who created it, the game is removed from the list. If the user is connected to the game, he is simply removed from the list of users of the game.
For local debugging, you must run Visual Studio as an administrator and run the project. This will launch the Windows Azure debugging environment. (To open the emulator window, click the emulator icon in the tray)

In this window, you can see the message console of each instance.
To create a test client, launch a new instance of Visual Studio and create a project.
In the project, add a link to the service:
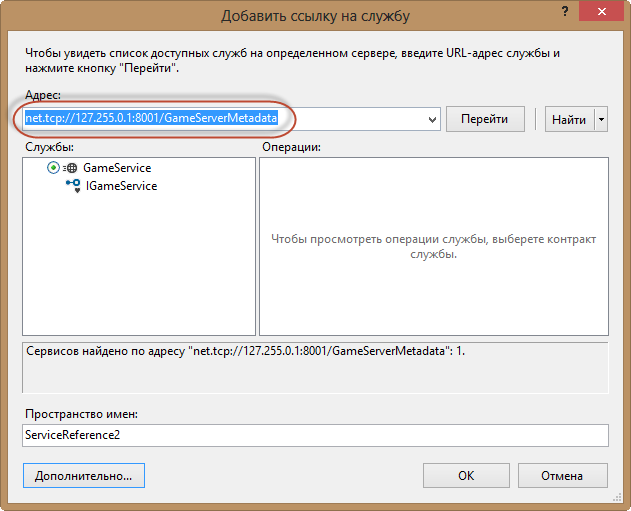
In the address field we write the url of our end point with metadata. (in my case, the local IP turned out to be 127.255.0.1). Register the namespace for the generated code and click the “OK” button.
We will configure Azure through the portal. Worker roles are created and managed in the “Cloud services” menu:

Click “Create a cloud service”, select a region with the nearest data center and invent url to access our role:
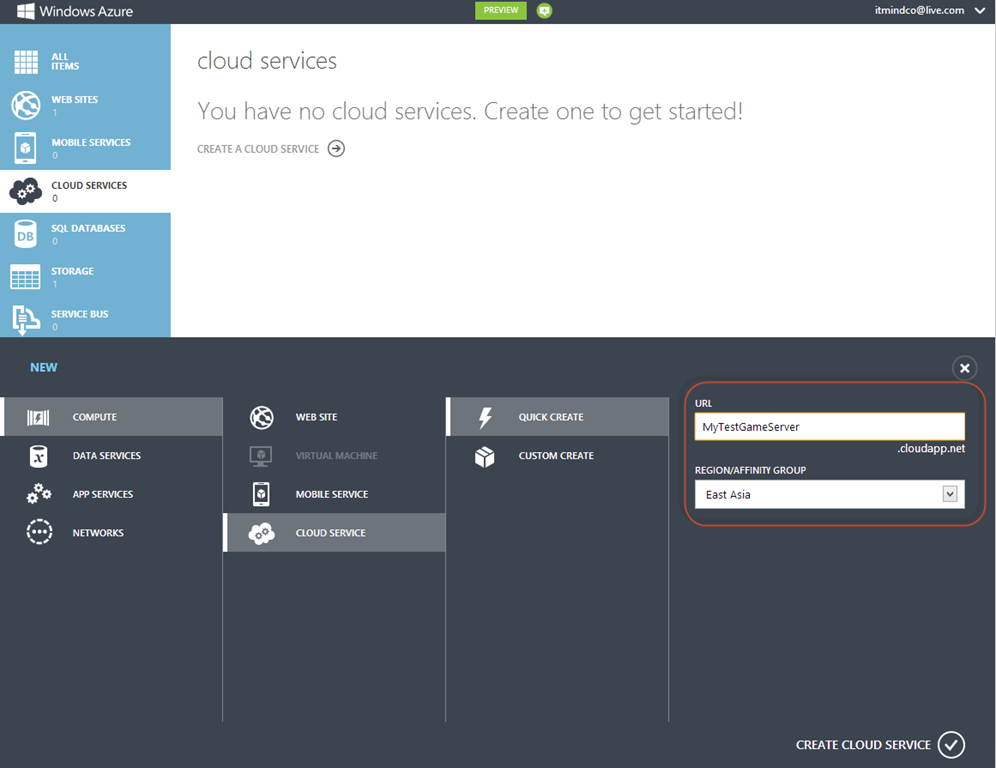
Click “Create cloud service” at the bottom of the form and after a few seconds, our service will be created.
Now you need to prepare a package for our role in Visual Studio. To do this, call the context menu of our roles and select the “Package”:
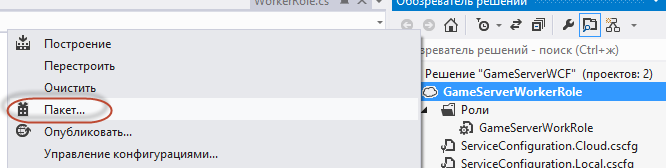
A new window will open in which you can specify the configuration of the service (in our case, the configuration is the same).
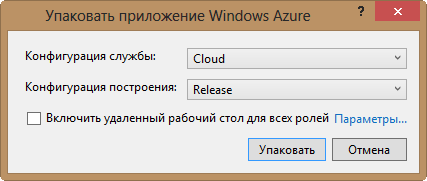
Click “Pack” and after a few seconds a folder will open in the explorer with two files * .cspkg and * .cscfg.
We return to the portal, go to our “service” and click “upload a new production production deployment”:

A window will open in which you need to select our package files:
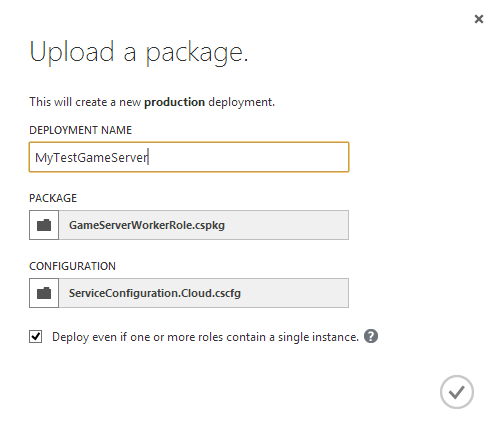
The tick “Deploy even if one of the roles contain a single instance” should be set if there is only one instance in your role (as in our case).
After a while, the role will unfold and tune.
Now we can add a service on the client, specifying the address net.tcp: //mytestgameserver.cloudapp.net: 8001 / GameServerMetadata with the string.
IMPORTANT. The role is spinning in a loop and therefore uses the processor time of the cloud. If you are not using the service, then disable the role so as not to pay for the use of processor time.
You can download the sample client by the link at the beginning of the article. The example is intended only to show the interaction of two clients through the game server, therefore there is no game logic, checks, etc. in it.
Change the url in the Reference.cs file to:
net.tcp: //mytestgameserver.cloudapp.net: 3030 / GameServer
because after the code autogeneration, the wrong IP appears.
To test the interaction of two clients, you need:
1. Deploy one application to “local computer”
2. Launch the second application in “Simulator”.
How to run multiple instances of the same application under WinRT on one computer I did not find. When the simulator starts, it checks for the service being started and if it is running, the second instance does not start. This complicates server debugging and makes it difficult to reach to check server operation with 3 or more clients.
As a result, we have a simple game server, the creation of which took no more than a few hours. Of course, the server can and should be further developed and implemented, but it copes well with its basic task, providing the game for 2 people via the Internet.
Under the cut description of the development and deployment of the server in the cloud.
So we will make a game server that provides the game for 2 people against each other. The server is built on WCF technology with duplex channel in Worker Role. The server provides the game in real time between different operating systems.
Creating a Worker Role
Create a new project in Visual studio 2012:
')
Choose a working role:
In the properties of the working role, create two endpoints:
One endpoint for the interface and one for the metadata. The endpoint for the metadata is needed in order to automatically generate client code.
The role will work in one copy. Generally recommended at least two copies. This is necessary to ensure minimum role resiliency and load balancing. If one role falls, the second will accept requests. But in the case of 2 roles, it is necessary to do synchronization between them. I will describe this process in the next article.
Now we will write the startup code for our WCF service in the WorkerRole.cs file.
private void StartGameService(int retries) { if (retries == 0) { RoleEnvironment.RequestRecycle(); return; } Trace.TraceInformation("Starting game service host..."); _serviceHost = new ServiceHost(typeof(GameService)); _serviceHost.Faulted += (sender, e) => { Trace.TraceError("Host fault occured. Aborting and restarting the host. Retry count: {0}", retries); _serviceHost.Abort(); StartGameService(--retries); }; var binding = new NetTcpBinding(SecurityMode.None); RoleInstanceEndpoint externalEndPoint = RoleEnvironment.CurrentRoleInstance.InstanceEndpoints["GameServer"]; RoleInstanceEndpoint mexpEndPoint = RoleEnvironment.CurrentRoleInstance.InstanceEndpoints["mexport"]; var metadatabehavior = new ServiceMetadataBehavior(); _serviceHost.Description.Behaviors.Add(metadatabehavior); Binding mexBinding = MetadataExchangeBindings.CreateMexTcpBinding(); string mexendpointurl = string.Format("net.tcp://{0}/GameServerMetadata", mexpEndPoint.IPEndpoint); _serviceHost.AddServiceEndpoint(typeof(IMetadataExchange), mexBinding, mexendpointurl); _serviceHost.AddServiceEndpoint( typeof(IGameService), binding, string.Format("net.tcp://{0}/GameServer", externalEndPoint.IPEndpoint)); try { _serviceHost.Open(); Trace.TraceInformation("Game service host started successfully."); } catch (TimeoutException timeoutException) { Trace.TraceError( "The service operation timed out. {0}", timeoutException.Message); } catch (CommunicationException communicationException) { Trace.TraceError( "Could not start game service host. {0}", communicationException.Message); } } In this method, we create two endpoints: the service itself and metadata to generate client code automatically. The service will try to start the specified number of times.
In the Run () method, we prescribe the launch of our service:
public override void Run() { // . . Trace.WriteLine("GameServerWorkRole entry point called", "Information"); StartGameService(3); while (true) { Thread.Sleep(10000); Trace.WriteLine("Working", "Information"); } } Server service
I will not give all the code, since volume for the article. (You can download the source code here ) I will give only the code sections describing the concept.
There are two managers: the user manager and the game manager, who store information about current user sessions and current game sessions, respectively. Data is stored in static dictionaries, where the key is a unique user / game ID. Also, managers implement thread-safe access to the dictionary.
Since the server is developed for games for mobile platforms, it is necessary to take into account that the connection with the server will constantly disappear and the session will break. To solve this problem, we will call the Register () server method on the client every 30 seconds.
Register method in server code:
public ClientInformation Register(string uid, string userName) { // retrieve session information string roleId = RoleEnvironment.CurrentRoleInstance.Id; string sessionId = uid; var callback = OperationContext.Current.GetCallbackChannel<IClientNotification>(); var game = GameManager.GetCurrentGamesForPlayer(sessionId); if (game != null && !game.IsActive) { game.IsActive = true; NotifyConnectedClientsGame(game); } SessionInformation session; if (SessionManager.CreateOrUpdateSession(sessionId, userName, roleId, callback, out session)) { // ensure that the session is killed when channel is closed OperationContext.Current.Channel.Closed += (sender, e) => { session.IsActive = false; game = GameManager.GetCurrentGamesForPlayer(sessionId); if (game != null && game.IsActive) { game.IsActive = false; NotifyConnectedClientsGame(game); } Trace.TraceInformation("Session '{0}' by user '{1}' has been closed in role '{2}'.", sessionId, userName, roleId); }; Trace.TraceInformation("Session '{0}' by user '{1}' has been opened in role '{2}'.", sessionId, userName, roleId); } return new ClientInformation { SessionId = sessionId, UserName = userName, RoleId = roleId }; } It was originally planned to receive sessionId from OperationContext.Current, but since the connection is constantly broken, every client call after the break will create a new session. We need not to create a new session, but to update an existing one. To do this, a unique user ID is passed to the Register method, which is obtained at the client by the Guid.NewGuid (). ToString () function.
When the connection is broken, the game and player session are marked as inactive. This is necessary because it is not known whether the user will return to the game or not. When you call Register, we get the current game and mark it as active (i.e. it is assumed that there was a communication break and the player returned to the game).
Every 60 seconds a handler is called on the server to disable inactive sessions and games:
imer timer; TimeSpan TimeForDelete; public GameService() { TimeForDelete = new TimeSpan(0, 0, 60); timer = new Timer(timerCallback,null,60000,60000); } private void timerCallback(object state) { var sesions = SessionManager.GetNotAcitiveSessions(); var sesionForDelete = sesions.Where(x => DateTime.Now.Subtract(x.LastSyncTime) > TimeForDelete).Select(x=>x.SessionId); foreach (var sessionId in sesionForDelete) { SessionManager.RemoveSession(sessionId); DeleteGame(sessionId); } } Thus, if the client has not updated his session within 60 seconds, it is considered that he will not return and his session and game will be deleted. In this case, notifications are sent to users connected to this game, that the game is no longer available.
The MakeTurn () method sends messages to all users of the current game:
public void MakeTurn(string uid, string type, string data) { var game = GameManager.GetCurrentGamesForPlayer(uid); if (game != null) { foreach (var player in game.Players) { if (player.SessionId != uid) { var playerSession = SessionManager.GetSession(player.SessionId); if (playerSession.Callback != null) { try { playerSession.Callback.DeliverGameMessage(type, data); } catch { } } } } } } Since a server crash due to an error is not acceptable, we enclose all the critical code in try / catch.
The message is a string, so we can develop any games without changing the server code.
The game ID is the user ID of the creator of the game. Therefore, if the game is deleted by the user who created it, the game is removed from the list. If the user is connected to the game, he is simply removed from the list of users of the game.
public void DeleteGame(string uid) { var deletingGame = GameManager.GetGame(uid); if (deletingGame != null) { GameManager.RemoveGame(uid); NotifyConnectedClientsGame(deletingGame); } else { deletingGame = GameManager.GetCurrentGamesForPlayer(uid); if (deletingGame != null) { try { deletingGame.Players.RemoveAt(1); NotifyConnectedClientsGame(deletingGame); } catch { } } } } Local debugging Worker Role
For local debugging, you must run Visual Studio as an administrator and run the project. This will launch the Windows Azure debugging environment. (To open the emulator window, click the emulator icon in the tray)
In this window, you can see the message console of each instance.
To create a test client, launch a new instance of Visual Studio and create a project.
In the project, add a link to the service:
In the address field we write the url of our end point with metadata. (in my case, the local IP turned out to be 127.255.0.1). Register the namespace for the generated code and click the “OK” button.
Deploying Worker Role in the cloud
We will configure Azure through the portal. Worker roles are created and managed in the “Cloud services” menu:
Click “Create a cloud service”, select a region with the nearest data center and invent url to access our role:
Click “Create cloud service” at the bottom of the form and after a few seconds, our service will be created.
Now you need to prepare a package for our role in Visual Studio. To do this, call the context menu of our roles and select the “Package”:
A new window will open in which you can specify the configuration of the service (in our case, the configuration is the same).
Click “Pack” and after a few seconds a folder will open in the explorer with two files * .cspkg and * .cscfg.
We return to the portal, go to our “service” and click “upload a new production production deployment”:
A window will open in which you need to select our package files:
The tick “Deploy even if one of the roles contain a single instance” should be set if there is only one instance in your role (as in our case).
After a while, the role will unfold and tune.
Now we can add a service on the client, specifying the address net.tcp: //mytestgameserver.cloudapp.net: 8001 / GameServerMetadata with the string.
IMPORTANT. The role is spinning in a loop and therefore uses the processor time of the cloud. If you are not using the service, then disable the role so as not to pay for the use of processor time.
Creating a client under Windows RT
You can download the sample client by the link at the beginning of the article. The example is intended only to show the interaction of two clients through the game server, therefore there is no game logic, checks, etc. in it.
Change the url in the Reference.cs file to:
net.tcp: //mytestgameserver.cloudapp.net: 3030 / GameServer
because after the code autogeneration, the wrong IP appears.
To test the interaction of two clients, you need:
1. Deploy one application to “local computer”
2. Launch the second application in “Simulator”.
How to run multiple instances of the same application under WinRT on one computer I did not find. When the simulator starts, it checks for the service being started and if it is running, the second instance does not start. This complicates server debugging and makes it difficult to reach to check server operation with 3 or more clients.
Total
As a result, we have a simple game server, the creation of which took no more than a few hours. Of course, the server can and should be further developed and implemented, but it copes well with its basic task, providing the game for 2 people via the Internet.
Source: https://habr.com/ru/post/156259/
All Articles