Game console based on Android. Detailed manual
Not so long ago, a friend of mine, acquiring the Chinese console ( info and info ) on Android 4.0 and installing the PS1 emulator, could not share this “happiness” with me. Such an opportunity to use my Android device was very interesting and I decided not only to experience all the charms of the emulator on my smartphone, but also to go a little further ...
The problems and difficulties that I encountered, as well as a detailed illustrated guide for setting up an emulator, a smartphone, and connecting a gamepad to it under the cat.
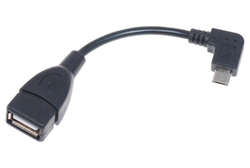
Upon completion of the settings for future use, only the presence of a smartphone, OTG cable and gamepad will be necessary.
Versions are not the last, but guaranteed to work and fairly stable.
')
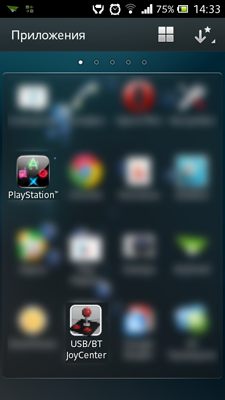
To begin, install the PlayStation 1 emulator (FPse) - you can download my .apk here , you will also need a BIOS, we take it here .
I will not describe the installation, since there are no differences or differences from the installation of any other application. Let's go to the setting.
After installing the application, copy the BIOS file scph1001.bin to any folder on your smartphone and launch the Playstation application.
We set the following settings:
The button “Save settings” should be pressed every time after changing the settings in any section, otherwise reset after restarting.


Two options are possible here: setting for touch control and setting for controlling with gamepad.
Set up first in the first embodiment, and later, after setting up the gamepad, we return to this section.
This completes the emulator setup, you can already start the game without using a gamepad, copy the game image to any place and select it in the “Download” menu. And those interested will continue.

Install the Joystick Center. The latest version 6 bought in the market refused to work, well, I managed to return the purchase within 15 minutes. Therefore, using the old .apk can be taken here .
After installation, we “assemble the kit” - first we connect a mouse and a gamepad to the hub, a hub to an OTG cable, and then all this to a smartphone, if you connect the hub first, the devices may not be determined.
If you asked the question “why do you need a mouse so much?” - to configure the Joystick Center, because it will be necessary to mark very small “checkboxes”, and with your finger, even if it is unreal to the small ones, the necessary boxes are not marked at all, and the extra ones “with a bang”.
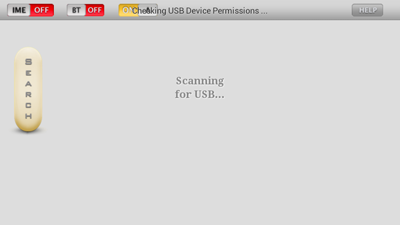
We start the application and immediately start scanning the connected devices.
My gamepad was determined to bebanal as a Gamepad and requested permission to access:
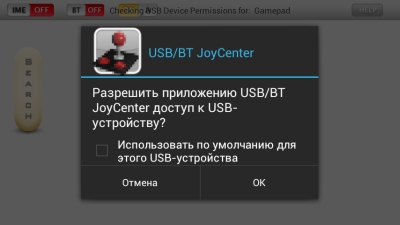
Do not tick and agree.
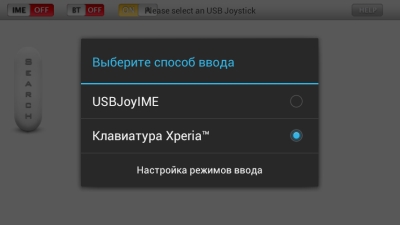
In the upper left corner put A (Analog) and IME in the on position and select the Joystick as the input method:
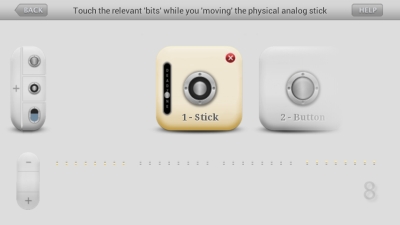
Click on the Gamepad and Create drive to “calibrate” the gamepad.
And here begins the most interesting thing over which I had to break my head for a couple of days. It seems that everything is simple, looking at the video instructions from the developers, you can easily understand what to do, but there are a couple of moments:
As I wrote above, it is simply unrealistic to select the necessary small bits on a small (compared to tablets) screen, for which I used an additional mouse.
Doing everything according to the instructions, the buttons did not want to be initialized in any way and after adding the second one they started to get confused among themselves, “stick together” and so on ...
In general, the setting did not succeed, which I did not try. But in the end I found a solution - and the point is that before marking the desired button bits, you need to clamp it, and then choose, and then the calibration will be normal.
After “calibration”, we return to the main menu of the program and correlate physical and virtual buttons, successively selecting the one on the screen and pressing on the gamepad.
This completes all complex manipulations and we can return to the emulator to enable the gamepad as a manipulator.
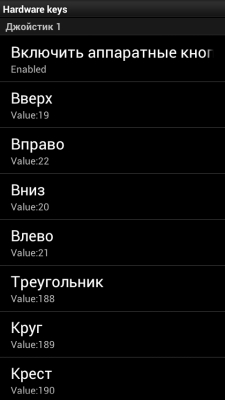
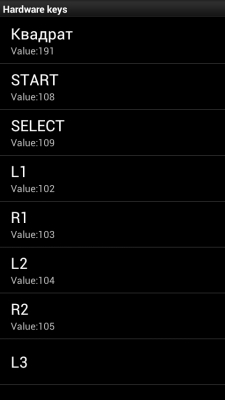
Go to the settings - control - physical buttons and also correlate the buttons.
In the onscreen buttons, remove all the checkmarks to clear the screen.
That's all the description of setting up your smartphone as a set-top box. The main advantage of the described method is the absence of the need to patch a smartphone (get root access). There are no great difficulties in setting up, but there are some peculiarities and subtleties, mainly described in this post. I could miss something, but I am ready to answer all your questions regarding this “set”.
Thank you for attention! Good luck - gamers;)
The problems and difficulties that I encountered, as well as a detailed illustrated guide for setting up an emulator, a smartphone, and connecting a gamepad to it under the cat.
What do we have?
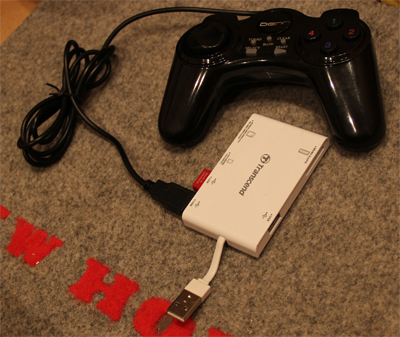
Of iron:
- Sony Experia Sola smartphone with official firmware (clean, without root) Android 4.0.4 (build 6.1.1.B.1.10)
- OTG cable (USB - MicroUSB) - 190 rubles
- Hub (in my case 2 in 1: Transcend TS-RDP7K card reader + hub)

- Denn DGP211 Gamepad - 170 rubles

- Mouse (wireless A4Tech)
Upon completion of the settings for future use, only the presence of a smartphone, OTG cable and gamepad will be necessary.
From the software:
- FPse 0.10.52
- USB / BT Joystick Center 1.93
Versions are not the last, but guaranteed to work and fairly stable.
')
Emulator setup
To begin, install the PlayStation 1 emulator (FPse) - you can download my .apk here , you will also need a BIOS, we take it here .
I will not describe the installation, since there are no differences or differences from the installation of any other application. Let's go to the setting.
After installing the application, copy the BIOS file scph1001.bin to any folder on your smartphone and launch the Playstation application.
We set the following settings:
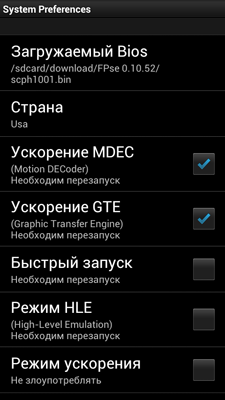
Section "System":
- Downloadable Bios - select the pre-copied BIOS file scph1001.bin
- Country - left usa
- Acceleration MDEC - Yes
- Acceleration GTE - Yes
- Quick Start - No
- HLE mode - No (operation mode without BIOS, doubtful)
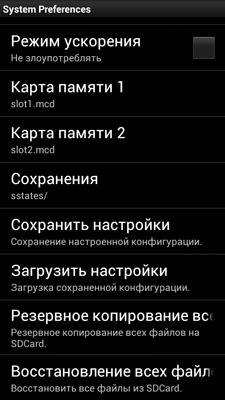
- Acceleration Mode - None
- Memory Card 1 and 2 - by default
- Save to default
The button “Save settings” should be pressed every time after changing the settings in any section, otherwise reset after restarting.
"Sound" section:
- Mute - No
- SPU Sync - Yes
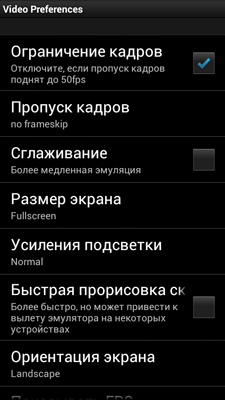
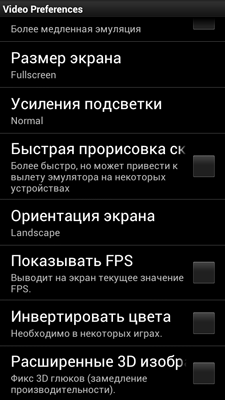
Section "Video":
- Frame Limit - Yes (frame limit to the desired parameter - 50 (PAL) / 60 (NTSC))
- Skip frames - Disabled (gives a speed boost, can help correct stuttering in sound)
- Smoothing - No
- Screen Size - Fullscreen
- Gain backlight - Normal (Normal)
- Quick draw - No
- Orientation - Landscape (Landscape - I prefer)
- Show FPS - No (optional)
- Invert Colors - No
- Enhanced 3D Images - No
Management Section:
Two options are possible here: setting for touch control and setting for controlling with gamepad.
Set up first in the first embodiment, and later, after setting up the gamepad, we return to this section.
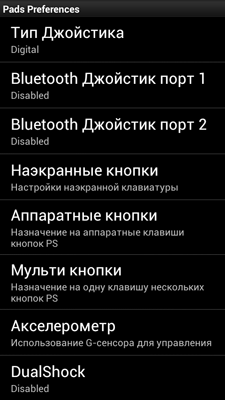
- Joystick Type - Digital (Digital)
- Bluetooth Joystick Port 1 and 2 - Disabled
- Onscreen buttons:
- Slide mode - Disabled
- Relative moves - No
- Vibration - can be enabled (at discretion)
- Fix Auto Alignment - No
- Button 0-7 - Expose at its discretion (I turned on the standard buttons of the console - arrows, cross, circle, triangle, square, L1-L2, R1-R2, Start, Select)
This completes the emulator setup, you can already start the game without using a gamepad, copy the game image to any place and select it in the “Download” menu. And those interested will continue.
Setting up the Joystick Center:
Install the Joystick Center. The latest version 6 bought in the market refused to work, well, I managed to return the purchase within 15 minutes. Therefore, using the old .apk can be taken here .
After installation, we “assemble the kit” - first we connect a mouse and a gamepad to the hub, a hub to an OTG cable, and then all this to a smartphone, if you connect the hub first, the devices may not be determined.
If you asked the question “why do you need a mouse so much?” - to configure the Joystick Center, because it will be necessary to mark very small “checkboxes”, and with your finger, even if it is unreal to the small ones, the necessary boxes are not marked at all, and the extra ones “with a bang”.
We start the application and immediately start scanning the connected devices.
My gamepad was determined to be
Do not tick and agree.
In the upper left corner put A (Analog) and IME in the on position and select the Joystick as the input method:
Click on the Gamepad and Create drive to “calibrate” the gamepad.
And here begins the most interesting thing over which I had to break my head for a couple of days. It seems that everything is simple, looking at the video instructions from the developers, you can easily understand what to do, but there are a couple of moments:
As I wrote above, it is simply unrealistic to select the necessary small bits on a small (compared to tablets) screen, for which I used an additional mouse.
Doing everything according to the instructions, the buttons did not want to be initialized in any way and after adding the second one they started to get confused among themselves, “stick together” and so on ...
In general, the setting did not succeed, which I did not try. But in the end I found a solution - and the point is that before marking the desired button bits, you need to clamp it, and then choose, and then the calibration will be normal.
After “calibration”, we return to the main menu of the program and correlate physical and virtual buttons, successively selecting the one on the screen and pressing on the gamepad.
This completes all complex manipulations and we can return to the emulator to enable the gamepad as a manipulator.
Go to the settings - control - physical buttons and also correlate the buttons.
In the onscreen buttons, remove all the checkmarks to clear the screen.
Conclusion
That's all the description of setting up your smartphone as a set-top box. The main advantage of the described method is the absence of the need to patch a smartphone (get root access). There are no great difficulties in setting up, but there are some peculiarities and subtleties, mainly described in this post. I could miss something, but I am ready to answer all your questions regarding this “set”.
Thank you for attention! Good luck - gamers;)
Source: https://habr.com/ru/post/155955/
All Articles