Adding SSD to laptop
Good time of day, Habr!
Through this post, I would like to share mycollective farm experience with those who will soon have to upgrade their laptop with a solid-state drive. Caution, a lot of photos!
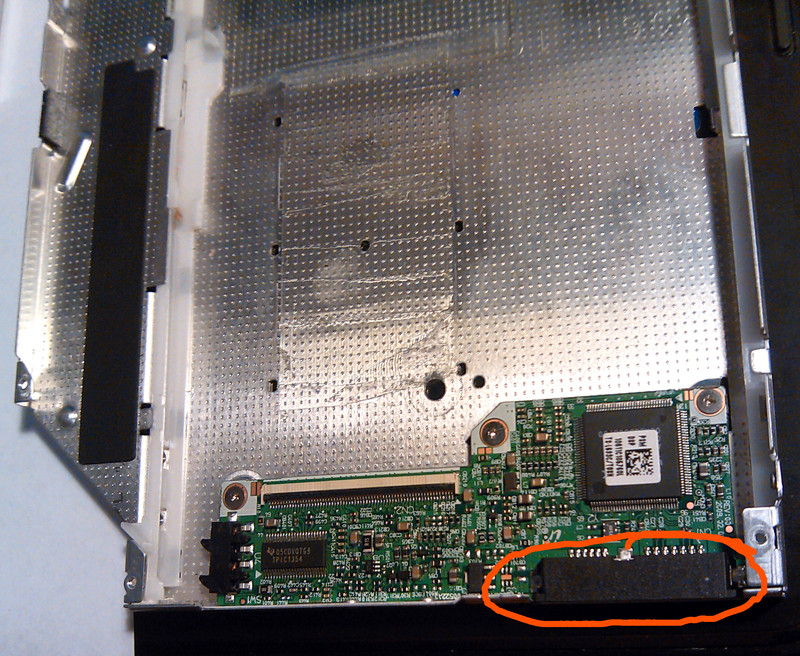
I changed my working laptop about six months ago and until I complain about its performance, but with the download everything is sad: the laptop began to demand 3-5 minutes for it. Initially, the model is equipped with a 750 GB HDD and a logical transition to the SSD is not at all pleased with the lack of free space (60 GB disk) - it is much more convenient to keep all material offline at hand, it is often necessary to go without a network and the Internet. The obvious way out is to replace a little-used DVD-RW with an SSD. If you also think about buying an SSD, do not use cd / dvd and want to leave the hard drive, my experience may be useful to you. Removing the drive, look: if the same as in the photo, then read on.

The optical drive has a Slimline SATA connector. It could be connected with the cable “Slimline 13 Pin SATA Male to 22 Pin SATA Female Cable”, which we would have to wait for from the Chinese, but we are not looking for easy ways.
For rich buratin there is an elegant solution: a basket adapter for HDD 2.5 '' (Espada SS12, similar to DX). With an SSD price of 1.5 kilo, buying a basket for 1 kilo is unjustified, it was decided to own a collective farm.
I want to make a reservation that it is not necessary to disassemble a laptop to a screw for changing a disk (as I had to do it), and it is even desirable to install an SSD in place of an optical drive, since with cooling it’s not so hot, and the power consumption of SSD is an order of magnitude lower mechanical predecessor. This is true provided that the sata-drive revision is no less than the sata port revision from the acquired SSD, otherwise all the advantages of the SSD will be eaten by the low-speed port of the laptop.
')
Tools and materials:
Solder, flux, soldering iron, we need a tester, if they are not available, then there is no sense in defining something, it will not work on twisting. Tools are inexpensive, then there are many more useful. Flux necessarily acid-free passive for soldering radio elements (usually rosin). The use of active is not recommended. Everything is purchased in khozmage.
It’s a pity to disassemble the native drive, so we go to the nearest service and beg for dead from the masters. In St. Petersburg, you can go to Juno and walk along the ruins, I got the drive for a symbolic 200 rubles. Of the entire unit, we need only the body and the connector, with which we will collectively adapt our adapter.
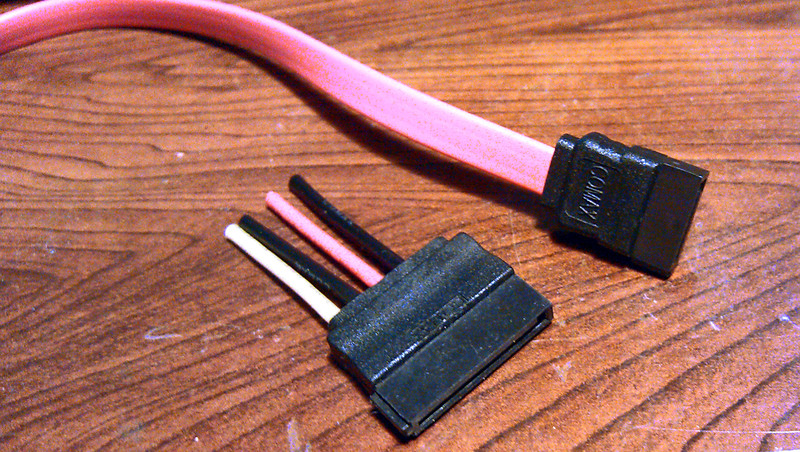
We need the sata cable to connect our implantable disk to the adapter:
we cut it to a convenient length, we clean it, we tin the wires and solder it to the controller board of the DVD, from which all the giblets were pulled out. Wiring lived on the cable and on the connector one to one.
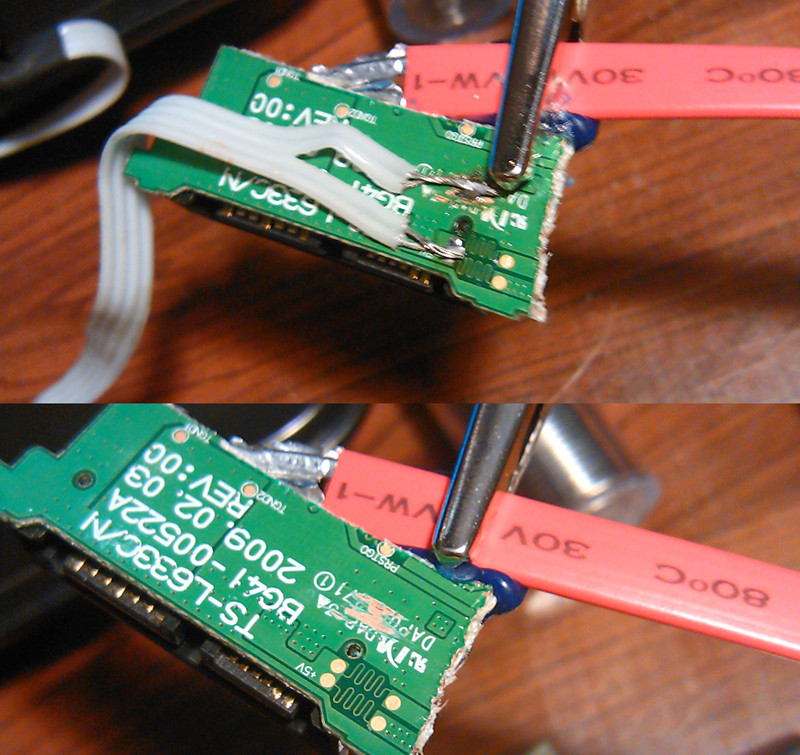
for example, in the photo below from left to right: the 1st contact of the cable is connected to the 1st contact of the drive, the 2nd with the 2nd, and so on.

For convenience and to increase free space, I heartlessly broke the controller board along with the mounting holes. Since then, it is securely fastened to the thick layer of hot melt glue. When “processing” our board, we need to make sure that the edges of the broken tracks do not touch each other and with the surrounding objects. Another reason why I broke off the board is to bind the controller, which interferes with the operation of our adapter. Therefore, we break it so that the power and signal lines also break off and we still have a board with a soldered connector on it. Broken fee can be seen later.
In the photo below you can see the sata cable with the plastic insulation removed, under it you can see two pairs of wires wrapped with copper foil. The foil should be unwound by 8-10 mm and cut, under the foil 2 wires each, with a hot soldering iron tip, we make a hem on insulation 3-5 mm from the edge and quickly tear off the insulation, baring the bare ends and soldering to the connector itself. Whether to solder the screen is a purely personal matter, in my case, soldering was not required, it works and so. Hot-melt glue is irreplaceable here: we use it to fasten the sata cable and power wires after wiring on our broken board. If you do not fix, then everything will come off, we will not have time to collect.

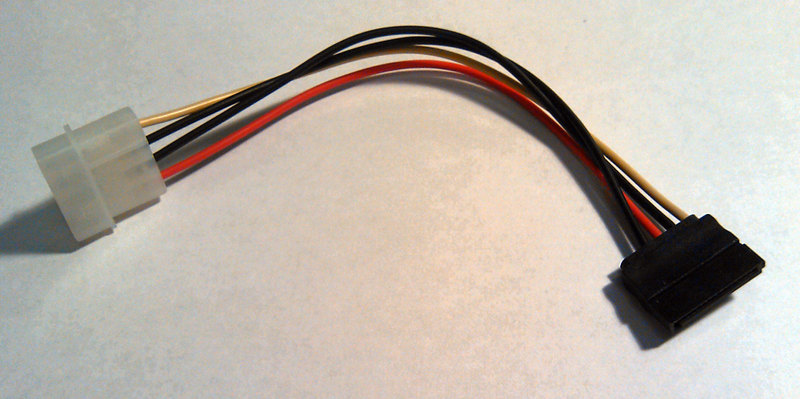
The molex-SATA adapter is needed, you know, to power our drive.
It is precisely because the power connector of the optical drive is non-standard, we are engaged in this collective farm. To make it work, you need to connect as follows:
Crop Molex. If the standard conductors are long and soft enough, you can leave them, otherwise we cut them almost to the root and increase them.
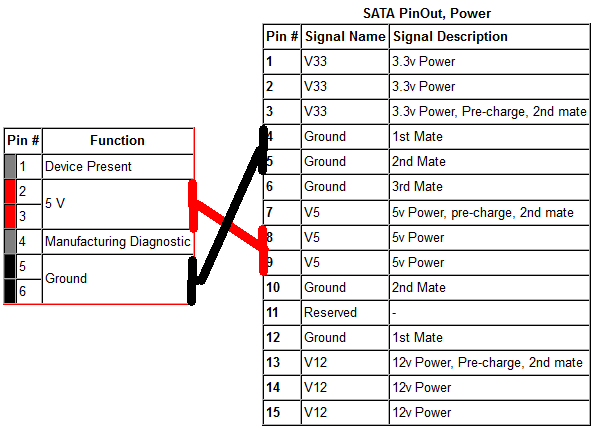
We cut off the yellow from the conductors, this is food +12, our disk will do without it. Also, if you are sure that the disk has common ground for everyone (and, most likely, it is), then one of the black wires can also be cut off.
We clean, pound, solder a suitable cable of the required length, isolate it with thermotubes. Red - + 5V, black - ground.
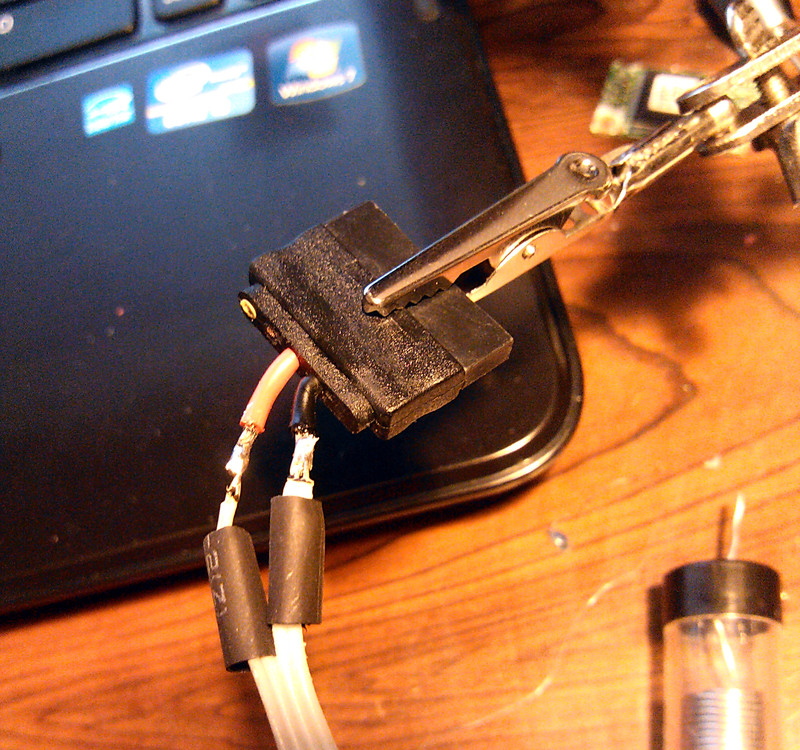
The other end is soldered to our connector in the drive, the polarity is not confused. You can find the site on the board and solder there. A distinctive feature of the "Earth" are longer contacts.
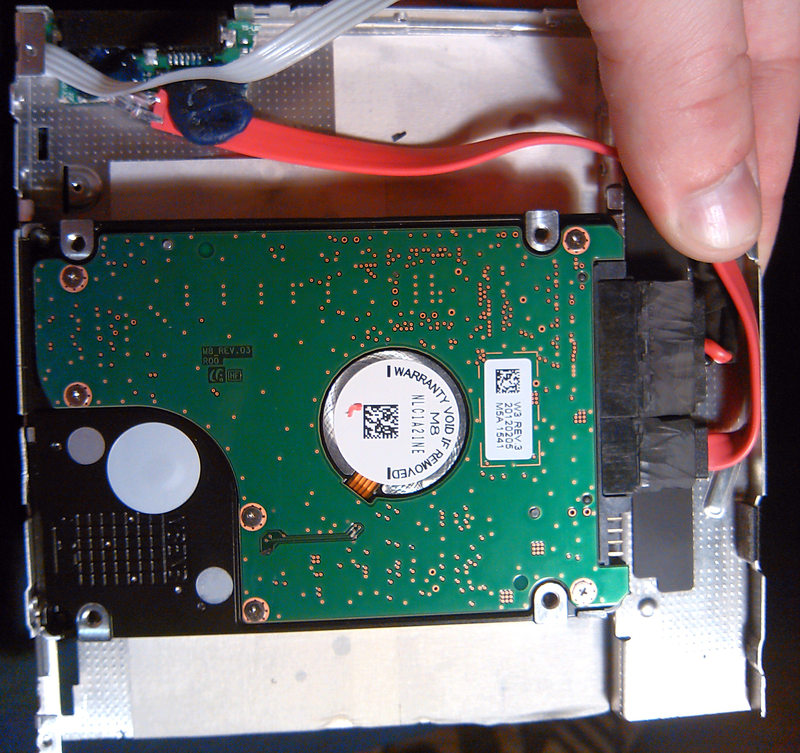
Soldered, fixed with hot melt, try on:

It would be nice to glue the inner surface with an electrically insulating material (scotch tape?), It will prevent the implantable disk from closing on the controller, but it will worsen the heat transfer that is so unimportant.
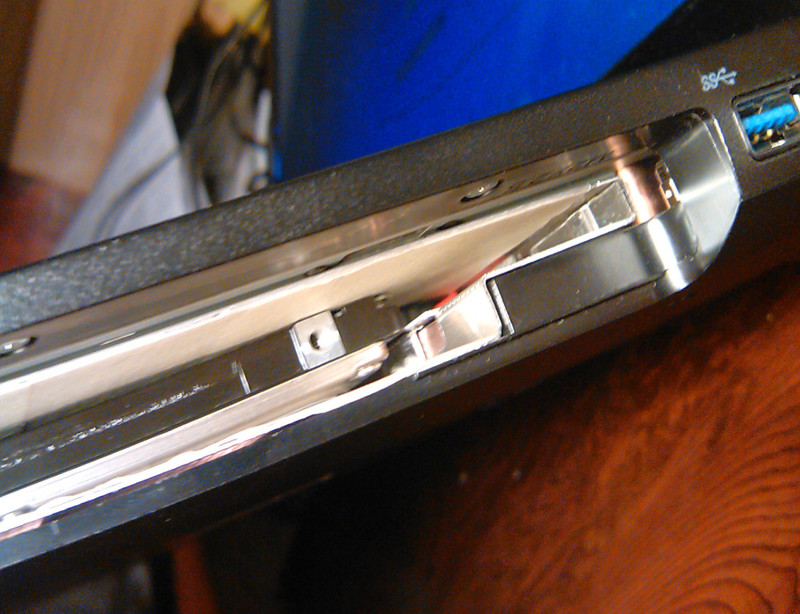
It was tried, everything is fine, before the final installation we call up all the connections with a tester for the presence of a contact where it should be, and the absence - where it should not be. Finally fix the board (hot melt). You can try a disk. In order to manage to close the upper half of the case, you can trim the plastic compound of connectors and bend / remove the slide on which the drive tray has traveled.
Once again all we call. Close the upper half of the case, fix the drive. In my case, no additional fixation was needed - the disc was securely pressed. Caution! When you press on the lid of the working disk, you can clamp the spindle and ruin the HDD, it will be difficult and expensive to recover data. Do not forget that we collective farm for the sake of economy. When installing a laptop, you can rearrange the mounting bracket, into which the fixing screw is screwed, from the native drive to the implantable one. Almost everything left to insert the drive into the slot and fix.
For aesthetics (so that no one guesses that we are collective farmers) the hole in the side of our laptop can be closed with a panel from a native DVD. Panel removable snaps. We fix it (no, not with hot melt glue) on double-sided tape!

Before you boot, you should look in the BIOS and make sure that the device is defined. My disk was defined as ODD, to boot from the SSD, I had to put the optical drive last in the queue of boot devices.
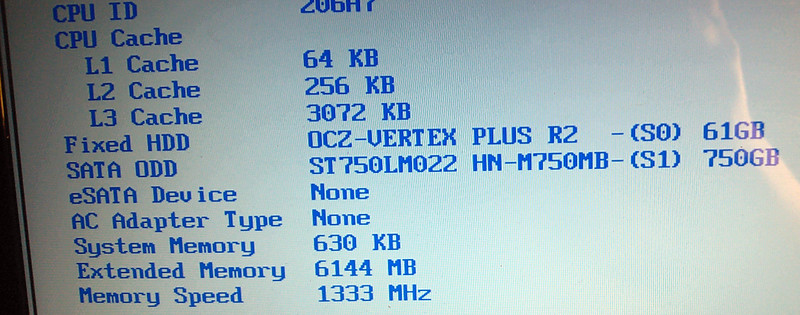
In the operating system, as expected, everything is OK: SSD and HDD are defined as disk devices.
List of links:
http://ru.wikipedia.org/wiki/SATA
http://www.allpinouts.org/index.php/Serial_ATA_%28SATA,_Serial_Advanced_Technology_Attachment%29
http://spvd.ru/page/slim-sata-power
Through this post, I would like to share my
I changed my working laptop about six months ago and until I complain about its performance, but with the download everything is sad: the laptop began to demand 3-5 minutes for it. Initially, the model is equipped with a 750 GB HDD and a logical transition to the SSD is not at all pleased with the lack of free space (60 GB disk) - it is much more convenient to keep all material offline at hand, it is often necessary to go without a network and the Internet. The obvious way out is to replace a little-used DVD-RW with an SSD. If you also think about buying an SSD, do not use cd / dvd and want to leave the hard drive, my experience may be useful to you. Removing the drive, look: if the same as in the photo, then read on.
The optical drive has a Slimline SATA connector. It could be connected with the cable “Slimline 13 Pin SATA Male to 22 Pin SATA Female Cable”, which we would have to wait for from the Chinese, but we are not looking for easy ways.
For rich buratin there is an elegant solution: a basket adapter for HDD 2.5 '' (Espada SS12, similar to DX). With an SSD price of 1.5 kilo, buying a basket for 1 kilo is unjustified, it was decided to own a collective farm.
I want to make a reservation that it is not necessary to disassemble a laptop to a screw for changing a disk (as I had to do it), and it is even desirable to install an SSD in place of an optical drive, since with cooling it’s not so hot, and the power consumption of SSD is an order of magnitude lower mechanical predecessor. This is true provided that the sata-drive revision is no less than the sata port revision from the acquired SSD, otherwise all the advantages of the SSD will be eaten by the low-speed port of the laptop.
')
Tools and materials:
- DVD-drive for a laptop (you can own, but better dead from the service nearby);
- Interface cable "sata";
- Power adapter "molex-SATA";
- Soldering iron, tin-lead solder, flux;
- Tester;
- Screwdrivers
- Knife / Cutter
- Hot melt glue;
- Heat pipe / tape / tape;
- Transplanted HDD.
Solder, flux, soldering iron, we need a tester, if they are not available, then there is no sense in defining something, it will not work on twisting. Tools are inexpensive, then there are many more useful. Flux necessarily acid-free passive for soldering radio elements (usually rosin). The use of active is not recommended. Everything is purchased in khozmage.
It’s a pity to disassemble the native drive, so we go to the nearest service and beg for dead from the masters. In St. Petersburg, you can go to Juno and walk along the ruins, I got the drive for a symbolic 200 rubles. Of the entire unit, we need only the body and the connector, with which we will collectively adapt our adapter.
We need the sata cable to connect our implantable disk to the adapter:
we cut it to a convenient length, we clean it, we tin the wires and solder it to the controller board of the DVD, from which all the giblets were pulled out. Wiring lived on the cable and on the connector one to one.
for example, in the photo below from left to right: the 1st contact of the cable is connected to the 1st contact of the drive, the 2nd with the 2nd, and so on.
For convenience and to increase free space, I heartlessly broke the controller board along with the mounting holes. Since then, it is securely fastened to the thick layer of hot melt glue. When “processing” our board, we need to make sure that the edges of the broken tracks do not touch each other and with the surrounding objects. Another reason why I broke off the board is to bind the controller, which interferes with the operation of our adapter. Therefore, we break it so that the power and signal lines also break off and we still have a board with a soldered connector on it. Broken fee can be seen later.
In the photo below you can see the sata cable with the plastic insulation removed, under it you can see two pairs of wires wrapped with copper foil. The foil should be unwound by 8-10 mm and cut, under the foil 2 wires each, with a hot soldering iron tip, we make a hem on insulation 3-5 mm from the edge and quickly tear off the insulation, baring the bare ends and soldering to the connector itself. Whether to solder the screen is a purely personal matter, in my case, soldering was not required, it works and so. Hot-melt glue is irreplaceable here: we use it to fasten the sata cable and power wires after wiring on our broken board. If you do not fix, then everything will come off, we will not have time to collect.
The molex-SATA adapter is needed, you know, to power our drive.
It is precisely because the power connector of the optical drive is non-standard, we are engaged in this collective farm. To make it work, you need to connect as follows:
Crop Molex. If the standard conductors are long and soft enough, you can leave them, otherwise we cut them almost to the root and increase them.
We cut off the yellow from the conductors, this is food +12, our disk will do without it. Also, if you are sure that the disk has common ground for everyone (and, most likely, it is), then one of the black wires can also be cut off.
We clean, pound, solder a suitable cable of the required length, isolate it with thermotubes. Red - + 5V, black - ground.
The other end is soldered to our connector in the drive, the polarity is not confused. You can find the site on the board and solder there. A distinctive feature of the "Earth" are longer contacts.
Soldered, fixed with hot melt, try on:
It would be nice to glue the inner surface with an electrically insulating material (scotch tape?), It will prevent the implantable disk from closing on the controller, but it will worsen the heat transfer that is so unimportant.
It was tried, everything is fine, before the final installation we call up all the connections with a tester for the presence of a contact where it should be, and the absence - where it should not be. Finally fix the board (hot melt). You can try a disk. In order to manage to close the upper half of the case, you can trim the plastic compound of connectors and bend / remove the slide on which the drive tray has traveled.
Once again all we call. Close the upper half of the case, fix the drive. In my case, no additional fixation was needed - the disc was securely pressed. Caution! When you press on the lid of the working disk, you can clamp the spindle and ruin the HDD, it will be difficult and expensive to recover data. Do not forget that we collective farm for the sake of economy. When installing a laptop, you can rearrange the mounting bracket, into which the fixing screw is screwed, from the native drive to the implantable one. Almost everything left to insert the drive into the slot and fix.
For aesthetics (so that no one guesses that we are collective farmers) the hole in the side of our laptop can be closed with a panel from a native DVD. Panel removable snaps. We fix it (no, not with hot melt glue) on double-sided tape!
Before you boot, you should look in the BIOS and make sure that the device is defined. My disk was defined as ODD, to boot from the SSD, I had to put the optical drive last in the queue of boot devices.
In the operating system, as expected, everything is OK: SSD and HDD are defined as disk devices.
List of links:
http://ru.wikipedia.org/wiki/SATA
http://www.allpinouts.org/index.php/Serial_ATA_%28SATA,_Serial_Advanced_Technology_Attachment%29
http://spvd.ru/page/slim-sata-power
Source: https://habr.com/ru/post/155769/
All Articles