Configuring Git Deployment for Windows Azure Virtual Machines
Hello to all! Today I will try to describe in detail the process of setting up Git publishing for virtual machines in Windows Azure. Many of you already know that Windows Azure gives developers the ability to publish applications in the cloud via Git (a detailed description of this process can be found here http://habrahabr.ru/company/microsoft/blog/150086/ ), but few know that Git is publishing operates at the expense of the so-called Kudu project. Kudu is a mechanism that enables Windows Azure to deploy your applications using Git. It is distributed under the open source license and is available on GitHub ( https://github.com/projectkudu/kudu ). The big advantage of this mechanism is that it has the ability to run outside of the Windows Azure environment. This means that we can freely upload it to our machine and configure Git deployment in our local environment. Given this feature, it would be very nice to set up a similar mechanism for Windows Azure virtual machines. That is what we will try to do.
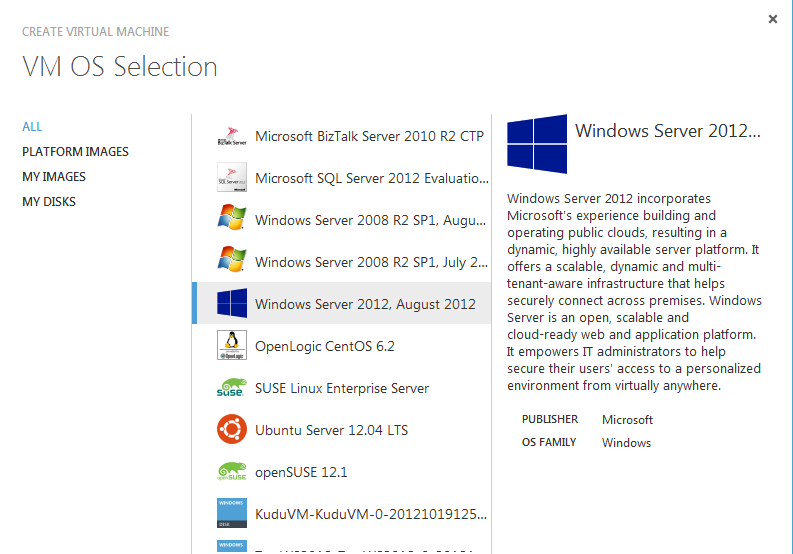
So, first of all, we need a target virtual machine on which our application will be deployed. You can create it on the Windows Azure portal in the Virtual Machines section. For our purposes, you can use the option of raising the machine from the gallery, which is the fastest option.
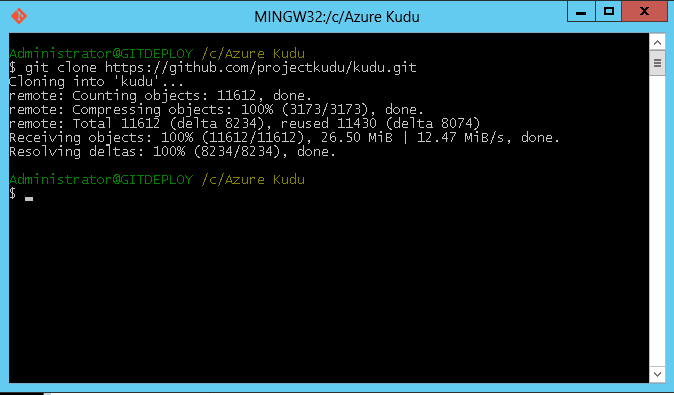
As soon as the virtual machine is configured and running, we will be able to remotely access it via the RDP protocol and proceed to the next step. In the second step, we need to clone the Kudu remote repository to our virtual machine and run the new application setup wizard. Let's do it consistently. First, install the Git client for Windows. To do this, go to the website http://msysgit.github.com , download and install the software (you can use any alternative Git client). Once the installation is complete, run git bash and clone the repository to any directory on drive C: (to test the viability of the solution, this drive will fully suit us). The repository address can be found at https://github.com/projectkudu/kudu .

')
To clone Kudu, run the following command in git bash.
The result of the operation should look like this:
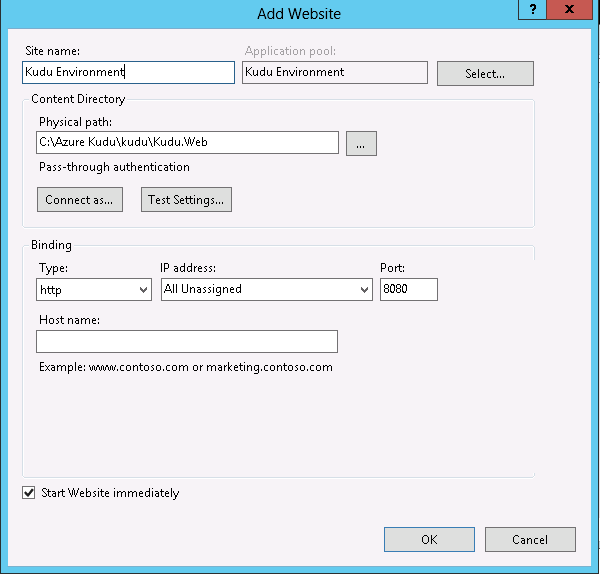
The next step is to build the project. To do this, find in our directory the file [kudu_installation_dir] /kudu/build.cmd and run it with administrator rights. The project build process can take up to 1 minute, after which we will need to create a new site on the local IIS instance to start the Kudu management console. The new site should be sent to the subdirectory [kudu_installation_dir] /kudu/Kudu.Web . Here is how it looks on the IIS instance of the virtual machine:
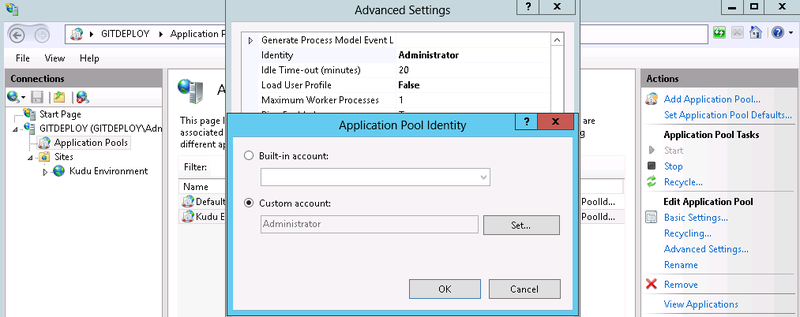
We use a custom port 8080, leaving the 80th port, which will be used by the main application, free. Since Kudu requires administrative rights for its proper functioning, it is necessary to run our application pool under a less limited account. To do this, go to the Application Pools section and in the advanced settings of the pool, change it to Identity. There is an Administrator user on my machine, which is fine for us.
After that, without leaving the remote terminal, open the browser and check if the site is working properly by clicking on the link localhost : 8080. If everything is successfully configured, we should see the Kudu management console.
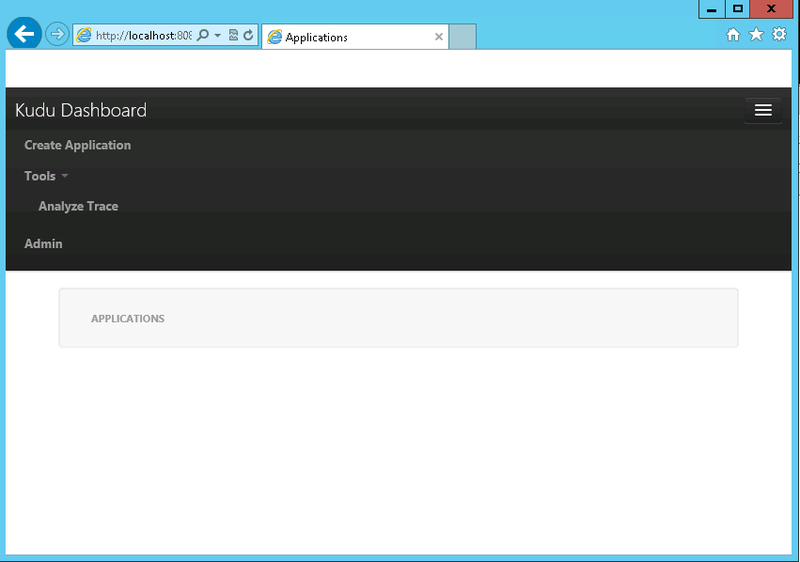
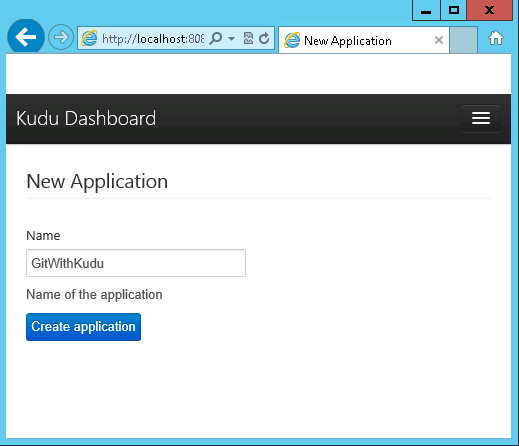
As you can see, when you first launch installed applications, there is no, so we need to create a new one. This is done very simply by selecting the Create Application menu item, while all we need to do next is to choose the name of the application being created. Let's dwell on the name GitWithKudu.
As soon as we click the “Create Application” button, 2 sites will be created on the local web server for the virtual machine: one is for launching the main application and the other for supporting Git deployment. Here's how the infrastructure we created will look like in the end:
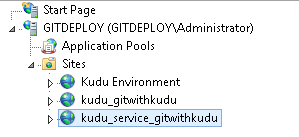
The Kudu Enrironment website is a Kudu console for managing all web server applications. Site kudu_gitwithkudu is our application deployed via Git. Site kudu_service_gitwithkudu is an auxiliary application through which publication will take place. Let's now go back to the Kudu control console again for a moment. After creating a new application, we will see the following result:
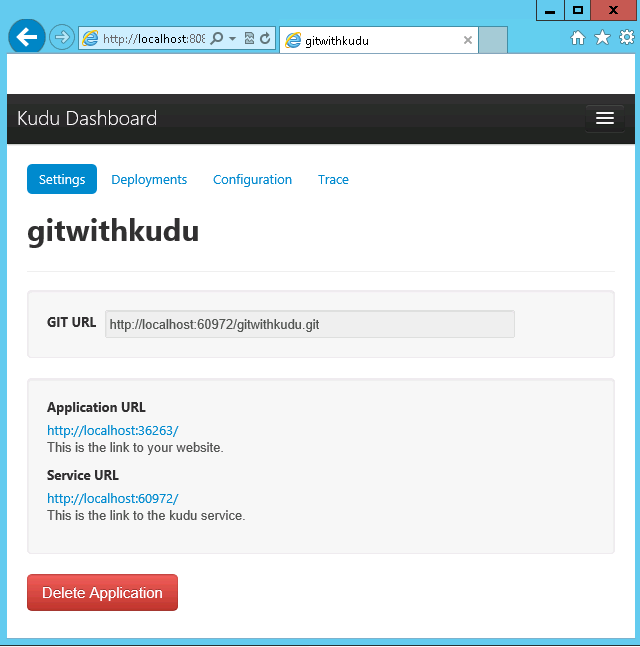
As you can see on this page is very useful information. Here we can find the address of our Git repository, the address of the application itself, as well as several auxiliary tabs that allow you to track the history of publications, change the configuration, etc. By default, Kudu uses a simple random port selection mechanism for the main application and the deployment service, so we see that our application will use a non-standard port 36263. To change it, you can use the usual technique of changing site bindings in IIS Manager, which we will actually do to transfer the site to the 80th port.
That's all the work related to setting up our target virtual machine can be considered complete. All that is left for us to do is deploy our application via the created infrastructure. Let me remind you that after the end of the Kudu setup, we had 3 sites:
But before proceeding with the deployment of the application, you must add port 60972 to the list of allowed ports on the Windows Azure portal. Ultimately, our Endpoints section should look like this:

As soon as a new point with port 60972 is added, you can start publishing. To do this, we need to perform a simple sequence of actions. First, create an empty directory on the disk and run git bash for it. Use the command
Add a new file to the repository called index.html. The contents of this file are presented below:
After creating the file, run 2 git commands in sequence:
It remains for us to deploy a new file in the cloud. To do this, execute the following git command:
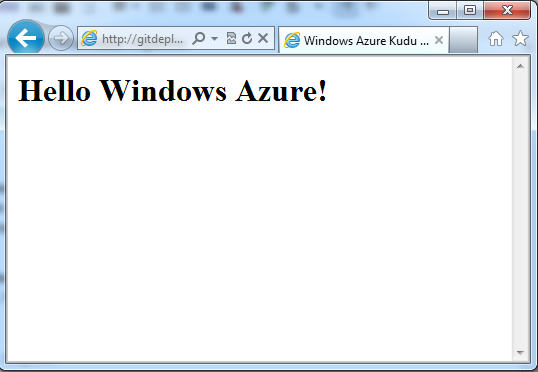
To check, open the gitdeploy.cloudapp.net site in your browser. We should see our changes on the server:
In addition, in the Kudu management console, in the Deployments tab, you can track the entire deployment history:

As you can see, we have successfully configured Git-deployment for a Windows Azure virtual machine based on the Kudu project. Despite the fact that this project is still young and has a number of drawbacks, I consider it quite promising and interesting. That's all, thank you for your attention! Reasoned criticism and advice are of course welcome :)
So, first of all, we need a target virtual machine on which our application will be deployed. You can create it on the Windows Azure portal in the Virtual Machines section. For our purposes, you can use the option of raising the machine from the gallery, which is the fastest option.
As soon as the virtual machine is configured and running, we will be able to remotely access it via the RDP protocol and proceed to the next step. In the second step, we need to clone the Kudu remote repository to our virtual machine and run the new application setup wizard. Let's do it consistently. First, install the Git client for Windows. To do this, go to the website http://msysgit.github.com , download and install the software (you can use any alternative Git client). Once the installation is complete, run git bash and clone the repository to any directory on drive C: (to test the viability of the solution, this drive will fully suit us). The repository address can be found at https://github.com/projectkudu/kudu .
')
To clone Kudu, run the following command in git bash.
git clone https://github.com/projectkudu/kudu.git The result of the operation should look like this:
The next step is to build the project. To do this, find in our directory the file [kudu_installation_dir] /kudu/build.cmd and run it with administrator rights. The project build process can take up to 1 minute, after which we will need to create a new site on the local IIS instance to start the Kudu management console. The new site should be sent to the subdirectory [kudu_installation_dir] /kudu/Kudu.Web . Here is how it looks on the IIS instance of the virtual machine:
We use a custom port 8080, leaving the 80th port, which will be used by the main application, free. Since Kudu requires administrative rights for its proper functioning, it is necessary to run our application pool under a less limited account. To do this, go to the Application Pools section and in the advanced settings of the pool, change it to Identity. There is an Administrator user on my machine, which is fine for us.
After that, without leaving the remote terminal, open the browser and check if the site is working properly by clicking on the link localhost : 8080. If everything is successfully configured, we should see the Kudu management console.
As you can see, when you first launch installed applications, there is no, so we need to create a new one. This is done very simply by selecting the Create Application menu item, while all we need to do next is to choose the name of the application being created. Let's dwell on the name GitWithKudu.
As soon as we click the “Create Application” button, 2 sites will be created on the local web server for the virtual machine: one is for launching the main application and the other for supporting Git deployment. Here's how the infrastructure we created will look like in the end:
The Kudu Enrironment website is a Kudu console for managing all web server applications. Site kudu_gitwithkudu is our application deployed via Git. Site kudu_service_gitwithkudu is an auxiliary application through which publication will take place. Let's now go back to the Kudu control console again for a moment. After creating a new application, we will see the following result:
As you can see on this page is very useful information. Here we can find the address of our Git repository, the address of the application itself, as well as several auxiliary tabs that allow you to track the history of publications, change the configuration, etc. By default, Kudu uses a simple random port selection mechanism for the main application and the deployment service, so we see that our application will use a non-standard port 36263. To change it, you can use the usual technique of changing site bindings in IIS Manager, which we will actually do to transfer the site to the 80th port.
That's all the work related to setting up our target virtual machine can be considered complete. All that is left for us to do is deploy our application via the created infrastructure. Let me remind you that after the end of the Kudu setup, we had 3 sites:
- http://gitdeploy.cloudapp.net:8080 - Kudu Management Console
- http://gitdeploy.cloudapp.net - test application
- http://gitdeploy.cloudapp.net:60972 - deployment-service
But before proceeding with the deployment of the application, you must add port 60972 to the list of allowed ports on the Windows Azure portal. Ultimately, our Endpoints section should look like this:
As soon as a new point with port 60972 is added, you can start publishing. To do this, we need to perform a simple sequence of actions. First, create an empty directory on the disk and run git bash for it. Use the command
git init , to initialize the new Git repository.Add a new file to the repository called index.html. The contents of this file are presented below:
<html> <head> <title> Windows Azure Kudu Engine! </title> </head> <body> <h1> Hello Windows Azure! </h1> </body> </html> After creating the file, run 2 git commands in sequence:
git add . git commit -m "First commit" It remains for us to deploy a new file in the cloud. To do this, execute the following git command:
git push http://gitdeploy.cloudapp.net:60972/gitwithkudu.git To check, open the gitdeploy.cloudapp.net site in your browser. We should see our changes on the server:
In addition, in the Kudu management console, in the Deployments tab, you can track the entire deployment history:
As you can see, we have successfully configured Git-deployment for a Windows Azure virtual machine based on the Kudu project. Despite the fact that this project is still young and has a number of drawbacks, I consider it quite promising and interesting. That's all, thank you for your attention! Reasoned criticism and advice are of course welcome :)
Source: https://habr.com/ru/post/155689/
All Articles