Pimping wheelbarrow - we customize and expand the capabilities of the D-Link DNS-325
NAS. Network-accessible file storage, a place to drain backups, the ability to store the necessary data in one place. But not only! Today we will reward our DNS-325 with new features. Owners of devices of the same series (for example, DNS-320, DNS-345, DNS-346) also will not leave offended. Under the cat more than a dozen photos and screenshots, beware!
Why this particular NAS? Firstly, it has quite decent characteristics: almost silent cooling, 2 disks with SATA2 interface (not everyone needs 3 disks, 1 disk - not enough), 1.2 GHz processor and 256 RAM. In addition, it installs the very real linux itself, which means you can get it to do almost anything! I want to warn you in advance - I am not a very experienced linux user, so if I’ve gotten used to terminology somewhere, forgot something or added an extra step, I’ll be happy with the comments!
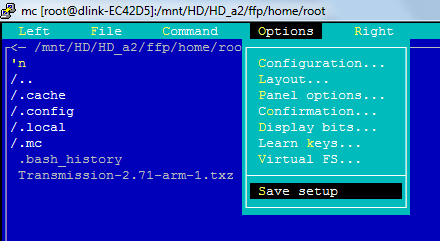
update 1 . As it turned out, it is still possible to launch automatic re-indexing of media files - the upnpdbmgr program is responsible for it. To do this, go to the task management mode (such a command is needed for convenient task management - via the mc editor):
Why this particular NAS? Firstly, it has quite decent characteristics: almost silent cooling, 2 disks with SATA2 interface (not everyone needs 3 disks, 1 disk - not enough), 1.2 GHz processor and 256 RAM. In addition, it installs the very real linux itself, which means you can get it to do almost anything! I want to warn you in advance - I am not a very experienced linux user, so if I’ve gotten used to terminology somewhere, forgot something or added an extra step, I’ll be happy with the comments!
0. Update firmware
First of all, I highly recommend upgrading the firmware, good, the latest version greatly stabilizes the work and removes a lot of bugs, for example, in the work of the FTP server. Updating is very simple - download the firmware from official FTP - ftp://ftp.dlink.ru/pub/NAS/DNS-325/Firmware/ (at the time of writing the latest version 1.03, the file ftp://ftp.dlink.ru/ pub / NAS / DNS-325 / Firmware / DNS-325_A1_FW_v1_03.rar ), unpack (tar file will be inside), go to this page in the system and update: 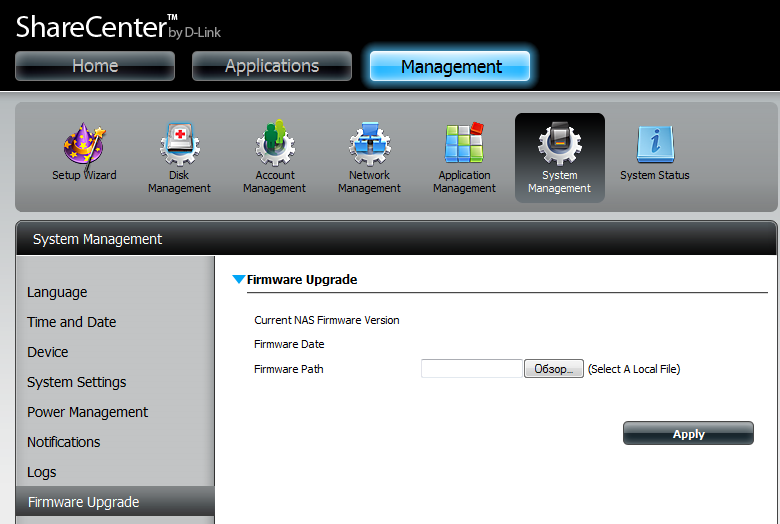
1.It is important to know about the wheels.
- The file system format is EXT3. No options. If you have another one - you will have to reformat, the NAS can do it yourself.
- The file system format of USB-screws and flash drives - as EXT3, and FAT / NTFS.
- Scripts to control the axis are placed on the first screw (Volume1), if you look at the NAS - it will be on the right.
2. Create balls (folders available on the network)
Everything is simple, of course, but there is one catch that baffled not only me: to get a list of directories, you need to click on the name of a folder or screw. 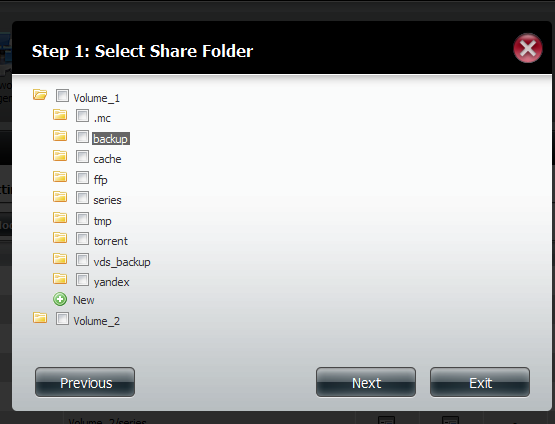
After creating directories - create users.
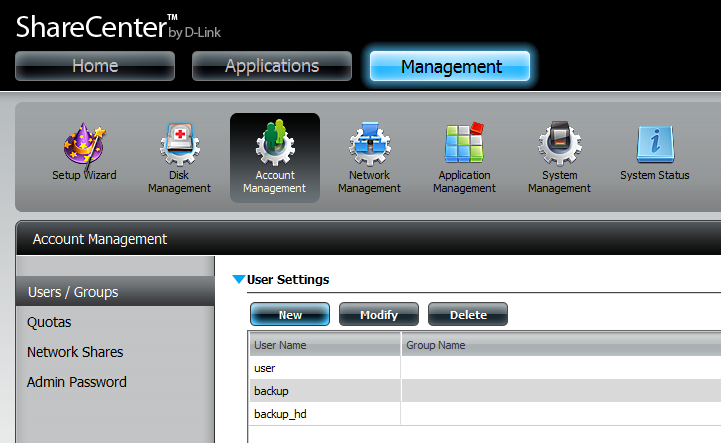
In the same place on the go we specify which user needs access, except for SMB (standard for windows access to directories) - for example, FTP.

After creating directories - create users.
In the same place on the go we specify which user needs access, except for SMB (standard for windows access to directories) - for example, FTP.
3. Connect FTP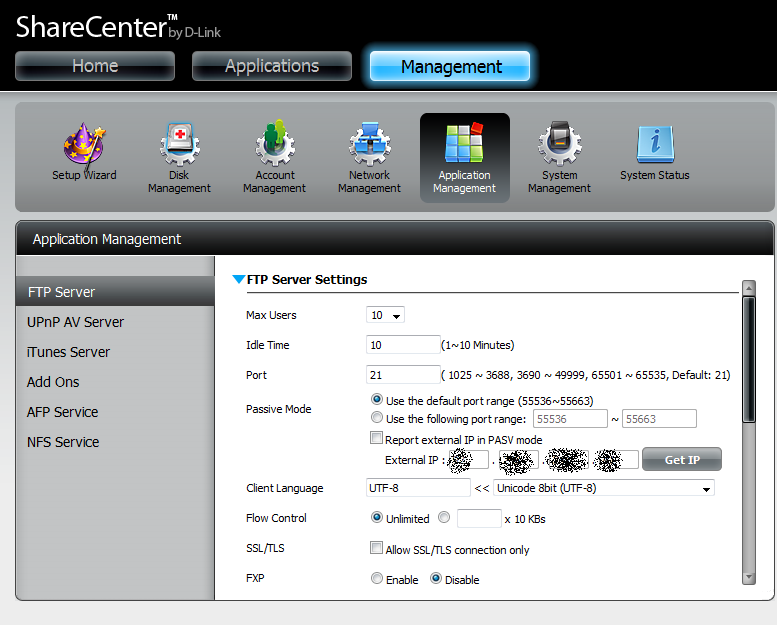
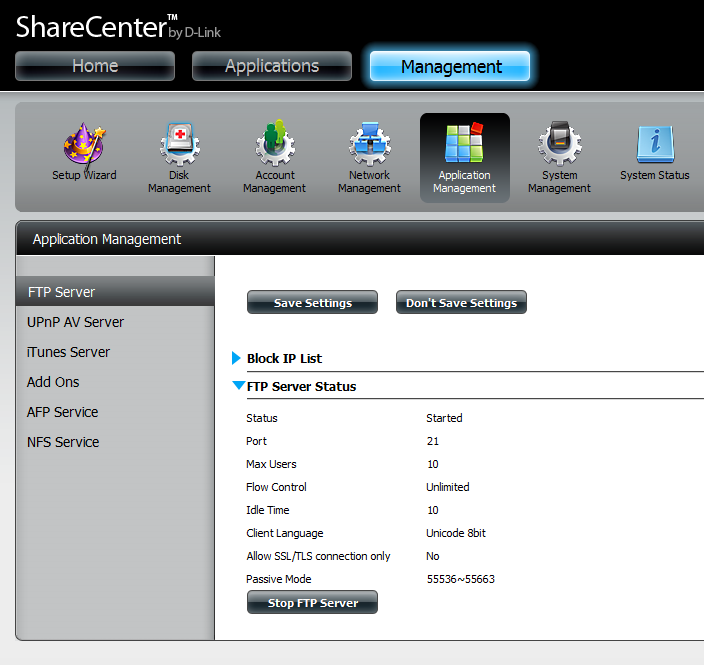 As you can see from the screenshot, everything is simple. But what is important: after adding new users or deleting old ones, it is highly desirable to restart FTP, if he didn’t do it himself. Also, if you have a NAS stuck in a router, do not forget to forward ports to the outside! (if you need access to FTP from the server). On my D-Link DIR-615, for example, the settings look like this:
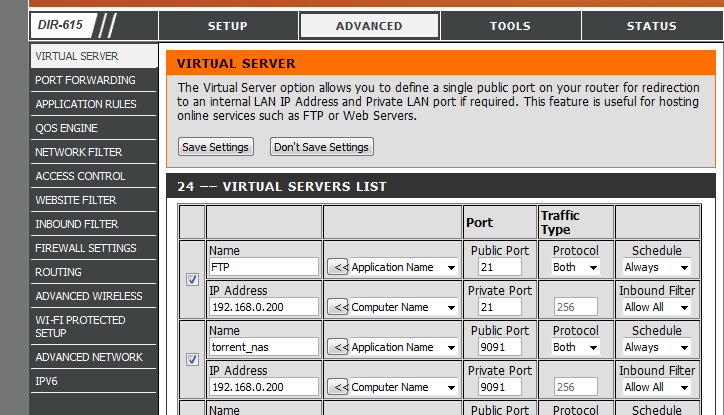
As you can see from the screenshot, everything is simple. But what is important: after adding new users or deleting old ones, it is highly desirable to restart FTP, if he didn’t do it himself. Also, if you have a NAS stuck in a router, do not forget to forward ports to the outside! (if you need access to FTP from the server). On my D-Link DIR-615, for example, the settings look like this: 4.Connect the video broadcast (UPnP media server than watch on android)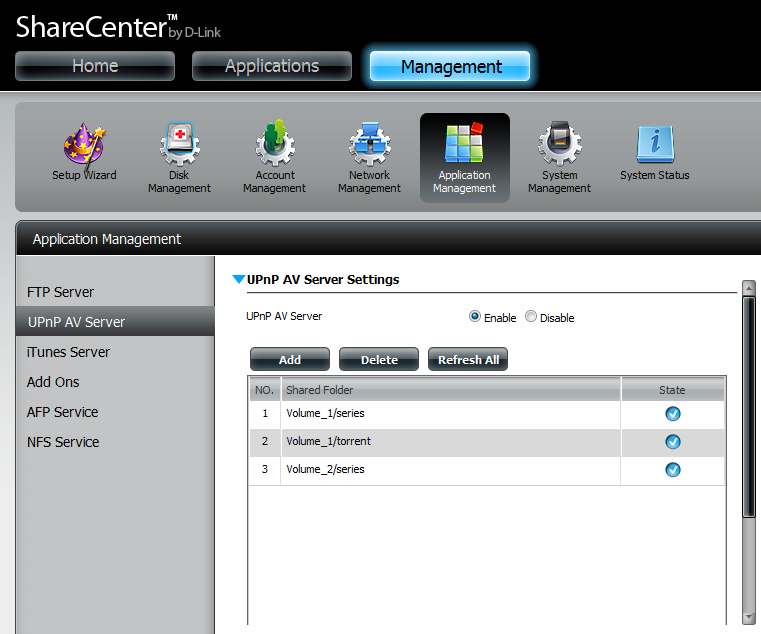 Turn on, select folders ... Supports all file types I have encountered. Cons: Reindexing will have to run hands. Unpleasant. What to watch video? I have an android on my tablet and phone, so I use the free UPnPlay .
Turn on, select folders ... Supports all file types I have encountered. Cons: Reindexing will have to run hands. Unpleasant. What to watch video? I have an android on my tablet and phone, so I use the free UPnPlay .5. Install fun_plug (ssh access to NAS)
Take care of telnet and ssh-clients in advance - I use trite putty on Windows, but there are so many that I don’t dare to recommend something specific.
- So, firstly, we upload the fun_plug file ( http://wolf-u.li/u/433 ) and fun_plug.tgz ( http://inreto.de/dns323/fun-plug/0.7/arm/ fun_plug.tgz )
- Restarting the NAS - now we can connect via telnet. Connect by name or address - no password!

') - Set root password
usermod -s /ffp/bin/sh root mkdir -p /ffp/home/root/ sed -ie 's#:/home/root:#:/ffp/home/root:#g' /etc/passwd pwconv
Enter the new password.passwd
We enter the root username and your password - we receive in reply the message “no mail”. The following steps are required to save a password:login
Activate SSHwget http://wolf-u.li/u/172/ -O /ffp/sbin/store-passwd.sh store-passwd.sh
And now - we connect in another window via SSH, we answer in the affirmative to the question about saving the key, and if everything went smoothly - we disable the autostart of the telnet service in the first window:chmod a+x /ffp/start/sshd.sh sh /ffp/start/sshd.sh start
Preparation is complete - now you have full access and full control over the system. If, all of a sudden, you need to delete fun_plug, thenchmod -x /ffp/start/telnetd.sh- Delete the file in the root fun_plug
- Reboot
- Delete the ffp directory
6. Install additional repositories (needed for steps 7-9, and simply useful)
- Add additional repositories
echo "mijzelf http://downloads.zyxel.nas-central.org/Users/Mijzelf/FFP-Stick/packages/0.7/arm" >> /ffp/etc/funpkg/sites echo "memiks http://ffp.memiks.fr/pkg" >> /ffp/etc/funpkg/sites echo "kylek http://kylek.is-a-geek.org:31337/files/ffp/0.7-arm" >> /ffp/etc/funpkg/sites - Install Optware
wget http://wolf-u.li/u/233 -O /ffp/start/optware.sh chmod a+x /ffp/start/optware.sh /ffp/start/optware.sh start
- Through slacker. It is quite convenient due to the full-fledged visual interface in text mode.
update information about available programsslacker -U
install the program (select the desired one in the visual interface)slacker -i
remove the program (select the desired one in the visual interface)slacker -r - Via ipkg. Commands:
update information about available programsipkg update
update installed programsipkg upgrade
to install the programipkg install [ ]
get information about the program. Templates can be used in the title, for example, “scree *”ipkg info [ ]
remove the program.ipkg remove [ ]
7. Install Midnight Commander (file manager)
Why is it needed? Perform Operations on files and folders inside an array. I like it more than the browser interface, it works faster, you can run on the background, log out, and it will copy / move itself.
- Initially, I constantly had problems with Russian letters, colors, cursor control keys (choose any 2 or even 3), but the following algorithm was developed. Actually, we install:
ipkg install pcre glib e2fsprogs slang libpng mc - Create a script called mc.sh (well, or whatever) in the /ffp/etc/profile.d/ folder with the following contents:
#!/ffp/bin/sh export TERM="xterm" export TERMINFO="/ffp/share/terminfo" export LANG="en_US.utf8" - We execute the command
After that, let's pause.chmod a+x /ffp/etc/profile.d/mc.sh - Now you can run commander command
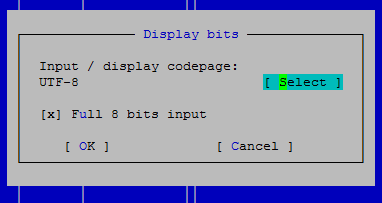
And you will have support for Russian file names, and normal key management. If there is a problem with Russian names, then go to this menu and everything will be fine:mc
8. Install the screen (run the commands in the background)
Screen is an extremely useful utility that allows you to create “screens” that work on the background. The beauty is that if the connection is interrupted or you close the putty - the user's session will remain working in the background. It is suitable if you need to download something, for example, or move the folder from disk to disk. We connect, start the screen, give the command, disconnect - and the NAS know yourself rustling and following instructions.
Now - how to use it.
screen - start the screen
screen -R - return to the last running screen. If there are several screens, a list will be displayed starting with numbers - the transition to a specific screen is made with the screen -R [number] command.
ctrl + a D - exit the screen without closing it (unhook from the window)
ctrl + ak - close the current window
- Install
ipkg install screen - Create a script with the name screen.sh (well, or whatever) in the /ffp/etc/profile.d/ folder and the following contents:
#!/ffp/bin/sh alias screen="screen -U"
Now - how to use it.
screen - start the screen
screen -R - return to the last running screen. If there are several screens, a list will be displayed starting with numbers - the transition to a specific screen is made with the screen -R [number] command.
ctrl + a D - exit the screen without closing it (unhook from the window)
ctrl + ak - close the current window
9. Install Transmission (Torrent)
Although NAS has a built-in rocking chair for torrents, the quality of its work is so far from ideal that it is extremely desirable to install another, if you need such functionality, of course.
- We execute the command
choose transmission and curl , then click "ok".slacker -i - We execute the following commands
chown -R nobody /mnt/HD/HD_a2/torrent mkdir /ffp/var/transmission mkdir /ffp/var/transmission/incomplete chown -R nobody /ffp/var/transmission - Now edit the file /ffp/start/transmission.sh, change the path to this:
TRANSMISSION_HOME=/ffp/var/transmission - Execute the command for the first run and initialization of the config:
su nobody -c "transmission-daemon -f -g /ffp/var/transmission -w /mnt/HD/HD_a2/torrent -t -u admin -v password -a 127.0.0.1,192.168.*.*" - Next - customizable. To do this, edit the file /ffp/var/transmission/settings.json
The most interesting lines for us are:"incomplete-dir": "/ffp/var/transmission/incomplete","incomplete-dir-enabled": true,"peer-port": 11000, "peer-port-random-high": 11999, "peer-port-random-low": 11001,"rpc-port": 9091,"rpc-whitelist": "127.0.0.1,192.168.*.* ""rpc-whitelist-enabled": true, - Finish the installation:
chown -R nobody /ffp/var/transmission chmod a+x /ffp/start/transmission.sh /ffp/start/transmission.sh start
10. Unsolved problems
UPnP server does not automatically re-index files - you need to do this manually.We look at the solution in update 1 !- Failed to compile davfs2 or another service / utility to work with WebDav. More precisely, it is of course compiled, when launched, it asks for a login, password, specifies whether we are sure ... Then it falls. Silently. Accordingly, it is not possible to mount cloud storage via WebDav such as Dropbox or Yandex.Disk.
- External USB-drives are connected with the rights of "everything is possible." Cannot be limited.
- When working from inside the screen, the PageUp / PageDown keys do not work (letters are typed instead)
11. References
- Performance characteristics, such as processor, output / proc / cpuinfo, etc. - http://dns323.kood.org/dns-325
- Description DNS-325 from D-Link website - http://dlink.ru/en/products/120/1400_b.html
- Detailed instructions for using fun_plug (in English) - http://bernaerts.dyndns.org/dns325
- Discussion of NAS D-Link ShareCenter Pulse DNS-320 on the iXBT forum - http://forum.ixbt.com/topic.cgi?id=11:43076
- Building davfs2 on an ARM device (in German) - http://www.synology-wiki.de/index.php/WebDAV-Speicher_mithilfe_von_davfs2_direkt_in_die_DS_einbinden
- Mounting cloud disks via Webdav - http://wl500g.info/showthread.php?24669-DropBox-Client-%E4%EB%FF-%F0%EE%F3%F2%E5%F0% E0-Asus&p=249071# post249071
- Instructions for using the screen - http://xgu.ru/wiki/man:screen
update 1 . As it turned out, it is still possible to launch automatic re-indexing of media files - the upnpdbmgr program is responsible for it. To do this, go to the task management mode (such a command is needed for convenient task management - via the mc editor):
EDITOR=mcedit crontab -e Now add to the end a command of this type (re-indexing the database every hour, at the 5th minute of the hour) 5 * * * * /usr/local/modules/sbin/upnpdbmgr --mode=add [ ] Example of a real command: 5 * * * * /usr/local/modules/sbin/upnpdbmgr --mode=add /mnt/HD/HD_a2/torrent /mnt/HD/HD_a2/series /mnt/HD/HD_a2/movie To clear the database of already deleted files, use the command /usr/local/modules/sbin/upnpdbmgr --mode=remove-all More information about the crown - in Wikipedia . The idea (obvious, but not for a deliberate eye!) “To search for a program and put it in cron” suggested Diam0n .Source: https://habr.com/ru/post/155557/
All Articles