Several interesting features of Windows 8
It so happened that in the last week of September and the first two weeks of October I held 6 workshops on Windows 8 for Campus Experts - students from German universities who provide technical support for the main Microsoft user products (operating system, office, etc.) in their own universities. In preparation for these master classes, I made a small list of “features” or features that seemed interesting and somewhat unobvious to me. Some more features were prompted to me by the students themselves. I decided to make this small list with screenshots in the form of a small review. Of course, not each of these features is new or completely unknown, but I tried to choose something. that seemed interesting to me.
If up to the 7th version of the operating system, Windows users used the traditional PrtScr and Alt + PrtScr shortcuts to copy either the entire screen or the current window to the clipboard, now a new shortcut is Win + PrtScr. By pressing this combination, the “Screenshots” folder is automatically created in the “Pictures” folder (if such a folder did not exist) and a picture of all screens is recorded there as a png-file, while connecting more than one monitor, all images (from the main and all monitors) are stitched horizontally. The order of stitching determines the number of monitors in the screen settings. When you click PrtScr, the stitched image from all screens is also attached to the clipboard.
Snipping Tools, which appeared in Windows 7, is also present in the delivery of Windows 8, but with its help you can take a screenshot of only desktop applications, Win + PrtScr allows you to take screenshots includingMetro Modern UI applications.
If in previous versions of Windows there was no single language switch command and the user could choose such a combination at his choice, now the language switch works regardless of the user-defined combination also by Win + space. In this case, the switching is shown graphically in the form of a briefly appearing menu of languages, which facilitates switching in the presence of more than two layouts.
')
A lot of user dissatisfaction is caused by the absence of the “Start” button in the lower left corner and the traditional program launch menu. There have even appeared several programs on the network that are trying to return this button to the taskbar. However, there is a fairly simple way to get a similar menu without resorting to any programs: you just need to add your own toolbar to the taskbar for which to choose an arbitrary path. As such a path, you can choose any folder - for example, “My Documents” or “Desktop”. In order to get the menu from previous versions of Windows, just add the folder “C: \ Users \ $ USERNAME $ \ AppData \ Roaming \ Microsoft \ Windows \ Start Menu \ Programs \” as a panel (here $ USERNAME $ is the name of the current user) .
If earlier the list of names of marked files could be copied to the clipboard using a cunning key combination (right-click on marked files with Shift pressed and select Copy as Path, thanks mooseyaka ), now this function is available in the new explorer menu. The resulting list can be inserted into the text in any text editor.
It was also quite simple to turn on the display of file extensions - for this, too, there was a menu item.
The explorer also supports contextual operations on a number of data types: for example, it can rotate pictures counterclockwise, show slideshows, and play video and audio.
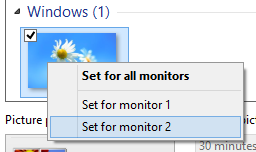
The fact that the taskbar can now show on multiple monitors, and not only on the main monitor, usually does not go unnoticed, as well as the fact that you can customize the view of this taskbar for several monitors: depending on the settings, they can be shown or not shown. stuck "application, as well as all running applications or only those that are located on this monitor. Less noticeable is the fact that now the desktop images in Desktop mode can be stretched to all connected monitors at once, or (by pressing the right mouse button) you can define different images for each of the connected monitors.
For many tablets that allow you to access the Internet using a SIM card, it may be a critical problem of accounting traffic through this kind of connection. To do this, you can define an additional property for network connections in the system: is this connection “metered” or not. For “metered connections”, very tight traffic control is used and most applications (eg Store) or system updates will not use this connection to download heavy content.
By default, connections via various kinds of modems are metered, and WiFi connections are normal. However, this can be changed in the context menu of the connection, which is invoked by pressing the right mouse button.
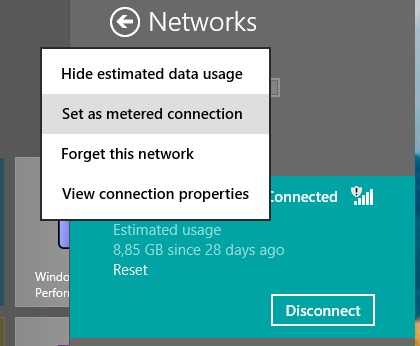
The consumption of traffic by individual applications can be viewed in the new task manager.

Task Manager has been significantly reworked and now there is almost no need to install Process Explorer from the Sysinternals toolkit on each working machine. In particular, right from the Task Manager you can now see which system services are running in the context of which processes and, if necessary, pause or restart these services.
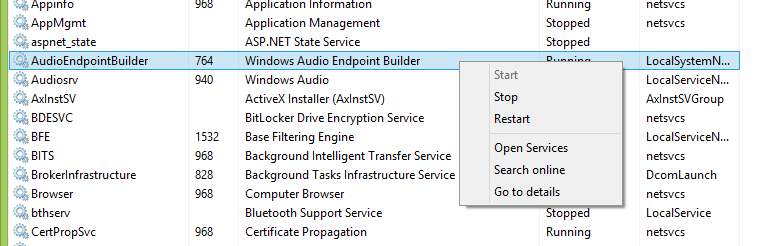
For system administrators, it will be useful to have information about uptime, as well as network and disk activity. Those who miss the on-screen "widgets" in Windows 8 may like the new Task Manager's new Summary View, which displays real-time resource usage information.

The new Autostart tab with a list of applications that are launched each time the system is started and information about their impact on the download speed will also be useful. Autostart application can be disabled directly from the same menu.
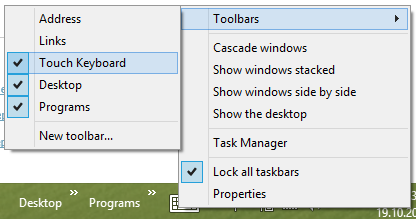
In view of the significant expansion of the form factor of the devices on which the new operating system will be installed, the on-screen keyboard has also undergone significant changes. The keyboard call icon is now located on the taskbar next to the tray and calls the default keyboard optimized for touch screens. If your computer does not have a touch screen, then this icon will not be there, but you can turn it on simply by adding a new Toolbar, which is called the Touch Keyboard.
This keyboard has two modes: the mode in which it is located on top of the screen, closing applications, and the “docking” mode, when applications “shift” upwards by the keyboard width. These modes can be switched by the icon in the upper right corner of the keyboard, next to the “cross” that closes it.
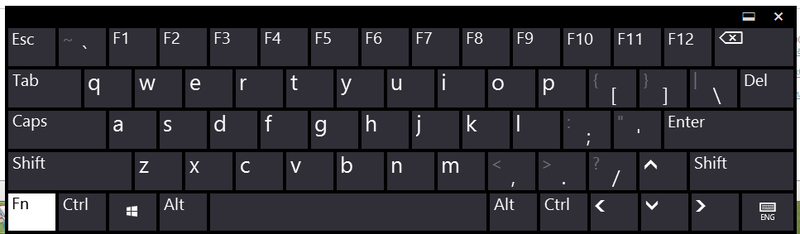
If you are working on a tablet, it may have happened to you to search for function keys on this on-screen keyboard — often without success. In fact, this keyboard is optimized for text input. To work with function keys, as well as to more conveniently enter a number of characters, the system also has a “full-featured” version of the keyboard, which is deactivated for touch devices by default and is enabled in the settings. After that, you can switch to this kind of keyboard - which is made in the image and likeness of most hardkey keyboards - and you can access the function keys using the dead Fn key.
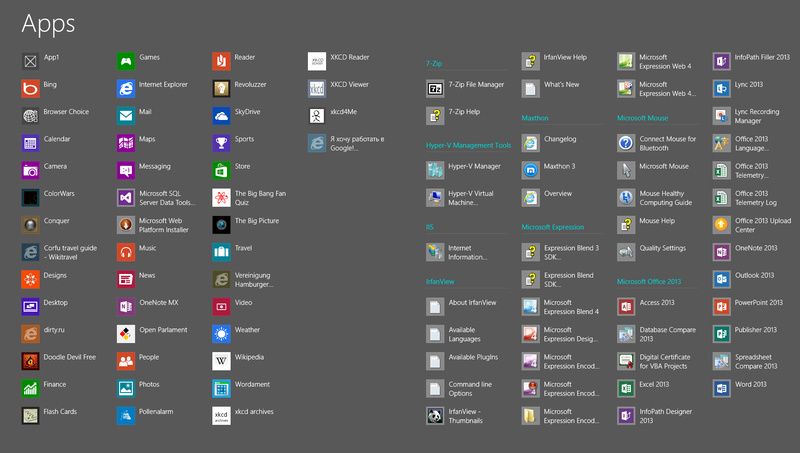
The new screen, replacing the traditional “Start” menu, may at first seem inconvenient and unusual. In order to switch it to a more “familiar” look, just press the Ctrl + Tab combination. In this view, all applications are shown with small icons (like the Start menu in earlier versions), and after all installed Windows Store applications, desktop applications are displayed with their folder headers. At the same time on this menu, you can very quickly move using the keyboard: navigation in the new two-dimensional menu is much faster than before in the one-dimensional.
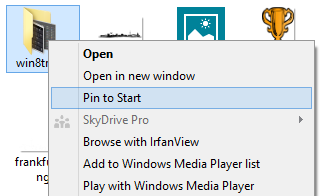
Not everyone has the obvious fact that in addition to Windows Store Apps, which are shown in the new “Start Screen” by default, you can “attach” any executable file, as well as any folder. To do this, select them in the Explorer (in Desktop mode) and select “Pin to start” in the context menu.
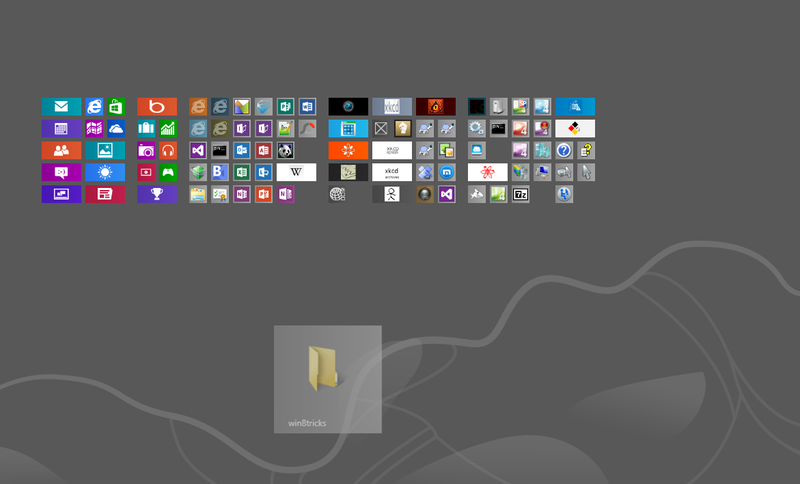
In this case, the folder or file, as a rule, appears at the end of the list of applications on the “Start Screen” far to the right. In order to quickly move an application or folder to the top, simply “drag” the tile to the bottom of the start screen using a mouse or a touch gesture — this will switch to the “Semantic Zoom” mode, in which applications and groups will be shown schematically and as a rule, all fit on one screen. Here it is easy to drag the tile to the right place and release it - it will be added to the application group at the place where it was released and the screen will return to its previous appearance.
Further cosmetic moves or tile settings can already be made here easily.
In general, Windows 8 can fully control any of the four types of input devices: keyboard, mouse, fingers, or stylus. It is only necessary to take into account the specifics of each of these devices: many touch gestures, for example, are duplicated by the wheel of the mouse or its right button.
The list of keyboard shortcuts for Windows 8 that is considerably enlarged (compared to previous versions of Windows) can be viewed, for example, here .
And what non-obvious features do you know ??
UPD: Here are a few features suggested in the comments.
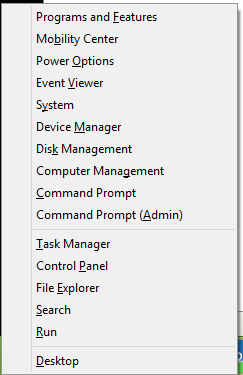
Razaz pointed out an important feature for system administrators that I know called Power User Menu. This menu can be called either by clicking the right mouse button in the lower left corner of the screen (when the red-blue icon of the start screen appears in the corner), or by using the Win + X combination. Here’s what this menu looks like for me:
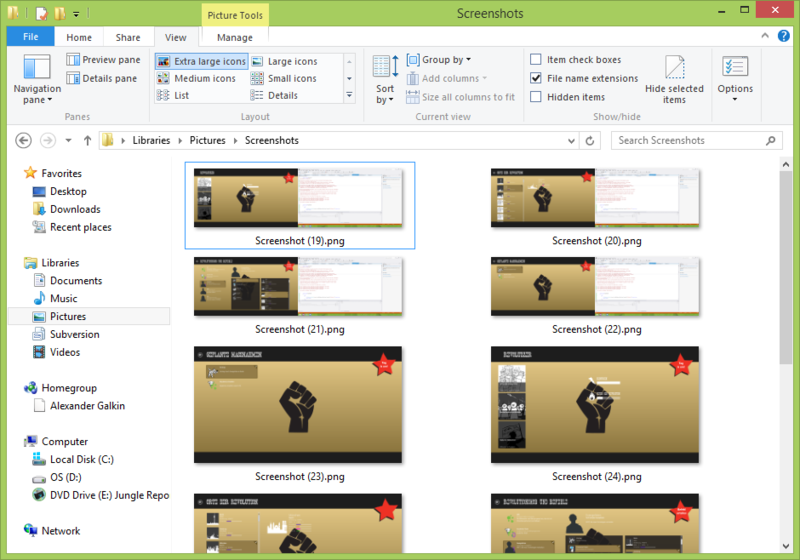
Making screenshots
If up to the 7th version of the operating system, Windows users used the traditional PrtScr and Alt + PrtScr shortcuts to copy either the entire screen or the current window to the clipboard, now a new shortcut is Win + PrtScr. By pressing this combination, the “Screenshots” folder is automatically created in the “Pictures” folder (if such a folder did not exist) and a picture of all screens is recorded there as a png-file, while connecting more than one monitor, all images (from the main and all monitors) are stitched horizontally. The order of stitching determines the number of monitors in the screen settings. When you click PrtScr, the stitched image from all screens is also attached to the clipboard.
Snipping Tools, which appeared in Windows 7, is also present in the delivery of Windows 8, but with its help you can take a screenshot of only desktop applications, Win + PrtScr allows you to take screenshots including
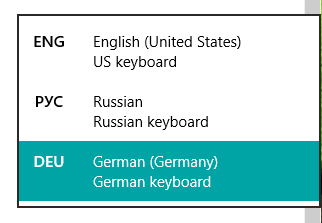
Language switching
If in previous versions of Windows there was no single language switch command and the user could choose such a combination at his choice, now the language switch works regardless of the user-defined combination also by Win + space. In this case, the switching is shown graphically in the form of a briefly appearing menu of languages, which facilitates switching in the presence of more than two layouts.
')
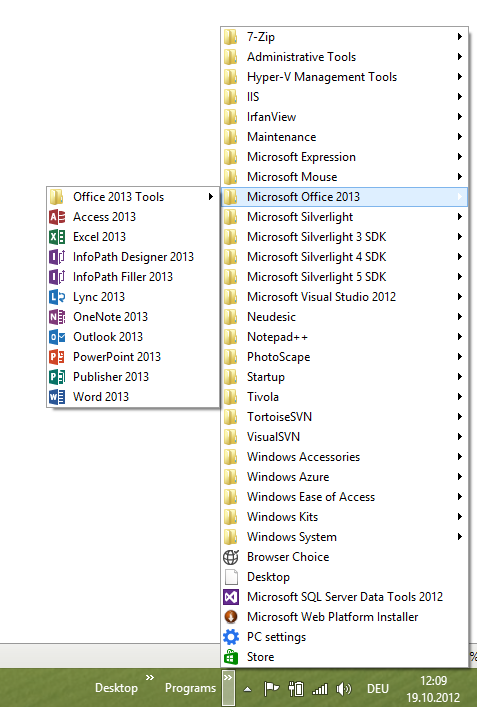
Return of the old menu
A lot of user dissatisfaction is caused by the absence of the “Start” button in the lower left corner and the traditional program launch menu. There have even appeared several programs on the network that are trying to return this button to the taskbar. However, there is a fairly simple way to get a similar menu without resorting to any programs: you just need to add your own toolbar to the taskbar for which to choose an arbitrary path. As such a path, you can choose any folder - for example, “My Documents” or “Desktop”. In order to get the menu from previous versions of Windows, just add the folder “C: \ Users \ $ USERNAME $ \ AppData \ Roaming \ Microsoft \ Windows \ Start Menu \ Programs \” as a panel (here $ USERNAME $ is the name of the current user) .
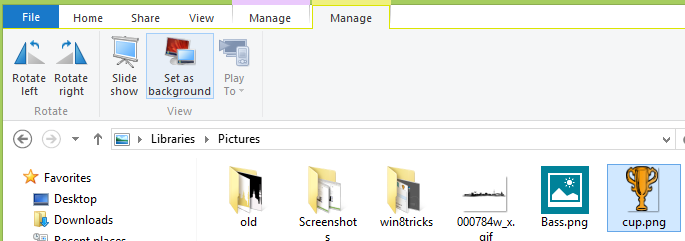
Some options in the new explorer menu.
If earlier the list of names of marked files could be copied to the clipboard using a cunning key combination (right-click on marked files with Shift pressed and select Copy as Path, thanks mooseyaka ), now this function is available in the new explorer menu. The resulting list can be inserted into the text in any text editor.
It was also quite simple to turn on the display of file extensions - for this, too, there was a menu item.
The explorer also supports contextual operations on a number of data types: for example, it can rotate pictures counterclockwise, show slideshows, and play video and audio.
Multi-monitor support
The fact that the taskbar can now show on multiple monitors, and not only on the main monitor, usually does not go unnoticed, as well as the fact that you can customize the view of this taskbar for several monitors: depending on the settings, they can be shown or not shown. stuck "application, as well as all running applications or only those that are located on this monitor. Less noticeable is the fact that now the desktop images in Desktop mode can be stretched to all connected monitors at once, or (by pressing the right mouse button) you can define different images for each of the connected monitors.
Traffic accounting
For many tablets that allow you to access the Internet using a SIM card, it may be a critical problem of accounting traffic through this kind of connection. To do this, you can define an additional property for network connections in the system: is this connection “metered” or not. For “metered connections”, very tight traffic control is used and most applications (eg Store) or system updates will not use this connection to download heavy content.
By default, connections via various kinds of modems are metered, and WiFi connections are normal. However, this can be changed in the context menu of the connection, which is invoked by pressing the right mouse button.
The consumption of traffic by individual applications can be viewed in the new task manager.
New reworked Task Manager
Task Manager has been significantly reworked and now there is almost no need to install Process Explorer from the Sysinternals toolkit on each working machine. In particular, right from the Task Manager you can now see which system services are running in the context of which processes and, if necessary, pause or restart these services.
For system administrators, it will be useful to have information about uptime, as well as network and disk activity. Those who miss the on-screen "widgets" in Windows 8 may like the new Task Manager's new Summary View, which displays real-time resource usage information.
The new Autostart tab with a list of applications that are launched each time the system is started and information about their impact on the download speed will also be useful. Autostart application can be disabled directly from the same menu.
Work with the on-screen keyboard
In view of the significant expansion of the form factor of the devices on which the new operating system will be installed, the on-screen keyboard has also undergone significant changes. The keyboard call icon is now located on the taskbar next to the tray and calls the default keyboard optimized for touch screens. If your computer does not have a touch screen, then this icon will not be there, but you can turn it on simply by adding a new Toolbar, which is called the Touch Keyboard.
This keyboard has two modes: the mode in which it is located on top of the screen, closing applications, and the “docking” mode, when applications “shift” upwards by the keyboard width. These modes can be switched by the icon in the upper right corner of the keyboard, next to the “cross” that closes it.
If you are working on a tablet, it may have happened to you to search for function keys on this on-screen keyboard — often without success. In fact, this keyboard is optimized for text input. To work with function keys, as well as to more conveniently enter a number of characters, the system also has a “full-featured” version of the keyboard, which is deactivated for touch devices by default and is enabled in the settings. After that, you can switch to this kind of keyboard - which is made in the image and likeness of most hardkey keyboards - and you can access the function keys using the dead Fn key.
New screen to launch applications
The new screen, replacing the traditional “Start” menu, may at first seem inconvenient and unusual. In order to switch it to a more “familiar” look, just press the Ctrl + Tab combination. In this view, all applications are shown with small icons (like the Start menu in earlier versions), and after all installed Windows Store applications, desktop applications are displayed with their folder headers. At the same time on this menu, you can very quickly move using the keyboard: navigation in the new two-dimensional menu is much faster than before in the one-dimensional.
Not everyone has the obvious fact that in addition to Windows Store Apps, which are shown in the new “Start Screen” by default, you can “attach” any executable file, as well as any folder. To do this, select them in the Explorer (in Desktop mode) and select “Pin to start” in the context menu.
In this case, the folder or file, as a rule, appears at the end of the list of applications on the “Start Screen” far to the right. In order to quickly move an application or folder to the top, simply “drag” the tile to the bottom of the start screen using a mouse or a touch gesture — this will switch to the “Semantic Zoom” mode, in which applications and groups will be shown schematically and as a rule, all fit on one screen. Here it is easy to drag the tile to the right place and release it - it will be added to the application group at the place where it was released and the screen will return to its previous appearance.
Further cosmetic moves or tile settings can already be made here easily.
Instead of conclusion
In general, Windows 8 can fully control any of the four types of input devices: keyboard, mouse, fingers, or stylus. It is only necessary to take into account the specifics of each of these devices: many touch gestures, for example, are duplicated by the wheel of the mouse or its right button.
The list of keyboard shortcuts for Windows 8 that is considerably enlarged (compared to previous versions of Windows) can be viewed, for example, here .
And what non-obvious features do you know ??
UPD: Here are a few features suggested in the comments.
Razaz pointed out an important feature for system administrators that I know called Power User Menu. This menu can be called either by clicking the right mouse button in the lower left corner of the screen (when the red-blue icon of the start screen appears in the corner), or by using the Win + X combination. Here’s what this menu looks like for me:
Source: https://habr.com/ru/post/155379/
All Articles