Wi-Fi in amateur project? Nothing is easier!
Hello everybody!
In this post I will try to convince you that you can add Wi-FI support to your device on the microcontroller with absolutely no problems. And for this you do not have to chuck your favorite router and solder to the conclusions of the debug uart, nor install the usb-uart adapter (which is of course the way out).
I will tell about two modules of WizNet : WizFi220.
Founded in 1998 in Korea, WizNet manufactures network solutions. The range of what the company produces is wide. These are microcontrollers on the 8051 core with an integrated PHY controller, and separate SPI-controlled Ethernet controllers, Wi-FI modules, and breadboard models for almost every chip.
About the first two types I know little, because I did not work with them. And about Wi-Fi quite a lot.
Who cares - I ask under the cat.
It differs from WizFi210 in higher signal power and, as a result, in increased power consumption.
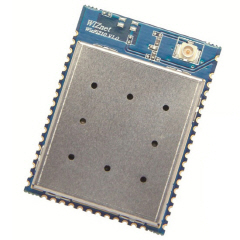
This small piece with a size of 32x24.5 mm has the following characteristics:
It is easy to see that in the module itself a lot of things have been done: SPI, UART, GPIO, I2C, ADC, JTAG. But what of this list can be used is another question.
')
Everything is very simple here. Pins CTS2, RX2, RTS2, TX2 go to the controller. If there is no desire to allocate any pin of the microcontroller under the control of the module reset, then EXT_RESETN can be pulled to the power through a 10K resistor or thrown in the air.
Conclusion No. 25 (GPIO_21 / CLK_11MHz) is needed in order to apply one of the two standard settings of the WizFI220.
LEDs are needed to indicate what is happening in the module processes.
All experiments will be carried out using the WizFi220-EVB layout.
Which to assess the capabilities of WizFi220 - the most it.
To enable the module, you need a mini-USB cable and a USB-RS232 adapter. After powering up, the blue LEDs (in the lower right corner) blink three times. This is evidence that WizFi220 has been successfully launched. Open your favorite terminal and connect to the port. Port configuration: speed 115200, 8 bits, 1 stop bit, parity disabled.
And we enter there thefirst thing that comes to mind AT.
Note: each command must end with the symbol CR (carriage return, 0x0D) otherwise it will not be processed.
The module should be fun to report
Those two letters that have now been accepted by the module are called the AT command. WizFi220 understands many AT-commands, the description of which (sometimes very meager) is contained in the manual.
Let's now raise the Limited AP. This can be done with a small number of commands.
Walk on each team.
Everything, we raised an access point. See how simple it is!
Do you remember the tcp-server on port 2345? We didn’t just lift him up like that. Connect to the MyCoolFreeNet network, open a browser and enter 192.168.55.1:2345 in the address bar.
Question: what does the browser do when the user enters something like this? Correctly, sends a GET request. And what makes our smart WizFi220? He throws the text of the request in the UART. If you do not believe, then you can easily verify this yourself. Therefore, using this module and the MK, you can do something that is controlled via Wi-Fi with its own admin panel.
WizFi220, as well as WizFi210, has a built-in web admin panel. But she is weak and frail. Here is its general view.
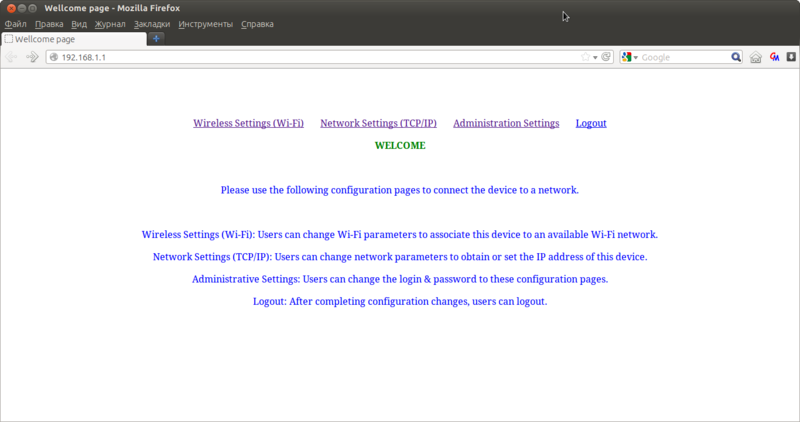
WizFi220 / 210 is a good and inexpensive (approximately $ 38) module for those who want to try to work with Wi-FI. And embed it somewhere. For example, in a radio-controlled machine.
I have been working with this module for about three months and I can say the following about it.
Pros: small size, low power consumption, simple wiring, easy setup and operation, low cost.
Cons: not very good documentation, some unexpected surprises at work.
Take, work, have fun!
In this post I will try to convince you that you can add Wi-FI support to your device on the microcontroller with absolutely no problems. And for this you do not have to chuck your favorite router and solder to the conclusions of the debug uart, nor install the usb-uart adapter (which is of course the way out).
I will tell about two modules of WizNet : WizFi220.
Instead of the preface
Founded in 1998 in Korea, WizNet manufactures network solutions. The range of what the company produces is wide. These are microcontrollers on the 8051 core with an integrated PHY controller, and separate SPI-controlled Ethernet controllers, Wi-FI modules, and breadboard models for almost every chip.
About the first two types I know little, because I did not work with them. And about Wi-Fi quite a lot.
Who cares - I ask under the cat.
WizFi220
It differs from WizFi210 in higher signal power and, as a result, in increased power consumption.
This small piece with a size of 32x24.5 mm has the following characteristics:
- All settings - via UART
- Start time - 20 ms
- Relatively low consumption: 34 µA in standby mode, 125 mA - reception, 250 mA - transmission
- Supports 802.11b / g / n standards.
- Support for the following encryption types: WEP, WPA / WPA2-PSK, Enterprise EAP-FAST, EAP-TLS, EAP-TTLS, PEAP
- Temperature range: -40 ℃ ... 85 ℃
- Power supply - 3.3V
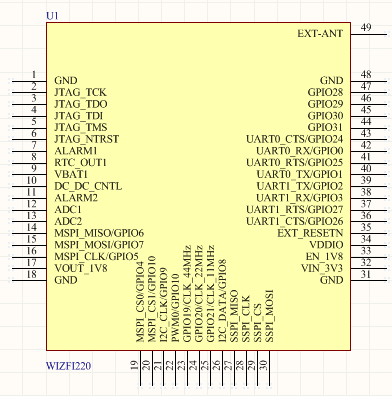
Pinout module
It is easy to see that in the module itself a lot of things have been done: SPI, UART, GPIO, I2C, ADC, JTAG. But what of this list can be used is another question.
')
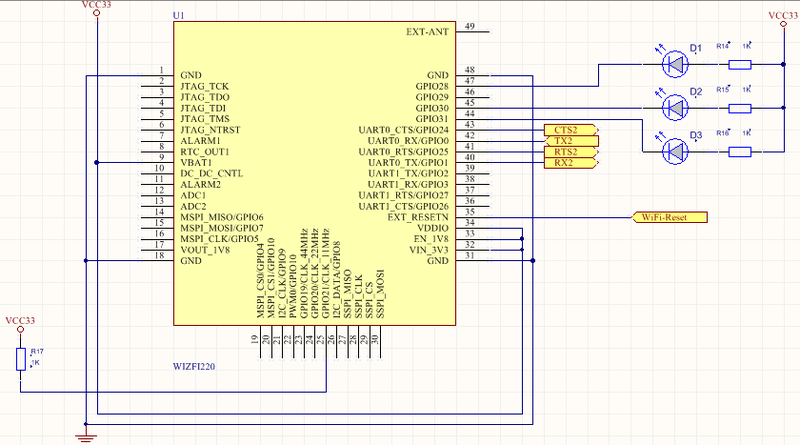
The simplest connection scheme of the module
Everything is very simple here. Pins CTS2, RX2, RTS2, TX2 go to the controller. If there is no desire to allocate any pin of the microcontroller under the control of the module reset, then EXT_RESETN can be pulled to the power through a 10K resistor or thrown in the air.
Conclusion No. 25 (GPIO_21 / CLK_11MHz) is needed in order to apply one of the two standard settings of the WizFI220.
- Two times omitted to zero for 300 ms with a pause between pulses of 300 ms - activation of the Limited AP mode (maximum 3 clients)
- Three times to zero - the inclusion of ad-hoc
LEDs are needed to indicate what is happening in the module processes.
Let's start the experiments
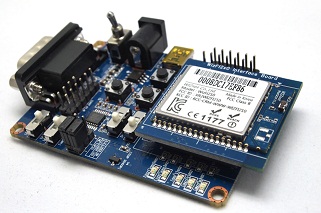
All experiments will be carried out using the WizFi220-EVB layout.
Which to assess the capabilities of WizFi220 - the most it.
To enable the module, you need a mini-USB cable and a USB-RS232 adapter. After powering up, the blue LEDs (in the lower right corner) blink three times. This is evidence that WizFi220 has been successfully launched. Open your favorite terminal and connect to the port. Port configuration: speed 115200, 8 bits, 1 stop bit, parity disabled.
And we enter there the
Note: each command must end with the symbol CR (carriage return, 0x0D) otherwise it will not be processed.
The module should be fun to report
AT [OK] Those two letters that have now been accepted by the module are called the AT command. WizFi220 understands many AT-commands, the description of which (sometimes very meager) is contained in the manual.
Let's now raise the Limited AP. This can be done with a small number of commands.
AT+WD [OK] AT+WM=2 [OK] AT+WAUTH=0 [OK] AT+NDHCP=0 [OK] AT+NSET=192.168.55.1,255.255.255.0,192.168.55.1 [OK] AT+WA=MyCoolFreeAP,,8 IP SubNet Gateway 192.168.55.1: 255.255.255.0: 192.168.55.1 [OK] AT+NSTCP=2345 [OK] Walk on each team.
- AT + WD - break all connections, if any.
- AT + WM = 2 - the module will operate in the Limited AP mode.
- AT + WAUTH = 0 - no encryption.
- AT + NDHCP = 0 - DHCP is disabled. Therefore, static parameters are required when connecting to this access point.
- AT + NSET = 192.168.55.1,255.255.255.0,192.168.55.1 - we set the module address, subnet mask and gateway address.
- AT + WA = MyCoolFreeNet ,, 8 - set the name of the network and the channel on which it will work. Two commas in a row mean that there is an optional parameter between them.
- AT + NSTCP = 2345 - we lift TCP - the server on the 2345th port.
Everything, we raised an access point. See how simple it is!
Do you remember the tcp-server on port 2345? We didn’t just lift him up like that. Connect to the MyCoolFreeNet network, open a browser and enter 192.168.55.1:2345 in the address bar.
Question: what does the browser do when the user enters something like this? Correctly, sends a GET request. And what makes our smart WizFi220? He throws the text of the request in the UART. If you do not believe, then you can easily verify this yourself. Therefore, using this module and the MK, you can do something that is controlled via Wi-Fi with its own admin panel.
WizFi220, as well as WizFi210, has a built-in web admin panel. But she is weak and frail. Here is its general view.
Summary
WizFi220 / 210 is a good and inexpensive (approximately $ 38) module for those who want to try to work with Wi-FI. And embed it somewhere. For example, in a radio-controlled machine.
I have been working with this module for about three months and I can say the following about it.
Pros: small size, low power consumption, simple wiring, easy setup and operation, low cost.
Cons: not very good documentation, some unexpected surprises at work.
Take, work, have fun!
Source: https://habr.com/ru/post/155203/
All Articles