Implementing Enhanced Write Filter (EWF)
 Enhanced Write Filter (EWF) is an optional component used in Windows Embedded. EWF makes a disk volume read-only. At the same time, write operations that are performed with data stored on this disk volume are redirected to its overlay, which may be on another disk or in the computer's memory. Windows treats the EWF overlay and its disk volume as a single device. At the same time, virtually no changes occur on the disk volume. All changes are only saved in the EWF overlay. Changes can be saved to a disk volume at any time.
 Enhanced Write Filter can be used for various purposes.
- Enhanced Write Filter allows you to create a bootable Windows Flash card and reduce the number of write cycles to a card, thereby increasing its lifespan.
- When using SSD write protection using EWF also allows you to increase the service life of the disk.
- You can also use EWF to protect your PC from the effects of viruses, trojans and other hazards when an inexperienced user browses the Internet.
I used EWF in Windows XP to keep the computer running smoothly.
')
The main idea was to get a secure OS for surfing the Internet. EWF allows you to protect your PC from the effects of visiting entertainment and information resources. It is no secret that cases of unfair advertising have recently become more frequent. Going to the resource where the advertisement is placed, you can undergo various attacks. However, when using EWF, all changes that occurred on the system disk are not saved after a reboot, and the system that has been attacked is ready to work again. The second pleasant moment is that when working through the EWF in the OS, the changes that slow down its work do not accumulate, and after six months, Windows XP works as fast as the day the OS was installed.
In this case, all the necessary changeable files (user documents, etc.) can be stored on the second disk or divided into two sections - the system section and the section for storing files.
Installing EWF on Windows XP
1. To install EWF on Windows XP, you need to download the archive EWF.zip .
It contains the following files:
ewf.sys
EWFMGR.EXE
ewfntldr
ewf.reg
ewf.sys file ewf.sys to %systemroot%\system32\driversEWFMGR.EXE to % systemroot% \ system32 .
2. The
ewfntldr file ewfntldr needed to replace the ntldr located in the root directory of the system disk. Remember to make a copy of the original file, in case you want to undo the changes.3. We need to add information to the
HKEY_LOCAL_MACHINE\SYSTEM\CurrentControlSet\Enum\Root\LEGACY_EWF .To do this, you must give the user on whose behalf you are working to write to the
HKEY_LOCAL_MACHINE\SYSTEM\CurrentControlSet\Enum\Root section.By default, only System has write access to this section.
4. The following information is added to the registry:
Windows Registry Editor Version 5.00[HKEY_LOCAL_MACHINE\SYSTEM\CurrentControlSet\Enum\Root\LEGACY_EWF]"NextInstance"=dword:00000001[HKEY_LOCAL_MACHINE\SYSTEM\CurrentControlSet\Enum\Root\LEGACY_EWF\0000]"Service"="EWF""Legacy"=dword:00000001"ConfigFlags"=dword:00000020"Class"="LegacyDriver""ClassGUID"="{8ECC055D-047F-11D1-A537-0000F8753ED1}""DeviceDesc"="EWF""Capabilities"=dword:00000000[HKEY_LOCAL_MACHINE\SYSTEM\CurrentControlSet\Enum\Root\LEGACY_EWF\0000\Control]"ActiveService"="EWF"[HKEY_LOCAL_MACHINE\SYSTEM\CurrentControlSet\Services\ewf]"ErrorControl"=dword:00000001"Group"="System Bus Extender""Start"=dword:00000000"Type"=dword:00000001[HKEY_LOCAL_MACHINE\SYSTEM\CurrentControlSet\Control\Class\{71A27CDD-812A-11D0-BEC7-08002BE2092F}]"UpperFilters"="Ewf"[HKEY_LOCAL_MACHINE\SYSTEM\CurrentControlSet\Services\ewf\Parameters\Protected\Volume0]
"Type"=dword:00000001"ArcName"="multi(0)disk(0)rdisk(0)partition(1)"
5. Now you need to maximally clean the system disk from temporary and unnecessary files.
6. You can also transfer the user profile to another disk. In Windows XP, for this you need to transfer all profiles, except for the administrator, as administrator account and correct the location information in
HKLM\SOFTWARE\Microsoft\Windows NT\CurrentVersion\ProfileList\SID\ProfileImagePath\ .7. Then you need to create a temporary user, give him administrator rights, log in on his behalf, move the administrator directory and replace the value in the registry.
The advantage of transferring user profiles is that you can save documents in the recommended location by the system.
The downside is that the loadable information and browser cache will quickly accumulate in the profiles.
8. It remains only to run EWF. To do this, use the ewfmgr c: -enable command.
The list of commands with which you can control EWF:
- ewfmgr c: -enable - enable EWF;
- ewfmgr c: -commitanddisable — disable EWF on the next reboot and save all changes to disk when shutting down / rebooting the system;
- ewfmgr c: -commitanddisable -live — disable EWF without rebooting the system (the information on the disk is saved immediately after the command is executed);
- ewfmgr c: -commit - save all changes to disk when restarting or shutting down the PC.
The last command is very important when installing system updates. Failure to comply with this command leads to the irretrievable loss of everything you did during your Windows session!
If you use EWF only to protect a flash card or SSD disk from a large number of write / read cycles, this command is best placed in autoload.
Installing EWF on Windows 7
Installing EWF on Windows 7 is only possible if you are using EWF for SSD.
The installation consists of the following steps.
1. Add the following information to the registry:
Windows Registry Editor Version 5.00[HKEY_LOCAL_MACHINE\SYSTEM\CurrentControlSet\Control\Class\{71A27CDD-812A-11D0-BEC7-08002BE2092F}]"UpperFilters"="Ewf"[HKEY_LOCAL_MACHINE\SYSTEM\CurrentControlSet\Services\ewf]"ErrorControl"=dword:00000001"Start"=dword:00000000"Type"=dword:00000001[HKEY_LOCAL_MACHINE\SYSTEM\CurrentControlSet\services\Ewf\Parameters\Protected\Volume0]"Type"=dword:00000001"Enabled"=dword:00000001"CompareBeforeAlloc"=dword:00000000"DiskSignature"=dword:00000000"PartitionOffset"=hex(b):00,00,00,00,00,00,00,002. Lay out the files .
ewf.sys copied to %systemroot%\system32\driversEWFMGR.EXE to
%systemroot%\system32 .3. Now run cmd, and in it - the utility diskpart.
4. Type “select disk nn”, where nn is the disk number (counted from 0).
Then "detail disk":
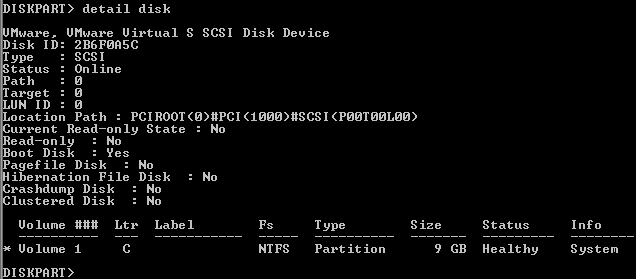
We are interested in “Disk ID” (in the Russian version of “Disk ID”), we remember this value.
5. Now type “select partition nn”, where nn is the number.
Display the “detail partition” information:

We are interested in the number coming after “Offset in Bytes” (in the Russified version “Offset in bytes”).
6. Open the section
HKEY_LOCAL_MACHINE\SYSTEM\CurrentControlSet\servic es\Ewf\Parameters\Protected\Volume0 and edit the values:DiskSignature - enter “Disk ID” here;PartitionOffset - “Offset in Bytes”.7. It remains only to enable the EWF command “ ewfmgr c: -enable ” and restart the computer.
Details of the EWF can be found on the MSDN website .
Author: Konstantin Ivanischev, leading security specialist at Positive Technologies.
Source: https://habr.com/ru/post/155135/
All Articles