Configure Asterisk 1.8 + FreePBX 2.10 from scratch
This article is a continuation of the installation of the system.
Finally, in one way or another, we have installed Asterisk and FreePBX installed.
I will describe the situation in a little more detail to compare whether our work scheme will suit you. We are a small Internet provider, we need a recording of conversations, queues of calls to landline and mobile phones, a voice menu telling about promotions with a choice of which department to get into, and the ability to quickly put all of these messages about accidents on certain streets of the city so that people don’t overwork support, preferably for free. In order not to buy expensive gateways, we decided to change landline numbers and buy a couple of numbers + a dozen channels from an ip-telephony provider. Someone will say that it is unreliable, etc. Just tell me, what difference does the Internet provider on landline phones, if it fell all the Internet? But it is cheap. The connection cost us only $ 38, each phone number is $ 2 and the line is $ 1.2 per month. After that, we received the settings even without authorization and an account was tied to our ip address. Immediately I would like to stipulate how this article will be built, so as not to overload it with tons of screenshots, I will describe the creation of each element once (which I advise you to do because they will be needed for your subsequent experiments), and then I will write out a scheme of what it refers to. in our work pattern. Surely you will have a different scheme, but you can understand the meaning. I will describe only those elements that are directly needed when setting up.
Now it's time to get a trunk:
For clarity, I will write in English because The interface is translated in pieces and quite mysteriously. Go to Connectivity> Trunks> Add SIP Trunk.

')
In the right corner there will be a list of trunks you have already created. Having opened a new one, I arbitrarily filled in the name - Trunk Name, calling it Vega (Vegatelecom is our provider). Outbound CallerID having entered the number in the format 380652 as our operator gives it, this is the number from which outgoing calls will be made, if you do not specify it, you cannot call using this trunk, all the lines said. In Outgoing Settings I filled in another Trunk Name field and entered the settings that the provider gave:
host = 93.178.205.29
type = peer
disallow = all
allow = alaw & ulaw & g729
nat = no
canreinvite = nonat
insecure = invite
dtmfmode = rfc2833
At the bottom I clicked the Submit Changes button and got the trunk created.
Now you need to choose where we will receive calls. Go to Applications> Extension> Generic SIP Device> Submit
User Extension - the internal number of this phone, softphone or whatever you will connect there. We used 100,101, etc.
Display Name - the display name
Required in the This device uses sip technology section. fill in the secret is a password.
Fields Recording Options include a recording of this phone:
Inbound External Calls Always = Incoming External Calls
Outbound External Calls? Always = Outgoing external calls
Inbound Internal Calls? Always = Incoming internal calls
Outbound Internal Calls? Always = Outgoing internal calls
On Demand Recording? Disable Write on request
At the bottom click Submit.
Next, let's digress a bit and set up a softphone, ie a program for making calls from the computer. There are a lot of them (EyeBeam, SJ-phone, Zoiper). I will show with the EyeBeam.
After installing the program under Windows, launch it, go to the settings in the Sip Accounts and edit the first one.

To make it work we need to enter Display Name = User 1, User Name = 100, Password = ******, Domain = ip-your server. The remaining settings can not touch. You can create several subscribers with numbers 101-102 or any others, run several phones on several computers and try to call from one customer to another, respectively, using the numbers 100-101-102, etc.
But we want to call our newly-purchased rooms.
Go Connectivity> Inbound Routes
Description - Route Description (Name)
DID Number - A very useful field, having set it, you can filter calls from a specific number. Let us dwell on it in more detail. In our case, 1 trunk enters 2 phone numbers, let's say we need the first number to go to the first operator and the call from the second number to the second operator. We go to the telephony server via SSH, or physically if there is a monitor, log in as root and launch Asterisk CLI with the asterisk command -r. Call one of the numbers that we connected to the trunk. We look at one of the first lines to appear: Executing [380652 ****** @ from-trunk-sip-vega: 2] Goto (“SIP / vega-000000e4 ″,“ from-trunk, 380652 ****** , 1 ″) in new stack. after the phrase from-trunk, we see what the DID of this number is, our provider sends the number in this format, if it is a GSM gateway in the form of a huawei modem, then its IMEI will be written there, in any case, if we create a route indicating this number , he will be responsible for calls to him. In this example, I propose to leave the field empty for universality. Those. the system will transfer all calls from all trunks to the specified Destination.
CallerID Number - works similar, but already with caller numbers. In the prompts you can see that you can specify for example Blocked, therefore calls from the blocked phone numbers will be transferred to the desired Destination. By tradition, leave empty.
Set Destination - the main field in which we finally specify where the calls will go, you can choose a queue or let's say a specific extension, select the extension 100 that we created earlier and plugged into the softphone.
Now, if you call the number that is running in the trunk, the softphone will ring. Congratulations! You made the first successful call.
It is time to think about the fact that we can call someone else.
Go Connectivity> Outbound Routes>
Route Name - the name of the route
Dial Patterns that will use this Route - here you can set a route to certain numbers, again our provider supports dialing in any form, you can dial with the area code, you can without it, all these routes are registered with him, then we will not prescribe anything and set in the match pattern field -. Yes, just a point. This will mean sending all the numbers dialed as is.
Finally, in Trunk Sequence for Matched Routes, we specify the trunks through which the call will go out, in our case, vega.
If you now call any phone number from the softphone, the call will go through the trunk from the number specified in the trunk.
It's time to think about the voice menu and call queues.
This is where the fun begins. We need a lot of notes for the voice menu. Looking ahead I will describe the principle. I personally had a problem on their dictation, but I found a wonderful way out. First, we create many many records (I will tell you how), dictate them with a nasty lisping voice, then turn on the wonderful function of changing the recording by calling to a number, then go to Admin> Feature codes, below the Recordings all codes that can be called with conditional names will be there records that you give them. Thus, having printed this piece on paper, it can be issued to a female person so that she calls there, listens to what you dictate and re-record in a melodious voice until she starts to like it. Another huge plus of this event is that these recordings can already be used in the finished voice menu, that is, you can change it to a hot one without stopping the operation of telephony and callers. In the same way, it is possible to implement the accident notification function for unqualified personnel. For example, by creating an entry with the name of the accident, a duration of 1 second and silence inside, you can hang it at the very beginning of your menu. If an accident happens, the support operator can call the number of this file - dictate the streets where the repair is being carried out, and after the repair is completed, call there and keep silence for 1 second.
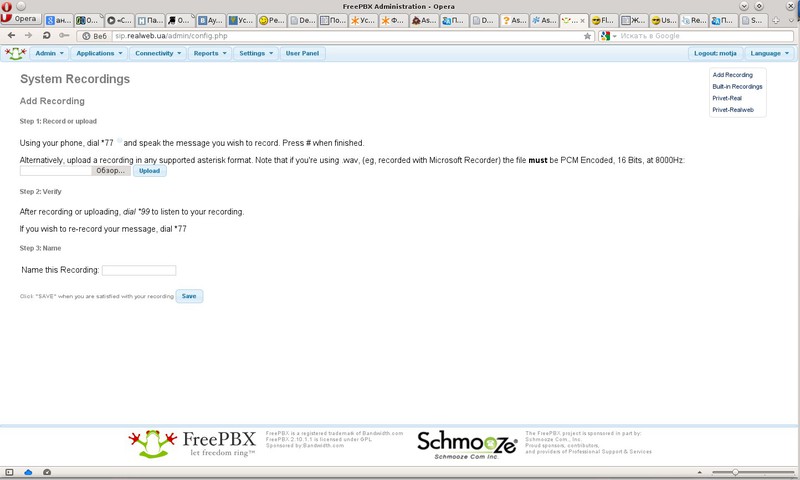
So the dictation! Go Admin> System Recordings -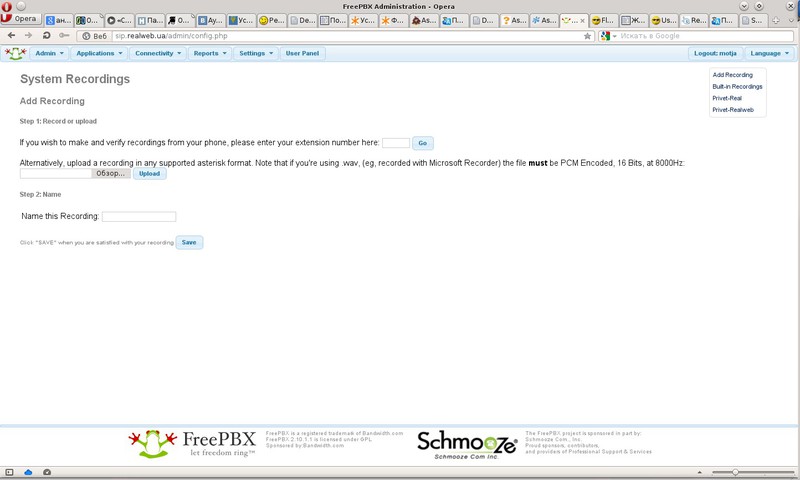
Here you can upload a file with the record, or you can enter your Extension number, press the Go button, call the * 77 number from the softphone or something connected to the server in the form of a phone and dictate what you need, then enter the name Name this Recording :, and Click the Save button, the record appears in the right corner.
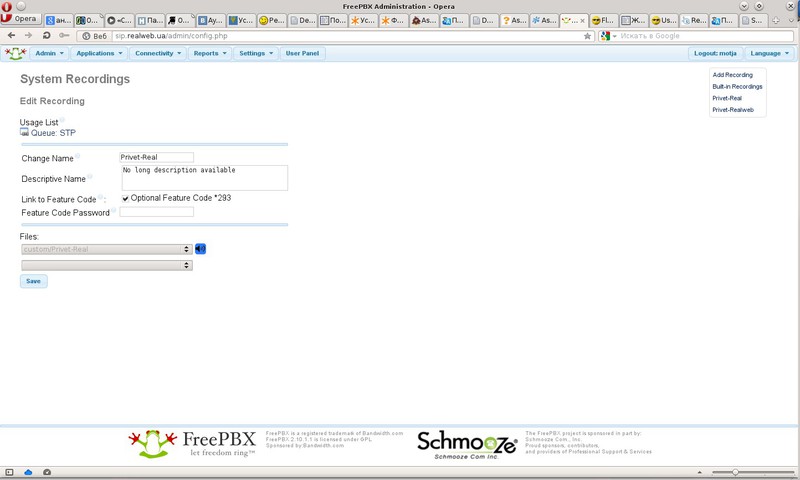
By logging in, you can select the awesome function about the application of which I wrote above - Link to Feature Code put a tick. Now by calling this code, you can overwrite it.
Where is the complete list of these codes that you have included - Admin> Feature Code:

Ahead of the course call queues Aplication> Queues:
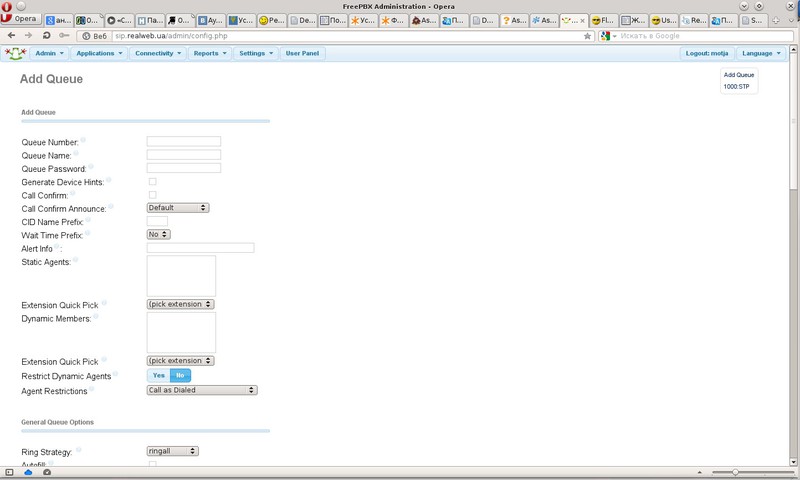
Queue Number - the queue number for which the call will go.
Queue Name - the name of the queue.
Static Agents: Here you can choose extensions (or other functions like MiscDestinations, there are legends that if you write a mobile number there and put the # icon at the end, it will switch there, but for some reason it did not work) that are constantly in this queue, respectively calls will always go to them.
Dynamic Members: Already more interesting ... I will use this for the head of the STF service because he is sitting on the phone, but he does not always have time to answer the subscribers so that he will not be tugged once again to ensure entry and exit from the queue, it may also be necessary if we assume the operator works in 2 departments and periodically switches from the sales department queue to the support queue or something like that. By adding an extension here, we will get little - to connect to the queue, you need to dial in the phone the queue number * (we have 1000) and then dial your extension and #, after which it will be reported that you are connected to the queue and will receive calls from it. To exit it, I dial 1000 ** then my number 100 # - after which I hear that they have disconnected me from the queue.
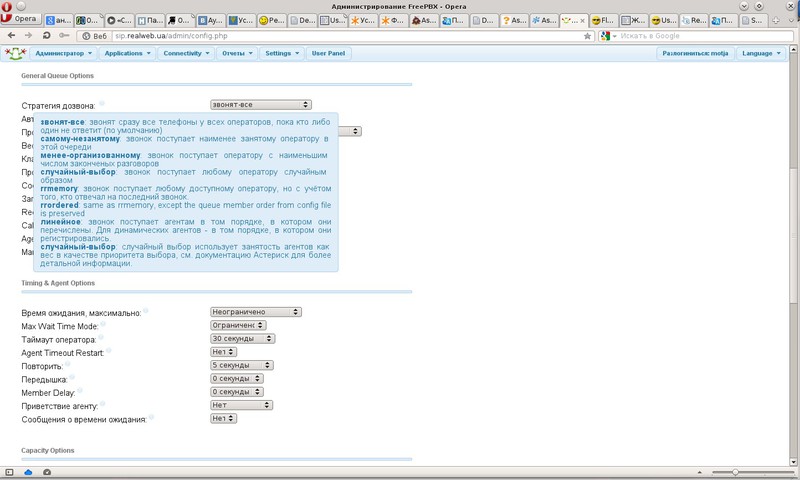
Ring Strategy: dialer strategy, let me get lazy and attach a screenshot with a Russian translation.
Join Announcement: Here you can choose one of the records, it is convenient enough if you get a call from some number to a queue of calls in which you just have to greet the client and call the name of the company he is calling, then the client is waiting for the connection with the operator.
Call Recording: the format of recording calls in the queue, I have a wav.
Max Wait Time: the time of the maximum stay in the queue, after which the subscriber will be advised to call later.
Agent Timeout: The time during which the operator’s telephone will ring. If there is a linear dialer strategy, then after this period of time there will be a switch to the next operator.
Retry: After how many seconds to try to call the operator again. An important jackdaw if you make a queue with a call to your mobile, when you need the phone to ring once for how many seconds and the operator can reset the call, after which the call will go to the destination if it is not answered - you need to select it without repeating.
Agent Announcement: Here you can select a message that will be communicated to the operator in the handset before it is connected to the subscriber, for example, if the operator is sitting in 2-3 queues at the same time - he can be told from which queue the call came to him.
Frequency: How often to inform the subscriber of his number in the queue.
Announce Position: Report position in the queue or not.
To create a greeting, go to the Applications-Announcements:
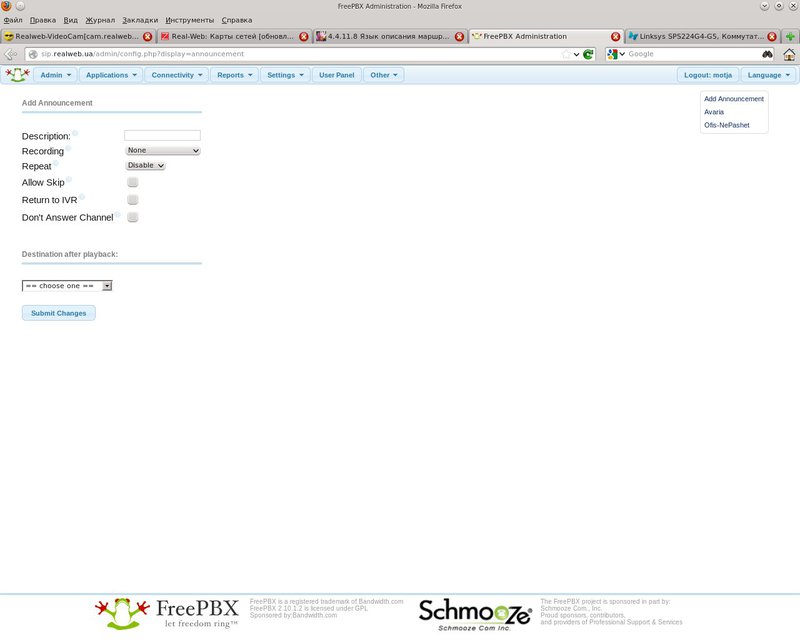
It's all very simple.
Description: Title.
Recording: Select the recording to be pronounced.
Repeat: The number of repeats.
Allow Skip: Allow the user to reset the greeting by pressing the keys.
Destination after playback: Where to transfer the call after the end of the greeting.
An interesting feature of the Applications-Follow Me:
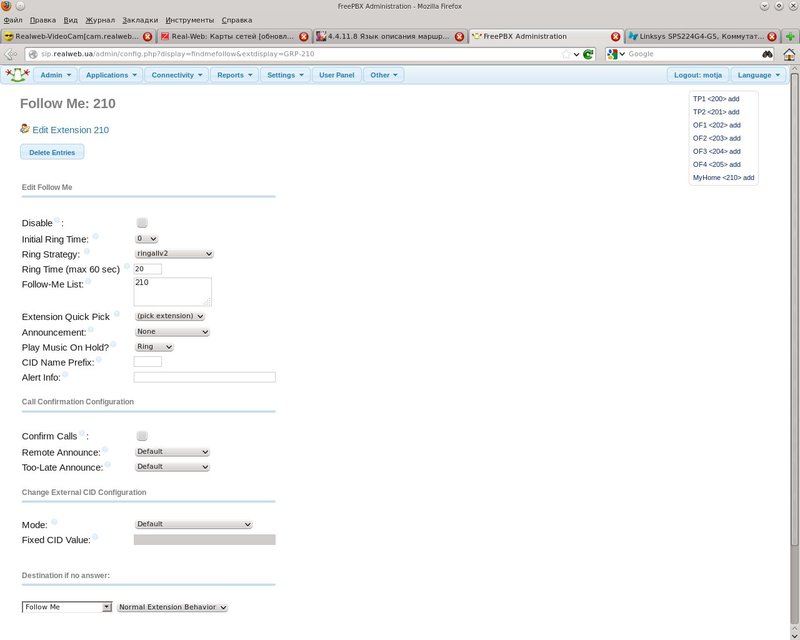
It is created on the basis of any Extension and makes it possible to redirect the call to something else. It is used when for example you are not on the spot, a subscriber was switched to your phone, and you left for lunch, this menu can switch the call to your personal mobile phone and at the same time solve the problem when, according to the dialing policy, the trunk that calls you is transferred as a name caller's number that actually calls. Then the trunk swears that the CID is invalid, that is, the caller's number. At the bottom there is a Change External CID Configuration setting, here you can select the desired mode to make your trunk work. A very common problem by the way in many forums. I will not dwell on the settings in detail. they duplicate many of the queue settings described above.
Create the Applications-IVR voice menu:

IVR Name - Name
IVR Description - Description
Announcement - A greeting to be pronounced.
Direct Dial - Direct Dialing the Extension if it is known to the caller.
Timeout - Time in seconds after the end of the greeting, after which it will be switched to Destination by timeout.
Invalid Retries - The number of attempts to incorrectly dial numbers.
Invalid Retry Recording - Record is played when wrongly dialed.
Append Original Annoucement - Reproduce the main greeting after a message about the wrong set of numbers.
Invalid Recording - A message that will be played after the attempts of incorrect input have been exhausted, but before switching over to assignments in case of incorrect input attempts.
Invalid Destination - Where to throw the subscriber who pressed a lot of wrong buttons.
Timeout Retries - The number of menu repeats after a timeout.
Timeout Retry Recording - Message after the timeout expires and before the message try again.
Append Original Annoucement - Add original message menu after timeout message.
Timeout Recording - Message after the timeout message and before the subscriber is sent to the destination by timeout.
Timeout Destination - Where to switch on timeout.
IVR Entries - Here are given by what numbers where to redirect.
Go to Applications - Misc Destination:
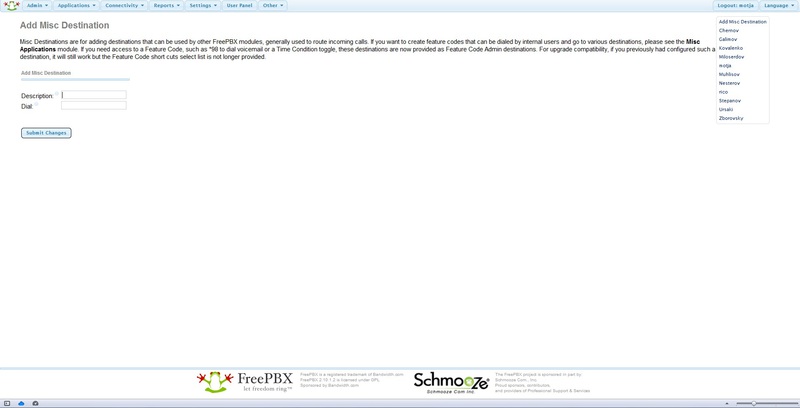
Description: Title
Feature Code: The code for which will be called. I have installers with personal mobiles crammed into 30x numbers.
Feature Status: On / Off
Destination: destination. Here I have chosen Misc Destination with phones of installers, and then for everyone there are queues in static agents of which, just the Misc Application numbers are indicated. This was done so that if the installer did not pick up the phone, you could switch to someone else.
Applications - Time Group even has nothing to describe, just to mention that one entry is first created, let's say office hours are from 8.00 to 17.00, then it is saved, it opens again on the right and then a button appears - to add an additional time period, for example, also on Saturday 10.00 to 15.00
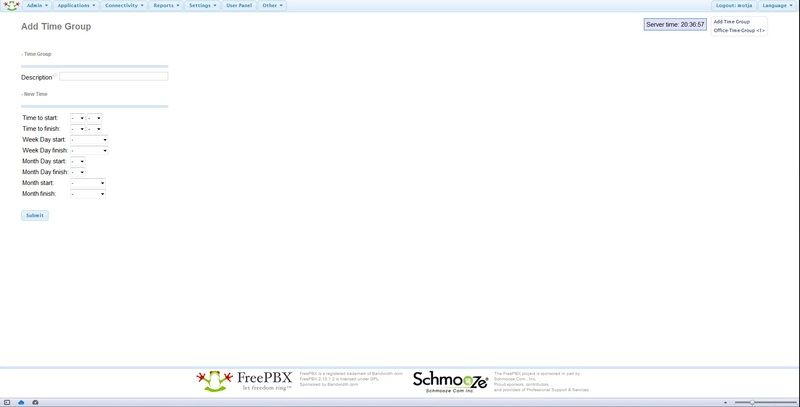
After creating the Time Group, you can create Applications - Time Condition:

Time Condition name: Name.
Time Group: selects a group from the past menu.
Well, 2 directions - if it is the same and if it is not.
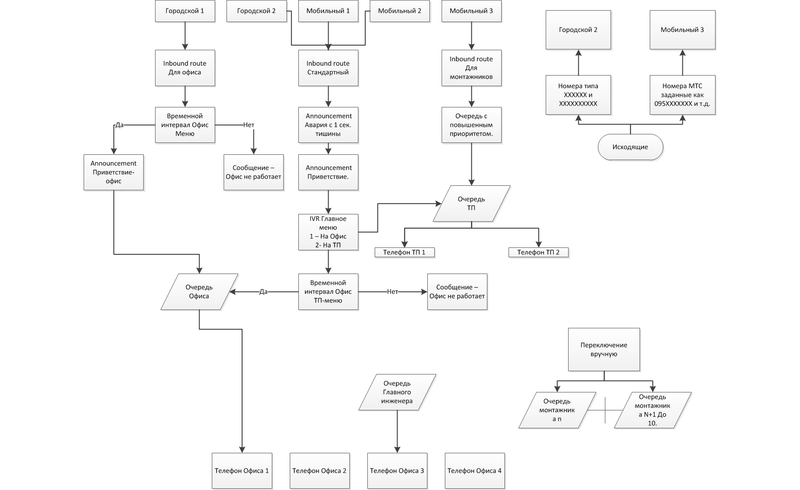
To clearly show how this all works, I'll show you a diagram:
I do not claim the correctness of what I did. Two months ago I did not know anything about telephony. When I searched for articles in runet, I could not find something large-scale that would help me to set up telephony to the state - it works. So maybe there are a lot of errors here and it works not optimally, but in any case, I hope the newcomer will help set up the server to a working state.
Finally, in one way or another, we have installed Asterisk and FreePBX installed.
I will describe the situation in a little more detail to compare whether our work scheme will suit you. We are a small Internet provider, we need a recording of conversations, queues of calls to landline and mobile phones, a voice menu telling about promotions with a choice of which department to get into, and the ability to quickly put all of these messages about accidents on certain streets of the city so that people don’t overwork support, preferably for free. In order not to buy expensive gateways, we decided to change landline numbers and buy a couple of numbers + a dozen channels from an ip-telephony provider. Someone will say that it is unreliable, etc. Just tell me, what difference does the Internet provider on landline phones, if it fell all the Internet? But it is cheap. The connection cost us only $ 38, each phone number is $ 2 and the line is $ 1.2 per month. After that, we received the settings even without authorization and an account was tied to our ip address. Immediately I would like to stipulate how this article will be built, so as not to overload it with tons of screenshots, I will describe the creation of each element once (which I advise you to do because they will be needed for your subsequent experiments), and then I will write out a scheme of what it refers to. in our work pattern. Surely you will have a different scheme, but you can understand the meaning. I will describe only those elements that are directly needed when setting up.
Now it's time to get a trunk:
For clarity, I will write in English because The interface is translated in pieces and quite mysteriously. Go to Connectivity> Trunks> Add SIP Trunk.
')
In the right corner there will be a list of trunks you have already created. Having opened a new one, I arbitrarily filled in the name - Trunk Name, calling it Vega (Vegatelecom is our provider). Outbound CallerID having entered the number in the format 380652 as our operator gives it, this is the number from which outgoing calls will be made, if you do not specify it, you cannot call using this trunk, all the lines said. In Outgoing Settings I filled in another Trunk Name field and entered the settings that the provider gave:
host = 93.178.205.29
type = peer
disallow = all
allow = alaw & ulaw & g729
nat = no
canreinvite = nonat
insecure = invite
dtmfmode = rfc2833
At the bottom I clicked the Submit Changes button and got the trunk created.
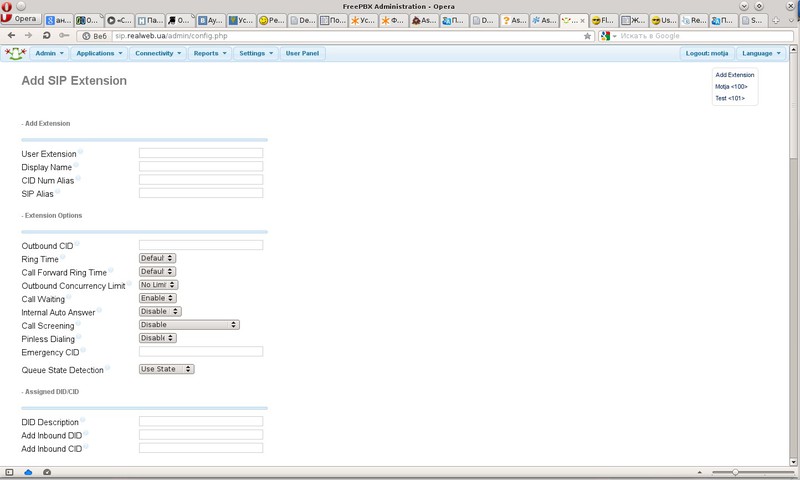
Now you need to choose where we will receive calls. Go to Applications> Extension> Generic SIP Device> Submit
User Extension - the internal number of this phone, softphone or whatever you will connect there. We used 100,101, etc.
Display Name - the display name
Required in the This device uses sip technology section. fill in the secret is a password.
Fields Recording Options include a recording of this phone:
Inbound External Calls Always = Incoming External Calls
Outbound External Calls? Always = Outgoing external calls
Inbound Internal Calls? Always = Incoming internal calls
Outbound Internal Calls? Always = Outgoing internal calls
On Demand Recording? Disable Write on request
At the bottom click Submit.
Next, let's digress a bit and set up a softphone, ie a program for making calls from the computer. There are a lot of them (EyeBeam, SJ-phone, Zoiper). I will show with the EyeBeam.
After installing the program under Windows, launch it, go to the settings in the Sip Accounts and edit the first one.
To make it work we need to enter Display Name = User 1, User Name = 100, Password = ******, Domain = ip-your server. The remaining settings can not touch. You can create several subscribers with numbers 101-102 or any others, run several phones on several computers and try to call from one customer to another, respectively, using the numbers 100-101-102, etc.
But we want to call our newly-purchased rooms.
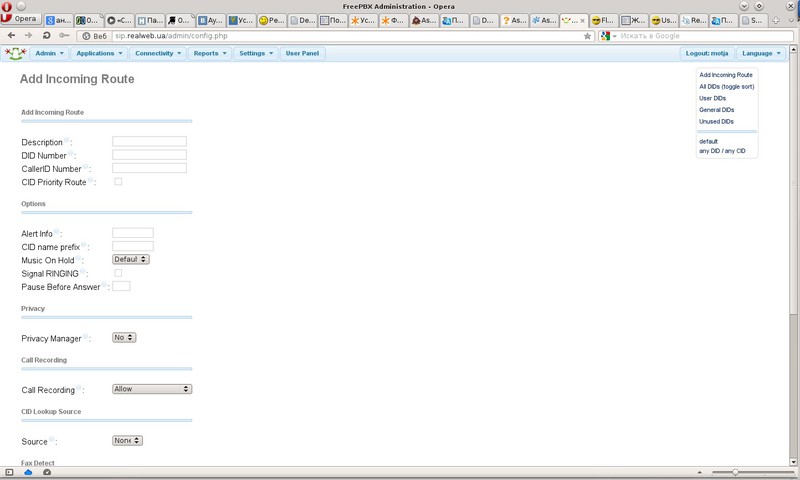
Go Connectivity> Inbound Routes
Description - Route Description (Name)
DID Number - A very useful field, having set it, you can filter calls from a specific number. Let us dwell on it in more detail. In our case, 1 trunk enters 2 phone numbers, let's say we need the first number to go to the first operator and the call from the second number to the second operator. We go to the telephony server via SSH, or physically if there is a monitor, log in as root and launch Asterisk CLI with the asterisk command -r. Call one of the numbers that we connected to the trunk. We look at one of the first lines to appear: Executing [380652 ****** @ from-trunk-sip-vega: 2] Goto (“SIP / vega-000000e4 ″,“ from-trunk, 380652 ****** , 1 ″) in new stack. after the phrase from-trunk, we see what the DID of this number is, our provider sends the number in this format, if it is a GSM gateway in the form of a huawei modem, then its IMEI will be written there, in any case, if we create a route indicating this number , he will be responsible for calls to him. In this example, I propose to leave the field empty for universality. Those. the system will transfer all calls from all trunks to the specified Destination.
CallerID Number - works similar, but already with caller numbers. In the prompts you can see that you can specify for example Blocked, therefore calls from the blocked phone numbers will be transferred to the desired Destination. By tradition, leave empty.
Set Destination - the main field in which we finally specify where the calls will go, you can choose a queue or let's say a specific extension, select the extension 100 that we created earlier and plugged into the softphone.
Now, if you call the number that is running in the trunk, the softphone will ring. Congratulations! You made the first successful call.
It is time to think about the fact that we can call someone else.
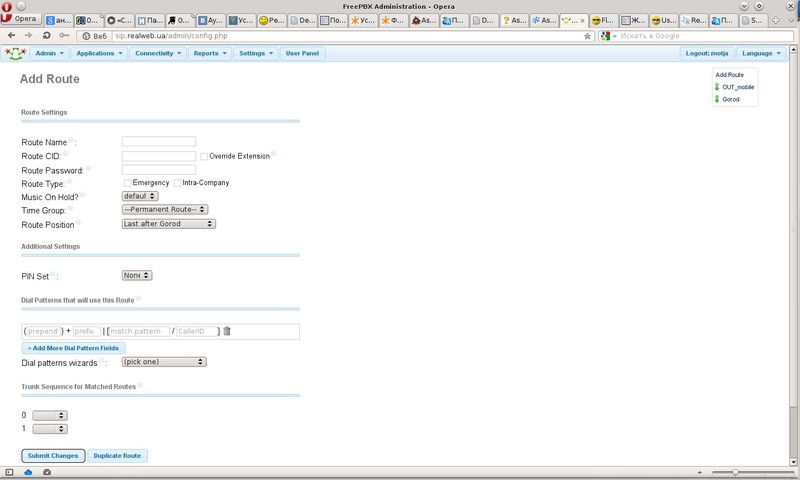
Go Connectivity> Outbound Routes>
Route Name - the name of the route
Dial Patterns that will use this Route - here you can set a route to certain numbers, again our provider supports dialing in any form, you can dial with the area code, you can without it, all these routes are registered with him, then we will not prescribe anything and set in the match pattern field -. Yes, just a point. This will mean sending all the numbers dialed as is.
Finally, in Trunk Sequence for Matched Routes, we specify the trunks through which the call will go out, in our case, vega.
If you now call any phone number from the softphone, the call will go through the trunk from the number specified in the trunk.
It's time to think about the voice menu and call queues.
This is where the fun begins. We need a lot of notes for the voice menu. Looking ahead I will describe the principle. I personally had a problem on their dictation, but I found a wonderful way out. First, we create many many records (I will tell you how), dictate them with a nasty lisping voice, then turn on the wonderful function of changing the recording by calling to a number, then go to Admin> Feature codes, below the Recordings all codes that can be called with conditional names will be there records that you give them. Thus, having printed this piece on paper, it can be issued to a female person so that she calls there, listens to what you dictate and re-record in a melodious voice until she starts to like it. Another huge plus of this event is that these recordings can already be used in the finished voice menu, that is, you can change it to a hot one without stopping the operation of telephony and callers. In the same way, it is possible to implement the accident notification function for unqualified personnel. For example, by creating an entry with the name of the accident, a duration of 1 second and silence inside, you can hang it at the very beginning of your menu. If an accident happens, the support operator can call the number of this file - dictate the streets where the repair is being carried out, and after the repair is completed, call there and keep silence for 1 second.
So the dictation! Go Admin> System Recordings -
Here you can upload a file with the record, or you can enter your Extension number, press the Go button, call the * 77 number from the softphone or something connected to the server in the form of a phone and dictate what you need, then enter the name Name this Recording :, and Click the Save button, the record appears in the right corner.
By logging in, you can select the awesome function about the application of which I wrote above - Link to Feature Code put a tick. Now by calling this code, you can overwrite it.
Where is the complete list of these codes that you have included - Admin> Feature Code:
Ahead of the course call queues Aplication> Queues:
Queue Number - the queue number for which the call will go.
Queue Name - the name of the queue.
Static Agents: Here you can choose extensions (or other functions like MiscDestinations, there are legends that if you write a mobile number there and put the # icon at the end, it will switch there, but for some reason it did not work) that are constantly in this queue, respectively calls will always go to them.
Dynamic Members: Already more interesting ... I will use this for the head of the STF service because he is sitting on the phone, but he does not always have time to answer the subscribers so that he will not be tugged once again to ensure entry and exit from the queue, it may also be necessary if we assume the operator works in 2 departments and periodically switches from the sales department queue to the support queue or something like that. By adding an extension here, we will get little - to connect to the queue, you need to dial in the phone the queue number * (we have 1000) and then dial your extension and #, after which it will be reported that you are connected to the queue and will receive calls from it. To exit it, I dial 1000 ** then my number 100 # - after which I hear that they have disconnected me from the queue.
Ring Strategy: dialer strategy, let me get lazy and attach a screenshot with a Russian translation.
Join Announcement: Here you can choose one of the records, it is convenient enough if you get a call from some number to a queue of calls in which you just have to greet the client and call the name of the company he is calling, then the client is waiting for the connection with the operator.
Call Recording: the format of recording calls in the queue, I have a wav.
Max Wait Time: the time of the maximum stay in the queue, after which the subscriber will be advised to call later.
Agent Timeout: The time during which the operator’s telephone will ring. If there is a linear dialer strategy, then after this period of time there will be a switch to the next operator.
Retry: After how many seconds to try to call the operator again. An important jackdaw if you make a queue with a call to your mobile, when you need the phone to ring once for how many seconds and the operator can reset the call, after which the call will go to the destination if it is not answered - you need to select it without repeating.
Agent Announcement: Here you can select a message that will be communicated to the operator in the handset before it is connected to the subscriber, for example, if the operator is sitting in 2-3 queues at the same time - he can be told from which queue the call came to him.
Frequency: How often to inform the subscriber of his number in the queue.
Announce Position: Report position in the queue or not.
To create a greeting, go to the Applications-Announcements:
It's all very simple.
Description: Title.
Recording: Select the recording to be pronounced.
Repeat: The number of repeats.
Allow Skip: Allow the user to reset the greeting by pressing the keys.
Destination after playback: Where to transfer the call after the end of the greeting.
An interesting feature of the Applications-Follow Me:
It is created on the basis of any Extension and makes it possible to redirect the call to something else. It is used when for example you are not on the spot, a subscriber was switched to your phone, and you left for lunch, this menu can switch the call to your personal mobile phone and at the same time solve the problem when, according to the dialing policy, the trunk that calls you is transferred as a name caller's number that actually calls. Then the trunk swears that the CID is invalid, that is, the caller's number. At the bottom there is a Change External CID Configuration setting, here you can select the desired mode to make your trunk work. A very common problem by the way in many forums. I will not dwell on the settings in detail. they duplicate many of the queue settings described above.
Create the Applications-IVR voice menu:
IVR Name - Name
IVR Description - Description
Announcement - A greeting to be pronounced.
Direct Dial - Direct Dialing the Extension if it is known to the caller.
Timeout - Time in seconds after the end of the greeting, after which it will be switched to Destination by timeout.
Invalid Retries - The number of attempts to incorrectly dial numbers.
Invalid Retry Recording - Record is played when wrongly dialed.
Append Original Annoucement - Reproduce the main greeting after a message about the wrong set of numbers.
Invalid Recording - A message that will be played after the attempts of incorrect input have been exhausted, but before switching over to assignments in case of incorrect input attempts.
Invalid Destination - Where to throw the subscriber who pressed a lot of wrong buttons.
Timeout Retries - The number of menu repeats after a timeout.
Timeout Retry Recording - Message after the timeout expires and before the message try again.
Append Original Annoucement - Add original message menu after timeout message.
Timeout Recording - Message after the timeout message and before the subscriber is sent to the destination by timeout.
Timeout Destination - Where to switch on timeout.
IVR Entries - Here are given by what numbers where to redirect.
Go to Applications - Misc Destination:
Description: Title
Feature Code: The code for which will be called. I have installers with personal mobiles crammed into 30x numbers.
Feature Status: On / Off
Destination: destination. Here I have chosen Misc Destination with phones of installers, and then for everyone there are queues in static agents of which, just the Misc Application numbers are indicated. This was done so that if the installer did not pick up the phone, you could switch to someone else.
Applications - Time Group even has nothing to describe, just to mention that one entry is first created, let's say office hours are from 8.00 to 17.00, then it is saved, it opens again on the right and then a button appears - to add an additional time period, for example, also on Saturday 10.00 to 15.00
After creating the Time Group, you can create Applications - Time Condition:
Time Condition name: Name.
Time Group: selects a group from the past menu.
Well, 2 directions - if it is the same and if it is not.
To clearly show how this all works, I'll show you a diagram:
I do not claim the correctness of what I did. Two months ago I did not know anything about telephony. When I searched for articles in runet, I could not find something large-scale that would help me to set up telephony to the state - it works. So maybe there are a lot of errors here and it works not optimally, but in any case, I hope the newcomer will help set up the server to a working state.
Source: https://habr.com/ru/post/154933/
All Articles