CCTV is easy
 Video surveillance systems appeared long ago and are intended for viewing and / or recording events occurring in a certain area. With the development of computers and networks, it has become possible to make surveillance systems “smart” - those that can detect movement and report it in a certain way. The quality of the recorded video also increased due to the appearance of new cameras and an increase in the bandwidth of the channel through which the video is transmitted. There are opportunities for archiving, automatic backup and quick preview of previously recorded video.
But the main thing in the video surveillance system is the camera. It may be subject to different requirements depending on the task. In some cases, you need high quality recording and good optics - for example, when the camera cannot be placed close to the object of observation, and you have to record from afar. Sometimes you need protection from weather conditions and physical impact, but when shooting in rooms, you can do without it. There are also controlled cameras (PTZ function, from the words Pan-Tilt-Zoom: pan, tilt, zoom). And there are situations when all these functions are not needed, and the main task is to simply record what is happening in the room where the monitoring is conducted.
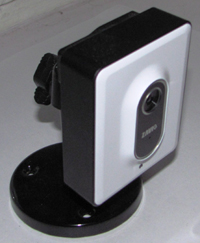
A separate class of video cameras is IP cameras, or network cameras. Their main feature is that it is a standalone network device that can be connected from any computer on the network to watch videos. In this case, the recording can be carried out on a computer, network drive or server with the appropriate software. The ZAVIO F1100 IP camera is an entry-level video camera for video surveillance in a home or small office environment. Its main features are small dimensions, the possibility of mounting on the wall and a minimum of difficulty in setting up. The body of the camera itself is rectangular, with dimensions of 63 * 77 * 33 mm. Almost the entire camera is black, with the exception of the front face of white. The camera lens is located on this face, as well as the LED indicating its condition. When you start the camera it glows red, and when working - blue, but if you want you can turn it off. On the back side are a power connector (5 volts DC), an RJ-45 port, a standard tripod thread, and a reset button to reset the camera settings. The package, in addition to the camera itself, also includes a tripod stand for it, a power adapter and disks with instructions and software. The ZAVIO F1100 camera is classified as compact by the manufacturer, which usually means low cost and overall dimensions, but at the same time an average recording quality. The hero we test, more precisely the heroine, is a pleasant exception to this “ordinary” rule, since it is equipped with a megapixel matrix that allows you to record video with a resolution of up to 1280 * 720 pixels, which corresponds to 720p format. The only reservation can be considered that it works in such a high resolution only at a frequency of 10 frames per second. This is actually the aforementioned retribution for compactness and budget. In addition to the 720p mode, it is possible to record video with a resolution of up to 640 * 480 and a frequency of up to 30 frames per second. The camera is equipped with a single-channel omnidirectional microphone that allows you to record audio. Recording is done with MJPEG compression, the main feature of which is that each frame is compressed separately by the JPEG algorithm, and the difference between frames is not taken into account. This allows you to get high-quality still images (since each frame is actually a separate photo), but it increases the volume of the video file. For example, one hour of video recording of this camera with a resolution of 640 * 480 and a frequency of 30 frames per second "weighs" from one to seven hundred megabytes. In practice, the daily recording camera installed in a living room, takes about ten gigabytes.

Figure 2 - freeze frame, resolution 640 * 480
')
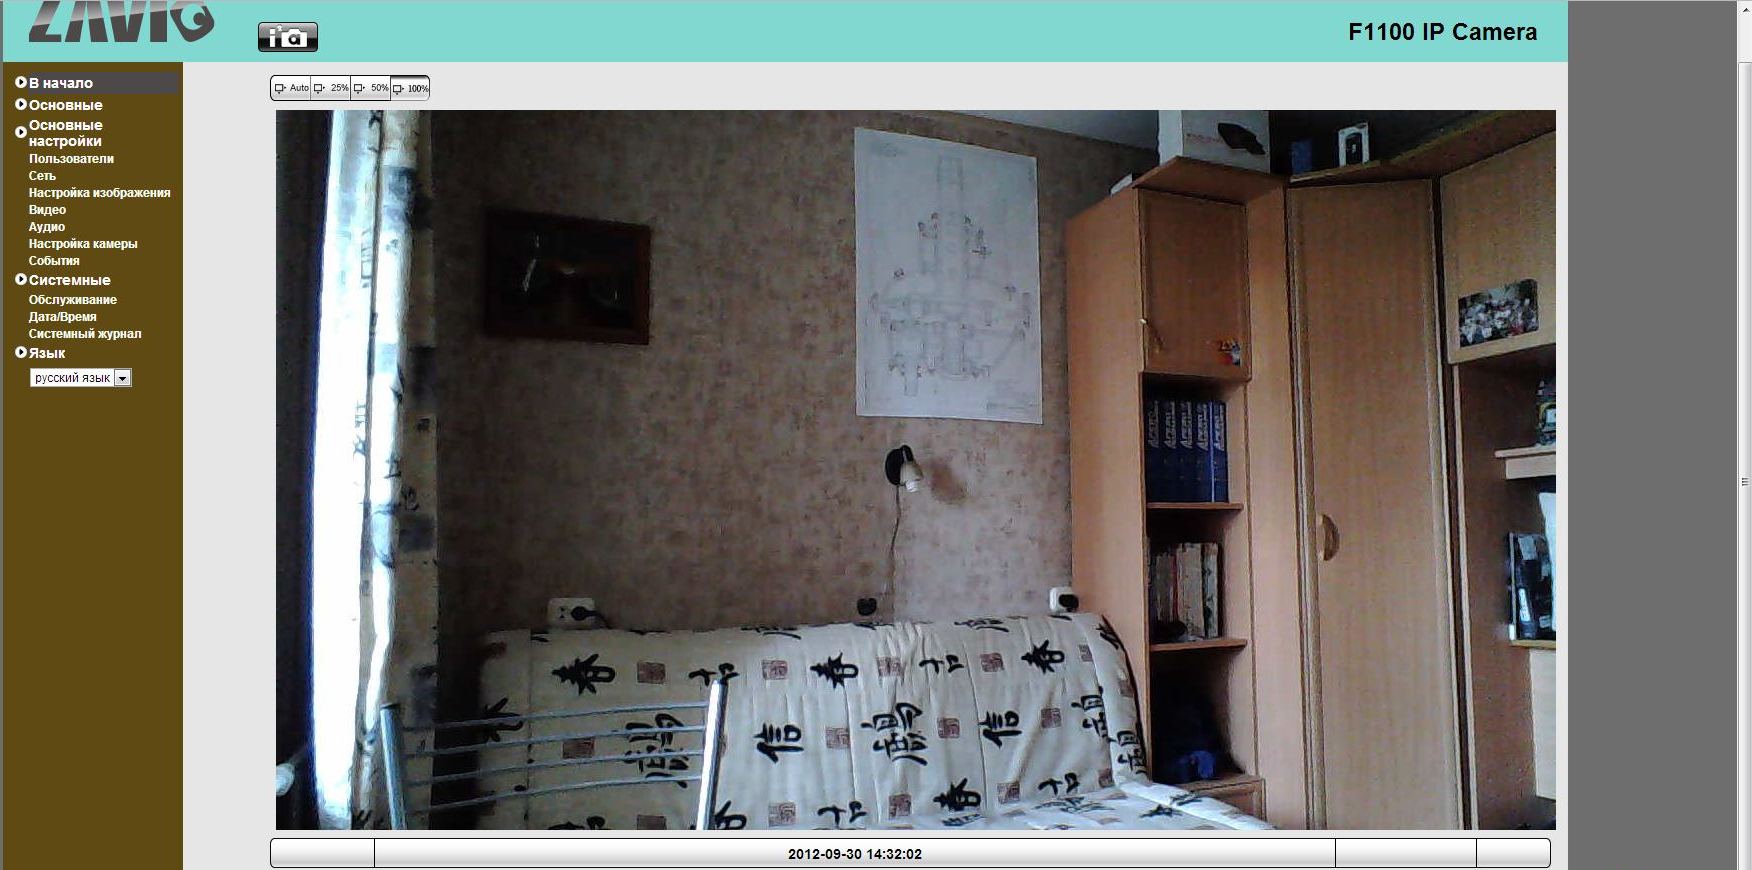
Figure 3 - freeze frame, resolution 1280 * 720
Since the camera is networked, it can be controlled via the web interface — you just need to type the IP address of the camera (by default, it can receive it via DHCP) and enter the login and password. After that, the browser window opens to view the video from the camera in real time.
Through the web interface, you can also view camera information — model, firmware version, and network address. Also available is the setting of access rights to the camera - you can create several users with different levels of access. This is the “Viewer”, which has the right only to view video from the camera, “Operator” with the right to also change the position of the camera and view information about it, and “Administrator”, which fully controls the camera. In addition, you can enable / disable anonymous (without authorization) video viewing. It also configures the network settings - choose between DHCP and static IP, change the web interface port, configure PPPoE and DDNS, as well as the UserID to access the EZvuu service. It should also be noted that it is not recommended to use DHCP for the IP camera - the camera must be accessible at the same address. In the event that DHCP is inevitable, it is recommended to fix the permanent IP address by MAC address with the settings on the router.
The next menu item is setting the image properties - brightness, contrast, color saturation, clarity and white balance. Video setting is also available - video resolution is adjusted here (the available options are 1280 * 720, 640 * 480, 320 * 240, 160 * 120), frame rate (1, 5, 7, 10, 15, 20, 30 frames per second; For the resolution of 1280x720, the maximum number is 10, for the remaining resolutions all options are available). In addition, you can choose the frequency of artificial lighting - 50 or 60 Hz. Properly set the frequency of illumination to avoid flickering images. Next - the settings of the camera itself - the network name, the color of the web interface and the on / off LED under the camera lens. There is also the ability to enable software motion detection - here you can set the sensitivity of motion detection, the area in which it will be recorded, as well as sending notification of detection to e-mail and uploading still images to an FTP server.
In addition, the available system settings - reboot, reset, backup and restore all settings, as well as flashing and installing language packs. I note that updating to the latest firmware version (dated September 4 of this year) did not cause any difficulties. Neighboring point - setting the date and time, synchronization with the NTP-server of the exact time, as well as the choice of time zone. Separately, the choice of the language of the web interface is available - 8 different languages are available, including Russian.
Video viewing is possible not only through the web interface. There is a special program for Windows - Zavio CamGraba for viewing video and recording on a video stream on a PC. This program is supplied free of charge with each ZAVIO camera and has extensive functionality sufficient to use a computer as a DVR and video surveillance terminal. Consider the possibilities of this program.
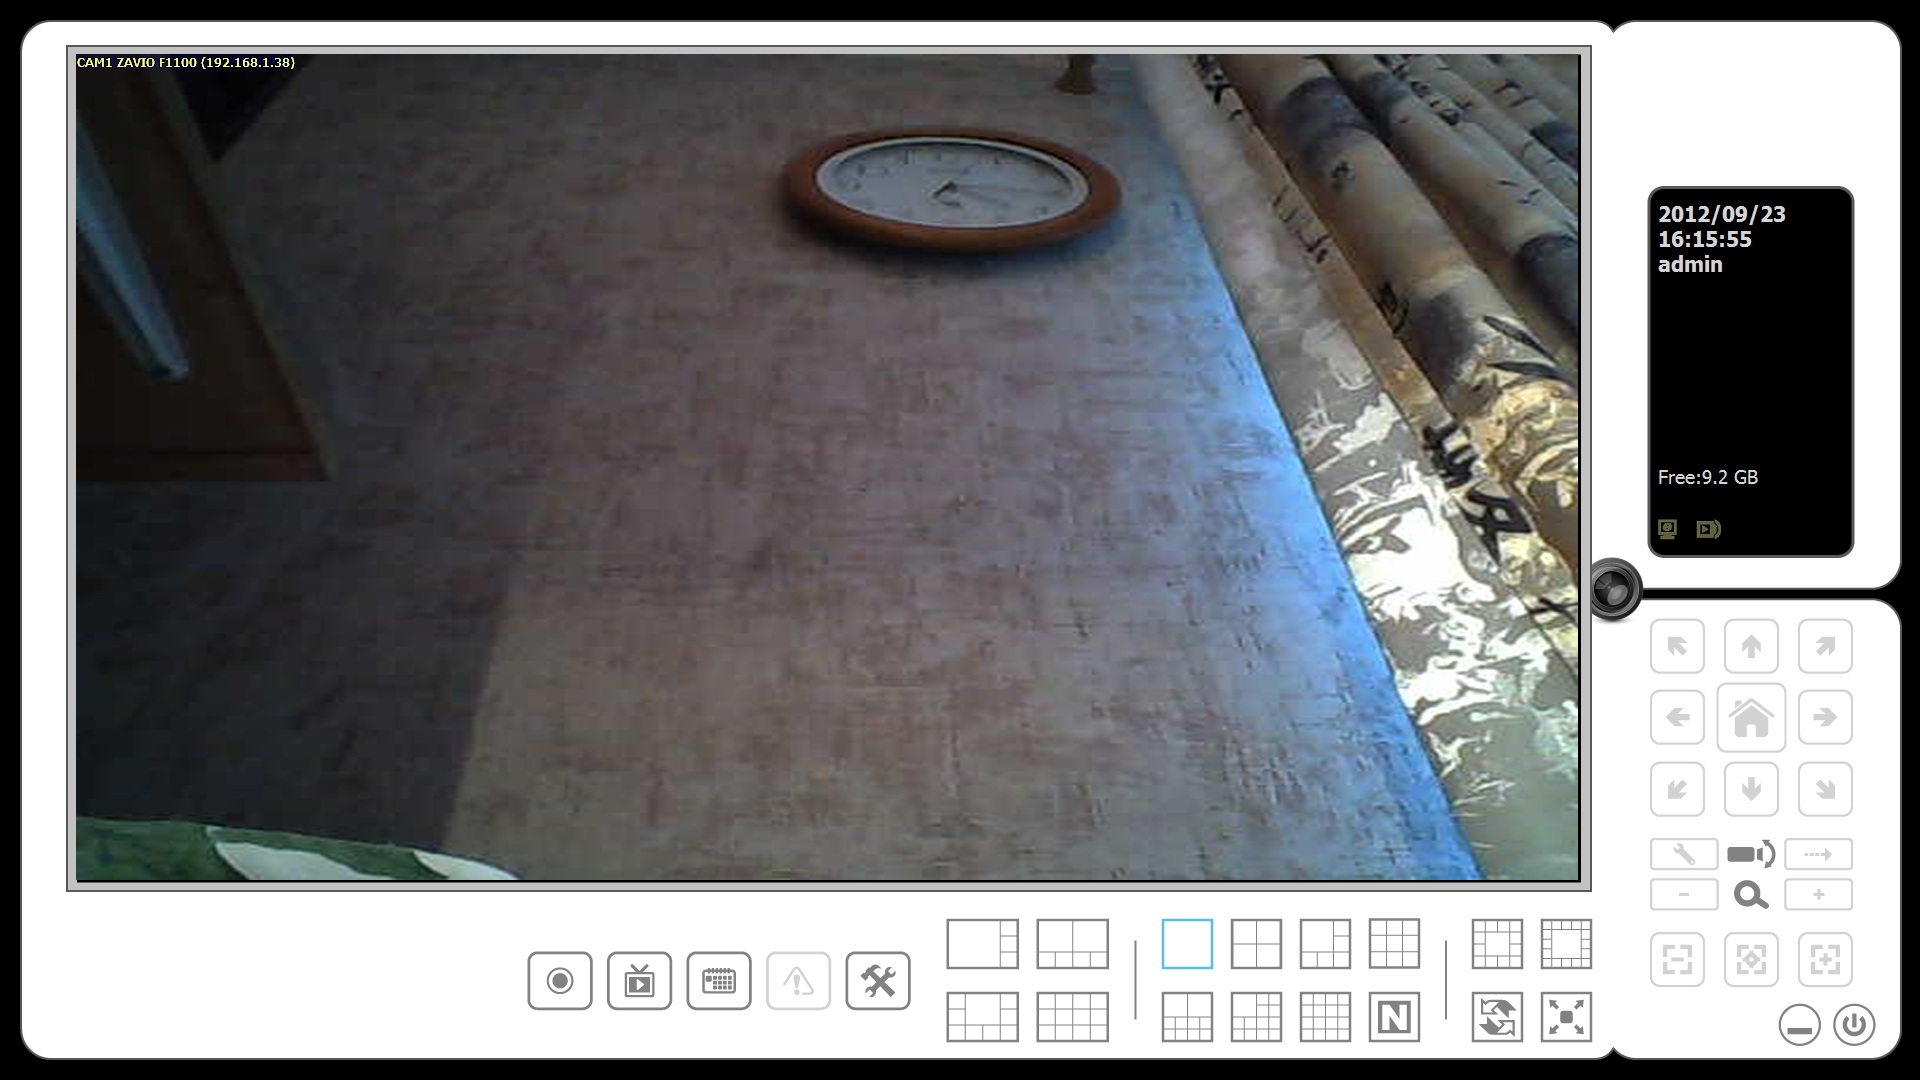
Figure 4 - CamGraba program interface
The main function is to view video from one or several cameras at the same time, the maximum number of cameras is 32. At the same time, various screen splitting options are possible: “picture” from one camera to the full screen; four, nine or sixteen "pictures" of the same size; one or two big "pictures" and around them a different number of small ones. In this case, by clicking on one of the “pictures”, you can enlarge it to the full screen, and then in the same way return the previous version of the view.
Camera control is available if it supports the PTZ function (Pan, Tilt, Zoom - pan, tilt, zoom) to change the zone that is being monitored.
It is possible to view previously recorded video - you can select any time using the preview function, and then start playing from it. You can also change the number of displayed video streams and change the playback speed. There is also an opportunity to change the scale, approximating any part of the frame.
Setting up video recording. You can customize the start and end time of the recording, the days of the week on which it will be held (each day of the week has its own schedule), as well as add holidays for which a separate recording schedule will be set. Also, recording can be made only when motion is detected, and the detection sensitivity is set by the user.
Setting up the program. Here you can add or remove a camera, as well as set up a connection to it (IP address, username and password). It is also possible to change the settings of the camera itself - the resolution and frame rate of the video, as well as the image parameters. You can select and data that will be superimposed on the video stream - the date, time, name and number of the camera, as well as the video bit rate. In the section of basic parameters, the program starts up when the computer is turned on, where the recorded video is stored, automatically clearing by time or running out of free space on the disk, as well as playing audio from one of the cameras. There are PTZ settings: the speed of rotation or zoom of the camera, as well as the choice of the point to which it will return after the control stops after a user-defined time.
Setting access rights to the program. User accounts are created here that can have various rights to work with the program, as well as the right to connect to certain cameras or control PTZ functions on them.
Together with so many possibilities, the interface of the program is simple and intuitive. In addition, the entire program is translated into Russian. Thanks to this application, you can turn your computer into a full-fledged video surveillance station.
There is a program for devices based on Android, designed to connect to a PC on which the Zavio CamGraba application is installed.
But not only a computer can be used to store records. For the same purpose, you can apply and network drives (NAS) of Synology. The recent update of the operating system - DiskStation Manager 4.1 - brought with it an update of the Surveillance Station application to the sixth version, which added even more features. In addition, Zavio IP cameras are officially compatible with Synology drives.
Installing a proprietary Surveillance Station application on Synology is straightforward. It is enough to open the Package Center in the web interface of the drive, select Surveillance Station from the list of available ones and install it. After installation, the application shortcut will appear on the desktop of the web interface of the drive. The application itself opens in a new browser window. There are three main sections: “Live video” allows you to view a stream from one or several cameras, “Timeline” is designed to view previously recorded video, and in the “Management” section all application settings are collected.
Section "Management". Work with the application begins with it.

Figure 5 - Adding a Camera
In the “Camera” subsection, we add a new ZAVIO camera, selecting its model from the list and specifying its IP address, username and password. However, it should be noted that to connect the second and subsequent cameras you need to buy a license - by default, the NAS will allow you to connect only one camera at a time. If several cameras are connected to the same drive, they can be grouped together to facilitate management. In addition, each camera can customize the video recording format and frame rate for recording, as well as the size and duration of each video file allocated for video files. In addition, you can set up a schedule that will be recorded - up to half an hour on any day of the week. In this case, you can choose in which case the recording will go for 30 minutes - constantly, only when motion is detected, when a warning signal is triggered, or not at all. In the same subsection, you can adjust the sensitivity of motion detection in real time - that is, the interface will show whether the camera will respond to the current movement in the frame or not. In the screenshot, the red indicator to the left of the image shows that this level of movement will be processed by the program in accordance with the settings for the appearance of movement - for example, an SMS or e-mail message will be sent.
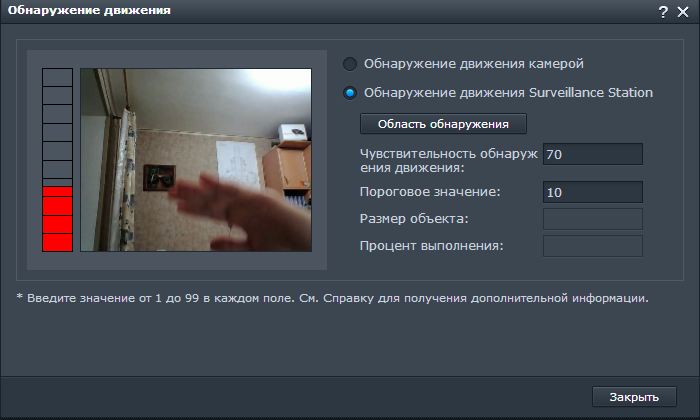
Figure 6 - Motion Detection Setup
It is also possible to configure video analysis: by detecting motion in any area of the frame, by the disappearance or appearance of an object, by blocking or defocusing the camera of the camera. There is also the ability to turn on the counter or set up a notification when a certain line crosses a frame. In the next subsection - "Event" - you can view a list of all recorded video fragments. All the records made by the camera will be shown here: fragments recorded when the motion sensor is triggered, recordings made according to the schedule, as well as fragments that are currently being recorded. For each recording, the camera on which the fragment was recorded, the recording start mode (by schedule, by motion, etc.), the start time, video format, its duration and size are shown. Here you can also save a part of the recorded fragments to an arbitrary folder of the drive or to a USB disk connected to it: you need to specify the cameras from which you need to record, as well as the time interval.

Figure 7 - setting notification parameters in the “System” subsection
The "System" subsection allows you to configure general settings for Surveillance Station. Here you can create a map that will contain all the cameras and show the direction of their review. You can also configure notification of events (creation or deletion of a camera, motion detection, the achievement of a free space limit, etc.) using various services. Notifications can be sent via e-mail, MSN or Skype account, as well as via SMS or Push notification to a mobile device (DS Cam installation is required, iOS and Android are supported). At the same time, for each situation you can set your own notification schedule. For e-mail and SMS notifications, both a separate setting and parameters from the DSM can be used. In the same subsection, you can configure the page that will open when you log into the application, and allow the connection to the VisualStation.
In the same subsection, access rights to the application are configured, and users can be either registered with DSM (if they have access to the application) or created separately in Surveillance Station. Each user can be given their own role - the dispatcher or browser, as well as indicate which cameras or groups of cameras the user has access to. In the next tab, you can add license keys to the cameras (by default, only one camera can be used, the right to connect more numbers must be purchased separately), as well as to view the application log (log).
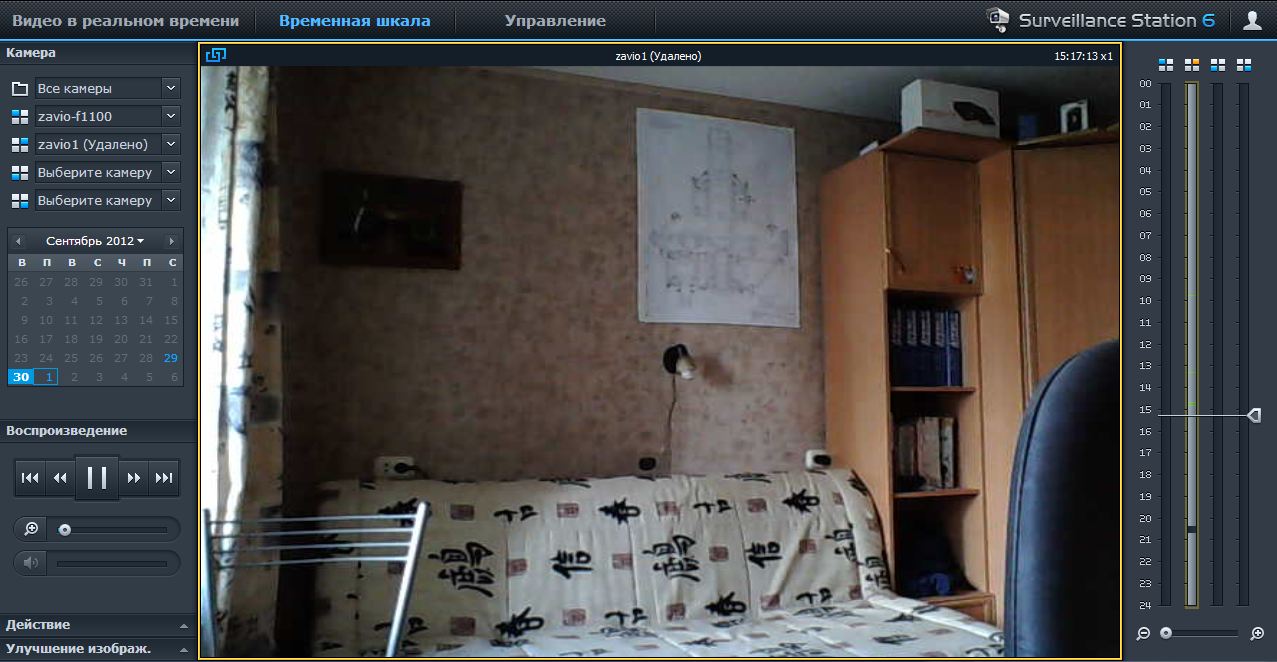
Figure 8 - viewing previously recorded video from one camera
Section "Timeline" allows you to view the video, shot earlier. In this case, you can choose to display several recordings at once to see one event from different cameras. You can also change the brightness, contrast, sharpness and color saturation of the recording. It is possible to save the current frame or the video being viewed to a computer. It is also possible to analyze the already recorded video on the appearance or disappearance of objects, defocusing, and so on - all the analysis possibilities that were described above.
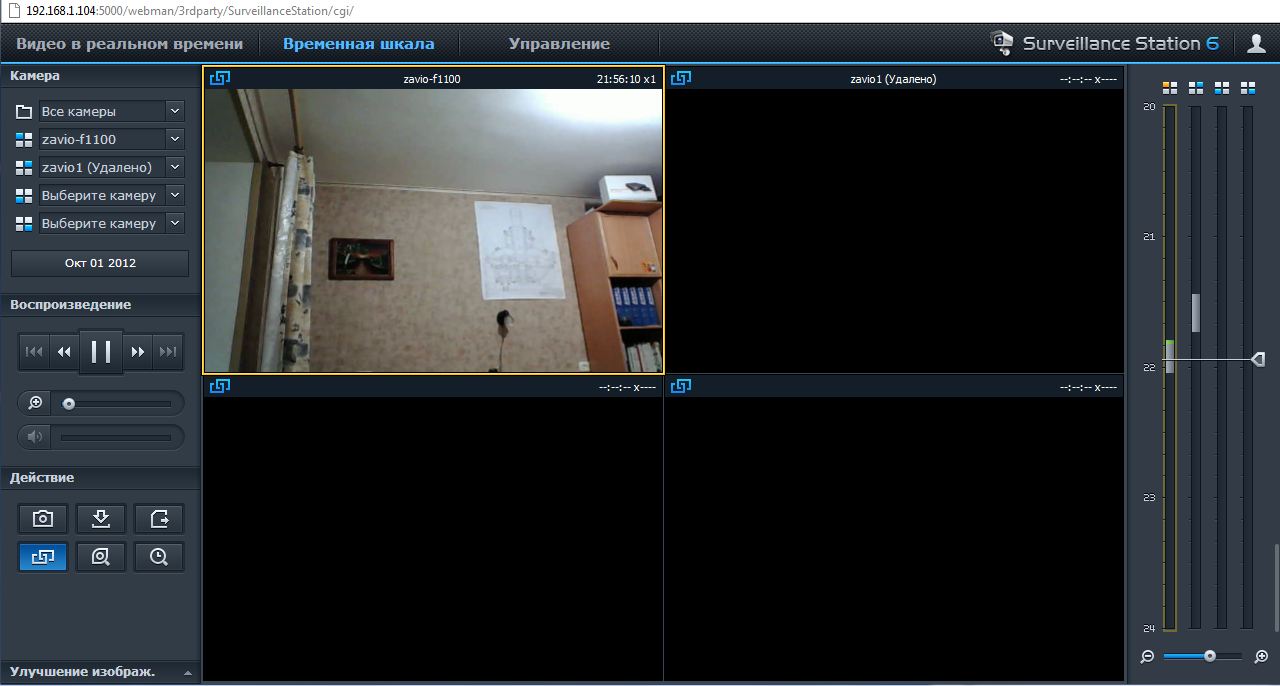
Figure 9 - Viewing previously recorded video from multiple cameras
The section "Live video" is designed to view what the cameras are currently showing. At the same time, it is possible to enlarge any part of the frame, save a snapshot or a video recording, as well as display a previously mapped room map with the cameras shown on it. “Pictures” from cameras can be presented in several versions - one for the whole screen, 4, 9, 16, 25, 36 or 49 “pictures” of equal size, one big “picture” and several small ones around it, as well as rotation of cameras on screen with a given sequence and interval. It is also possible to control a camera that supports the PTZ function.

Figure 10 - viewing video from a camera with the room layout turned on (E-Map)
There is also a mobile version - the DS Cam program from Synology, available on the AppStore and Google Play. It allows you to watch video from any camera in real time, as well as view any previously recorded fragment. In addition, after installing this program, it is possible to automatically send push notifications about various events to your smartphone.
The Zavio F1100 IP camera is a good solution for organizing video surveillance in a home or small office environment. With small dimensions, the device allows high-quality video recording, and in two versions - either with high image resolution, but a low frame rate, or vice versa, with a small resolution, but a large number of frames per second. Support for the Russian language in the web interface of the camera makes working with it easy, even for a novice user.In addition, the camera capabilities are enhanced with the Synology drive, which allows you to record video on a schedule or motion detection from multiple cameras simultaneously. Also available is the ability to automatically analyze the video, view it through the web interface of the drive and save the selected fragments to a USB drive. Thus, Zavio IP cameras and Synology network drives are a good and easy to set up and use video surveillance solution.
The author thanks InPrice Distribution for providing the Zavio F1100 IP camera.
Konstantin Boyarov
Source: https://habr.com/ru/post/154471/
All Articles