Its ownCloud-based cloud storage

ownCloud is a system for organizing the storage, synchronization and exchange of data hosted on external servers.
Unlike Dropbox and others like it, ownCloud differs in providing the user with complete control over their data - the information is placed on the systems controlled by the user. Data access in ownCloud can be done using the web-interface or the WebDAV protocol.
Features ownCloud
- Open source;
- Support data encryption;
- Automatic backup;
- WebDAV support allows you to organize access to data from any operating system;
- Support for synchronizing data with other web applications that support the remoteStorage protocol;
- Manage users and groups;
- The web-interface includes tools for working with a synchronized address book, a calendar-scheduler, a collection of photos, an archive of musical works;
- For ownCloud prepared server Ampache, which allows you to organize streaming music;
Setting ownCloud
I used Ubuntu 12.04 as the OS for installing my ownCloud.
Step One - Preparation
To run ownCloud will require ( as suggested by the official site ):
- php5 (> = 5.3);
- php5-json ( When installing, the system suggested using php5-common , and we will install it );
- php5-gd;
As additional dependencies:
- php5-sqlite (> = 3)
- curl
- libcurl3
- libcurl3-dev (the system also suggested using libcurl4-openssl-dev )
- php5-curl
Actually installing the missing dependencies:
sudo apt-get install apache2 php5 php5-common php5-gd sudo apt-get install php5-sqlite curl libcurl3 libcurl4-openssl-dev php5-curl Download the latest stable version of ownCloud ( At the time of writing - 4.0.7 ):
cd /home/$name/ wget http://owncloud.org/releases/owncloud-latest.tar.bz2 where $ name is your account name ( home directory ).
')
Step Two - Installation
Unpack the archive:
tar -xvf owncloud-latest.tar.bz2 Transferring everything to / var / www /:
sudo mv owncloud /var/www/owncloud Create a directory for storing data:
mkdir /home/$name/data_owncloud/ Editing access rights:
sudo chown -R www-data:www-data var/www/owncloud/ sudo chmod 750 /home/$name/data_owncloud/ sudo chmod -R 777 /var/www/owncloud/config/ Edit the file / etc / apache2 / sites-enabled / 000-default ( someone may have a different name ):
nano /etc/apache2/sites-enabled/000-default Find in it the section "Directory / var / www"
AllowOverride none replace with AllowOverride All
Save and exit (Ctrl + O, Enter, Ctrl + X)
Restart Apache:
sudo service apache2 restart You can go further.
Step three - go to the browser
If everything was done correctly, when you go to the browser at localhost / owncloud / or your_ip_address / owncloud / , the following should appear:
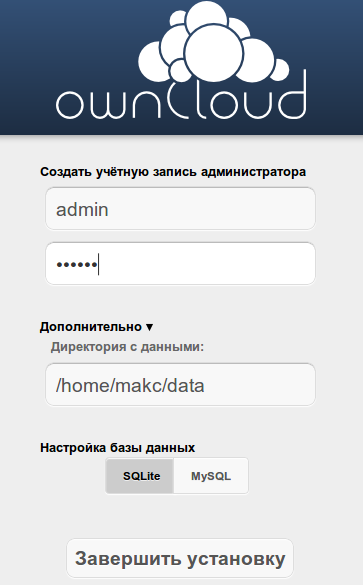
- We invent login / password to access owncloud;
- We change the Directory with the data on our own ( previously we created it / home / $ name / data_owncloud / );
- Choose a database ( I use SQLite3, if MySQL is selected, you will be asked to enter the database username and password, as well as the database name for owncloud );
- Click finish;
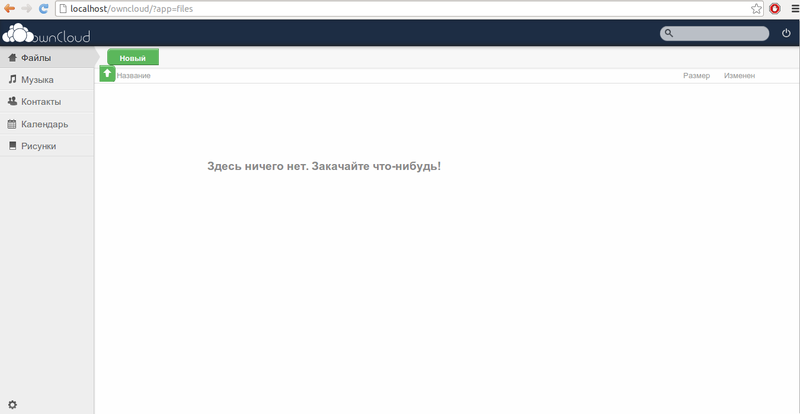
The following appears before us:
Click on the gear in the lower left corner and see the menu:
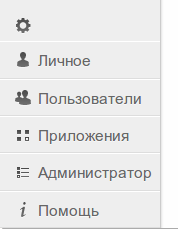
Items:
- Personal - Change personal data and links for remote access and synchronization;
- Users - add / remove user, add groups and set restrictions;
- Applications - enable / disable applications for working with the cloud;
- Administrator - setting the maximum file size, recent log messages;
I also want to add that the maximum file size should be added to /etc/php5/apache2/php.ini. By default it is 2 MB:
nano /etc/php5/apache2/php.ini We are looking for upload_max_filesize and post_max_size (To search, press Ctrl + W). We change the value to your discretion, just remember that the maximum size can not be greater than the amount of free RAM.
Conclusion
As a result, we get:
- Cloud storage for their needs;
- Convenient interface;
- Many applications to work with the cloud;
- Access logging;
- The ability to synchronize contacts and calendars;
Source: https://habr.com/ru/post/154047/
All Articles