Creating icons for Mac OS X applications
By the nature of the activity, I am a beginner iOS coder. It so happened that I recently assembled a very small program for Mac and I needed to make an icon for my own small application. Having learned that the installation of the icon for these two platforms is very different, I decided to publish a tutorial for those who may need it.
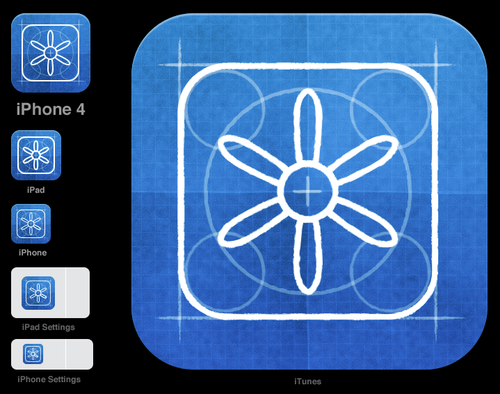
Those who wrote under iOS know that in the minimal case, to display the application in the simulator you need only two icons - for old and for retinovskih displays (we will not consider the case of publishing where more sizes are needed in this article). The existing icons in the respective sizes are simply dragged into the corresponding placeholders in Xcode 4. From the fourth version they do not even need to be signed in a special way - Xcode does this by automatically writing them as icon.png and icon@2x.png. With applications for Mac OS X, it's not that simple, so let's get started.
Stage 1 - Sizing Preparation
And so, to begin with, we need to understand that the application in the system will be displayed in different places and therefore only for display in the system (again, we do not consider publication) will be much more. For example, an icon in the dock, in the list of programs, when displayed through Cover Flow or in the Spotlight row. And so it was necessary to have five standard sizes before the appearance of ret-in displays:
')
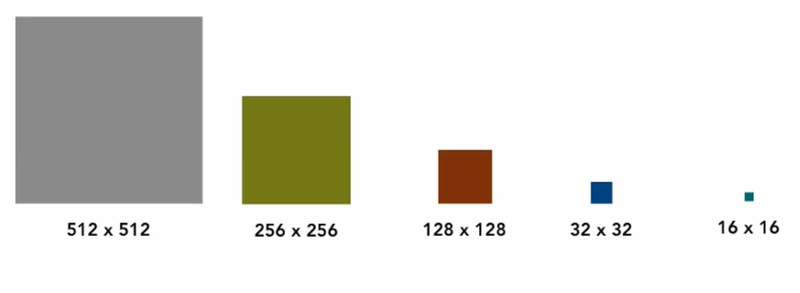
Here pay attention to the fact that if your icon has a high detail then you may need to separately redraw the icon for sizes 32x32 and 16x16 for its more adequate display. Also, with the advent of retina, now you need to submit 10 icons for the application.
So all we need is ten icons. Five under the old and five taking into account retina-displays.
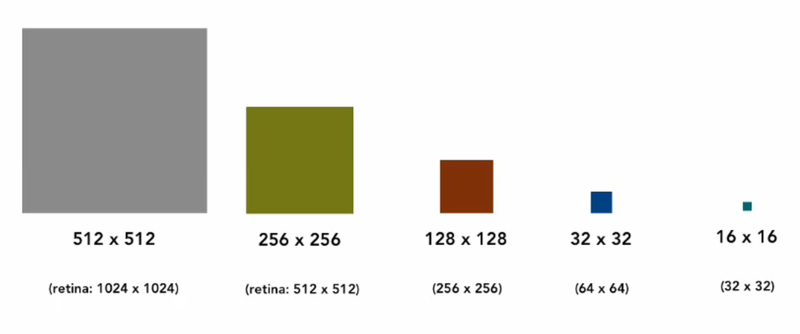
Please note that in order for you to complete the process you need to correctly sign all the icons. Retino icons should be signed not by their real size but doubled from the standard one. For example, a retinov icon with a size of 1024x1024 should be signed as icon_512x512@2x.png. That is, the name Retinovsky coincides with the standard and contains the prefix @ 2x .

Habrayuzer Dreddik kindly provided information on the radii of the icons that can be useful to those interested, for which he thanks a lot!
1024x1024 = 160
512x512 = 80
144x144 = 23 (iPad retina)
114x114 = 18 (iPhone / iPod touch (Retina))
72x72 = 11 (iPad)
57x57 = 9 (iPhone / iPod touch)
Stage 2 - Build a bundle.
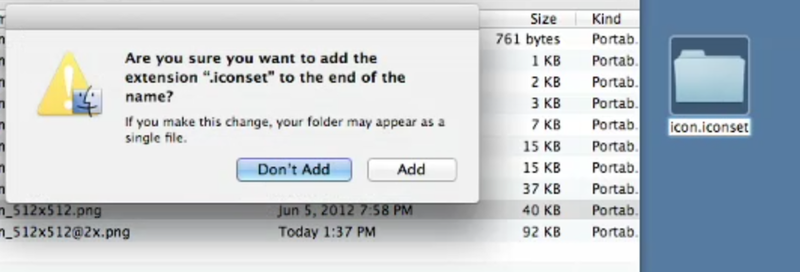
So the icons of all sizes are ready for you, signed and are in the same folder. You can’t just drag and drop them into Xcode, first we’ll make a bundle out of all these icons. To start, create (for example on the desktop) a new folder and rename it to icon.iconset. Before saving the name, a modal window will pop up with a clarification whether or not we really want to save this folder with the .iconset extension, we agree.
Next, drag the prepared icons into this newly created bundle. If after dragging and dropping, you click on this bundle and press the spacebar, you will need to see that the Finder already sees it as a bundle and not a folder. Moving the slider down you can view all versions of the icons in the folder.
Next, we need to convert this bundle into a format in which Xcode can use it. This will help us iconutil utility. Open the Terminal and go to the directory where our bundle is located, in our case on the desktop and enter the following into Terminal:
iconutil -c icns icon.iconsetAfter this procedure, the icon.icns file appears in the same directory, which we need. Please note that the procedure will be successful only if the number of icons was correct and they were signed correctly, otherwise you will receive a warning.
The final stage. Go to Xcode, open the project workspace and go to Project -> Targets -> Summary. On this tab you can see the area for the icon on top. We drag our newly created .icns there and everything is ready.
Have a nice weekend!
Source: https://habr.com/ru/post/153857/
All Articles