Configuring Cisco ACS 5.3 in conjunction with Active Directory
Cisco ACS (Access Control Server) is a system for centralized authentication, authorization and accounting of users on all kinds of equipment, in particular on active network equipment of various manufacturers.
Having a fairly small experience as a system administrator in a large enterprise enterprise segment, I came to the conclusion that every system administrator should ideally have one account for authorization on all the resources he needs: network equipment, servers, workstations, etc. This is related as with ease of administration, and with security. In the case of dismissal of a person, you can lock only one account in one depository and access to absolutely everything will be lost. But the ideal cases, as is known, does not happen. In this article we will try to get closer to the ideal and configure user authentication on active network equipment using an Active Directory account.
So, in our network there are 3 campuses: two user and one server farm.
In accordance with the campus network building structure, devices are divided into groups: access layer, distribution layer, core layer. Separately, there is a border group for managing border iron: border routers, firewalls, VPN gateways, etc.
Permissions to administrators are granted based on hierarchical access policies. Administrators with little experience are allowed to work only with access level equipment, and user noncritical campus. With gaining experience, administrators are given authority to the access level of the server farm. However, they can also work with user equipment. For access control, the following model is used. The authority structure is shown in the figure:
')
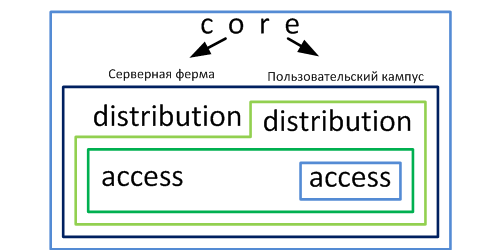
Each rectangular area is equipment authority that is granted to a specific group of administrators.
Afterdownloading from the torrent tracker the purchase of a new piece of hardware Cisco 1120 and the initial installation, we get to the login and password entry page:
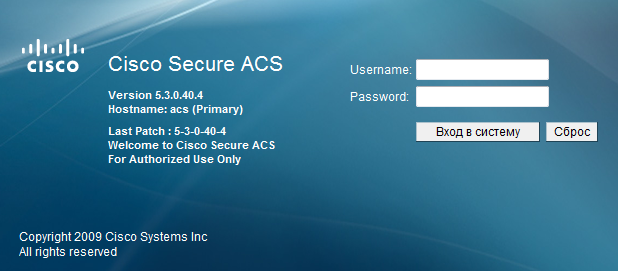
We enter the login and password, hammered in during the installation and get to the start page:
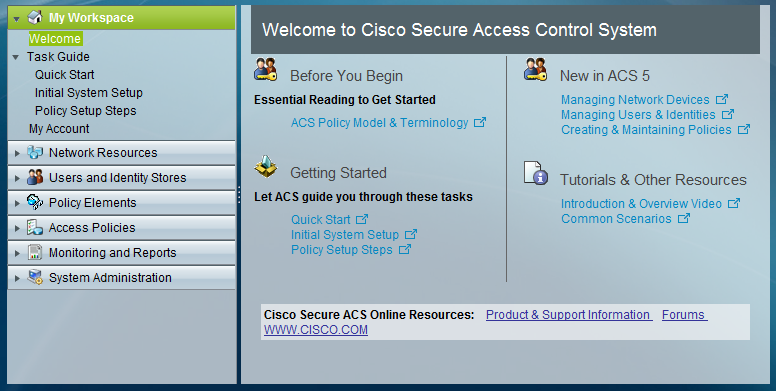
The Network Resources section describes the locations, types of devices and, in fact, the devices themselves.
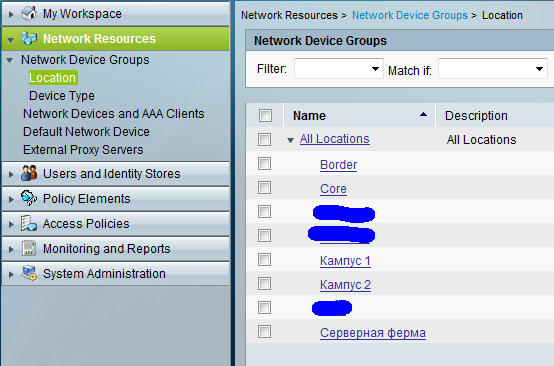
First we need to describe the devices that will be connected to the server. Go to the Network Resources → Location section and create at least 3 device locations: Campus 1, Campus 2, Server farm:
In the Device Type section we create 3 types of devices: AccessLayerSwitches, DistributionLayerSwitches, CoreLayerSwitches.
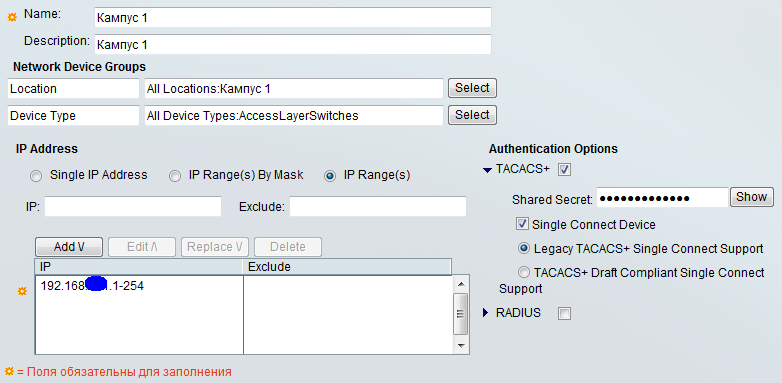
Further, in the Network Devices and AAA Clients section, we describe the device ip addresses and assign them to locations and types. Cisco ACS can use tacacs + and radius punctures. Our devices will work according to the Tacacs + protocol, put a tick in front of Tacacs +. In the field Shared Secret we drive in a key.
The settings of the Network Resources section are over.
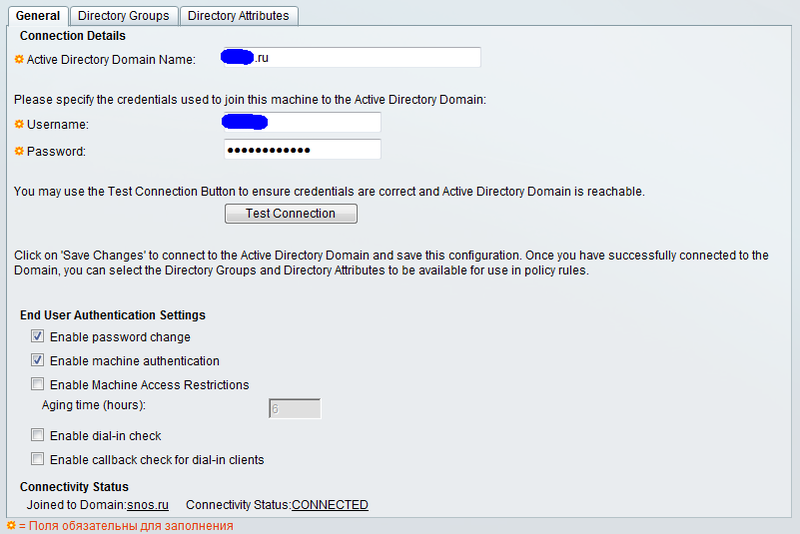
We proceed to configure the bundle with Active Directory. Open the Users and Identity Stores → External Identity Stores → Active Directory section. Fill in the fields. To connect to AD, you need a domain administrator account. Why - I do not know. With the user account does not work.
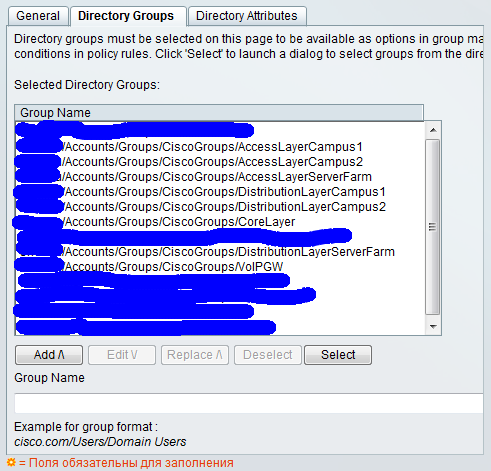
In the Directory Groups tab, you are bound to Active Directory groups.
The Directory Attributes tab is needed to configure policies for a specific user.
Setup of a sheaf with AD on it is finished.
Moving on to configuring policy elements. Create a profile of full access to the device. To do this, go to the Policy Elements section in the Authorization and Permissions → Device Administration → Shell Profiles group. Create a profile FullAccess. In the Common Tasks tab, we set the maximum privileges:

Click Submit. That's all, profile settings are finished.
Access policies themselves are configured in the Access Policies section.
First you need to create a policy to work with Active Directory. Click on the Access Services link and create a new access policy:
We put 2 ticks Identity and Authorization.
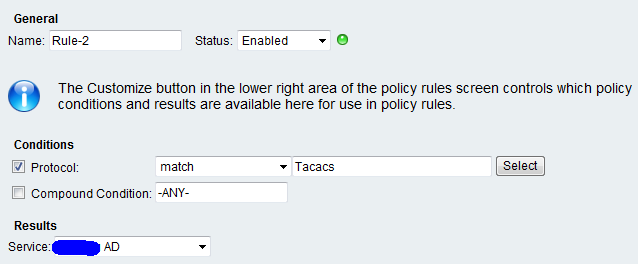
Next, you need to specify the access policy for which the devices will operate. Click on the link Service Selection Rules. Create a rule by which tacacs + devices will match:

According to this rule, all devices that request data using the tacacs + protocol will be processed by the policy created above.
We proceed directly to setting access policies. In the Identity item, the source of accounts is configured. Choose Active Directory. In the Authorization clause, rules for user authorization are specified. By default, the columns we need are not available, they must be activated by pressing the Customize button.

In the Customize Results section, the possible options for a command line profile and a set of commands are selected. In our case, only the command set is used.
To create a rule, click the Create button.
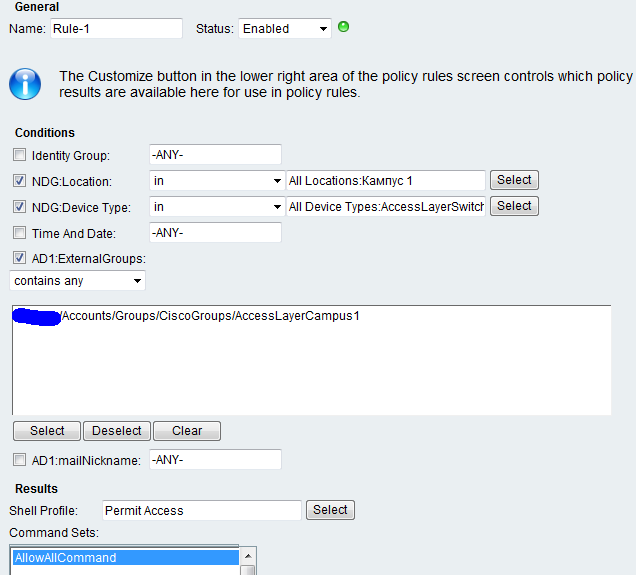
Put down ticks and conditions. Item AD1: mailNickname is needed if the rule is configured with binding to a specific user name, and not the entire group.
Next, you need to configure the rules in accordance with the first picture.
Authorization passes through the tacacs server if it is unavailable, but local accounts are checked.
Cisco:
HUAWEI:
Juniper SRX (m0ps habraouser ):
Next in Shell Profiles we create a JuniperFullAccess profile in Custom Attributes which we create an attribute with the name local-user-name and a value — the name of the user profile template (in my example, REMOTE_SU).
Now we go to Access Policies and in the Authorization menu we create the corresponding rule according to which the corresponding Shell Profile is applied to all those authorized on Juniper devices.
Specifications of the m0ps habrouser :
1. Understanding ACS 5.3 Configuration
2. Wikipedia - the free encyclopedia
3. HedEx Lite - HUAWEI Hardware Documentation
Having a fairly small experience as a system administrator in a large enterprise enterprise segment, I came to the conclusion that every system administrator should ideally have one account for authorization on all the resources he needs: network equipment, servers, workstations, etc. This is related as with ease of administration, and with security. In the case of dismissal of a person, you can lock only one account in one depository and access to absolutely everything will be lost. But the ideal cases, as is known, does not happen. In this article we will try to get closer to the ideal and configure user authentication on active network equipment using an Active Directory account.
So, in our network there are 3 campuses: two user and one server farm.
In accordance with the campus network building structure, devices are divided into groups: access layer, distribution layer, core layer. Separately, there is a border group for managing border iron: border routers, firewalls, VPN gateways, etc.
Permissions to administrators are granted based on hierarchical access policies. Administrators with little experience are allowed to work only with access level equipment, and user noncritical campus. With gaining experience, administrators are given authority to the access level of the server farm. However, they can also work with user equipment. For access control, the following model is used. The authority structure is shown in the figure:
')
Each rectangular area is equipment authority that is granted to a specific group of administrators.
ACS server setup
After
We enter the login and password, hammered in during the installation and get to the start page:
Network Resources
The Network Resources section describes the locations, types of devices and, in fact, the devices themselves.
First we need to describe the devices that will be connected to the server. Go to the Network Resources → Location section and create at least 3 device locations: Campus 1, Campus 2, Server farm:
In the Device Type section we create 3 types of devices: AccessLayerSwitches, DistributionLayerSwitches, CoreLayerSwitches.
Further, in the Network Devices and AAA Clients section, we describe the device ip addresses and assign them to locations and types. Cisco ACS can use tacacs + and radius punctures. Our devices will work according to the Tacacs + protocol, put a tick in front of Tacacs +. In the field Shared Secret we drive in a key.
The settings of the Network Resources section are over.
Users and Identity Stores
We proceed to configure the bundle with Active Directory. Open the Users and Identity Stores → External Identity Stores → Active Directory section. Fill in the fields. To connect to AD, you need a domain administrator account. Why - I do not know. With the user account does not work.
In the Directory Groups tab, you are bound to Active Directory groups.
The Directory Attributes tab is needed to configure policies for a specific user.
Setup of a sheaf with AD on it is finished.
Policy elements
Moving on to configuring policy elements. Create a profile of full access to the device. To do this, go to the Policy Elements section in the Authorization and Permissions → Device Administration → Shell Profiles group. Create a profile FullAccess. In the Common Tasks tab, we set the maximum privileges:
Click Submit. That's all, profile settings are finished.
Access Policies
Access policies themselves are configured in the Access Policies section.
First you need to create a policy to work with Active Directory. Click on the Access Services link and create a new access policy:
We put 2 ticks Identity and Authorization.
Next, you need to specify the access policy for which the devices will operate. Click on the link Service Selection Rules. Create a rule by which tacacs + devices will match:
According to this rule, all devices that request data using the tacacs + protocol will be processed by the policy created above.
We proceed directly to setting access policies. In the Identity item, the source of accounts is configured. Choose Active Directory. In the Authorization clause, rules for user authorization are specified. By default, the columns we need are not available, they must be activated by pressing the Customize button.
In the Customize Results section, the possible options for a command line profile and a set of commands are selected. In our case, only the command set is used.
To create a rule, click the Create button.
Put down ticks and conditions. Item AD1: mailNickname is needed if the rule is configured with binding to a specific user name, and not the entire group.
Next, you need to configure the rules in accordance with the first picture.
Tacacs + authorization configuration examples on Cisco and HUAWEI devices
Authorization passes through the tacacs server if it is unavailable, but local accounts are checked.
Cisco:
# tacacs-server host 1.1.1.1 tacacs-server key _$ecretkey! # aaa new-model aaa authentication login default group tacacs+ local aaa authentication enable default group tacacs+ enable aaa authorization exec default group tacacs+ local if-authenticated aaa authorization commands 0 15 group tacacs+ local aaa accounting send stop-record authentication failure aaa accounting exec default start-stop group tacacs+ aaa accounting commands 0 15 start-stop group tacacs+ aaa accounting connection default start-stop group tacacs+ # HUAWEI:
# hwtacacs-server template ht hwtacacs-server authentication 1.1.1.1 hwtacacs-server authorization 1.1.1.1 hwtacacs-server accounting 1.1.1.1 hwtacacs-server shared-key cipher _$ecretkey! # aaa authentication-scheme default authentication-scheme lh authentication-mode hwtacacs local authentication-super hwtacacs super authorization-scheme default authorization-scheme hwtacacs authorization-cmd 3 hwtacacs authorization-mode hwtacacs accounting-scheme default accounting-scheme hwtacacs accounting-mode hwtacacs accounting start-fail online accounting realtime 3 recording-scheme scheme0 recording-mode hwtacacs ht cmd recording-scheme scheme0 outbound recording-scheme scheme0 system recording-scheme scheme0 domain default domain default_admin domain huawei authentication-scheme lh accounting-scheme hwtacacs authorization-scheme hwtacacs hwtacacs-server ht # Juniper SRX (m0ps habraouser ):
set system authentication-order tacplus set system tacplus-server 10.10.10.1 secret «key» set system tacplus-server 10.10.10.1 source-address 192.168.1.1 set system accounting events login set system accounting events change-log set system accounting events interactive-commands set system accounting destination tacplusset system login user REMOTE_SU full-name «Tacacs+ template for remote SU access» set system login user REMOTE_SU class super-user Next in Shell Profiles we create a JuniperFullAccess profile in Custom Attributes which we create an attribute with the name local-user-name and a value — the name of the user profile template (in my example, REMOTE_SU).
Now we go to Access Policies and in the Authorization menu we create the corresponding rule according to which the corresponding Shell Profile is applied to all those authorized on Juniper devices.
Specifications of the m0ps habrouser :
We reached the hands to collect the lab.
All “ok”, except that all users from AD can log in to devices with privilege level 1. And only users from the specified group have privilege level 15. Found a document on tsisko.kom similar to this topic - in it all the steps are the same.
Did I do something wrong, or do I need to somehow restrict the ability to log in to user devices that are not in “interesting” groups?
I apologize, the question can be considered removed. The fact is that there is a standard rule according to which if not one of the configured rules does not fit the Shell Profile was Permit Access, but the Command Sets are Denny all Commands.
Accordingly, in the Shell Profile, select DenyAccess and the problem is solved.
I think it is worth clarifying this in the article, because someone else may step on this rake.
Bibliography
1. Understanding ACS 5.3 Configuration
2. Wikipedia - the free encyclopedia
3. HedEx Lite - HUAWEI Hardware Documentation
Source: https://habr.com/ru/post/153625/
All Articles